According to the vehicle maintenance card, it is necessary to replace the front wheel bearings of the VAZ-2108. Their dimensions are larger than those of similar ones installed on the VAZ 2101-2107 model. Moreover, there are features of the replacement. The “classic” uses tapered bearings; it is imperative to observe the permissible force when tightening the hub nut. Otherwise, the bearing will fall apart and you will have to buy a new one. Eights use cylindrical bearings; when tightening the hub nut, you need to apply as much force as you can - just don’t break the thread.
Signs of a broken wheel bearing
As the vehicle is used, its components and assemblies wear out. Moreover, those that suffer the most are those that are constantly loaded - these are rubbing parts. The weight of the engine and the friction force act on the front hub bearing of the VAZ-2108. That's why its dimensions are so impressive - to cope with the load. But when an element fails, the following symptoms occur:
- In the early stages, a barely noticeable hum appears.
- Minor vibrations may be felt transmitted from the wheels to the body.
- As the bearing wears, the noise and vibration increase.
If you do not replace it in a timely manner, the bearing may jam. During operation, excessive heating of the hub will be observed - there is very little lubricant inside the bearing race, the metal elements rub against each other.
Tips for replacing front wheel bearings on a VAZ 2109
1. It is recommended to replace the product on both wheels of the car at once; in this case, it is recommended to perform a wheel alignment. 2. Did you cool the p/sh before installation? We recommend that you also heat the rotating mechanism, then no effort will be required to press it in. 3. Purchase spare parts only from trusted retail chains with dealer certificates and product quality certificates.
Dear customers, in order to avoid errors when sending the front wheel bearing, please indicate your car model and year of manufacture in the “Comment” line.
All VAZ cars are equipped with only three types of wheel bearings - wheel bearings for front-wheel drive VAZ cars, wheel hub bearings for rear wheels, and wheel bearings for Kalina and Grant cars, which are smaller in size.
Hubs play a very important role. Without them, the wheels will not rotate at the required speed, which will first lead to damage to the brake system, and then to failure of the entire car.
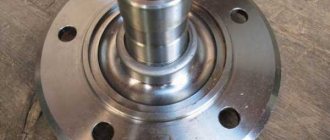
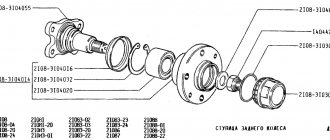
The front wheel hub is a rather complex forging. In the front wheel hub there is a double-row angular contact ball bearing, into which a driver with an internal splined cylindrical surface is inserted for the splined end of the drive shaft. To protect the hub, there is a cap covered with dirt-reflecting rings.
The bearing is of the HUB-1 type, has a double-row design, is a type of angular contact ball bearings with closed working surfaces and does not have flanges for attachment to the hub, which does not require lubrication and adjustment during vehicle operation.
The drive shaft is secured in the driver with a self-locking nut and washer. The nut has an external hexagonal key, thread M 20 x 1.5, tightening 290 Nm ±10%.
If you hear a noise, a characteristic noise or a certain hum in the front of your car, which only intensifies when entering a turn, this indicates an urgent need to replace the front wheel bearing on your VAZ 2108-2115.
If the hum is heard on only one side, then only one bearing is damaged. But most likely the second one doesn’t have much time left either. Buying two bearings as a set will be cheaper than buying them separately.
When pressing out the wheel hubs, the bearings are destroyed. Therefore, pressing out the hubs should be carried out only in cases of increased bearing noise or a significant increase in the gap in them: more than 0.015 mm in the front and more than 0.030 in the rear.
Other article numbers of the product and its analogues in the catalogues: 21080310302000, 21080310302002.
VAZ 1111, VAZ 2108, VAZ 2109-099, VAZ 2110-2111, VAZ 2112, VAZ 2113-2115, VAZ 1117-1119, VAZ 2170.
Any breakdown is not the end of the world, but a completely solvable problem!
How to independently replace the front wheel bearing on a VAZ family car.
AvtoAzbuka online store, repair costs will be minimal.
Just COMPARE and BE SURE.
Don't forget to share the information you find with your friends and acquaintances, because they may also need it - just click one of the social networking buttons located above.
Repair tool
To replace the front wheel bearing of a VAZ-2108, you will need a tool. All work must be carried out on a well secured vehicle. You will need the following tool:
- Set of keys and sockets.
- Mounting blade.
- Bearing puller.
- Gas-burner.
- Jack, wheel chocks and secure supports.
- A small piece of pipe with a diameter of 10 cm.
- Hammer and chisel.
- Pliers for removing retaining rings.
The procedure for carrying out work on the left and right wheels is the same. It is advisable to replace bearings on both sides at once. It is required to install elements from the same manufacturer, which are recommended by the factory.
Preparing for repairs
Now it's time to remove the old VAZ-2108 front wheel bearing. Its dimensions are indicated in the article below; when pressing out, you can use a clip from an old roller. Before starting work, do the following:
- Loosen the front hub nut.
- Using a 30mm wrench with a large lever, remove the nut.
- Install wheel chocks under the rear wheels.
- Remove the wheel bolts.
- Raise the side to be repaired with a jack.
- Place supports under the car.
- Remove the wheel and place it under the car engine.
That's all, now you can start dismantling the front wheel bearing of the VAZ-2108. The dimensions of the old and new must match. If the diameter is slightly larger or smaller, the bearing may not work properly.
Three ways to replace the front wheel bearing on a VAZ 2109 with your own hands
There are three popular methods that vary in speed and quality of replacement. Depending on your needs, choose the replacement option that suits you. Before performing any operations, familiarize yourself with the unit structure.
Preparatory activities before replacement
Regardless of the chosen replacement option, you will need a minimum set of tools: – Large screwdriver – Keys: 17, 13, 10 – Hexagon 10 – Hammer and chisel – Long wrench 30 or socket 30 with a wrench – Wheel puller for VAZ (photo) – Mandrels (or heads) for knocking out the old part from the hub. – Torque wrench.
We prepare the car, place it on a flat surface, you will also need bright lighting. You will complete all the work faster with an assistant, and also if you use an inspection hole (overpass). Put the car in first gear, and be sure to put chocks under the rear wheels.
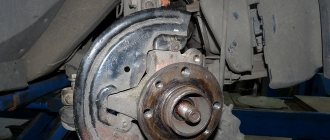
Removing the front wheel hub
Now you need to remove the hub. To do this you will need:
- Mark the position of the hub on the strut using a marker. Be sure to clean the surface thoroughly before doing this.
- Using keys “17” and “19”, unscrew the nuts from the bolts securing the hub to the shock absorber strut.
- Using a “17” wrench, you need to unscrew the lower bolts securing the ball joint to the hub. This is a simple option when you do not need to replace the ball. But if you need to change it, then you need to use a “19” key to unscrew the nut from the ball pin and remove it using a puller.
- Completely unscrew the hub nut.
- Carefully push the front wheel hub off the CV joint.
That's all, now you need to completely disassemble the element and remove the front wheel hub bearing of the VAZ-2108.
Bearing removal
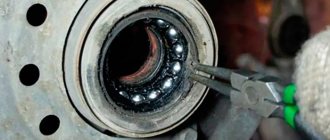
To remove the bearing from the seat, you will need a puller. You can even make it yourself, there are no scarce components, the design is very simple. The VAZ-2108 front wheel bearing puller is a long bolt with a coarse thread and a nut. And most importantly - spacers and mandrels with a diameter similar to that of a wheel bearing. If there is no such puller, then all the work can be done with a hammer, but there must still be a mandrel.
First of all, remove the hub itself, in which the holes are made for attaching the wheels. Next, you need to use pliers to remove the retaining rings. If you don’t have such a tool, you can use a flat-head screwdriver, pliers and an awl. After removing the rings, you can begin pressing out the bearing. If you do this with a hammer, then try to hit accurately and sharply, this way the bearing will come out faster.
Wheel bearing diagnostics, causes and signs of failure
Let us briefly list the signs of this breakdown:
- Noise when driving from the front (right or left), and when turning there is also a noise or howling.
- Vibration in the interior is a sign that repairs are required, as the lubricant may have dried out or a lot of dirt has entered.
- A grinding or crunching sound means that the front wheel bearing has already fallen apart.
Before jumping to conclusions, do a step-by-step diagnosis:
- Jack up the side where there are characteristic signs, but before doing this, remove the wheel.
- Rotate the disk by hand; if there is a “rolling” sound or other noise, a replacement is needed. When the product is in good working order, rotation is smooth, without jamming or noise.
- Remove the brake disc, check the hub play by moving it by hand in the axial direction - if you feel the movement without measurements, then the front hub bearing needs to be replaced.
Causes of breakdown: - Inappropriate driving, over pits, potholes in the asphalt. — Frequent overheating of the mechanism. — Damage to the boot, contamination of the spare part from the inside. — Wear of the product according to the warranty service life (60 thousand km stated). — Malfunction of other elements (impaired balancing of the brake disc, wear of the rotating mechanism or imbalance of the wheels, etc.). Be sure to watch the video on how to check a wheel bearing:
Bearing sizes
The article contains a photo of the VAZ-2108 front wheel bearings, as well as a drawing of a puller indicating all dimensions. Therefore, if you are in doubt whether you purchased the right roller, check the dimensions of the hub. The part number is 256907.
The dimensions of the element are:
- The outer diameter of the holder is 64 mm.
- Inner diameter – 34 mm.
- Weight – 445 g.
- Balls with a diameter of 9.525 mm are installed inside.
- The total number of balls is 28.
- The unit is designed to operate at rotation speeds above 6000 rpm.
In any car store, salespeople will be able to advise you on the best quality product.
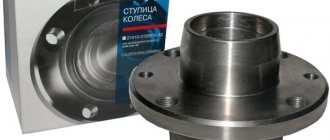
Bearing 256907 - VAZ front hub
Its main area of application is the front wheel bearing of VAZ 2108, 2109, 2110, 2111, 2112 cars. It has the following design characteristics - ball, angular contact, double-row, closed type (seals on both sides). The double row ball bearing has the ability to be locked on both sides. Bearing 256707 is installed in the front hub of more modern VAZ models (Kalina, Granta).
Since most VAZ models are widely used not only in our country, but also abroad, the demand for front wheel bearings is very high - they are produced at once in four factories in our country:
- JSC "Saratov Bearing Plant" (labeled SPZ) - according to experts, produces the best front wheel bearings in our country, and they are not very expensive. Buy from official representatives in your region (only they have a guarantee of authenticity and at the same time minimal trade margins - the price for a wheel bearing will be about 350 rubles).
- 23 GPZ (or VBF, Vologda) - among motorists it is considered the best plant, however, the wheel bearings of the previous manufacturer are in no way inferior to them in durability, are less likely to be counterfeited and are a little cheaper.
- SPZ-4 (Samara) - produces products for those who are used to saving. But if you need a high-quality front wheel bearing, it is best to pay attention to the manufacturers presented above.
- 20 GPZ (Kursk) - currently not produced, but some companies still sell them; you will not receive a guarantee of their long-term performance.
For off-road use, it makes sense to install hub roller bearings 537907, which have an increased load capacity, but a lower maximum rotation speed.
Domestic bearings are produced in accordance with GOST 520-2002, imported in accordance with ISO 15:1998. According to the international designation system, the number of this bearing is 532066DA.
Technical parameters and dimensions of the front hub bearing 256907:
Inner diameter (d): 34mm;
Outer Diameter (D): 64mm;
Ball diameter: 9.525 mm;
Number of balls: 28 pcs.;
Dynamic load capacity: 31.5 kN;
(Load capacity of the roller bearing of the hub 537907 - 68.6 kN);
Static load capacity: 27.9 kN;
Manufacturers
Many motorists do not know which VAZ-2108 front wheel bearing to choose for their car. Now you can find several manufacturers on the market:
- GPZ-23, Vologda, has the abbreviation VBF. The plant has earned the trust of motorists and is one of the best manufacturers of wheel bearings for domestic cars. Due to the relatively low cost, these parts are practically not counterfeited.
- SPZ, Saratov - according to many experts, the bearings of this manufacturer are the most reliable, durable and high quality. And most importantly - the very low cost of parts.
- GPZ-20, Kursk is no longer engaged in the production of wheel bearings, but you can find products in stores and warehouses.
- Experts do not speak very well of the Samara SPZ-3. The cost of the bearings is very low, but the quality is not great, the service life is very short.
Some auto stores try not to deal with little-known companies that produce low-quality products. Therefore, on the shelves you can only find bearings from Saratov and Vologda.
Welcome to the website Bearings in Russia
To quickly find the information you need, use the site search in the upper right corner.
Any spare part of a modern car must be perfectly matched to fit and technological dimensions. Unfortunately, the manufacturer does not always take into account the specifics of using materials in spare parts, which affects their service life, reliability, and, ultimately, traffic safety. The chassis of a car is subject to enormous loads, so it is simply impossible not to pay attention to the correspondence of the factory dimensions with the ones being replaced.
Content:
VAZ 2108 front wheel bearing size
If we take this issue more specifically, the chassis of cars of popular models and brands most often suffers from low-quality spare parts. First, let's look at this problem using the example of a VAZ 2108 front wheel bearing.
It would seem that there is nothing complicated - the hub has its own standard dimensions, which the roller bearing must correspond to:
internal diameter - 34 mm; outer diameter - 64 mm; Bearing width - 37 mm.
Only by these parameters can you select a bearing, of which domestic factories produce thousands. Manufacturers from China actively help in this, providing products that are not of the best quality and do not stand up to any criticism. Neither the steel grade, nor the number of balls, nor the dynamic performance of such bearings meet the standards. There are bearings without any markings at all, and there are particularly zealous owners who buy them. Such bearings burn out within 1000 km and simply fall apart while driving.
Features of choosing a wheel bearing for a VAZ 2108
Naturally, we will not be able to check the dynamic load on the bearing races and on each of its balls. But you need to remember, like the Our Father, that:
- The VAZ 2108 wheel bearing is marked 25 69 07;
- according to the international marking system it is designated 53 20 66 DA;
- the bearing has a mass of 0.445 kg;
- ball diameter - 9.525 mm;
- number of balls - 28.
Installing a new bearing
To simplify installation, you can do a little trick - warm up the hub a little and cool the bearing in the freezer. In the first case, the metal will expand, in the second, it will contract. Pressing will be much easier and faster. The main thing is not to overheat the hub, otherwise the seal on the bearing will melt and the lubricant will leak out. As a result, you will have to buy new spare parts and do the repairs again.
Lubricate the inner surface of the hub and install the retaining ring on one side. Carefully now you can begin to press in the wheel bearing of the VAZ-2108. If the dimensions are correct and there are no deviations in the geometry of the nodes, assembly will not take much time. When finished, install the second snap ring. Assemble the entire assembly and install it on the CV joint, tightening the bolts at the top and bottom. If necessary, replace the ball joint.
The hub nut is tightened with a “30” wrench with very high force after assembling the entire suspension and installing the car on the wheels. The entire assembly is carried out in reverse order, do not forget about the marks on the surface of the shock absorber strut. After all the work, make sure that there is no significant wear on the rubber - otherwise, do a wheel alignment.
How to replace the front wheel bearing on a VAZ 2108-VAZ 21099?
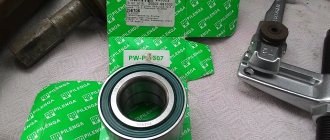
Note! Before you start replacing, be sure if you bought a new bearing, open the box with it and see what comes with it! (The kit will have to include two locking rings, which in the photo below the person is holding in his hand, as well as a hub nut, which is indicated by the arrow, and the bearing itself, if any of these are missing, then go back to the store and buy these parts separately )
Removal: 1) At the very beginning of the operation, remove the protective cap of the hub nut from the wheel you need, using a screwdriver, or a knife, or something else.
Note! If you don’t yet know which wheel you will need to remove the protective cap from (you don’t know which side the bearing needs to be changed), then in this case, check without removing anything from the car to find out more precisely which bearing you have has become unusable, to do this, use the section under title: “Checking the bearing for functionality”!
2) After the cap is removed, take a screwdriver or a bit in your hands and, with their help and also with a hammer, straighten the dented shoulder of the hub nut.
Note! Before straightening this collar, be sure to make sure that you have a new hub nut, because if you don’t have it, it’s very bad, since the old nut cannot be used again after unscrewing!
3) Next, go through all the places in your car and place bricks under the rear wheels so that your car doesn’t roll away, and after that, just in case, put the handbrake on the car and put it in gear.
4) Next, take the extension with the union head in your hands and use it to loosen the hub nut a little, but you don’t need to unscrew it completely yet.
5) After loosening the hub nut, you will need to completely remove the wheel from your car, if you do not know how to do this correctly, then read the article entitled: “Correctly replacing a wheel on a car”, everything is written in detail in it.
Note! When your car is suspended and the wheel is removed, then take the extension with the union head again and this time completely unscrew the hub nut and remove the thrust washer that is located under it!
6) Then you will have to completely remove the car caliper from the brake disc; you can find more details on how to remove it in the article entitled: “Replacing the VAZ brake caliper.”
Note! Remember once and for all, you don’t need to completely remove the caliper when replacing the bearing, you will only need to remove it from the brake disc and then take some kind of wire and use it to hang the brake caliper, for example, by a spring, and something else, the caliper does not need to be removed completely just because when removing it you will have to disconnect the brake hose, and because of its disconnection you will eventually need to bleed the brake system, and in order to bleed it you will need to go to a car store and buy new brake fluid or you may have some in the garage, so to avoid this, you don’t need to disconnect the brake hose from the caliper, so after you remove the caliper from the brake disc, take the wire and hang it by the spring and under no circumstances leave the caliper hanging on the brake hose!
7) Next, using a wrench or, best of all, a spanner, unscrew both nuts, which are shown in the photo below, these nuts secure the ball joint to the steering knuckle and therefore you will definitely need to unscrew them, since you can easily remove the steering knuckle with the strut will not work without unscrewing these nuts.
 Now take a crowbar or a mounting blade in your hands and push it in as shown in the figure, then rest it on the place indicated under the red arrow and, pressing the mounting blade down, pull the lever indicated by the blue arrow.
Note! After you hold the lower arm with one hand using the mounting paddle as shown in the photo above, with the other hand, grab the brake rotor and move it away from the CV joint (It is indicated by the red arrow in the photo below), move the brake rotor until the CV joint is completely will not come out of gear as shown in the small photo below!
9) After you move the brake disc to the side, take a felt-tip pen or marker in your hands and use them to mark the eccentric (the eccentric is indicated by a white arrow and this is part of the bolt itself) relative to the front strut bracket, in general, do everything as shown in the figure and then when you install everything in its place, be sure to install it exactly the same as it was before, otherwise the camber of your wheels may change.
10) And finally, completely unscrew the two nuts while holding the bolts from turning, and when both nuts are unscrewed, remove both bolts and remove the steering knuckle assembly with the brake disc as shown in the small photo below:
11) Now that you have removed the entire steering knuckle together with the brake disc, you will need to remove the brake disc itself so that it does not interfere with the replacement, and for information on how to remove this disc, see the article entitled: “Replacing a VAZ brake disc,” point 7 -10.
12) Then take a wrench in your hands and use it to unscrew several bolts that secure the brake disc protective casing (the protective casing is indicated by an arrow in the photo below for clarity), so after all the bolts securing this casing have been unscrewed, remove it from steering knuckle so that it does not interfere with replacement.
13) Next, turn the steering knuckle over and, using thin pliers, remove the retaining ring from its reverse side, which holds the bearing itself in place and prevents it from being removed.
Note! When you remove the retaining ring, you can also help with a screwdriver as shown in the photo just above!
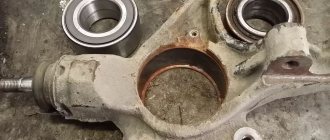
14) Then install the steering knuckle in a vice, but do not clamp it, just install it so that the legs of the steering knuckle (They are indicated by red arrows) rest on the vice itself and after that, taking a drift in your hands, insert it into the hole (the photo below shows inserted a drift into the hole and it is indicated by blue arrows for clarity) and use it to press the hub out of the steering knuckle as shown in the figure.
Note! When your hub is pressed out, that is, in other words, removed, a mud ring will remain on it and the hub bearing ring may also remain; if the wheel bearing ring remains, then you will definitely need to remove it, the whole point is that the wheel bearing ring (From the name already clear) is part of this bearing, so if you change the hub bearing, then you will need to remove the ring accordingly, and when installing a new wheel bearing, the new ring will also be installed with it, so the old ring must be removed, and for how to remove it, see article on our website entitled: “Removing the front wheel bearing race”!
15) Now turn the steering knuckle over and, on the reverse side, remove another retaining ring that secures the bearing itself.
16) Finally, place the steering knuckle in a vice and completely press out the wheel bearing using a mandrel.
Installation:
Note! Before you proceed to installing a new bearing, always remember that in order to install the bearing in its place, namely press it into the steering knuckle, very large forces are required, so to make the installation of this bearing a little easier, use oil to lubricate the entire internal mirror surface of the steering knuckle fist as shown in the photo below:
1) At the very beginning of the operation, turn the steering knuckle over and, on the side shown in the photo below, install the outer retaining ring, just as it was installed earlier.
Note! It is recommended to replace the outer retaining ring with a new one and not install the old one in its place, and in most cases this ring comes in the same box with the hub bearing when purchasing it!
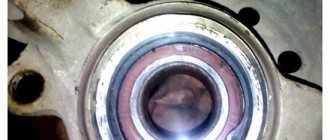
2) Next, install the new bearing into the steering knuckle and press it in after that, and in order to press this bearing, simply install the steering knuckle in a vice along with the bearing already inserted a little as shown in the figure below and then, while clamping the vice, make sure that the bearing ( Indicated by an arrow) is installed all the way in its place.
Note! Under no circumstances try to hammer the bearing into the steering knuckle with a hammer or anything else, it may fall apart, and oh, what else, after the bearing has reached the maximum possible distance, it will then need to be pushed even further inside , so here you will need to use a special mandrel and thereby applying force to the outer ring, install the bearing all the way into its place!
3) Now when your bearing goes deep and all the way, take the inner ring of the bearing in your hands and install it in the reverse order of removal in its place, so that it holds the bearing and by the way, do not install the old ring, since it is Over time, it loses its rigidity and can fail faster, so if you are already replacing the bearing, then change the entire ring along with it for new ones.
4) And finally, using a special mandrel, press the hub (In other words, install it) into its place, namely, it is pressed into the inner ring of the bearing as shown in the figure below, so do not confuse anything there when you install it.
Note! When you install all the parts previously removed in their places, do not forget the fact that the old hub nut needs to be replaced with a new one, and after you have already lowered the car to the ground and tighten all the bolts that secure the wheel until they stop, be sure to lock it with something hub nut in two places!
Checking the wheel bearing for functionality:
It can be checked in two ways without removing it from the car, but for this you will need to stock up on a jack, in both cases it will be needed and without it it will be more difficult to check the wheel bearing for functionality, well, let's get started, the first method is, on the one hand, more successful but on the other hand, it is the most dangerous, since when hanging the wheel you do not need to throttle as most people do, in general, watch the video clip carefully and you will understand everything.
The manufacturer recommends replacing the bearing after 60,000-80,000 km. In fact, this is required much earlier.
wheel bearing VAZ 2109
External manifestations of a malfunction and the causes of its occurrence
First of all, you should pay attention to extraneous noises that arise in the front of the car when driving, which intensify when cornering.
The feeling of vibration directly in the cabin also indicates the need for urgent repairs (it is caused by a lack of lubrication in the bearing or excessive contamination of its internal cavity).
A clearly audible grinding and crunching noise directly indicates that the bearing has most likely already fallen apart.
In order to clarify the assumption about the need to replace it, you need to do a number of simple diagnostic operations:
Hang the side from which extraneous noise was heard on the jack and remove the wheel; Manually spin the disc. The presence of noise of rolling elements or other extraneous sounds indicates the need for replacement. If the bearing is intact, then the rotation will be quite smooth and almost silent;
Remove the brake disc and determine the actual hub play. To do this, you should try to move it in the direction of the axis with your hands. If there is free play, the bearing needs to be replaced. Options for replacing a faulty product
wheel bearing VAZ 2109
Car owners can replace a faulty wheel bearing in at least three different ways:
First
– without removing the struts and without performing camber (discussed in detail below);
Second
, the stand is removed.
But the puller is not used. Provides for dismantling the entire structure. Including steering knuckle. The product is changed directly on the counter. As a result, there is no need to re-set the camber/toe; The third
- without removing the rack and without using a puller. The turning mechanism is removed along with the hub. Then the latter is knocked out (squeezed out) from the axle. It is necessary to set the camber/toe. We recommend using the first option. It is performed using the right tools and guarantees the highest quality work.
Algorithm of work according to option 1
This version requires removal of the wheel and rim. The hub is removed and the caliper is dismantled. The work is performed directly on the machine. In this case, the stand is not removed. In addition to the standard set of tools, you will need a universal puller to remove the wheel bearing.
wheel bearing VAZ 2109
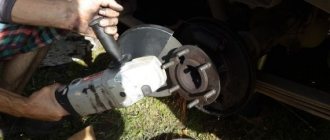
The brake drum is dismantled, the fasteners of the ball bearings are unscrewed; Then the CV joint shaft is removed from the hub itself (by hand); It is advisable to disconnect the steering tip, this makes it more convenient to work. Next, the front hub is removed from the fist and set aside. The retaining ring is removed from the fist (we leave the outer race of the old bearing in it). A puller is installed and the faulty bearing is pressed out. After removing it, we continue to work with the hub. The protective casing is removed from it, after which it becomes possible to dismantle the inner race of the bearing assembly. It is removed with a universal puller, or knocked down with a chisel (optionally, it is filed with a grinder, then pricked).
wheel bearing VAZ 2109
Installing a new bearing
(you can order it here), after first cleaning the seat from dirt and old grease. Lubricate the fist from the inside. We fix the new bearing in the puller (it is advisable to cool it before installation, which simplifies installation). We place it in a fist, while ensuring that there are no distortions. Then we tighten it and press it in. The hub is put on. Further, all operations are performed in the reverse order of dismantling work.