REMOVAL, REPAIR AND INSTALLATION OF PEDAL ASSEMBLY
REMOVAL, REPAIR AND INSTALLATION OF THE PEDAL ASSEMBLY
The pedal assembly is a collapsible structure that combines the clutch, brake and throttle pedals on a common bracket. If the pedals squeak or jam, or if the pedal return springs break, remove the pedal assembly to lubricate the rubbing surfaces or replace parts.
You will need: all the tools necessary to remove the steering column, as well as a “13” wrench, pliers, a bit, and a hammer.
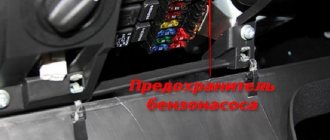
1. Disconnect the wiring harness block from the brake light switch by squeezing the clamps that secure it.
If you are removing the pedal assembly to replace it, remove the brake light switch from it (see “Replacing the Brake Light Switch”).
3. Disconnect the brake booster pusher fork from the brake pedal (see “Replacing the brake booster”).
4. Unscrew the three nuts that simultaneously attach the vacuum brake booster and the pedal assembly bracket to the front panel, and one nut of the left side fastening of the bracket.
5. . as well as the nut for the upper bracket fastening.
6. Disconnect the cables from the throttle pedal (see “Adjusting and replacing the throttle cable”).
7. . and from the clutch pedal.
8. Unscrew the two nuts of the lower fastening of the pedal assembly bracket to the front panel.
9. . and remove the pedal assembly.
10. To remove the clutch and brake pedals, pry them up with a screwdriver.
eleven. . and remove the pedal axle clamp.
12. Remove the clutch pedal from the axle.
13. . its return spring.
14. . and spacer sleeve.
15. Remove the pedal axle and remove the brake pedal from the bracket.
16. . and remove the spacer from the pedal.
17. . and a return spring.
18. Remove the clutch pedal servomechanism retainer.
19. . and its spring.
20. Remove the servo guide clamp.
21. . and remove the guide and its spacer washer from the bracket axis.
Remove the throttle pedal only if absolutely necessary, since its axis is additionally fixed in the bracket by welding.
22. If you need to remove the throttle drive pedal, remove the weld seam using any available method (see note above) by prying it off with a screwdriver.
23. . remove the axle clamp, remove the axle from the holes in the bracket and pedal and remove the pedal.
24. If it is necessary to replace the plastic pedal bushings, press them out of the pedal lugs using a mandrel of a suitable diameter (for example, a socket from a tool kit). Press in the new bushings in reverse order.
25. Reassemble the pedal assembly by replacing:
– worn or damaged spacer bushings;
– pedal return springs that have lost their elasticity or are broken;
. and a heavily compressed servo spring.
Before assembly, lubricate all rubbing surfaces of axles, bushings and springs with grease, such as Litol.
Clutch and brake pedals with brackets and clutch cable assembly - removal and installation
Removal
1. Place the vehicle in the work station, apply the parking brake and turn off the ignition.
2. Remove the steering shaft.
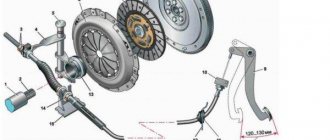
3. Unscrew the clutch drive cable lead 2 from the cable tip and remove the cable 3 from the clutch drive fork 1 and the cable mounting bracket 4.
Clutch drive elements:
- clutch release fork;
- leash;
- clutch cable;
- cable fastening bracket.
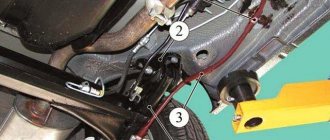
4. Remove the locking bracket and remove the pin securing the vacuum booster pusher to the brake pedal (flat-head screwdriver, pliers).
5. Disconnect the instrument panel wiring harness connectors from switch 3, Figure 3-2, brake signal and switch 6 of the clutch pedal position signal.
Removing the clutch and brake pedal bracket:
- bracket mounting bolts;
- bracket for clutch and brake pedals;
- brake light switch;
- vacuum booster mounting nuts;
- bracket fastening nuts;
- clutch pedal position switch
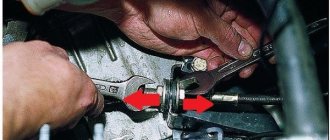
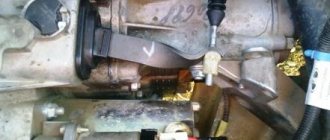
6. Unscrew the two nuts 4 securing the vacuum booster to the clutch and brake pedal bracket (replaceable head 13, extension, ratchet wrench).
7. Unscrew the three bolts 1 securing the clutch and brake pedal bracket to the cross member of the instrument panel (replaceable head 13, extension, ratchet wrench).
8. Unscrew two nuts 5 securing the clutch and brake pedal bracket and remove bracket 2 assembled with pedals and clutch cable (replaceable head 13, extension, ratchet wrench).
Installation of clutch cable VAZ 2190
Procedure:
- Pass the cable through the hole in the bulkhead, secure the wear compensation mechanism housing to the clutch pedal pin.
- Attach the cable sheath stop to the pedal bracket stud.
- Install the cable sheath seal into the hole in the front panel.
- Pass the cable through the hole in the gearbox bracket and install the guide sleeve of the cable sheath into this hole.
- Screw the leash into the lower tip of the cable, ensuring that the tip protrudes relative to the end of the leash by 0-1mm.
- Set the clutch cable to its original position, for which, overcoming the force of the mechanism spring, move the lower tip of the cable all the way forward in the direction of movement of the car.
- Insert the end of the cable into the groove of the clutch release fork and lower it.
- Under the action of the spring, the tip driver should be installed on the fork without any gap.
Clutch adjustment on Grant
How to adjust the clutch:
- Holding the tip in an extended position, measure the dimension “L” between the fork and the leader, it should be 27mm.
- If this value does not correspond to the specified value, then set it by rotating the leash in the desired direction.
- Press the clutch pedal three times all the way and repeat the “L” measurement. If necessary, repeat the clutch cable adjustment.
The entire process of replacing the clutch cable along with its adjustment will take no more than 30 minutes.
Self-adjustment of the Lada Granta clutch
Lada Granta is one of the most popular cars in Russia made after 2010.
The advantage of a car is its affordable price, which is a decisive factor for the majority of residents of our country. In addition, Granta is quite cheap to maintain, unpretentious and reliable, which many other AvtoVAZ models cannot boast of. Granta is considered one of the most successful VAZ models in the recent history of the manufacturer. However, any car needs care, and the Lada Granta will be no exception. The clutch is a system that requires increased attention in any car. However, sooner or later problems also happen to him. In this case, you will need to replace the cable or simply re-adjust the clutch on the Lada Granta. Today we’ll talk about the design features of the car, and also look at some methods that will help you solve the problem yourself.
We adjust the clutch on the Lada Granta ourselves, bypassing the automation
VAZ cars use a clutch cable with automatic adjustment. The machine itself is a separate unit, which is fixed near the pedals. Clicking or crackling noises when the machine operates can be considered normal. But if the pedal begins to sink and the clutch does not disengage completely, then the automatic system will no longer help - you need to forcibly reduce the length of the cable. A threaded tip is provided for these purposes. That is, clutch adjustment on the Lada Grant can be done manually. Let's look at all the steps in more detail.
➤ Grant clutch pedal creaks - fix the problem
Pedals on Grant
To remove the clutch pedal on a Lada Granta car, you must perform the following steps:
- Secure the car on a level surface, squeeze the parking brake lever, and install wheel chocks on the rear row of wheels.
- Using a “14” key, unscrew the three bolts and disconnect the steering shaft (interior of the car, at the base).
- Unscrew the plastic clamp from the clutch cable lead.
Plastic retainer
- Remove the protective bracket and remove the brake pedal vacuum booster pin.
Safety bracket
- We disconnect the block with wires from the dashboard with the sensors on the bracket.
- Using a key set to “13”, unscrew the four nuts and remove the vacuum brake booster.
- Using a “13” wrench, unscrew the five nuts and remove the clutch pedal bracket and brake assembly.
After troubleshooting, we replace the worn elements with new ones and assemble the structure in the reverse order.
The reason for the squeaking clutch pedal on the Lada Grant
The design of the clutch on the Lada Granta car is different from previous VAZ models. The shaft drive is activated by a cable with an automatic tensioner.
If the adjustment was made correctly from the factory, then the owner does not need to re-adjust the strain relief. In practice, this is far from the case; problems do happen. Especially at the stage of passing the first and second technical inspections.
The device of the "VAZ" clutch cable
If you open the hood, you will notice that the cable sheath is held by bushing 5. Tip 2 is inserted into the slot of the clutch fork. Leash 1, made of plastic, can be screwed or twisted from the tip. This is how the “effective length” is adjusted.
Cable device with automatic adjustment
Automation can also adjust the length of the cable. But the limits of “auto-tuning” are small.
The ability to change the cable length “manually” was provided by the factory. And that means we must take advantage of this opportunity.
All steps from start to finish
Open the hood and find the gearbox. The starter will be located nearby. All nodes are covered with a filter that needs to be removed:
- Disconnect the negative terminal of the battery (key “10”);
- We disconnect in turn: the mass air flow sensor connector (oval), the adsorber valve (we press the tongue from below). We also loosen and remove the fastening tie for the “thick wire”;
Getting rid of unnecessary details
A “fork” will be attached to the top of the crankcase - a bent plate with a slot. This is the clutch fork (see photo).
Found the most important detail
Using pliers wrapped in electrical tape, try to pull the tip forward.
Clutch adjustment on Lada Granta (first method)
Here we will look at how to adjust the clutch on a Lada Grant:
- Grasping the end of the cable, pull it forward as far as it will go.
- Using a caliper, measure the distance from the fork to the plastic leash. The distance should be exactly 27 mm.
If everything is set up and checked, measure the clutch pedal travel.
We measure the free movement distance
The distance from the “top point” to the “bottom” should not exceed 146 mm.
If at the last stage it turns out to be more than 146, then the cable needs to be replaced.
Alternative clutch adjustment method (second method)
No calipers are needed here:
- Carry out step 1 as indicated above - pull the tip forward.
- Let go of the tip and look: if the leash does not fit tightly to the fork, screw it onto the rod.
- Press and release the pedal (3 times), repeat steps 1 and 2.
Achieve the following: when the pedal is not pressed, the leash should be pressed tightly against the metal, at the same time, the displacement of the fork should not be noticeable. Let the displacement be equal to 1-2 mm.
Clutch adjustment on the Lada Grant is carried out using any of two methods. And according to reviews, the need arises every 15,000-20,000 km.
Review of Manufacturer Prices
| Manufacturer | Price, rub.) | Resource (Thousand km) |
| LADA 21901-1602210 |
clutch cable assembly
clutch cable assembly
*prices are current as of October 29, 2018.
Recommendations for the selection of parts and components
The vast majority of spare parts for the Lada Granta are domestically produced. Foreign analogues are not in demand due to their high cost. Compared to “our” products, imports are 10–15% more expensive. The workmanship is at the same level.
When purchasing spare parts and components, always give preference to high-quality, original parts. Check the correspondence of catalog items with the actual data specified in the operating instructions for the technical device.
If you have no experience in car maintenance, seek qualified assistance from service station specialists.
Why the ECM detects error “P0830”, video explanation
Praise to the author! I am also a terrible car enthusiast, albeit with little experience... I also had right-hand drive ones, but unfortunately, they are not convenient with our traffic. I now have probably the most boring Toyota model. For almost 2 years of owning this car, I had no problems at all, it burned out once a light bulb in the foot, and I changed the brakes and oil according to plan, despite the fact that the car is 8 years old, the mileage is about 150 thousand. It accelerates quickly, drives smoothly, and is maneuverable. spacious trunk and for its size a very comfortable and spacious interior, dad feels completely comfortable in the back seat, and he is a large man. After a night in a windswept parking lot at minus 35, it started up and didn’t even sneeze once. The stove heats perfectly, the air conditioner cools quickly, the consumption is 6-7 liters of 92 in the city. engine 1.5. 106 horses, + with its size it will fit into any hole in the parking lot. In short, the car is just great. )))
I've been meaning to adjust the clutch on my Grant for a long time. I made a printout of your article. Tomorrow I’ll arm myself with the necessary tools and go to the garage to do everything with my own hands step by step, as described in the article.
Open the hood, under the air filter there is a clutch foot. It is equipped with a cable with a plastic screw. Lightly pressing the foot, remove the cable to the side. We adjust the cable screw and put it back on the foot.
When accelerating, the engine roars slightly when the leveler revs up
Clutch needs replacement! It's slipping!
When starting off there is jerking, what could be the problem?
Replacement clutch disc
I sharpened the flywheel! and he was crooked. so you can’t get away with just one disk
The clutch cable broke. I went and bought a new one. Changed it. While I was driving, the clutch was soft; accidentally, in 4th gear at 90 km/h, I jumped into 3rd gear instead of 5th. But nothing. An hour later, I noticed that when changing gears, my car seemed to be giving up gas (by the sound), but in fact I don’t know what it is. The clutch pedal has free play, i.e. hanging out. And the pedal is too soft. Can there be different clutch cables on the grant?
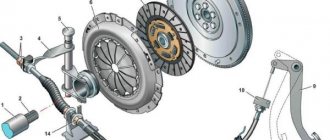
Clutch device Lada “Granta”
Main clutch elements:
- flywheel;
- basket with drive disk;
- driven disk;
- fork with lever;
- sheathed cable.
Torque from the crankshaft is transmitted to the flywheel, to which a basket with a drive disk presses the driven disk. The latter, in turn, transmits torque to the gearbox shaft. When you press the clutch pedal, the Lada “Granta” clutch cable is stretched, forcing the clutch fork to press on the petals of the basket. The driven disk stops pressing against the flywheel and the mechanical connection between the crankshaft and the gearbox is broken.
A special feature of the Lada “Grant” clutch is a self-adjustment mechanism, thanks to which there is no need to adjust the length of the clutch cable during vehicle operation. However, after replacing parts, adjustment of the Grant clutch cable is necessary.
LADA Granta from 2011, removing the clutch pedal instructions online
Payment for goods and downloading of the book in electronic form (PDF format) is made on the website.
To do this, you need to find the book you are interested in and click on the “Buy” button. The price of the book is indicated on the button.
For convenience, the price on the website for residents of Russia, Belarus and Kazakhstan is presented in rubles.
For residents of Ukraine in hryvnias, and for all other countries - dollars.
After clicking on the “BUY” button, a payment window will open where you can select a payment system with which you can pay for the selected book using any bank card (Visa, MasterCard, MIR, etc.)
When you click on the “Pay by bank card” button, the Portmone payment system will open, which is the easiest way to make a payment.
In addition, the website offers four payment systems for payment:
- Yandex (payment from any bank cards, Yandex Money account, QIWI Wallet, terminals, etc.);
- Portmone (payment from any bank cards, Portmone account);
- PayPal (payment from any bank cards, PayPal account);
- WebMoney (payment from any bank cards, payment from WebMoney wallets).
Payment via Yandex Cashier
After selecting payment via Yandex, the Yandex Cashier payment system will launch, where you need to select a convenient payment method (bank card, QIWI, Yandex Money account, etc.)
After specifying payment details and confirming payment, payment for the goods will occur.
If you have a bank card in a currency other than the ruble, then the money will be debited from the card at the rate of the Central Bank of Russia at the time of the purchase.
This payment method is optimal for residents of Russia, Kazakhstan and Belarus.
Official website of the Yandex Kassa payment system https://kassa.yandex.ru
Payment via Portmone
After selecting payment through Portmone, the payment system will launch, where you need to select the payment method: bank card or Portmone account.
The price in the Portmone payment system is converted into dollars at the exchange rate of the Central Bank of the country where you are located.
If you have a bank card in a currency other than the dollar, then the money will be debited from the card at the rate of the Central Bank of your country at the time of the purchase.
After specifying payment details and confirming payment, payment for the goods will occur.
Official website of the Portmone payment system https://www.portmone.com
Payment via PayPal
After selecting payment via PayPal, the PayPal payment system will launch, where you need to select the payment method: bank card or PayPal account.
If you already have a PayPal account, then you need to log into it and make a payment.
If you do not have a PayPal account and you want to pay using a bank card via PayPal, you need to click on the “Create an Account” button - shown with an arrow in the picture.
PayPal will then prompt you to select your country and provide your credit card information.
After specifying the information required to make the payment, you must click on the “Pay Now” button.
Official website of the PayPal payment system https://www.paypal.com
Payment via WebMoney
After selecting payment via WebMoney, the payment system will launch, where you need to select the payment method: bank card or WebMoney wallet.
If you already have a WebMoney wallet, then you need to log into it and make a payment.
If you do not have a WebMoney wallet and you want to pay in another way, you need to select any of the methods that WebMoney offers and make the payment
After specifying payment details and confirming payment, payment for the goods will occur.
Official website of the WebMoney payment system https://www.webmoney.ru/
Downloading a book
After successfully completing the payment (by any method) and returning to the KrutilVertel store from the payment system website, you will be taken to the successful payment page:
On this page you need to indicate your e-mail, where access to download the book will be sent.
If you are already registered on our website, then simply follow the link to your personal account.
The book you purchased will be in your personal account, from where you can always download it.
Please note that after making the payment, you need to return back from the payment system website to the KrutilVertel website.
If for some reason you did not return back to the site and closed the payment system tab with a message about the successful completion of the payment, please let us know - we will send you a letter indicating access to download the book.
Problems when paying with bank cards
Sometimes difficulties may arise when paying with Visa/MasterCard bank cards. The most common of them:
- There is a restriction on the card for paying for online purchases
- A plastic card is not intended for making payments online.
- The plastic card is not activated for making payments online.
- There are not enough funds on the plastic card.
In order to solve these problems, you need to call or write to the technical support of the bank where you are served. Bank specialists will help you resolve them and make payments.
That's basically it. The entire process of paying for a book in PDF format on car repair on our website takes 1-2 minutes.
If you still have any questions, you can ask them using the feedback form, or write us an email at
Source: https://krutilvertel.com/lada-granta-2011-glava6-pedali-sceplenija-i-tormoza-s-kronshtejnami-i-trosom-privoda-sceplenija-v-sbore
Signs of a faulty clutch cable
Replacing the Lada “Granta” clutch cable is necessary in the following cases:
- the clutch pedal “falls” (the cable is broken);
- The pedal is pressed and returned unevenly, jerking is observed when starting off (the clutch cable gets stuck).
What you need to replace the clutch cable
To change the clutch cable you will need:
- key to 8;
- ruler;
- flat screwdriver;
- pliers;
- new clutch cable.
Replacing the clutch cable Lada “Granta”
Dismantling the clutch cable is carried out as follows:
- unscrew the nut securing the cable to the pedal bracket (located in the cabin under the front panel);
- remove the cable sheath stop from the pin;
- Using pliers, remove the locking bracket holding the clutch pedal axis;
- pull out the axle;
- remove the clutch pedal;
- disconnect the spring from the clutch pedal bracket;
- using pliers, pull out and remove the cable end stopper;
- disconnect the cable end from the clutch pedal;
- remove the cable sheath seal located in the engine compartment;
- pull the tip of the clutch cable inserted into the fork in the direction of vehicle travel;
- pull the cable tip out of the fork groove;
- unscrew the cable end lead;
- remove the cable braid guide bushing inserted into the hole in the gearbox bracket;
- remove the clutch cable from the Lada “Grant” by dragging it out of the hole in the partition between the car’s interior and the engine compartment.
The new clutch cable should be pre-lubricated by pouring a little oil between the braid and the cable. The clutch cable is installed as follows:
- pass the cable into the passenger compartment from the engine compartment through the hole in the shield (partition);
- attach a compensation mechanism to the pedal pin that regulates the tension as the clutch disc wears out;
- install the clutch pedal in place and fix its axis;
- fix the cable sheath stop on the pin located on the pedal block bracket;
- install the clutch cable seal on the partition of the engine compartment;
- thread the clutch cable into the hole in the gearbox bracket;
- install the cable braid guide in the same hole;
- insert the driver into the lower tip of the clutch cable so that the tip protrudes beyond the end of the driver by 1 mm;
- set the clutch cable to the working position, moving the lower tip all the way forward in the direction of movement of the machine (you will have to overcome the resistance of the mechanism spring);
- measure the distance between the driver and the clutch fork, holding the cable in an extended position;
- by rotating the leash, set the gap to 27 mm;
- insert the cable tip into the groove on the clutch fork;
- release the tip (the spring should move the tip towards the fork, installing it without gap);
- press the clutch pedal three times;
- re-measure the gap between the fork and the driver;
- If necessary, adjust the cable by rotating the leash.
Adjustment of the Grant clutch cable is carried out only after its installation. Subsequently, the correct length of the cable is ensured by a compensation mechanism. He makes sure that the cable is constantly in a slightly taut position. If there is a deviation from the norm, the mechanism either adds the length of the cable or reduces it.
Second adjustment method
If you don't have a caliper on hand, you can use an alternative method.
It begins similarly to the previous case. Again, you need to pull the tip forward as much as possible. When he rests, release him and see how tightly the leash adheres to the fork. If it’s not tight enough, it means you need to wrap it around the rod. Then we return to the salon and press the clutch pedal three times. Once you've done this, go back and look under the hood again. Pay attention to whether the leash is pressed against the metal? A prerequisite is the minimum movement of the fork (it is better that there is none at all). The fork movement is allowed no more than 2 millimeters. Car enthusiasts can use any of the above methods. If any points remain unclear to you, we recommend watching the video instructions on our website. Despite the presence of an automatic adjustment system, you will still need to carry out this procedure. Even if the cable serves you reliably and does not break, you will still need to periodically look under the hood.
Experienced car enthusiasts recommend not waiting for problems with the clutch and performing this work at least once every 10,000 kilometers. This way you will protect yourself from problems with this system. During adjustment, be sure to evaluate the condition of the cable. If it has become thin and cracked somewhere, it won’t last long. In this case, you can immediately replace it.
source
Eliminating clicks and squeaks in the clutch pedal
The clutch mechanism of the Lada Granta is equipped with a ratchet-type compensation mechanism that regulates the tension of the clutch cable. Clicks when the pedal is pressed indicate that the clutch cable is incorrectly adjusted during installation, or its adjustment has become “lost” during operation or repair of the machine. It’s easy to eliminate clicks - just adjust the Grant’s clutch cable. Once the distance between the extended cable guide and the clutch fork is set to within 27 mm, the clicking should stop.
Creaks when pressing the clutch pedal occur in different places. It can creak:
- plastic pedal bushing;
- clutch cable guide;
- clutch cable;
- gearbox input shaft.
Therefore, it is necessary to establish the source of the squeak and act depending on the identified cause.
- If the pedal bushing squeaks, you should lubricate it, and if this does not help, replace it.
- The creaking of the clutch cable guide is eliminated using a lubricant, for example, “Litol”. It must be applied to the contact point between the clutch fork and the plastic cable nut.
- You should try to lubricate a squeaking clutch cable by pouring a little oil inside the braid. If this does not help, the cable should be replaced with a new one.
- If the squeak comes from the gearbox, this indicates a lack of lubrication on the input shaft along which the pressure bearing moves under the influence of the clutch fork. The problem can be fixed without removing the gearbox. You need an aerosol can with graphite lubricant, equipped with a tube. To do this, you need to remove the engine protection (to get access from below) or dismantle the air filter (to allow access from above). Next, you need to remove the boot of the fork lever, insert a spray can into the hole and generously spray the shaft with graphite lubricant.
How to replace the clutch cable on a Lada Granta
At one time, the Lada Granta car managed to create a buzz around itself and arouse great interest from potential buyers who value domestically produced models.
Having familiarized yourself with the technical characteristics, Lada Granta can be classified as an above-average class of car. The engine capacity is 1.6 liters and the power is 100 horsepower. The Renault-Nissan platform was used as the basis. When creating the car, new digital technologies were introduced to reduce its cost. Each machine is checked for manufacturing defects using computer roller stands. The obtained test and inspection results are entered into the manufacturer's database and further checked.
A significant part of Lada Granta parts were used to order from Japan, Italy, Germany and South Korea. Here we can draw conclusions that the important components of the car are of high quality and reliable, since no savings were made on them. The main distinguishing feature of the Lada Granta is its hybrid platform, which makes the car noticeably changed in comparison with its predecessors. It provides for the use of Euro-4 gasoline. Additionally, the machine can use an internal combustion engine and an electric motor as a driving force. By the way, the engine is powered in two ways - regular fuel and a battery, which is very convenient.
Speaking about the operation of a Lada Granta car, it is necessary to note the important importance of such factors as period and frequency. Depending on this, the transport periodically suffers some malfunctions of its individual components, and this is quite normal. It is important to understand and be prepared for this, so that in case of malfunctions of the car mechanism, it is time to diagnose the breakdown and fix it.
It is the car's chassis that most often fails. However, you need to take into account other mechanisms of the Lada Granta - engine, clutch and more. By the way, clutch problems are important and require special attention from the car owner. Below are existing clutch problems that we recommend you familiarize yourself with.
Discomfort: tight clutch pedal on Lada Granta - causes and treatment recipe
To comfortably select gears on a manual transmission, it is necessary that the gearbox is easily disconnected from the engine. This function is performed by the clutch. Excessively tight pedal movement is unacceptable. This is not only discomfort for the driver, but also excessive stress on the knee joint. And with regard to the unit itself, the identified malfunction allows us to draw certain conclusions about the need to replace some parts.
Drive system design and symptoms of malfunction
Without knowing the drive configuration, it is not possible to figure out why the clutch pedal on the Lada Granta suddenly became tight. Structurally, the unit consists of a basket and a driven disk. The first is connected to the engine flywheel, the second is connected to the gearbox shaft.
The pressure mechanism is controlled by the leftmost pedal. A well-designed lever ensures easy movement of the release disc petals. In this model of machine, commands to move the fork are supplied by a cable. He “walks around” in a matching shirt. It is worth noting that an automatic cable length adjustment system is implemented here.
Symptoms of a problem
On a new car, the important pedal assembly moves easily. Violation of the factory condition requires stopping operation and identifying the reasons. Usually, along with tight movement, related symptoms occur that indicate a malfunction of the assembly module:
- Extraneous squeaks during pedal movement.
- Jerky movement of the pedal.
- The need for frequent adjustment of the idle speed of the lever.
- The machine jerks when connecting the box to the motor.
Causes of a tight clutch pedal on a Lada Granta car and ways to eliminate the problem
Problems with a hard lever arise both on new cars and on models with an impressive mileage. Depending on the age, the nature of the problem can vary - from a banal drive wedge to serious problems with the unit connecting the engine and gearbox.
What's the matter
Often a tight clutch pedal on a Lada Granta occurs for the following reasons:
- Mediocre performance of the diaphragm spring.
- Fork jamming.
- Release bearing jamming.
- Scratches on the surface of the cable in the working braid.
- The cable is distorted in the mounting bracket to the interior pedal assembly.
- Wedging of the driven disk.
On vehicles with a long service life, cracks may appear in the bearing drive fork and on the release support guide. The accumulation of dirt in the assembly also cannot be ruled out. Damage to the cable clamp bracket should also not be discounted.
For your information. All of these problems can result from the manufacturer allowing defective parts to be installed.
Owners who have installed a new clutch often encounter a stiff pedal. The appearance of an unpleasant effect is due to the fact that some manufacturers of these units deliberately increase the rigidity of the leaf spring of the basket. As a rule, this is done by little-known companies with Chinese registration. The goal is to increase the resource of the device.
How to troubleshoot
There is no point in immediately positioning the unit connecting the box and the engine as faulty. The cost of a new set of spare parts in the form of a basket, driven disk and release bearing is high, and there will be no 100% certainty that there is a problem with this module until a thorough diagnosis of the drive has been carried out.
Problems with the drive part
In 80% of cases, the culprit of a tight clutch pedal on a Lada Granta car is one of three:
- The rope is unraveled.
- Corrosion or dirt in the cable jacket.
- Lack of lubrication on the fork shaft.
Cable
On a note. Checking the serviceability of the cable part is quite simple. Just squeeze the pedal and throw it. The return stroke of the lever must be fast and continuous. More detailed diagnostics are performed with the cable disconnected. The operation takes more time, but gives a clear answer to the question. You can check both the condition of the cable and its ease of movement along the jacket.
However, there are often cases when it is enough to add lubricant to the jacket, and the pedal assembly shows proper operation. As lubricating products you can choose:
- Transmission or engine oil (fill in a syringe with a needle).
- Emulsion of silicone origin in cans.
- WD-40.
Fork
The need to lubricate the fork shaft will be indicated not only by tight movement. When a command is given to the unit, a creaking sound will also be heard from under the hood. You can deal with this kind of malfunction using the following method:
- Remove the engine air filter along with the housing.
- Pry off the plastic bushing of the fork.
- Spray with silicone lubricant or WD-40.
Problems with the clutch assembly
When installing a new basket, difficult behavior of the part is inevitable. The effect disappears after 500-1,000 km in mixed mode. If the normal functioning of the unit is not restored after running-in, an unofficial set with an increased leaf spring stiffness was probably purchased. Then there is only one way out - buy a proven set and change it again.
Wear or deformation of the Lada Granta clutch fork also causes tight pedal travel and subsequent discomfort. In this case, it is necessary to act as quickly as possible, since the presence of critical defects can damage the module at the most inopportune moment.
Verdict
Substandard behavior of the Granta pedal assembly is a malfunction that should be eliminated as soon as possible. The issue may be either in the drive, which here is a cable drive, or directly in the unit connecting the engine and the gearbox.
Most often, the problem lies in an unraveled cable or its limited mobility in the jacket. This problem can be eliminated by replacing the cable and/or lubricating it with oil, silicone or WD-40. The fork shaft often needs lubrication.
Less commonly, the problem is caused by a deformed or cracked fork. Wear on the leaf spring can radically change the amount of force required to release the pedal. A new clutch can also cause it to feel stiff.
Source: https://autobann.su/tugoi-chod-pedali-scepleniya-lada-granta.html
Malfunctions of the clutch mechanism in a car
The most common cause of a malfunction in the clutch system is the clutch disc, since it is the most actively functioning part here.
Possible problems with the clutch mechanism are presented below:
- Pressure plate and release bearing:
- breakage/curvature of the diaphragm spring of the pressure or release disk;
- twitching when the clutch operates;
- instability of the pressure plate.
- Clutch drive:
- hydraulic drive – lack of tightness of the system, malfunction of the working cylinder;
- systems with a cable - the cable lengthened and it broke;
- Manual transmission with electric drive - software disorder in control, breakdown of the actuator electric motor.
- Driven disk:
- friction linings are oily;
- friction adjustments are out of order/damaged;
- Damper springs are broken/deformed.
It is noteworthy that the problems arising in the clutch system cannot be considered insignificant. They usually modify quite quickly from “the car is acting a little strange” to “the car is not moving.” For this reason, it is necessary to immediately eliminate existing problems in the system.
You can determine if the clutch cable is faulty by paying attention to the traffic:
- the clutch pedal starts to bother you;
- the free play of the clutch pedal increases;
- no gear shift when the engine is on.
After diagnosing the vehicle for possible causes of the malfunction, repair work must be carried out. To do this, it’s time to contact a special service center or carry out repairs yourself. In the second case, you will need to first study the necessary information regarding this topic.
Before carrying out work, it is recommended to remove the air filter housing for greater convenience.
Replacing the Grant clutch cable: step-by-step instructions
So, the process of replacing a necessary part on a Lada Granta includes the following manipulations:
- Remove the nut securing the cable sheath holder to the pedal assembly holder, located under the instrument panel. An 8mm wrench is used here.
- Remove the spring clip from the clutch pedal pin groove by carefully prying it up with a Phillips screwdriver.
- Remove the eye of the cable length adjustment mechanism housing (automatic) from the clutch pedal pin. Pull the cable with its upper part out of the pedal assembly bracket.
- Remove the cable guide from the groove of the clutch fork lever, which is located inside the engine compartment. To do this, you will need to carefully pull the cable forward.
- Unscrew the leash from the thread of the cable end.
- Release the cable end from the protective cover. It is rubber, so this will not be difficult to do.
- The end of the cable sheath is installed inside the bracket on the gearbox. You need to get it.
- Remove the cable sealing cover located inside the front panel in the passenger compartment. Pull the cable slowly into the interior. At this stage, experts strongly recommend checking the plastic bushing on the pedal pin. If a part is worn out, it would be better to replace it. If it is in perfect order, just lubricate it with a plastic product.
- When replacing the Grant clutch cable, perform the following steps:
- insert the cable from the passenger compartment into the engine compartment, doing this through the hole in the front panel;
- close the shield hole with a special cover for sealing;
- attach a mechanism to the pedal pin that allows you to adjust the length of the cable automatically and secure it properly;
- screw the plastic leash onto the end of the cable so that the end of the cable end is located flush with the end of the leash;
- hide the protruding guide inside the groove of the clutch fork rod;
- Adjust the clutch drive as required.
- Remove the cable, holding it by the threaded end, until it stops. Here the clutch pedal will interfere with this process, so force must be applied. After removing the cable, you must hold it in this position.
- Determine the distance between the end of the plastic guide and the clutch release fork lever using a caliper. The distance should not exceed 27 mm.
- Remove the load or release the cable so that the leash takes its place near the fork lever. There should be no gap if installed correctly.
Having completed all the manipulations, press the clutch three times so that the cable length adjustment mechanism is automatically activated. Install the air filter housing.
First adjustment method
There are two ways of regulation. Let's look at the first one:
- Pick up the tip and pull it forward as far as it will go.
- Arm yourself with a caliper and measure the distance from the fork to the leash. The norm is 27 mm, no more, no less.
- If a problem is still observed, adjust the length of the cable by tightening the thread.
- Press the clutch pedal three times and make sure everything is working properly.
Repeat the operation until the pedal travel is normal and the clutch operates optimally. You also need to take repeated measurements using a caliper. The distance between the extreme points should be no more than 146 millimeters. If you notice that the distance is still greater than the specified value, you will have to install a new cable (therefore, we advise you to keep a spare one on hand).