The key fob binding process is as follows
: 1). With the ignition off, press the valet button 7 times 2). We turn on the ignition, sound signals from the alarm are heard, after which you need to bind ALL key fobs that will be used (press 2 and 3 buttons simultaneously on the LCD key fob, and on the additional (without LCD) 1 and 2 buttons simultaneously) 3). Turn off the ignition, after which the dimensions will blink 5 times. After these steps, the binding process is completed, we check the operation of the key fobs and that’s it.
Set time
on the starline alarm key fob in the following way: 1). Press button 3 and hold it until 1 melodic beep, 1 short beep and then 2 short beeps sound. After which the clock icon will start flashing. 2). Button 1 of the key fob increases the readings, button 2 decreases it. First, the hour indicator flashes, set the required hour and use button 3 of the key fob to switch to the minutes indicator, set the desired time. 3). Afterwards, you don’t need to do anything, wait about 5 seconds and the time on the key fob will be set.
The Starline A61 car alarm belongs to the modern Dialog family, which differs from its predecessor Twage in a stronger encryption system. The encryption of the “Dialogue” signal is extremely difficult to crack and is practically invulnerable to code grabbers.
The described model of car anti-theft system is distinguished not only by improved codes, but also by improved sensors. One of the signs that this is a fake and not an original is outdated shock and temperature sensors.
This device is universal and will fit any car - from a passenger car to a 4x4 SUV. Its modernity is reflected even in the design, which is clearly visible in the photo.
Alarm capabilities Starline A61
The modification of Starline's A61 anti-theft system boasts a fairly wide range of functions. These include:
- a blocking digital relay that provides protection for the machine’s power plant;
- limit switches that guarantee protection of the handbrake, door locks, luggage compartment and hood from intruders;
- ignition system protection relay cutting into the electrical circuit;
- two-level sensitivity controller that detects the slightest external impact on the car body;
- additional controller for detecting movement inside the car;
- the use of a “dialogue” encryption system in signal encoding, which gives each command an individual key that protects against interception or hacking of the system by code grabbers;
- the ability to remember the initial state of the anti-theft system in case of an unforeseen situation such as a battery disconnection, thanks to which, immediately after eliminating the problem, the alarm will return to performing its functions;
- limited number of alarm signal transmission cycles when security is activated due to the operation of the controllers;
- the ability to enable automatic interruption of alarm signals when the security mode is disabled;
- the ability to activate light and sound alarms if the controllers are triggered when the security mode is on;
- the ability to monitor a car from a distance, thanks to the system’s ability to transmit information impulses to the remote control;
- the presence of an immobilizer that seriously limits the capabilities of car thieves due to automatic engine blocking in the event of unauthorized entry into the car;
- the presence of a turbo timer that increases the life of the engine;
- anti-robbery option, thanks to which you can block the car if a robber gets inside;
- the ability to disable the blocking functions of the anti-theft system in several stages;
- the presence of a function for selecting a personal code for emergency disabling of the security mode;
- the ability to maintain engine blocking even after dismantling the alarm system;
- automatic monitoring of protective sensors, sending messages to the main key fob in the event of disconnection of non-working zones;
- LED indication of the status of the alarm system and the vehicle directly on the screen of the main key fob;
- indication of the activation of the security system on the screen of the main control panel, indicating information about a specific activation zone (of which there are nine in total);
- recording the presence of non-working zones when the protection mode is activated, with sending a report about this to the screen of the main control panel;
- the presence of not only siren signals, but also an audible warning on the key fob in case the vehicle’s protection is triggered;
- the presence of LEDs, the indication of which signals the operating state of the limit switches;
- automatic activation of the light alarm if the door locks are open.
The presence of such a wide range of functions gives the owner of the system quite a lot of opportunities not only to ensure the safety of the car, but also to manage it:
- control of the anti-theft system using a mobile application;
- setting up device options and managing its capabilities using SMS commands;
- obtaining current information about the operation of the security device by calling the number of the built-in GSM module from your own smartphone;
- the ability to receive notifications and alarms even while in another region or country, if you have linked your mobile number to the system and have a working cellular connection;
- option to block the vehicle’s power unit not only using commands from the control panel, but also via SMS or call from a mobile phone;
- option to warn about disabling the security mode from the key fob, even if it is authorized - a corresponding message will be sent to the car owner’s phone, which is pre-configured in the official application of the device
- the possibility of detailed monitoring of the vehicle’s position in space with the transfer of coordinates to any mobile device of its owner, which is capable of downloading maps and receiving GPS coordinates - the better the GSM coverage, the more accurate the coordinates, which can be clarified on the official website of the manufacturer;
- protection against hacking by strictly linking to a mobile phone number - in total, the system can be linked to three different numbers, in addition to the main one;
- in case of a call from an unidentified mobile phone number, before providing information about the state of the system, the latter will request a special four-digit code, if entered incorrectly, access will be blocked, and information about the attempt to establish communication will be sent to the main linked number;
- binding to a new main phone number, in case of loss of the previous one, is carried out using two secret passwords that the car owner chooses himself.
A large number of functions have made the use of the Starline A61 signaling system not only more secure, but also more convenient.
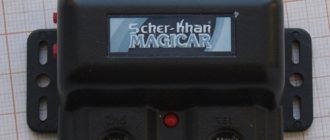
Starline A61 key fob diagram
A61 remote controls belong to a new generation of control communicators. To control them themselves, and through them the car alarm, buttons and a display are used. The latter is present only at the main remote control. Because of its presence, three buttons are located on the side. The additional key fob has two keys on the front.
On the screen you can see icons indicating the activated functions of the system, as well as the current status of both the alarm and the machine.
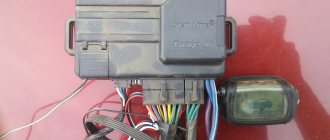
Alarm equipment
The modern car alarm StarLine A61, in its factory configuration, is not very different from other devices of the same manufacturer of a similar class. The buyer receives in the store:
- main control module in a plastic case with a processor;
- two-level vehicle sensitivity sensor;
- antenna amplifier with antenna and signal reception/transmission device;
- main remote control equipped with a liquid crystal display and two-way communication, supplied with a leather case;
- additional key fob without screen, double connection and with a different number of buttons;
- main control battery pack;
- GSM module for providing mobile communications;
- sticker for fixing the antenna on the car;
- wires for connecting various elements of the system;
- hood close button;
- Valet service button;
- LEDs used to determine the status of the device from inside the cabin;
- wires with a sixteen-pin plug for connection to the central unit;
- power cables for connecting the built-in interlocking circuit;
- cables for connecting the central lock of the car with a plug having sixteen contacts;
- operating instructions for the system, describing in detail both the installation of the complex and the features of its configuration.
Button functions
For the main control of the anti-theft complex, buttons are used - both those located on the key fobs and the Valet service key located in the cabin. Each of the buttons or their combinations has its own purpose.
The first key is used for:
- Activation of the car security option with a sound signal is a one-time short press.
- Activation of protection without confirmation by sound is a sequential effect.
- Step-by-step activation and deactivation of the motion sensor - double click.
- Clicking the door locks when the ignition is running is a one-time short press.
The functions of button number two include:
- Deactivation of the security function with an audible warning is a one-time short press.
- Deactivation of the security function without an audible warning is a sequential action.
- Turning an additional controller on and off in several levels - double impact on the key.
- Disabling the door locks when the ignition is running is a one-time long press.
- Disabling the anti-robbery function - double impact.
- Disabling the alarm is a short one-time press.
- Display general information about the state of the system, including indicators of temperature sensors - a one-time short-term exposure.
- Find a car if it is lost in the parking lot - double click, which will turn on the turn signals.
- Turn on the third additional channel - sequential exposure.
- Activate anti-burglary function - long-term impact.
- Deactivate the engine lock in two steps - long press.
- Disable the silent security option - long press.
- Activate the immobilizer option - long-term exposure.
- Enable the turbo timer and automatic activation of the security mode - single long press.
- Set the values of time, timer and car factory alarm clock - short press.
The alarm is controlled by pressing not only individual keys, but also their combinations. Among the most common:
- simultaneous impact on the first and second with the ignition off - activation of the panic mode;
- Simultaneously pressing the first and second buttons with the ignition on - enable the anti-robbery option;
- simultaneous impact on the first and third keys - activation of the main control panel keyboard lock;
- Pressing the second and third keys at the same time disables the keypad lock;
- sequentially pressing buttons numbered and three - turning on the security mode while the engine is running;
- sequentially pressing keys number three and one - activating the settings of additional channel number one;
- sequentially pressing the third and second keys — turns on the settings mode for the second additional channel.
How to enable ignition support on A61
The starline alarm system has an interesting function when the car is warming up, even when the ignition key is turned off. The procedure is similar to autostart from a key fob, but the start itself is done manually. The ignition support relay is connected via channel 3, and the duration is programmed via the starline key fob. The algorithm is listed in the programming table under number 16.
- Apply the parking brake while the engine is running. The dimensions will flash once.
- We pull the key out of the lock for 30 seconds, get out of the car, and lock all the doors.
- Press the 1st key of the starline key fob for a long time, and then the 3rd briefly. One beep sounds and the lights flash once.
Programming table
To program commands and options for the Starline A61 signaling, use a special table contained in the user manual. In this table, each function is assigned its own number, which is used to register it in the system memory. All options are arranged in order, making it easy to find what you need.
For example, in order to program function number 13, with the ignition off, you must enter the service mode by pressing the Valet button, which will be indicated by the corresponding light and sound signal. After this, press the service key 13 times and wait a while for the system to exit the settings mode. The same can be done using a mobile application.
Setting up the Starline A61 alarm
Setting up Starline A61 is carried out in accordance with the user manual and using the main key fob. In some cases, use the Valet service key.
How to enable Valet mode
To replace any parts at a car dealership, you must temporarily disable the security system. To do this, use the service mode, activated by the Valet button. Both turning it on and off occurs according to the same algorithm. The first step is to turn the ignition on and off, which should take no more than a couple of seconds. Immediately after this, press the desired key located in the cabin and wait for light and sound signals. You can also disable the Valet mode using the key fob by pressing the third and first buttons in sequence.
Setting the clock
To set the time on the main control panel, first briefly press the third key, which allows you to enter the corresponding mode. First of all, it becomes possible to set the indicators of the current hour. To increase the value use key number one, and to decrease it use key two. By pressing the third button again, you proceed to setting the minutes. Do this again with keys number one and two. Complete the setup by pressing the same key number 3.
How to turn the siren on and off
The sound of a siren activated when the security mode is activated is turned off by pressing the second button on the key fob.
Adjusting the shock sensor
The levels are adjusted using button number 1. To turn off the first level, press it twice. To deactivate the second level, repeat the action. One more repetition of such an impact on the first key will lead to the switching on of the switched off controller.
How to turn on the turbo timer
The turbo timer can only be connected if additional channel 3 is programmed to operate in the fourth option (function 16). The hood must be closed and the car must be in either park or neutral gear. The motor must be running.
To automatically activate the turbo mode, you must hold the third key until the sound signal. Move the cursor that appears by briefly pressing the same button to the “TURBO” icon and press the first key.
Closing windows
To implement closing windows using Starline A61, it is necessary to install additional specialized blocks.
Opening the trunk
The opening occurs using the first additional channel. Entering it is done by successively long pressing key number three and short pressing button one. After this, the trunk will unlock, accompanied by three flashes of the side headlights.
How to turn off the Starline A61 alarm
Disabling the Starline A61 car alarm is possible in 2 ways:
- turning off the power;
- using the Valet service button.
The first option is recommended to be used as a last resort. As for the second, to do this you need to enter the car and turn on the ignition. Find Jack and press three times within two tens of seconds. Turn off the ignition.
Emergency disarming
Emergency disabling of the security mode occurs using the service key. Why, the car owner opens the car door and immediately turns on the ignition. Within twenty seconds, press the Valet key three times and turn off the ignition. A double siren signal will indicate the success of the action.
Factory reset
To reset the system to factory settings, press the Valet service button ten times with the ignition on.
Enabling silent mode on Starline A61
The function is possible for this model. There are no beeps in this mode. You can program it like this:
- Press button 1 of the key fob. The dimensions will flash once. It is important to ensure that all doors, trunk and hood are closed and the car is set to the handbrake.
- We hold down button 3 of the key fob for a long time until two beeps: long and then short.
- Short presses of the third button move the cursor to the corresponding icon.
- Press button 1 on the key fob. Two short beeps will sound, a melody and two sounds again.
You can park or unlock the car in this mode by double pressing the first button on the starline key fob.
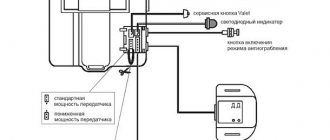
Connection diagram Starline A61
The installation of the anti-theft system is carried out in accordance with a fairly simple scheme. It consists of several stages:
- Disconnection of voltage in the car circuit.
- Installation of the main unit with a central processor.
- Settings for the Valet service key.
- Installation of a security siren.
- Installing a signal transceiver under the windshield.
- Installation of shock sensors in the car interior.
- Installation of limit switches under the hood and on the doors.
Each stage consists of installing the necessary element and connecting it through wires to the central unit and to the handbrake.
Step-by-step instructions for installing Starline A61
Installing the Starline A61 signaling system with your own hands is quite simple. The installation procedure for different car models is almost identical, be it Chevrolet Niva, VAZ 2107, 2110, 2114, Renault Duster, VW Tiguan, Polo 2011 or Gazelle Next. Therefore, let’s look at the installation using the Kia Rio as an example.
The first step is to turn off the power by disconnecting the negative terminal of the battery. Next, the central module is placed near the driver's seat, but unnoticed by others. It must be connected to the ignition switch. A Jack button and a siren are mounted nearby. It is placed so that it is not affected by high temperatures. The antenna module is mounted on the windshield, maintaining a five-meter distance from any metal parts. At the last stage, sensors and limit switches are installed, after which everything is connected in accordance with the diagram. Installation details can be found in the video.
Alarm malfunctions and their elimination
Most faults can be divided into two large groups:
- those associated with the breakdown of the key fob;
- which are caused by a breakdown of the central unit.
If the engine does not start or the alarm clock does not work, then it is most likely the first reason. This can be fixed by simply replacing the remote control. Or the battery, if it starts to malfunction due to lack of power. Sometimes the display may need to be replaced.
If the system does not open or close the doors, then the reason is probably due to a breakdown of the main unit. For example, oxidation of wires that are connected to limit switches. This can be corrected not only by replacing the cable, but also by additionally protecting it. This may also be the problem due to which the status indicator does not blink.
If the fuel pump does not turn on or the settings are not reset using the service key, the reason may lie in processor problems. In this case, you will not be able to fix it yourself.
Keychain repair
Like any technical device, Starline A61 remote controls are subject to malfunctions and breakdowns. But the reason does not always lie in the communicator itself. So, if he doesn’t see the car or it doesn’t respond to his signals, then most likely the whole problem is in the antenna unit. Another reason why the key fob may lose contact with the car is problems with binding.
If the remote control does not close the car doors or stops opening the trunk, then the reason may lie in the limit switches. Sometimes it doesn't want to do anything simply because it doesn't work with the new battery - the last one needs to be replaced.
Owner reviews
We needed a new, modern, but affordable signaling system. The choice settled on Starline A61 and I must say that I don’t regret a single day.
Anton, 38 years old:
Starline A61 is what the domestic motorist needs. It has all the necessary functions and causes a minimum of problems. All my friends have it and have never encountered a break-in yet.
In this article, we asked the wizard to answer the question: “How to set the clock on the Starline A61 key fob?”, as well as give useful recommendations on the topic. Read on to find out what came of it.
The key fob binding process is as follows: 1). With the ignition off, press the valet button 7 times 2). We turn on the ignition, sound signals from the alarm are heard, after which you need to bind ALL key fobs that will be used (press 2 and 3 buttons simultaneously on the LCD key fob, and on the additional (without LCD) 1 and 2 buttons simultaneously) 3). Turn off the ignition, after which the dimensions will blink 5 times. After these steps, the binding process is completed, we check the operation of the key fobs and that’s it.
You can set the time on the starline alarm key fob in the following way: 1). Press button 3 and hold it until 1 melodic beep, 1 short beep and then 2 short beeps sound. After which the clock icon will start blinking. 2). Button 1 of the key fob increases the readings, button 2 decreases it. First, the hour indicator flashes, set the required hour and use button 3 of the key fob to switch to the minutes indicator, set the desired time. 3). Afterwards, you don’t need to do anything, wait about 5 seconds and the time on the key fob will be set.
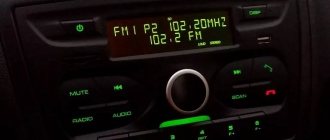
Instructions for displaying time on a Starline keychain
Structurally, alarm systems of type a, b or e series have different functionality and configuration. The a-series key fob received three buttons (see photo), and the Starline e-series remote control received four keys. Therefore, setting the clock has features depending on the type of construction.
Setting the time on the Starline A series remote control
The operating instructions provide a clear diagram for setting the parameters.
- To set the time on the Starline A61, A91 or A94 key fob, take the remote control and press the button number three. The key is responsible for programming the parameter. Press it until a short signal is heard and two small melodies are played. Now the system is configured for time programming, and on the Starline key fob itself the clock display began to blink. Pressing the first button increases the number, and using the second key decreases this value.
- After setting the “clock” parameter, you must press the third button again. You can now change the minutes. The desired value will flash on the screen. Use button one to increase it, and key two to decrease it.
- Having set the current time, press the third button again. This puts Starline into alarm settings activation mode. Here you can set the parameters that interest us using buttons 1 or 2, where the first one increases the value, and the second one decreases it.
- By pressing the third button again, we set the minutes for the alarm clock, using the first two buttons in the same way.
- A short click on the third button will activate or deactivate the alarm again.
- Pressing key three again will enter the alarm timer setting mode. Similar to the previous steps, we set the hours and minutes for the Starline system.
- Exit from the setup mode is automatic - just do not press anything for about 8-10 seconds.
Setting the time on the Starline E, D, B series
Other models have a different programming algorithm, different from the a61 or a91 versions. Setting up Starline E91 goes like this.
- Press and hold button number 4. The Starline key fob will emit one long and two short beeps.
- The sound will be repeated a second time, and then the time indicators will flash on the screen. Using buttons two or three you can lower or increase the value, setting the clock indicator in relation to the real one.
- A short press of button 4 will switch to the minutes setting mode. The procedure is also carried out using keys 2 or 3.
- You can set the time, alarm functions, set the timer, adjust the volume and type of key fob signals.
- Additionally, you can configure the date or year indicators. All Starline parameters are adjusted using buttons 2 or 3, where the second key lowers the values, and the third – increases.
- When all indicators are set, you must not touch any buttons for 8 seconds - the system will automatically fix the current values. Detailed instructions can be seen in the training video.