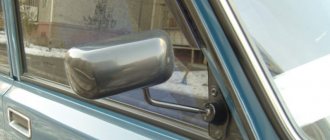
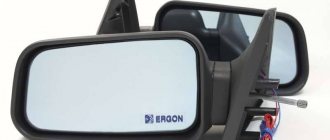
There is no time to explain, just repairing the mirror adjustment by replacing the inside (skeleton), without unnecessary stories. Why buy new mirrors when you can make old ones? Plus the fact that I think that the original mirrors are best suited to the design of the Nine. Everyone else looks kind of like a collective farm. I looked for these skeletons in all the stores, they were nowhere to be found, and today, while I was buying up pendant parts (more on that later), I walked around the market and found what I was looking for. Step 1: remove and disassemble the mirrors. Remove the plug, unscrew the nut and remove the mirror element. Then we carefully pull off the rubber boot and take out the broken insides.
Step 2: Take the purchased repair kit and carefully disassemble it for ease of installation. Then we install both parts in place. We coat all rubbing parts with lithol. In photo 4, we do not tighten the bolt too much, so that the hinge rotates without much effort.
To control the situation on the road, each car is necessarily equipped with rear-view mirrors. Two are located outside on the sides or one more is located inside the cabin. As a result, the driver receives a 360-degree view.
But it happens that the integrity of these mirrors is violated. This can happen as a result of an accident, banal looting, or some kind of accidental blow to them caused by the driver himself.
In any case, it is advisable for you to know how they are removed, disassembled, installed in place, adjusted and even insulated. Today our article will be devoted to these issues.
Replacing side mirror glass using the example of Priora, 2110, Ford Focus and Honda Fit
- 1. Apply pressure on the lower part of the mirror until a gap forms on top;
- 2. Insert a screwdriver into the gap that has formed and, using lever pressure with a screwdriver, disconnect the fastening clamps;
- 3. Remove the mirror by disconnecting the electrical contacts;
- 4. Then, in strict reverse order to the previous one, install the mirror element in its place.
- 1. Press down the lower part of the surface of the mirror element until a gap forms at the top between the glass and the side mirror housing;
- 2. Then, using a curved object, or if there is none, a screwdriver through the resulting gap, apply pressure to the center of the mirror from the inside. With this impact, its retaining clips should become detached. It is highly not recommended to press on the side with a screwdriver, as there is a possibility of damaging the mirror.
- 1. Press on the side of the mirror surface closest to the car body. It should come off on the opposite side;
- 2. Grasping the protruding side of the mirror, pull it in a horizontal direction opposite to the location of the car. The latches should come loose. After these simple manipulations it should be in your hands.
- 1. Gently press the upper part of the mirror surface with your hand, while the lower edge should stick out;
- 2. Grasping the lower part of the mirror, disconnect it from the clamps and hooks securing it to the drive;
- 3. Disconnect the electrical contact for the heated mirror.
AutoFlit.ru
What mirrors are suitable for the VAZ 2109
The car driver needs to see what is happening on the road behind him when he is overtaking, turning around or reversing. In this case, the mirrors of the VAZ-2109 serve as his eyes. After all, if God did not give a person eyes on the back of his head, deciding that eyes were not needed at the back, then this is fair if a person moves on his own two feet. It’s a completely different matter when you have to sit behind the wheel; you can’t do without the ability to see. “Nine”, like all cars of this class, is equipped with three reflective devices: an interior one and two side ones.
Interior rear view mirror
The rear view mirror is installed in the cabin. In order for it to serve not only for passengers who want to fix their makeup, but to actually help the driver keep an eye on the road, the rear window of the car should not be tinted, and there should be no curtains or objects on it that block the view.
The rear view device is mounted in the center of the car, on the windshield. The case is made of durable plastic with mirror glass inserted inside. The articulated holder allows it to be adjusted according to the driver’s height and driving style. The driver usually turns the mirror towards himself at a slight degree to ensure a good view.
Interior mirrors have been refined and improved in recent years. Manufacturers offer car owners so-called panoramic reflectors, which provide a wider view of the road than conventional ones, with or without anti-reflective coating.
Side mirrors
But the interior mirror still does not provide a complete view of the road, and to expand it, two more mirror devices are installed on the car body next to the front doors at the driver’s eye level. Standard side mirrors have a small adjustment range and limited options
Therefore, the attention of car owners is attracted to more modern and improved products with such additions as:
- anti-reflective coating that protects the driver from unexpected glare from the headlights of a car behind;
- heated side mirrors, protecting them from icing, which reduces visibility;
- turn signal repeater.
All improvements make driving easier and safer. There are a wide variety of viewing reflector styles available for sale at different price ranges. They can be oval or rectangular, with rounded corners, with or without legs.
Formula 1 style side mirrors
These non-standard side mirrors first appeared on Formula 1 racing cars and immediately attracted the attention of car enthusiasts. f1 models are intended for those who:
- energetic and prefers a sporty style,
- strives for individuality in everything;
- ready to improve the aerodynamic properties and change the appearance of the standard nine with the help of tuning (from English - adjustment, tuning).
Malfunctions of heated rear window and electric mirrors
Checking the rear window heating grid lines
If during operation it was noticed that one of the grid lines does not work, you can detect the gap by performing the following steps. If none of the grid lines are working, a complete diagnostic of the system should be performed before starting repairs.
- Set the ignition to the on position.
- Turn on the heated rear window.
- From inside the car, connect a voltmeter to each end of the grid line. The voltmeter will show the voltage supplied by the battery if the grid line is open.
Note: Be careful when touching the voltmeter contacts to the grid line. If you apply the contacts roughly, you can scratch the mesh, which will lead to a break in the chain.
- If the grid line appears open, the voltmeter contacts should be moved to one side of the line and the test repeated closer to the other side of the window. Continue checking, each time bringing the voltmeter contacts closer to the side of the window opposite the one from which the measurements were started. The break point of the grid line is the place where the voltmeter begins to show 0 instead of the voltage supplied by the battery.
- If the grid line appears open, the voltmeter contacts should be moved to one side of the line and the test repeated closer to the other side of the window. Continue checking, each time bringing the voltmeter contacts closer to the side of the window opposite the one from which the measurements were started. The break point of the grid line is the place where the voltmeter begins to show 0 instead of the voltage supplied by the battery.
- Use a marking chalk to clearly mark the break point on the rear window. The marking should be on the glass, not the grid line itself, and the marking should be made far enough that it can be removed without ruining the fix.
- Use a marking chalk to clearly mark the break point on the rear window. The marking should be on the glass, not the grid line itself, and the marking should be made far enough that it can be removed without ruining the fix.
- Repair the break in the grid line using a grid line repair kit. Refer to “Repairing Rear Window Defogger Mesh Lines” in this section.
- Repair the break in the grid line using a grid line repair kit. Refer to “Repairing Rear Window Defogger Mesh Lines” in this section.
Heated exterior mirrors
Electric exterior mirrors
Electrically adjustable outside rear view mirrors are not adjustable
Installation of heated mirror elements
To the list of articles
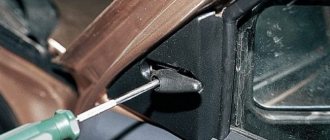
We remove the mirror. To do this, pull off the plastic handle of the mirror adjustment lever. Use a screwdriver to remove the plastic cover underneath. Unscrew the 3 screws securing the mirror. Everything is simple here.
Next, remove the mirror element. To do this, remove the cover on the back of the mirror by prying it off with a screwdriver; unscrew the nut and pull out the mirror element. It is convenient to remove the element when the adjustment lever is in the extreme position.
When installing the mirror, carefully lower the wires inside the door. Next, we lead them through a protective tube (corrugation) into the interior and connect them to the rear window heating button through a new button. Ergon mirror elements have a resistance of 8-9 ohms and consume low current, so connection via a relay is not necessary. The S1 button is conveniently located on the left side of the instrument panel, where the rear window heating button is located. The wire in the cabin can be routed along the bottom of the instrument panel on the left, under the heater levers in the center, in the niche under the glove box on the right (it will run in a straight line with a minimum length). Don't forget to connect the ground from the body to the doors, because... loops conduct current unreliably.
Often heated mirrors come in an anti-glare version and with a left aspherical mirror. The photo below compares an aspherical (top) and a conventional (bottom) mirror. An aspherical mirror produces a smaller image, and at first it appears very distorted. However, the area covered by the mirror is much larger, which helps when cornering, for example, at merging streams. Anti-reflective coating gives a darker, more pleasing picture.
PS: of course, everything can be done simpler and faster, but the above option assumes guaranteed reliable installation of the electrical part.
And update from 10.2012: a HU-3/WF-3 connector was installed on the wires leading to the mirror, which makes it easy to remove the mirror. You don't need to pay attention to the third wire - it's for illumination.
Sources
- https://allanda-auto.ru/avtosovety/kak_zamenit_bokovoe_zerkalo.html
- https://vazikov.ru/vaz-2108-2109-21099/ustanovka-bokovyh-zerkal-na-vaz-2109.html
- https://lada-2108.ru/tuning.php?id=4
Internal
Let's start with the rearview mirror installed inside your car.
Interior rear view element
There are several reasons why the driver will want or have to dismantle this element:
- The desire to replace with a more advanced, new model;
- Installation of electronics, parking sensors;
- The glass or plastic case is damaged, broken and does not allow further use of the component;
- There is a need to install sensors that are not included in the standard equipment of your car.
Replacement
Do not rush to remove the old mirror if you have not yet purchased a new product. Sometimes you have to wait for weeks because of the speed of delivery, and sometimes it’s enough to go to the market or store, where you will immediately find the desired product.
VAZ 2114 were produced until 2009, which requires the use of a standard type of fastening consisting of two bolts. This method of fixation has been used since 1976.
The downside of bolt-on mounting is the impossibility of installing an interior mirror from a foreign car. It’s good that there are many domestic products on the market that perfectly match the VAZ 2114.
You can start working.
- Remove the plug from the bolts. Although it is not always present.
- Holding the mirror body with one hand, begin to unscrew the mounting bolts with the other.
- Remove the old mirror.
- Check the condition of the seat and clean it.
- If the old bolts are covered with rust, it is better to replace them with similar new ones.
- Screw in the new mirror using the bolts.
- Insert decorative plugs so that the bolt heads do not spoil the appearance of the interior.
The simplest fastener
The bolts should be fixed as tightly as possible to avoid damage to the glass as a result of shaking and vibration.
Adjustment
The interior rear view mirror is tilt adjustable.
- The ideal setting is when, when you look into it, you can see everything that is happening behind your car;
- Some cars have high seats, which means you can see part of your ear and headrest in the reflection. This is a normal phenomenon, so there is no need to change the settings;
- A panoramic product with backlighting is best suited for the role of a rear mirror, since the glass used is flat and there is no image distortion, which has a positive effect on safety.
Price issue
First of all, we will orient you a little on the price tags that are presented on the market today.
The cost may vary depending on the manufacturer, technical features of the product and the region of its sales. Therefore, prices are average.
Obviously, the characteristics of the panoramic interior mirror provide a better view, and the presence of heated exterior mirrors provides comfort and does not require constant wiping. It is better to pay more, but buy new functional products.
How to replace the side rear view mirror on a VAZ 2108-VAZ 21099?
Removal: 1) First, remove the side mirror adjustment knob.
2) Then use a screwdriver to remove the side mirror cover.
3) And then unscrew the three screws that secure the side mirror to the body.
4) Next, remove the side mirror from the car.
Installation: 1) Install the new side mirror in the reverse order of removal.
Important! 1) Install the new side mirror on the car carefully, do not damage it!
For newbies! Question: What does the standard side rear view mirror look like, which was installed from the factory on VAZ 2108-VAZ 21099 cars? Answer:
The need to remove the side rear view mirrors of a VAZ 2110 may arise for various reasons, for example, for painting, installing heating, or completely replacing them. Disassembly is therefore necessary to carry out repairs or any other modifications.
How to remove the rear view mirrors of a VAZ 2110 - detailed instructions
- Pry up the rearview mirror control knob cap and unscrew the mounting screw with a Phillips screwdriver.
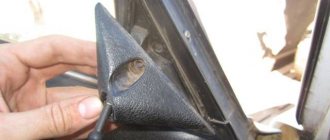
- Remove the triangular plug by prying it up with a flat-head screwdriver, carefully releasing the latches as you do so.
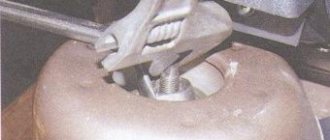
- Next, unscrew the three screws that secure the mirror to the base, using the same Phillips screwdriver.
There are several ways to remove the mirror element from the housing:
- Pressing on the central part of the mirror from the inside, unclip it using a curved screwdriver. In this case, you need to be as careful as possible so as not to accidentally break the mirror element itself.
- The second method is more risky, but no less effective. To get the mirror, you need to not forcefully, but sharply hit the mirror body on some soft elastic surface.
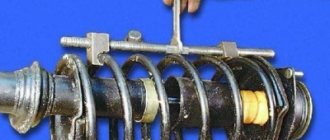
Removing the mirror housing from the triangular mount is quite simple; you just need to unhook the spring, unscrew the adjusting rod and remove its pin.
The rear view mirror is assembled and installed in the reverse order.
Buy side rear view mirror VAZ 2110
Key words: rear view mirror, VAZ rear view mirror, rear view mirror 2110
Lateral
There can also be many reasons for removing side mirrors. But mainly this is replacement, painting or installing a heating system.
Regardless of the situation specifically with your VAZ 2114, the first thing you will have to do is remove the elements. How to do it?
Dismantling
Removing side mirrors is not a difficult task. Here you only need a screwdriver to work. Perhaps not alone.
- Pry off the plug located on the side mirror control knob.
- Behind the plug there is a screw that needs to be unscrewed with a Phillips screwdriver.
- Remove the triangular plug. In the case of the VAZ 2114, it is held in place by special clamps. So to remove it you need to carefully unscrew the latches. Use a flathead screwdriver to pry the plug and remove it without too much trouble.
- Next, three mounting screws appear in front of you.
- By unscrewing them, you will thereby remove the side mirror.
- Do the same procedure with the second rear view element.
As you can see, removing the components is quite simple; simple fastening is provided. This is largely why they love domestic cars, since even a person without much experience can disassemble and assemble most components.
Disassembly
It is not a fact that you will need to completely change the rear view element assembly. Therefore, it is necessary to figure out how to properly and accurately disassemble the side mirror.
There are several ways to do this, each of which has its own characteristics.
- Press the inside of the plastic case and snap off the holders with a flat-head screwdriver. This method cannot be called reliable, since the probability of breaking the mirror itself is quite high.
- The second method is even more risky because it involves quickly striking the glass onto the surface. Choose a soft surface, such as rubber. This will allow you to quickly and easily remove and disassemble the element. Strike lightly but quickly.
- To replace the plastic housing or main fastener, you need to remove the adjusting rod and pin. Assembly is carried out in exactly the reverse order.
Heating
If you have driven foreign cars, especially in winter, you could appreciate all the delights of having heated exterior mirrors.
The VAZ 2114 does not have such an option, but this did not stop third-party manufacturers from producing a whole range of products equipped with heating.
Frankly speaking, it is much easier to spend about 800-900 rubles on buying a ready-made heated side mirror than to try to make the heating yourself. This is better in terms of reliability and safety.
The only peculiarity of the installation is that, unlike a conventional rear view element, you will need to not only install the housing on the seat, but also additionally connect the wiring to the power system of your car. That's all.
Heated mirror
For reference, we add that today there are kits for self-insulation on the market. It consists of three components:
- Wiring;
- A light bulb (it is this that creates the effect of heating the mirror);
- Insulating material (prevents the heat from the lamp from being wasted and leaving the housing).