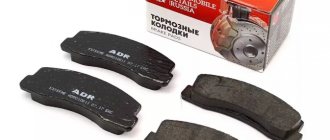
Replacing the brake pads of the rear wheels of VAZ “OKA” 1111 1988-2008
Check the condition of the brake pad linings each time you remove the brake drum.
Replace the pads in the following cases:
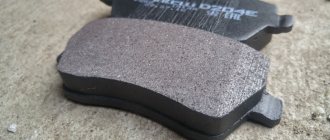
– the thickness of the linings is less than 1.5 mm;
– the surface of the linings is oily;
– the linings are not firmly connected to the base;
– the linings have deep grooves and chips
The brake pads on both rear wheels must be replaced at the same time.
When replacing pads, the manufacturer recommends replacing the grease in the hub bearings (see “Replacing grease in the rear wheel hub bearings”).
You will need: keys “13” and “27”, pliers, screwdriver, hammer, jack, stand, wheel chocks.
1. Lower the parking brake lever all the way down (the car is released).
2. Remove the rear wheel.
3. If the brake fluid level in the reservoir is at or close to the “MAX” mark, pump out some of the fluid from the reservoir.
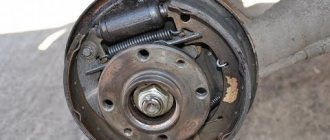
4. Remove the brake drum (see “Removing, installing and repairing the brake drum”).
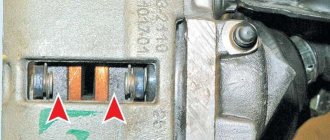
5. Using a screwdriver, remove the upper tension spring.
6. Remove the lower tension spring in the same way.
7. Compressing the leaf springs.
8. Turn the struts of both pads and remove the springs.
9. Remove the front block and spacer bar.
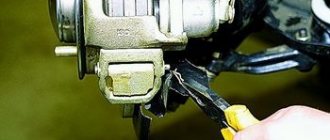
10. Remove the rear shoe by disconnecting the parking brake cable end from the shoe manual drive lever.
11. Unscrew the nut of the lever axle of the manual drive of the shoes.
Please note: there is a spring washer installed under the nut.
12. Remove the spring hook.
13. Remove the hand drive lever from the block.
14. Remove the axle from the lever.
15. Install the manual drive lever onto the new rear shoe in the reverse order of removal.
16. Remove the block stop with the nut lock from the expansion bar.
17. Turn out the adjusting nut of the pad expansion bar to half the length of its threaded part to increase the length of the bar. This is necessary for ease of assembly, since the short bar will fall out of the slot of the pads.
18. Lubricate the threaded part of the expansion bar with Litol-24 lubricant.
19. Install the pads in the reverse order of removal. When installing the spacer strip, make sure that its flat side faces down.
20. Using a file, remove the shoulder caused by wear from the brake drum.
21. Lubricate the trunnion with Litol-24 grease.
22. Screwing the adjusting nut onto the expansion bar, bring the pads together so that they do not interfere with the installation of the brake drum. Install the brake drum and adjust the play in the wheel hub bearing (see “Adjusting the play in the rear wheel hub bearings”).
23. Adjust the gaps between the brake pads and the drum (see “Adjusting the gaps between the pads and brake drums”).
24. Install the wheel, check the operation of the parking brake and, if necessary, adjust it (see “Adjusting the parking brake”).
How to change rear pads on an Oka
Developed in conjunction with
Car service
- Diagnostics and repair of electrical equipment Repair of electric drives
- Installation of car radios
- One way car alarms
- Body repair Body geometry
- Bumper painting
- Soldering bumper cracks
- Windshield replacement
- Inspection and repair of chassis Replacement of grenades
- Replacing the crankshaft
- Replacing clutch discs
- Replacing the working cylinder
- Replacing the pump
- Argon welding
- Vibration isolation
- Wheel balancing
Developed in conjunction with
Car evacuation
- Car tow truck
- Motorcycle tow truck
- SUV tow truck
- Minibus tow truck
- Truck tow truck
- Crane manipulator services
Developed in conjunction with
Rental of special equipment
- Earthmoving equipment Motor graders
- Bulldozers
- Crawler excavators
- Wheeled excavators
- Mini loaders
- Mini excavators
- Trench excavators
- Front loaders
- Backhoe loaders
Developed in conjunction with
Information
- Vacancies
- Photo gallery
- FAQ
- Tips and articles
- News
The causes of wear on the brake pads of the VAZ-1111 (Oka) will be:
— the quality of the roads on which the car is operated;
— temperature conditions throughout the year;
The wear of the front pads of the VAZ-1111 (Oka) occurs faster because most of the inertial force that the brakes dampen falls on the front of the car.
So the front pads of the VAZ-1111 (Oka) should be changed two to three times more often than the rear ones.
The VAZ-1111 (Oka) pads need to be changed in pairs - immediately changed either on the front wheels or on the rear ones. The pads on a pair of wheels should not be allowed to have different degrees of wear. It is also necessary to change the pads on time; worn-out VAZ-1111 (Oka) pads severely damage the VAZ-1111 (Oka) brake discs and, most likely, then the cost of repairs can increase several times.
It is quite difficult to describe the entire process of replacing brake pads on a VAZ-1111 (Oka) in detail, since the procedure for replacing rear brake pads and replacing front pads is slightly different, especially if there is a disc and drum system, and also each car model has its own nuances .
However, there are still some general points:
— the hood of the car is opened and the brake reservoir cap is unscrewed;
— the car’s brake mechanism is cleaned of dirt;
- unscrew the bolts (caliper guides or brake drum bolts) to get to the brake pads
— use a screwdriver to remove the pads (brake mechanism);
When is it necessary to replace the rear brake pads on a VAZ 2114
The rear drums do not wear out as quickly as the front plates, since the front circuit operates earlier than the building, but the rear drums need to be replaced exactly within the specified service life.
It is worth noting that the rear brake system is no different from the VAZ 2108, 2109, 2113, 2114, 2115 models.
In this article we will tell you how to correctly replace the rear brake pads in a front-wheel drive VAZ model car.
Rear pads
There is no specific time for replacing brake pads, but as a rule, the pads are replaced after about 70 thousand km. mileage But basically there are various reasons for replacing parts in brake drums:
- Firstly, it depends on the driver’s driving style;
- High-quality pads;
- Quality of friction linings and drums;
- Conditions for using the car.
Often, sharp braking will lead to rapid wear of the fractional linings.
Parts that rub against each other in a damp, humid environment are consumed faster.
If the drums are not worn out evenly, then new pads will also be produced incorrectly. At the moment, VAZ 2114 rear brake pads are manufactured by many different companies. But the best quality will come from the original manufacturers.
Now there are many different companies that have proven themselves to be of the best quality at affordable prices. But you shouldn’t fall for inexpensive parts, because they have small but important flaws.
They are expressed as:
- metal;
- overlays;
- The spare parts do not correspond to the factory parameters.
Rear brake pads for VAZ 2114 how to choose
If you are wondering which rear brake pads for the VAZ 2114 you should choose, I recommend that you familiarize yourself with this table of the most successful brands of pad manufacturers for the VAZ 2114.
| Trademark | Front number | Rear number | Consumer Reviews |
| Ferodo Premier | TAR527B | FSB240 | They do not damage the disc, are silent, and provide uniform braking. But there are a lot of fakes. |
| Brembo | P41004 | S41503 | Wear-resistant, good heat dissipation, do not overheat at high speed |
| Lukas TRW | GDB1446 | GS8210 | Stable braking properties at any temperature changes. |
| ATE | 13046029652 | 03013702312 | Optimal price/quality ratio. Silent, efficient braking. Discs are spared |
| Girling | 6114461 | 5182109 | High quality. Even if the brake drum is in poor condition, they rub in and do not creak. |
| Ferodo Premier | FOB 1325 | FSB240 | Durable and withstands extreme driving well. |
| Bosch | 0986491700 | 986487813 | Durable linings hardly wear out after a run of 20 thousand km. |
Dimensions of rear brake pads VAZ 2114
All pads have different sizes, and therefore they may not fit your car; in this case, when purchasing pads for a VAZ 2114, I recommend that you familiarize yourself with their sizes.
| Characteristics | Front disc | Rear drums |
| Length, mm | 104,3 | 179 |
| Height, mm | 62,1 | 146 |
| Thickness, mm | 17,5 | 68 |
Brake drum
The rear brake drum is considered one of the main elements of the wheel braking system, and interacts at the moment when the pads are released. The car performs braking due to the interaction of the shoes with the drum when the brake is pressed.
The drum brake system is less effective than the disc brake system and is outdated. But it is less vulnerable.
Replacing brake pads (disc system)
1) Having chosen the pads recommended by the manufacturer, take a set of tools, unscrew the wheel nuts, jack up the car and remove the wheel.
2) Unscrew the cap of the brake fluid reservoir (to make it easier to press in the brake piston).
3) Unscrew the caliper guides, and if there are fixing brackets, remove them with a screwdriver. If your car is equipped with a pad wear sensor, disconnect the connector.
4) Use a screwdriver to remove the brake pads (insert a powerful flat-head screwdriver between the pads) in order to press the brake piston. Remove the old brake pads. Clean the installation site from dirt.
5) Install new pads. It is recommended to lubricate the brake caliper guides, but very carefully so that the grease does not get on the contact surfaces of the pads, otherwise the brakes will not work.
6) Reassemble the brake system in the reverse order, install the wheel, and remove the car from the jack.
7) Bleed the brakes to get the new brake pads to break in.
Replacing drum brakes with disc brakes. Correct improvements
Efficiency increases due to more optimal application of braking forces; Brake response time is reduced; The braking distance is reduced; The ventilation of the brake system is improved, this is important for drivers who work the brakes a lot, for example, on mountain roads.
If the brake discs are installed incorrectly, uneven braking may occur, leading to skidding; Problems with setting the hand brake. You will have to either redo the “cable” system, or make a hydraulic handbrake. Both options are quite complex; It is not always possible to pass a technical inspection
Although now they do not inspect the car too meticulously, but pay more attention to the correct operation of the components, difficulties may still arise; Also, such a modification is another reason for the traffic police inspector to quibble. Here the issue comes down to unregistered design changes; In case of an accident, you will become the culprit of the accident, again due to design changes
Find out in advance how your insurance company will react to such tuning.
- The handbrake is released. They jack up the car; for greater convenience, you can lift the entire rear of the car by the beam (bridge). For greater security, you can place a block of wood there. Remove the wheels;
- Next, the drum and parts of the brake mechanism (pads, spacers, springs) are dismantled;
- The plug is removed from the hub or axle shaft. Dismantling the hub (half shaft) fastening is carried out in accordance with the manufacturer's recommendations. Typically, hubs are secured with a nut located on the axle. The axle shaft is most often attached to the drum plate;
- Using a special puller, remove the hub. If you have an axle shaft, then this is even easier; on most models it can be removed quite easily even by hand;
- It is advisable to service the hub at the same time; replace the bearing with a new one. In this case, you will not have to disassemble everything again to replace it soon;
- The drum plate is removed, this mainly applies to models with hubs, otherwise it is removed along with the axle shaft. To remove the drum you will need to unscrew 4-6 bolts. Please note that due to difficult operating conditions they may have become “stuck”, so they may have to be cut off with a grinder. Do not forget to unscrew the brake pipe from it before doing this;
- Install a new brake pipe;
- A new shield is screwed to the axle;
- The handbrake cable is replaced with a new one. It can be borrowed from any model with rear disc brakes;
- The disk is installed, after which the hub or axle shaft is mounted;
- The caliper and brake pads are installed. The caliper is attached to the casing using several bolts;
- We install the handbrake mounting plate and adjust it;
- The brake lines are connected and the brakes are bled to remove any remaining air from the system.
AutoFlit.ru
Replacement of rear pads (drum system)
1) Carry out the same procedure as in the first two points when changing the front ones.
2) Unscrew the brake drum fixing bolts and remove it. The drum may become stuck or cannot be removed as a result of misalignment of the pads, so tapping with a hammer may be necessary.
3) Remember the location of all locking springs (if installed incorrectly, the brake will not work).
4) Release the handbrake cable, remove all springs and rods of the rear brake mechanism with a screwdriver. Remove the pads.
5) Install new pads and assemble the brake mechanism in reverse order. Install the wheel (without removing the car from the jack).
6) Put the car on the handbrake and try to spin the rear wheel, checking the operation of the rear mechanism.
7) Remove the car from the jack.
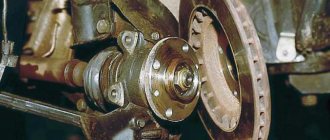
How to remove a rear brake drum
The first and main condition for removing the brake drum is reliable fixation of the car with the removed wheel. At the most inopportune moment, the jack can fall off, break, and the consequences of such an “accident” will be the most tragic.
An experienced driver always has an iron “goat” (tripod) in his garage or, at worst, “folk” remedies such as a fragment of a cut tree trunk. True, not everyone uses them correctly: instead of lowering the car onto a support, they place it to secure an already raised car, depriving themselves of the opportunity to verify its stability.
Signs of brake pad wear:
- increasing the braking distance of the car;
— incorrect behavior of the vehicle’s braking system when braking;
— the appearance of metal shavings on brake discs and pads;
- knocking noise when braking hard;
- squeaking noise when braking.
If at least one of these signs appears, you must immediately inspect the brakes and, if necessary, replace worn parts.
Visually you can detect the following damage to discs and pads:
— the thickness of the pad lining is below the required technical specifications;
After the pads are replaced, they take time to get used to. Therefore, braking may not be effective. If, after time, braking has not improved, or there are any knocks or vibrations, then the replacement was made incorrectly and the procedure must be repeated.
— chips and scratches on the block or lining;
— reducing the thickness of the brake disc below the required technical specifications;
- the appearance of a protruding edge along the edge of the disk.
Replacement of rear brake pads, for fun, correct it please
IDIOT advice was given to you by an IDIOT, which you CANNOT follow. Unfortunately, the advice is well known. And extremely DANGEROUS. 1. Serviceable pads do not need to be filed. 2. Worn, at least slightly worn pads are replaced AS A SET. Better on both sides at once. Because the seed’s flame and mine were lower here - the seed there spoke well about different resistance coefficients, etc. And I - what is acceptable, if one pad is completely new, do not replace it as a set. The pads must be the IDENTICAL, from the same batch with the same wear, without thermal overheating. If the wear is uneven, you should consider replacing the brake cylinder or looking for the exact cause of the uneven wear. Uneven wear is dangerous! By the way, it is better to change the pads at 80% wear. You will live longer. Sergey 77
Not at all. Since many people often change pads one at a time, they sell them at retail. And when I needed 1 pad, and the guy only sold it as a set, it began to cost 3 rubles more.
: *** An even more correct option is to put shoes (stones, other stops) under the wheels (on the side opposite to the one being jacked), because there is ALWAYS a risk that when the load on one of the wheels is loosened, the differential will play and you will drop your car .
: *** Buy a 27mm wrench and a socket and use them to unscrew the nut. Much more convenient, the tool will be useful in the future.
Yes, there the nut can almost be unscrewed by hand. I always have an adjustable wrench just in case (I use it to change the Carlson sensor), but I don’t carry a 27 wrench. BUT I will partially correct it.
: ***Throw out the old oil seal in any case - the probability of soon repeating all the described movements is too high due to the cheap part (which, after 60-90 tkm, see above, has already turned from rubber to wood).
Questions about choosing and replacing brake drums
During operation, brake drums are subject to significant mechanical and thermal loads, which leads to wear and damage. The main problem with drums is wear on their working surface.
Wear can be uniform or uneven; in the first case, the inner diameter of the drum simply increases and the pads have to travel a longer distance before contacting the friction surface, and in the second case, grooves, irregularities, etc. are formed on the friction surface. Also, the inner surface of the drum may become oval, which impairs braking efficiency. In all these cases, the drums are bored or replaced.
When boring a drum, a number of repair dimensions established by the vehicle manufacturer are used, which usually come in 1 mm increments and with a tolerance of 0.25 mm. When the maximum repair size is reached, the brake drum must be replaced, since its walls become too thin and the entire structure loses strength - such a part is dangerous to operate.
It is also necessary to change the drum in cases where too deep grooves, significant scuffs and, especially, cracks and chips form on it. To detect these defects in a timely manner, it is necessary to regularly (during each routine maintenance in accordance with the vehicle manufacturer’s recommendations) inspect the drums through the inspection windows in the wheel brake shield.
To replace, you must select a drum of the type and catalog number installed by the vehicle manufacturer. A part of a different size and with a different arrangement of holes on the flange either cannot be installed at all, or after installation the entire brake system will not work correctly.
For passenger cars with rear drum brakes, it is recommended to replace both drums at once; for this purpose, the parts are sold as a set (in pairs). The brake drum must be replaced in accordance with the vehicle maintenance and repair instructions; when installing a new drum, all necessary adjustments to the brake mechanisms must be made.
If all recommendations are followed, the installation of the brake drum will be completed quickly, and the brakes will operate reliably in all conditions.
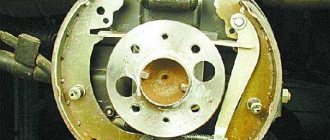
Rear brake mechanism VAZ 1111
| You will need | |
| |
Before starting work
Lower the parking brake lever all the way down (the car is released).
Remove the rear wheel.
Inner diameter of the brake drum, mm: nominal 180 maximum permissible 181.5
Be sure to replace the drum if its inner diameter has reached the maximum permissible size.
A defective brake drum will reduce the life of the brake pads and result in ineffective and uneven braking.
| Execution order | |
| 1. Clean the brake drum and wheel hub protective cap from dirt. 2. While turning the drum, carefully knock off the protective cap of the hub and. 3. . remove it from the drum. 4. Unbend the cotter pin and remove it from the hole in the hub axle. 5. Unscrew the hub nut. 6. Remove the thrust washer. 7. Remove the front (outer) wheel bearing. To do this, slightly move the drum towards you, and then move it into place. 8. If removing the drum is difficult, bring the pads together by rotating the adjusting nut of the expansion bar and knock the drum down with a rubber hammer. 9. Remove the brake drum. 10. Carefully inspect the drum. Be sure to replace the drum if chips or cracks are found on it. 11. Inspect the working surface of the drum. If there are deep scratches, chips or noticeable ovality, the drum must be replaced. 12. The drum can be bored and ground, but its internal diameter must be no more than 181 mm. 13. Replace wheel rim studs with a loose fit in the drum or with damaged threads. 14. When replacing the drum, press the studs out of it, screwing the nuts onto them flush so as not to damage the threads. Also remove the oil seal, rear bearing and inner races of bearings (see subsection 5.2.3.). 15. Press the studs into the new drum with the cut part of the head towards the center. Press in the outer rings of the bearings and install the rear bearing with the oil seal (see subsection 5.2.3.). 16. If a bead has formed on the working surface of the drum due to wear, remove it with a file. 17. Bring the pads together by screwing the adjusting nut onto half of the threaded part of the expansion bar. 18. Lubricate the axle with Litol-24 grease, install the brake drum and adjust the clearance in the wheel hub bearings (see subsection 5.2.4.). |
How does a drum brake work?
A closed type brake drum is attached to the wheel hub. It is the outer shell within which the braking process occurs. The brake pads are attached to the support disk located inside the drum. Their shape is convex, repeating the curvature of the inner wall of the drum. On the surface of the pads there are brake linings, which work to increase friction.
The pads are controlled by one or two brake cylinders. When you press the brake pedal, the cylinders press the pads against the surface of the brake drum, causing the wheel to slow down. The harder the pedal is pressed, the tighter the pads will be pressed against the drum. When the pedal is released, the springs return the pads to the depressed state.
Disadvantages of drum brake:
- The drum and pads become very hot during braking, especially emergency braking. This is due to the closed type of the drum. When the brakes are hot, they lose some of their effectiveness;
- The braking distance is increased compared to disc brakes. This happens due to the uneven contact of the surface of the pads to the drum;
- Fear of water. If water gets inside the drum, this can lead to poor adhesion of the pads to the surface of the drum. The result is an increase in braking distance. To restore normal operation of the brakes, they must be dried. This is done by pressing the brake pedal several times. Heated parts will evaporate moisture from their surfaces faster;
- When the linings rub against the surface of the drum, dust is formed, which acts as a lubricant. This leads to deterioration in braking quality;
- The pads may stick. That is, the pads can remain in the pressed position. But such a drawback rarely occurs, and it is usually associated with the use of the handbrake. For example, if the car is left in the handbrake for a long time in frost or extreme heat.
Advantages of a drum brake:
Thanks to its good protection, dust does not penetrate inside the drum. As a result, the brake pads wear out more slowly, since there is no additional abrasive (dust)
This is especially important for those cars that are operated mostly on dirt roads; Since Porter brake pads adhere unevenly over their entire area to the inner surface of the drum, their wear is slowed down; Braking performance can be improved by increasing the width or diameter of the drum and pads; Drum brakes make it easier to install the parking brake. Yes, and stopping the car is possible using the hand brake.
As you can see, drum brakes have certain disadvantages, but they also have advantages. It is quite possible to adapt to these conditions