Choosing pads for Niva Chevrolet
Different types of braking systems are used on the rear and front wheels of this car. Based on this, the pads on them are also different: disc pads on the front wheels, drum pads on the rear wheels. The part that plays the main role in the braking process is the pads; they bear the main load and wear out the most during operation.
Pads for Niva Chevrolet
The pads differ from each other in the raw materials used in the manufacturing process, their service life and, accordingly, their price.
When choosing pads, you should focus on the following criteria:
- The lower the heating temperature during braking, the longer the pads will last.
- The need to increase the degree of pads in cold seasons.
- Sounds made by the brake system during braking.
- Maximum service life.
Replacing pads on the rear axle
To replace the rear pads, you will need to carry out the same preparatory work, after which the first thing you need to do is loosen the handbrake. Subsequence:
- We remove the spring near the lever from which two cables go.
- Using two “13” keys, you need to unscrew the bracket nuts, after which the cables weaken and do not affect the pads.
You can start directly replacing the pads
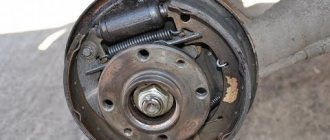
- You need to remove the drum from the axle shaft using a “12” key by unscrewing two bolts. The drum often sticks, so you need to tap it with a hammer around the entire perimeter.
- The working cylinder must be pushed inward on both sides using a flat screwdriver.
- You need to pry the tension springs by pulling them out.
- The block must be moved to the side opposite to the other block by the lower part, after which the two blocks are removed from the shield.
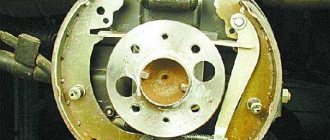
- After removing the pads, the brake flap and drum must be cleaned and degreased and checked for the presence or absence of cracks.
When to replace pads
The main signs of brake pad wear include:
- Increasing the duration of the braking distance. This occurs when the friction material is depleted, friction between the pad and the discs occurs with the metal part, leading to a decrease in braking coefficient.
- Not linear braking. This happens if one of the discs is clamped tighter during braking.
- Brake pedal damping. When the brake pads are completely worn out, the brake pedal loses its shock-absorbing properties and does not return to its original position.
- Low brake fluid level.
- Extraneous sounds during braking. A sign of complete wear of the friction linings.
- Dust on wheel rims. The dust can be dark or metallic. Dark dust occurs as a result of abrasion of the friction material, metal dust is a sign of abrasion of the discs.
What are pads
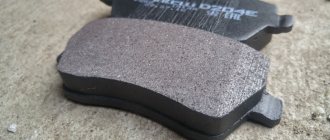
The brake pads are arched in the shape of the letter “C” and are installed in the rear wheel drums, where they do their work. The brake pad consists of the following elements:
- main part made of special steel;
- friction lining applied to the brake pads from the back of the head;
- fastening elements, which are various holes.
Rear brake pads
Let's briefly consider the principle of operation of the rear pads. So, the brake pads are located in the rear wheel drums, two in each. They are located with the inner side facing each other, and the outer one, with a friction layer, interacts with the wheel drum. The resulting interacting force, which is accompanied by the release of energy, ultimately leads to the car stopping.
When you press the Niva Chevrolet brake pedal, pressure is created in the brake system, which acts on the pistons of the working cylinders of the front and rear wheels. Next, the so-called extrusion of the pads occurs; the friction part interacts with the moving wheel drum (or disk) and leads to its braking. As the pads wear out, the friction layer wears off. The inside of the drum is also erased.
When is pad replacement necessary?
Before replacing the rear pads, an inspection must be carried out. A malfunctioning handbrake does not mean that the brake pads are urgently needed. They change in the following cases:
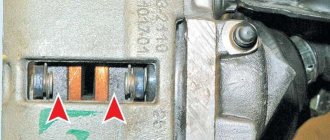
- If the thickness of the friction layer is less than the permissible value, that is, less than 1.5 mm.
- There is oil or other liquids on the lining.
- There are cracks, gouges or chips on the layer.
- Poor connection between the gasket and the base.
Only disassembly and detection of one of the above damages indicates the need to replace the pads.
Replacement of brake system elements
Replacing elements requires the availability of basic tools and careful implementation of repair actions. 1) It is necessary to place the Niva Chevrolet car on a flat surface and set second gear to the gearbox. Bars are placed under the wheels to secure the car in a stationary state. Set the handbrake to its lowest position. 2) Using a jack, lift the rear part and remove the wheel. Next, the drum is removed and a picture of the arrangement of the elements of the rear brake system is observed. Now you can remove the brake pads in two ways, let's look at both:
- First extraction path:
- One of the ends of the upper spring is pryed off with a screwdriver and removed.
- The spacer bar installed below the spring is removed.
- The support post, located in the middle, is held by hand on the back side of the shield and, using pliers, the outer post of the front block is rotated until the slots coincide with the protrusions.
- The tension spring with both cups is removed and the stand located on the reverse side is removed.
- The upper part is slightly retracted and the lower spring is removed.
- Next, retracting the rear part, the drive lever is pulled out and freed from the tension cable.
- Second extraction way:
- The support posts are removed from both edges.
- The rear block is pryed up with a screwdriver and removed, after first removing the spacer plate.
- The upper fastenings are removed from the working cylinder.
- The lower spring and both elements are removed along with the spacer bar and the spring.
- The tip of the cable is removed from the lever, and the brake pads assembled with the bar and spring are removed.
- Now holding one element, the spring and spacer are removed.
After removal, it is necessary to tighten the working cylinder with wire so that the pistons do not come out of their seats and the brake fluid does not leak out.
Next, replacement continues, but before installing new ones, it is necessary to check all parts: springs, spacers, struts. If there is damage or stretching, it is better to replace them. 3) Lubricant is applied to friction points, as well as to the threads of the spacer bar if old spacers are used.
Preparatory stage
The process of removing the front brake pads of a car from a Chevrolet Niva:
- Put the car on the handbrake. It is also recommended to set the vehicle to maximum speed.
- Install chocks under the wheels.
- Remove the bolts on one of the wheels. Sometimes this process turns into an almost impossible task. What could be the problem:
- Deformation of parts or joints. This can happen after a strong impact.
- Applying physical force when tightening bolts without getting into the threads.
- Formation of rust or oxidation of parts.
- Raise the “working” side with a jack.
- Remove the wheel.
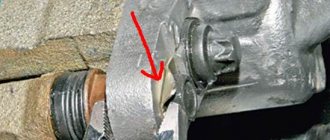
- Unscrew the caliper:
- get rid of the fixing cotter pin;
- remove the clamping brackets. It is also advisable to lubricate them on both sides.
- Remove the brake pads. This can be done using a flathead screwdriver. You need to pry it off from both sides of the disc, helping with your hands if necessary.
- Get rid of burning particles.
- Check the condition of the dust protection cuff.
Don't forget to clean the brake pad housings. This can be done using a pipette or syringe. The sockets also need to be lubricated with copper grease.
Bleeding the front brakes of a Niva Chevrolet
Bleeding Chevrolet Niva brakes is important if one of the following symptoms is observed:
- "cotton pedal" effect
- decreased braking efficiency,
- With each press of the pedal, the force increases.
Why do you need to bleed Chevrolet Niva brakes?
Air, compared to liquid, is easily compressed, so its presence in the line sharply reduces braking efficiency. The Chevrolet Niva brake system is built on a dual-circuit principle, ensuring safety in the event of depressurization. One circuit contains the working cylinders of the rear right (R) and front left (F) wheels, and the second - the rear left (R) and front right (F). The procedure for bleeding the brakes involves bleeding air through a special fitting of the working cylinder in the sequence: ZP-PL-ZL-PP.
To work you will need:
Special wrench 8 mm with tightening (you can also use an ordinary open-end wrench);
- Brake fluid for topping up;
- Small jar;
- Rubber hose of suitable diameter.
Algorithm of actions
1. Remove the dust cap from the fitting (for convenience, you can first remove the wheel). 2. Moisten the fitting with WD-40, put a wrench on it and tighten the tightening bolt. 3. Place the rubber hose onto the fitting, and lower its other end into a container with brake fluid.
4. The assistant in the cabin slowly works the brake pedal until significant resistance appears. After that, he fixes the pedal pressed. 5. Turn the key in the unscrewing direction one turn. The liquid along with the air will escape into the vessel, but this will prevent a new portion of it from entering the system. The pedal will go down.
6. Tighten the fitting. 7. Repeat these steps until bubbles stop coming out.
8. Move to the next cylinder.
Work must be carried out only after the liquid leak has been eliminated, if this has not been preceded by repairs. After repairing the brake system, bleeding will only be necessary when depressurizing. For example, after replacing the brake pads, there will be no air in the system.
Bleeding the brake system on a Niva Chevrolet car is carried out if air gets into the system as a result of any repair work or breakdown of components and their depressurization. The main signs indicating the presence of air in the system: a decrease in the working stroke of the pedal, at the same time the appearance of its softness; when the pedal is pressed repeatedly, it gradually reduces its stroke and increases its hardness.
If the work involves the repair of any one circuit, then pumping of only one circuit being repaired is allowed. Prepare a standard set of tools, new brake fluid, a silicone tube with a plastic bottle, drive the car onto an inspection pit or overpass and perform the following sequence of actions:
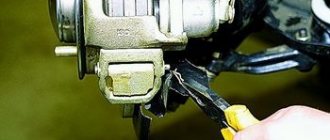
If the car is installed on lifts, that is, the rear wheels are suspended, then you must first unlock the brake pressure regulator by installing a flat-head screwdriver between the screw and the bracket.
- Remove the rubber caps from all brake cylinder valves.
- Open the brake fluid reservoir, check the level and top up if necessary. Also, while bleeding the system, monitor the fluid level.
- Now the assistant must create pressure in the system; to do this, intensively press the brake pedal several times and do not release it.
- In the meantime, you put a silicone hose on the valve, the second end of the hose is lowered into a bottle, previously filled to a third with new brake fluid, and by opening the valve you bleed the air from the system. The presence of air is determined by its bubbles, which exit the cylinder through the hose into the bottle.
- Then we tighten the valve and again create pressure in the system.
- We repeat this operation until liquid without air bubbles comes out of the system.
We carry out the work together with an assistant on an inspection ditch or lift.
Bleeding the brakes is necessary when replacing brake fluid, as well as to remove air that has entered the hydraulic drive during repair or replacement of individual components of the brake system.
We remove air first from one circuit of the system, then from the other. We start bleeding from the right rear wheel cylinder.
Remove the cap from the rear brake cylinder bleeder nipple
We put a transparent hose on the fitting, lowering its free end into the vessel
An assistant presses the brake pedal three to four times at intervals of one or two seconds and holds the pedal down.
Using an “8” wrench, unscrew the bleeder fitting 1/2–3/4 turn.
In this case, part of the brake fluid and air are forced into the vessel, and the pedal is lowered to the floor.
Installation of front brake pads Niva Chevrolet
It is important to remember that you need to change the pads on both sides at once, otherwise the braking process will not occur correctly, which will lead to greater wear on one of the pads and disruption of the braking functions as a whole.
- We immerse the pistons into the caliper. We do this as deep as possible, since new pistons are sometimes much thicker than the previous ones. This occurs as a result of worn out pads that need to be replaced.
- After proper installation, you need to reassemble the system in reverse order.
- In order for the pistons to take the correct position, you need to manipulate the brake pedals. You need to press several times for the best effect.
- After manipulating the pads, the brake fluid level often changes. After finishing work, you need to check it.
Brake force regulator (“sorcerer”).
In most passenger cars, the brake force regulator, or “sorcerer,” is located near the rear axle. Its main purpose is to distribute force between the front and rear wheels during braking. This is due to the fact that when braking, the car's center of gravity is directed towards the front wheels. In this case, the rear wheels are unloaded. The main purpose of the regulator is to prevent the rear wheels from locking, making the car more controllable. Typically, the “sorcerer” works on the trigger principle: it either passes pressure to the rear wheels or blocks it.
The principle of its operation is based on the shifting of valves that transmit fluid pressure to the contours of the rear wheels when the position of the car body changes. Main faults: jamming in any position. If the regulator is stuck in the open position, or its lever is faulty/not adjusted, then all wheels are blocked when braking. As a result, the car skids and pulls to the side when braking. Jamming in the closed position, or breakage/incorrect adjustment of the lever results in complete disengagement of the rear wheels. Before replacing the brake force regulator, you must ensure that it is working properly.
To do this, the rear wheels of the car are hung on jacks or a lift. Then you need to press the “sorcerer” lever all the way and ask an assistant to press the brake pedal. If, with the lever recessed, both wheels can be turned by hand, but after releasing the lever they are locked tightly, then the problem is in the adjustment of the lever itself. If nothing changes and the wheels are also locked or spin freely, the problem lies in the adjuster mechanism. If piston jamming, return spring breakage, signs of wear and mechanical damage are detected, the part should be replaced as an assembly. If the “sorcerer” is jammed as a result of dirt and deposits, it is worth cleaning it, rinsing it and replacing the rubber parts. After repair, it is necessary to flush and remove air from all brake system lines.
Problems with Niva Chevrolet front calipers
Quite often, Chevrolet Niva owners complain about sounds that should not occur when the brake system is operating.
The situation can be resolved using several methods:
- Change the caliper guides. This can be done by unscrewing all the bolts of the caliper guide elements. If it doesn't come out of the blocks well, you can use physical force and a hammer.
- Treat the caliper mechanism with lubricant. For this process, it is necessary to use a lubricant with a high level of temperature resistance.
- Install quality pads.
Installing ventilated discs
But what needs to be done when replacing brake discs on a Chevrolet Niva? Installing ventilated discs instead of standard ones is quite difficult; you will have to perform several costly manipulations:
- Replace wheel rims. Instead of size R15 you will need to put R16.
- Of course, you need to buy the discs themselves.
- You will also need a new set of pads.
- You still need to install new calipers and fasteners.
After installing all the elements, you can start operating the car. And do not forget to promptly check the condition of the brake mechanisms. If necessary, you need to replace the brake discs on the Chevrolet Niva. If the standard ones do not suit you, you need to install ventilated ones - they can not only eliminate overheating, but also significantly improve braking efficiency.
Tips for caring for brake pads
The service life of brake pads is influenced by many factors: the condition of the brake discs, the driver's driving skills, the operation and quality of the pads, climatic and weather conditions, as well as the storage conditions of the vehicle.
Tips for caring for brake pads
To extend the life of the pads you must:
- Adhere to the schedule for checking the vehicle and all its systems, including the braking system.
- Use spare parts from the original manufacturer, and also use “original” consumables.
- Adhere to an adequate driving style. Use the vehicle only in areas suitable for it.
- Replace brake fluid at appropriate intervals.
- You must use the brake fluid specified in the vehicle manual.
- Regularly check for leaks under the car.
- Monitor the wear of the gaskets.
Brake disc disassembly sequence
It is worth noting that replacing the front brake discs on a Chevrolet Niva is a little more complicated than on any other passenger car. You'll have to work hard before disassembling the entire mechanism.
Perform the following manipulations:
- Using a screwdriver, bend the tab of the plate on the lower and upper bolts that secure the brake pad guide to the knuckle.
- Remove two bolts.
- Remove the casing and guide block.
- Now unscrew the hub securing nut and remove the entire mechanism.
- Disconnect the hub and brake disc.
After this, repairs can begin. All elements are assembled after repair in the reverse order. We looked at how to remove a brake disc on a Chevrolet Niva. But the tightening should be done cross to cross. Only in this case will you be able to achieve high connection reliability.
Recommendations for the driver
To prevent sticking of the friction linings, sudden braking should be avoided after installing new pads, since they are deformed and subsequently make the normal braking process impossible. Smooth braking is recommended during the first half a thousand kilometers after manipulating the brake pads.
The lifespan of brake pads is affected by many nuances. Performance depends not only on the skill and driving style of the vehicle owner, but on weather conditions. Remember, brake pads should be checked at least once a year.
How to replace it yourself
Before changing elements of the brake system, you need to treat the cotter pin and caliper with a special anti-corrosion lubricant, for example, WD40, since problems may arise during removal due to rust. If upon inspection it is clear that there is uneven wear, this may indicate that there are problems with the caliper. It may also be that the pressure cylinder boot is torn; if so, it needs to be immediately replaced with a new one. If there is uniform wear, then you can replace them with new ones.
- Using pliers, pull out the cotter pin from the bottom finger.
- Take a thinner screwdriver and push out the cotter pin itself
- We remove the clamping lever with two springs
- Take a screwdriver and hook the caliper, lifting it up
- We remove the worn pads and inspect them; if there is wear, replace them with new ones.
- We recess the pistons onto the caliper as deeply as possible so that the new ones will fit in without problems since they are thicker and simply won’t fit.
- When you have installed the new pads, we begin to assemble everything in the reverse order.
After changing, press the brake pedal a couple of times so that the pistons take their working position. You should also check what level the brake fluid is, since after replacement the level of brake fluid may increase. Replacing these elements on a Niva Chevrolet SUV takes no more than four hours and can be done independently. And only after a complete inspection of the brake system and replacement of all faulty elements can you be 100% sure that it will not let you down.
Chevrolet Niva owners usually operate their iron horse both in rural areas and completely off-road. And they are often forced to change many parts themselves, using a minimal set of tools and ingenuity. Therefore, for most of them it will not be difficult to replace the brake pads themselves. Moreover, they are essentially consumables and, depending on the conditions of use, cover from 5 to 15 thousand kilometers.
A complete set of front and rear pads will cost from 2,500 thousand, depending on the manufacturer. It should be taken into account that if the replacement is incomplete on one axle, the car may pull to the side when braking. Therefore, it is best to change the pads completely, or separately front or rear.