Introduction to the topic
Few car owners know how to disassemble a headlight, but they are willing to sacrifice personal time and money to install xenon lenses, which will have a better effect on driving safety at night.
The lighting devices of most modern cars are equipped with special parts that contain xenon lamps. The powerful light from gas-discharge components performs well not only at night, but also in conditions of snowfall, fog, and rain.
Xenon is considered a sign of an expensive foreign car with a bunch of options and a set of modern systems. However, many manufacturers have started producing components for independent implementation in almost any headlight.
For installation, you need to disassemble the optics; in addition, you will need a set of lenses, gas-discharge lamps, sealant, screwdrivers, a hair dryer, spatulas and a lot of patience.
How to disassemble a headlight
In our profession we often have to disassemble car headlights.
There may be several reasons for disassembling the headlights: - To eliminate fogging of the headlights. — To clean the headlights from the inside. — Polish the inside of the headlight glass. — For cleaning standard lenses. — To replace standard lenses with new ones, for example, with Optima Bi-Led Professional 3.0 LED modules or with non-original lenses. — For installing xenon or LED lenses in a reflector headlight. — And finally, for headlight repair or tuning. Important! Before disassembling the headlight, you need to determine the type of glass fastening: - Thermally dismountable headlights (headlights whose glass can be separated by heating the sealant). — Conditionally non-removable headlights on polyurethane (in this case, the headlight glasses “sit” on a polyurethane sealant. Simply heating the headlights will not help here, but we will write about disassembling such headlights a little lower.) — On latches . On some cars, the headlight lenses are held in place with latches without the use of sealant. Taking these headlights apart is the easiest task.
Description of automotive optics
Car headlights vary in appearance, size and type. However, the parts meet stringent requirements for certain characteristics. For example, for right-hand traffic, the optics must correctly collect the beam of light, have a clear limitation without flare horizontally and a clearly defined “daw” towards the side of the road. This luminous flux allows you not to dazzle oncoming drivers and illuminate the side of the road on the right.
You can form and direct the light beam:
- headlight reflector;
- lens;
- outer glass.
The reflector is most often used with halogen lamps, but there are exceptions with xenon. The lens is used to form the beam for all types of lamps. It can be halogen, xenon or even LED.
Glass with special guide ribs on the inside can be seen on old foreign cars produced before 1990. The most striking example is considered to be a lantern from an old Zhiguli. For example, on the glass of a VAZ 2107, stripes are clearly visible, which are responsible for collecting the light flux.
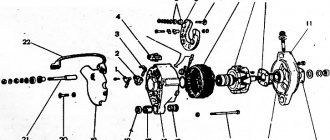
Structurally, any headlight consists of:
- housings;
- glass;
- reflector;
- lamps;
- wires and plugs.
Description of lenses
The lens is the most favorable component for installing a gas discharge lamp. The internal device allows you to accurately collect the light flux and direct it to the right place, providing a clear cut-off line and a clearly defined daw.
Lenses are divided into:
- xenon;
- bi-xenon
The bi-xenon version comes with a special built-in curtain that covers the light flux in low beams and opens completely in high beams. Thus, one lens is sufficient for installation in a headlight with one module. Classic components are responsible only for high or low beam and are not equipped with a curtain.
Types of lighting devices
Depending on the year of manufacture, the VAZ 2110 can be equipped with either Kirzhach or Bosch headlights. Both of them are a block that includes high and low beam headlights, side lights, and direction indicators.
An article on choosing a low beam lamp can be found here:
No matter how much difference there is, there are some nuances:
- In Kirzhach, the glass is sealed, so both removing it and replacing it with a new one is more difficult. In addition, the low beam glass has a lens that makes the light output more focused, although limited;
Left headlight block Kirzhach - Bosch glass is secured with latches. They are sealed with rubber gaskets. Their low beam boundary is more blurred, since there is no lens in the glass.
Right headlight block Bosch
It’s difficult to say unequivocally which headlight unit is better. But disassembling Boshevskys is definitely easier. In any case, it doesn't hurt to know how to do it in both cases.
What is needed for installation work
To install bi-xenon and classic lenses, you will need to complete the following steps:
- Remove the headlights from the car. This may require a special tool.
- Warm up the light fixtures with a hairdryer, disassemble the module and remove the old sealant.
- Remove the halogen lamp from the reflector and unscrew all fasteners.
- Place the lens into the hole that appears and secure it with the retaining ring on the reverse side.
Installation of lenses in the headlight is carried out in accordance with the side position indicators. Otherwise, the “daw” will be turned the other way around and the beam will shine incorrectly. After installation, you will need to install ignition units in the engine compartment and connect the wires.
Dismantling and disassembling optics
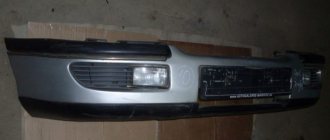
It is not possible to disassemble the headlight directly in the car, so the optics will have to be removed. Cars use different mounting systems; many models will require the front bumper to be removed.
Typically, the optics are mounted with 1 or 2 bolts on top and several latches on the bottom, under the bumper. To remove the part you need to do the following:
- Open the hood and remove the negative terminal from the battery.
- Unscrew the screws holding the headlights.
- Disassemble the back cover and remove the chips and wires.
- Remove lighting fixtures.
Some manufacturers use a latch system that does not require the use of bolts. It is quite easy to disassemble and remove such a part.
To install lenses, we must disassemble the optics. To do this you need:
- Unscrew all the screws along the contour of the glass on the back side.
- Disassemble the retaining clips and latches.
- Take out all the light bulbs.
- Place the part in a box of suitable size with a small hole for a hair dryer.
- Close the box and heat the headlight for 5–8 minutes.
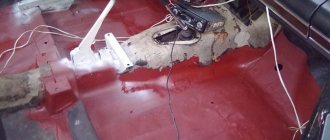
- The softened sealant will easily come off if you carefully pry the glass with a flat-head screwdriver.
Often the headlight is assembled using a special rubber glue, which is easily softened in a box with a hairdryer. You should carefully remove any remaining compound that will interfere with the assembly of the headlight.
To remove the reflector from the headlight housing, screw in the adjusting screw to the end of the thread and remove the plastic fastener.
What tools are needed to remove headlights on a Priora?
The process of removing the headlight unit on a VAZ-2170 is not complicated, and for all modifications of this car model it is identical. In order to correctly perform the dismantling procedure for the purpose of subsequent repair or replacement of the front lights, you will need to first prepare the following tool:
- The key is "10". For convenience, it is better to use a head with a ratchet.
- A Phillips screwdriver (preferably several screwdrivers with different tip diameters) for unscrewing self-tapping screws and mounting bolts.
- A slotted screwdriver with a long shaft (preferably at least 20 cm). It is needed to disconnect the bumper from the body part. You can use a screwdriver with a shorter shaft length, but in this case the likelihood of damaging the paintwork on the bumper or car body increases.
To carry out work, the car does not need to be placed on an inspection hole or jacked up. For safety reasons, it is recommended to only disconnect the negative terminal from the battery, after which you can begin performing the planned manipulations.
This is interesting! Many people are wondering how to remove the headlights on a Priora without removing the bumper. This is almost impossible to do, since it is under the bumper that the fastening elements of the device are located. However, it is not necessary to completely remove the bumper, especially if the headlight is removed only from one side.
Lens installation
It is not difficult to place lenses in headlights with your own hands. The main thing is to follow the signs on the upper and lower sides. The body of the lens is placed in the hole where the lamp stood and screwed into a ring on the reverse side. The ring is included in the package. All work is carried out wearing fabric gloves - also part of the kit.
It will take no more than half an hour to install the lenses in the headlights. The most time-consuming part of the process is running the wiring through the back wall of the headlight housing. You can insert the wires using a drilled hole, which must be filled with rubber glue.
How to replace a light bulb
To replace a headlight bulb, you need to open the hood of the car and find the socket on the back wall of the headlight housing. You can identify it by the bundle of wires that connect to the removable cover. First you need to disconnect the plug with wires from the cover. Next, you need to remove the cover block itself. In most cases, it is attached to the headlight housing in the following ways.
- Plastic clip. In this case, there should be a plastic lever at the top of the cover. By pressing it and simultaneously pulling the cover towards you, you can disconnect it from the headlight housing.
- Metal clamp. In this case, you just need to pull the cover towards you - it should easily come away from the headlight housing.
- Screw cap. This is the most common option for attaching the cover to the headlight housing. In this case, you just need to turn it counterclockwise until the lid moves away from the body.
The bulb itself is attached to the inner surface of the blocking cover, so after the blocking cover is disconnected from the headlight housing, a new lamp can be installed. To remove a burnt-out light bulb from the base, you just need to pull it out of the groove, in some cases you will have to turn it slightly counterclockwise.
It is necessary to wear gloves when screwing in a new halogen light bulb, since even the slightest dirt or fingerprints on the glass can lead to rapid failure of the lamp. The further installation procedure is done in reverse order. The cover block is installed in the rear part of the headlight housing, and after that a plug with wires is connected to it.
Unfortunately, on some car models, replacing a light bulb requires completely removing the headlight. In such a case, the above steps are carried out on a headlight that has already been disconnected from the car. An even more difficult case is when replacing a light bulb requires dismantling the radiator grille and front bumper, as when replacing a light bulb in the headlight of a Volkswagen Golf IV.
Installing ignition units and adjusting light
Ignition units are installed inside the headlight housing or outside in the engine compartment of the car. If one of the units fails, you will have to disassemble the case again and remove the glass, so it is more convenient to place the electronics behind the bumper or directly under the headlight using double-sided tape.
Xenon devices shine perfectly even in heavy snow and fog, but for correct operation they require professional setup using a special stand. This procedure is offered at each maintenance station and is inexpensive.