VAZ 2109 is a pretty good car, one might even say, the pride of the domestic automobile industry, a project that combines decent dynamics and handling, a harmonious, attractive appearance and an affordable price. But along with positive qualities, nine, of course, also has a number of disadvantages. One of these disadvantages is the small trunk. But don’t be upset: you can always improve the situation for the better: there is nothing difficult in making the trunk of a VAZ 2109 with your own hands, and how to do it - we’ll tell you about this and more later.
Advantages of an acoustic shelf
VAZ 2109 acoustic shelf
Today you can purchase an acoustic shelf in specialized stores. Its cost is not that high, although it is still recommended to do it yourself. In any case, whether the shelf is purchased or made with your own hands, it will provide advantages:
- The acoustic shelf creates improved sound from the speakers.
- Thanks to the shelf, rattling is significantly reduced and other unnecessary sounds are eliminated.
- This shelf harmonizes perfectly with the interior of a car such as a VAZ 2109.
- After installing the shelf in place of the standard rear panel, there is a unique opportunity to use the entire useful volume of the trunk to play music. In other words, in this case the luggage compartment plays the role of a kind of acoustic box.
- The acoustic shelf protects from external attacks. Therefore, such an installation is called hidden. If everyone saw that you have expensive speakers in your car, the likelihood of theft would increase several times.
- The shelf allows you to install speakers of any size. If you make a shelf yourself, this will give you even more possibilities.
Acoustic shelf VAZ 2109
Note. To hide budget types of speakers or for some other reason, the panels are covered with special materials that do not distort the sound. In addition, when choosing or manufacturing shelves, special attention is paid to options for different sound directions. On the shelves it is possible to build so-called scenes. In this case, the sound can come from different angles in different directions: to the rear window, into the passenger compartment or trunk.
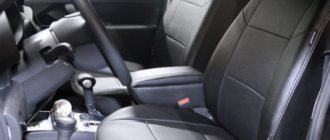
Lock installation
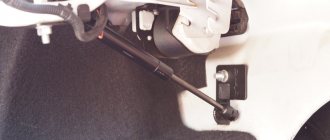
The lock is installed on the same seats on which the rear door wiper motor is attached. They fit well in size. It is not recommended to dismantle the windshield wiper, as some car enthusiasts do. The Nine is a notoriously dirty car, and cleaning the rear window of this car is an absolute must.
The lock's electric drive motor can be used with low power. Opening occurs primarily not due to the traction force of this motor, but due to the spring, compressed during closing and accumulating the corresponding energy. The motor should be connected to the lock actuator with a rigid metal rod, the length of which must be selected according to the location. The lock button is usually placed on the dashboard. Buttons with a pictogram in the form of a profile of a car with an open trunk lid are available for sale.
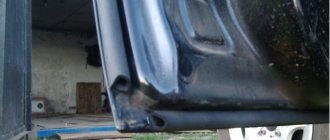
Over the many years of operation of your “nine”, the gaps in parts of its body may well have moved away from the original values, and the lock may require adjustment and adjustment.
| What to do | What to pay attention to |
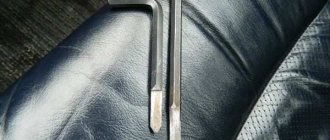
| This adjustment is carried out by placing the appropriate number of washers under the lock mounting bolts. | Do not forget to connect and pass through the upholstery the safety cable for opening the lock from the passenger compartment in the event of a power failure. |
| To adjust the lock, you will have to climb into the trunk of a VAZ 2109 and, trying to close and open the lock, adjust the setting. | If the lock does not close, use washers; if it is loose, remove it. |
| Set the indication signal. | Keep in mind that the Kalinovsky lock is equipped with an end connector, which allows you to output an open door indication signal to the instrument panel. |
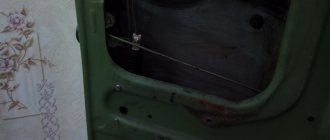
Close the unnecessary larva with a suitable plug.
What can a shelf be made from?
MDF shelf drawing
A common material for an acoustic shelf is MDF or multi-layer plywood. Be sure to cover the surface of these materials with carpet or other acoustic material to ensure compliance with the overall design of the interior. As for the area for installing speakers, they must be made so firmly that they completely eliminate rattling and vibration.
Making a shelf with your own hands
Acoustic shelf for VAZ 2109
So, if we decide to make a shelf with our own hands, then go ahead. A ready-made acoustic shelf costs about 1,000 rubles in a store. Why waste extra money if you can make everything yourself, spending some of your time and receiving inexpressible pleasure from the process. A homemade shelf has advantages over a purchased one, and it’s simply impossible not to notice.
Start
To make a shelf for a VAZ 2109, you will need to prepare.
Materials
- Plywood or MDF.
- Macroflex.
- Glue (one can is enough).
- Several meters of carpet.
- Self-tapping screws.
- Polyurethane foam.
- Sanding paper.
- Standard rear shelf made of plastic.
- Small nails (furniture).
- A simple pencil.
- Tape measure or simple ruler.
- Screwdriver.
- Drill with drills.
- Brush.
- Construction stapler.
Tools
Note. As mentioned above, the ready-made standard shelf of the VAZ 2109 is used as a model. Therefore, it will need to be removed. A simple screwdriver, a little patience and time - the shelf is dismantled.
- We place this very shelf, cleaned of dirt and dust, on a flat table.
- We lay a sheet of chipboard on top.
- Take a pencil and carefully trace the edges intended for the seat belts.
- Draw ovals for the speakers with a pencil.
How to mark an acoustic shelf
Main stage of work
Acoustic shelf for VAZ 2109
This includes the manufacture of acoustic podiums, the construction of a box for seat belts, pasting and much more.
Podiums
- We also make the base of the podiums from chipboard.
- We work with a jigsaw.
- To give the structure additional rigidity, you need supports made of bars measuring 20x40 mm. There should be several pieces of bars and they are inserted between the ovals using screws.
Note. The podiums, as mentioned above, are made on a separate piece of chipboard.
- We place the podiums on a standard shelf and trace them with a pencil.
- We also mark with a pencil the places of the round holes intended for air intake from the trunk.
- Between the bars of the podium, voids appear that need to be filled with sealant. As for the holes inside the product itself, they are covered with cardboard. This will prevent the foam from falling out during the drying process.
- Fill with polyurethane foam.
DIY shelf
- We wait until the foam dries completely.
- Take a sharp knife and carefully cut off the excess.
- We process the surfaces with sandpaper.
- Now we impregnate a piece of nylon with epoxy glue and wrap it around the entire structure. This is done for strengthening and strength.
How to make an acoustic shelf for a VAZ 2109
Making a box for belts
Note. When making a box, the following point must be taken into account: the belts must enter the box from the side.
- We outline the places with a pencil.
- Cut with a jigsaw.
Covering with carpet
- Pasting can be done using clothespins.
Note. After these operations, the boxes are assembled and screwed in place.
The final stage of work
- The final stage involves installing the manufactured shelf in place. Bolts attached to the metal part of our “nine” can be used as clamps. The nuts must be attached to the trunk side.
Shelf reupholstery
Upholstery material
Reupholstering the acoustic shelf on a VAZ 2109 can be the most problematic part of the job. That is why we devoted a separate chapter to it in our publication. Every owner of a VAZ 2109 dreams of making the interior of their “nine” more comfortable and attractive. An acoustic shelf is not only an element that serves a practical purpose, but also a separate component of the entire interior. For this reason, she needs to be able to give a style that is beautiful and consistent with the overall design. The material most often used is carpet. On the other hand, if the interior itself is covered with leather or a substitute, or maybe Alcantara, covering the shelf with the same material will come in very handy.
Carpet reupholstery
Re-upholstering the shelf with carpet
Experts recommend paying special attention to working with carpet. The following points need to be taken into account:
- This material does not stick together. In other words, it will be impossible to glue two pieces of this material together.
- Carpet can take on any shape if you sprinkle a little water on it, and then dry it with a hairdryer after shaping it.
- Carpet is best glued to chipboard or plywood using an aerosol compound.
- The carpet will adhere firmly if the layer of glue is thin and evenly laid on the surface.
- We apply glue to the shelf (you can use not only an aerosol composition, but also Armenian glue Nairit, which also holds very well).
Making an acoustic shelf for a VAZ 2109 with your own hands
As mentioned earlier, the optimal price-quality option for a sound system on a VAZ 2109 would be to install 4 speakers, two in front and two in back. There are no problems with the front seats, since there are standard places for 13-inch speakers in the front panel. For those who don't have 13 inches, they can make podiums for the front doors and install speakers with a diameter of 16. The rear standard places for speakers in the plastic inserts on the sides of the rear shelf are no good - they are too small to reproduce more or less noticeable bass, and the standard shelf is too flimsy to support the 6x9-inch oval speakers that are most suitable for placement in it.
Therefore, in this article we will look at how you can make a good rear acoustic shelf to accommodate two 6x9 speakers. The material will be useful to owners of VAZ 2109, 2108, 2114, 2113.
From the materials we will need:
- Plywood sheet 18 mm thick
- A piece of carpet measuring approximately 1 m x 1.5 m
- Aerosol adhesive for carpet
- Wood stain
- Staples for furniture stapler, size 8 mm
- Two hinges for the folding part of the shelf
- Masking tape
- Self-tapping screws
- Jigsaw
- Plane
- Screwdriver (or drill)
- Furniture stapler
- Stationery knife
- Scissors
- Ruler
- Pencil
However, this list can be shortened, but you will spend more time performing certain operations manually, without the help of a tool.
You can cut out the shelf template yourself, taking into account your preferences. To do this, you need to take a piece of thick cardboard and, by measuring and adjusting, make a model of the future acoustic shelf. For example, the contours of a future shelf can be outlined by removing a standard shelf with plastic sides (it is highly recommended to make a full-size shelf, from glass to glass) and laying this out on a sheet of cardboard.
For the lazy, I can offer this ready-made template for the rear acoustic shelf for a VAZ 2109 (download), many thanks to its creator. You just need to print it on A4 sheets on a regular printer and lay it out in a certain order, you’ll figure it out.
It is also worth considering the fact that our cars may have some variation in dimensions when assembling cars. Therefore, if you use a ready-made template, you will still have to adjust the shelf to its location.
Next is the manufacturing process itself.
We place a plywood sheet on the workbench and draw on it the contours of the future shelf according to the template. Don't forget about the holes for the speakers, as well as the processing of the edges for the contours of the rear pillars and the rear window rubber. Then we cut out the folding part of the shelf, attach the stiffener and cover all the parts with stain. After the stain has dried, you can screw on the hinges.
Now we spread the carpet on the future shelf and measure, leaving an allowance of 4 centimeters at the edges. We cut it out, apply glue and evenly and carefully glue the carpet to the wood of the shelf. Some places require careful gluing.
The ends of the shelf also need to be glued with carpet, the remainder is wrapped on the bottom edge. In order not to smear everything with glue, we use masking tape.
Next, we pierce the edge of the carpet along the perimeter of the shelf with construction staples using a stapler. You can leave a carpet allowance above the hinges for the lid, and they will not be visible from the outside. Now we cut off the excess carpet that is not glued with a stationery knife.
Next, we tighten the folding part of the shelf into the carpet, according to the same principle as the shelf itself. We mark the places where the canopies will be attached to the folding part.
All that remains is to screw the folding part, and that’s it, our shelf is ready, you can install it on the car. This is what it looks like externally:
There is no need to remove the plastic sidewalls where the holes for the standard speakers are located; our shelf is placed on top of them and screwed from below using self-tapping screws.
You can enhance the bass and sound quality of the rear speakers by installing a power amplifier, which can be placed on the same shelf between the speakers, it will stand.
How to make a trunk shelf on a VAZ 2109
Today it is rare to meet a car enthusiast who is content with the standard equipment of his car. Modern drivers are increasingly engaged in styling (from the English word “styling” - style), i.e. change the interior of the car and its appearance in order to stand out from the general flow of vehicles. At the same time, owners of domestic cars do not lag behind the owners of foreign cars, and sometimes even surpass them in design ideas translated into reality. In this article we will give an example of how to make a trunk shelf on a VAZ 2109 with your own hands at the lowest cost from simple and affordable materials.
We cut according to the template.
Tools that will be needed for work:
- decorative handles for furniture;
- plywood;
- cardboard;
- upholstery material;
- adhesive mixture (universal glue);
- two hinges for furniture.
Read more about the technical characteristics of the trunk
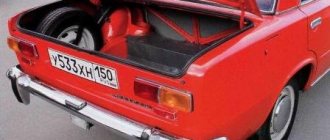
The first models had a body width of 1650 mm, but after a while the developers reduced it by 30 mm. Thus, the compactness of the trunk has increased. Other options are:
- height – 1402 mm, which is 30 mm less than its predecessors. Compensate for the space of convex glass. This allows you not only to increase volume, but also to improve presentability;
- the capacity is 330 liters, and with the seats folded down – 640 liters.
At one time, the luggage compartment of the VAZ-2109 made a real splash on the market. Even today it deserves attention. Thanks to the compact dimensions of the body, it can transport small-sized cargo even when there are heavy traffic jams on the roads.
Note that the fuel consumption of this model is much less than that of an SUV. This increases the practical profitability of the VAZ-2109. Among the shortcomings of the body, it is worth highlighting only the following:
- rapid loosening of fastenings, which subsequently can weakly hold the load;
- periodic squeaking while the car is moving.
However, these problems can be easily resolved by contacting technical service. The cost of any repair work on a VAZ-2109 is quite affordable for all car owners. Despite some shortcomings of the body, it is still considered very reliable and practical. It can easily transport things purchased in bulk, or products, but in small quantities. Of course, you can’t fit a baby crib or stroller in there, but other things will fit comfortably.
If the squeaking really annoys you, you always have the opportunity to replace a separate functional element at a service station. In general, the spaciousness of the body and its convenient dimensions significantly affect the popularity and demand for the VAZ-2109. This machine is still actively used today due to its good appearance and decent technical characteristics.
Step-by-step instructions for independent production of VAZ 2109
The workpiece is ready.
First of all, you should determine the points at which the decorative handles of the future design will be fixed, and then drill the holes necessary for mounting the clamps and installing the handles in the selected places.
Cutting out the moving part
Next, you can proceed to making a shelf template. It is important to consider that the structure will have a moving part, which must be marked on the cardboard template using cuts. It is strongly recommended to make sure that if the moving part of the structure is lifted, it does not come into contact with the arches of the trunk of the car.
After all the necessary markings have been made on the cardboard sheet, it should be attached to the plywood and the future shelf should be cut out strictly according to the size of the template. This stage of work requires special concentration, because only if it is carefully cut will the shelf fit into the trunk slots.
Video
An example of a homemade trunk shelf can be seen here:
Hello Kulibins! I think it’s no secret to many people what kind of trunk the 99 is, not only is it small and not convenient, but the floor is not even and has a hole in the middle. If you put the spare tire “face up”, it seems like a more or less level floor, but there is nowhere to put all the little things.
If you turn the spare wheel upside down, the carpet and all your luggage will fall through. Putting a rubber mat is not an option, I have a gas cylinder. That’s why, when I did a complete ShVI for my car, I decided to immediately finish the trunk as well.
Additional Information
The lid rises with the trunk.
If desired, the shelf lid can be connected to the trunk door using a spring or rubber band. In this case, the lifting part of the shelf will rise along with the trunk door.
In conclusion, it is necessary to pay attention to the financial component of the issue. Self-manufacturing of a trunk shelf for a VAZ 2109 will cost the vehicle owner much less than the cost of services from service station specialists.
Subtleties of choice
When choosing a trunk, carefully study the types and information about the load capacity. If the trailer has a spring suspension of any design, which facilitates maneuvers over bumps and holes, then in the case of a roof rack on a car, with a shock-absorbing suspension of the car, it is separated by that very roof. It does not have pronounced properties to level out vibrations and take on the vector impacts of the load mass. But a body with inter-window pillars is a damper between the road and an additional high center of gravity. Therefore, they attach the trunk as low as possible to the roof, even one centimeter is important.