Car insulation
Car modernization includes thermal insulation of the interior and engine compartment.
Construction insulation
. It is better to carry out all preventive insulation work in the warm season. In cold weather, the setting efficiency of adhesives and sealants decreases.
Insulation of the interior
Insulating the trunk
If you are choosing options for how to insulate a VAZ 2114 and are looking for optimal methods of thermal insulation, then you need to keep in mind that the interior is insulated by gluing insulating materials to the internal parts of the body. Construction insulating materials (for example, isolon, foil and non-foil, or penofol) are used as insulation. Cheap, low-quality materials are not recommended because they can cause persistent unpleasant odors in the interior.
Door insulation
To achieve maximum effect, the roof, bottom, wheel arches, doors (including the lower parts of the rear doors), the overlap of the engine compartment from the passenger compartment, and the sides of the rear seats must be glued.
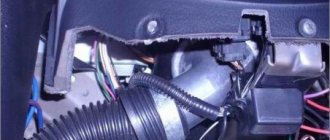
Insulation of the engine compartment
Insulation of the engine compartment
The purpose of insulation is to supply heated air into the cabin and quickly warm up the engine to operating temperature. Most of the inner surface of the hood is covered with insulating material. The stores have a selection of ready-made kits for the engine compartment. The set consists of already cut parts, ready for gluing. In order to save money, you can purchase building insulating material, make a cut, cut it and stick it according to the marked marks.
To “insulate” the radiator, a suitable piece of cardboard is inserted behind the radiator grille. There are also special screens for radiators in stores. They are put on the radiator grille in frosty weather.
. The radiator cannot be closed 100%. Complete restriction of air flow reduces heat transfer and the engine constantly operates at the limit of permissible temperature conditions. The cooling fan will spin continuously or turn on very frequently.
The cardboard sheet (screen) should cover approximately 2/3 of the radiator area.
What will be needed for repairs?
Please note that replacing the VAZ 2114 stove (that is, the radiator) can be done in 2 ways: with removing the dashboard and without dismantling the dashboard. Professionals prefer the first method. That is, master mechanics of any service station replace the radiator with a 2114, having first disassembled the top down to the screw. Only someone who has already assembled and disassembled the dashboard with their own hands can handle this work. There are a lot of subtleties and nuances.
Speaking for us, we will replace the VAZ 2114 heater radiator without removing the dashboard.
By the way, there is another way to change the radiator. Craftsmen cut out the bottom of a VAZ 2114, calmly climb under the radiator and quickly remove it.
But again, only highly qualified craftsmen can qualitatively change the design of the machine. We won't interfere there, out of harm's way.
For this job we will need:
- Screwdriver Set
- A pair of new clamps for the diameter of the radiator pipes
- New radiator. By the way, it’s better to take something imported, for example, Fenox RO0004C3 (it costs twice as much as the original)
- New antifreeze for the heating system
A set of keys
Idling and cold air
Some car owners are faced with this problem: at idle the heater produces cold air, but at high speeds it starts working normally.
The reasons why the VAZ 2114 stove does not heat up may be the following:
- Insufficient amount of antifreeze. The problem can be solved only by pouring the required amount of coolant.
- Presence of an air lock. It is quite simple to determine: you can hear the murmur of coolant in the radiator area, the sensor detects that the antifreeze is about to boil, and the main radiator pipe is cold. To break through the plug, you need to remove the expansion tank cap and blow until coolant flows out of the fitting. Then screw the cap back on. In some cases, the cause of an air lock is a faulty valve in the tank cap. The plug can simply be replaced.
A simple way to “break through” an air lock: place the car on a hill, give it a good gas and add antifreeze.
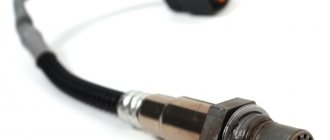
Temperature sensor VAZ 2114
- If the sensor shows a maximum temperature tending to 100 ºC, then we can definitely talk about a thermostat malfunction. You can check its functionality as follows: remove it and immerse it in water with water. Gradually heat the water while watching the thermostat valve. The thermostat will be considered working if the valve opens at a temperature of 90 to 95 ºC.
- The head gasket burns out, causing an air lock to form that cannot be removed using the methods described above. It is necessary to replace the gasket, but this will have to be done at a service center. Not every car owner is able to do this on their own.
The process of replacing the stove radiator
When replacing the heater radiator, we recommend also changing the hoses. They are not expensive, but can save a lot of nerves
Of course, it would be much easier to dismantle the dashboard to replace the heater radiator, but this process is long and requires a lot of time. Therefore, as practice shows, many motorists change the heater radiator without removing the central dashboard.
Right away, we can say that to complete the operation you will need another pair of hands, that is, an assistant.
So, when the main aspects are sorted out, you can proceed directly to the operations. Let's consider the sequence of actions aimed at replacing the stove radiator:
- We dismantle the center console.
Removing the center console
We remove the glove compartment. Removing the glove compartment
Places for attaching the glove compartment to the panel
We unscrew the fastenings of the torpedo so that it can be moved in different directions.
Unscrew the torpedo mounts so that it moves in different directions
We unscrew the cable drives for controlling the stove modes. They come on both the driver's and passenger's sides.
Remove the heater drive cables
Remove the radiator cap.
Unscrew the radiator cap and remove it
In order to remove the pipes, it is necessary to either partially drain the coolant, or place a container so that the antifreeze (antifreeze) does not spill.
A plumbing hose is ideal for draining, which can be placed on one of the hose outlets on the stove faucet.
Now unscrew the heater radiator pipes.
Unscrew the clamps and remove the coolant pipes
Unscrew the bolt securing the entire instrument panel to the body (to the leg).
Attaching the panel to the body
Next, when everything is ready, with the help of an assistant, move the dashboard and pull out the radiator. It is necessary to pull out the spare part very carefully so as not to damage the other components located inside the panel.
Move the instrument panel to the side
Important! When dismantling the heater radiator, extreme care must be taken, since residual coolant can spill from the product onto the vehicle’s electronic devices, including the electronic control unit, which can damage them or completely disable them.
Installing a new radiator
The controversial issue of using sealant. On the one hand, sealant cannot be used in the cooling system; its remains can jam the pump. On the other hand, the radiator slots are often crooked and the hoses do not hold. You decide.
Replacement instructions
The radiator is a replaceable unit, so if it is faulty, it needs to be replaced.
The replacement procedure consists of the following steps:
- First of all, you need to drain the coolant.
- Next you need to dismantle the dashboard. You can remove not the entire tidy, but only part of it to get to the radiator. How to remove the panel is described in the operating instructions.
- Before replacing, it is necessary to disconnect all wires and hoses that go to the radiator.
- Then you need to unscrew the fasteners and dismantle the unit.
- The removed radiator must be cleaned if it is clogged. If it leaks, it needs to be changed. Assembly should be carried out in the reverse order (video author - VChSLV).
After the repair, the microclimate in the cabin will be restored and no frost will be scary.
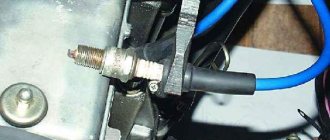
The first “jamb”: the stove tap
The first problem area of the VAZ 2114 is the valve at the antifreeze inlet into the stove. On the one hand, its undoubted advantage is that if you accidentally break off the fitting on which the pipe is placed, it is enough to replace the tap. For example, on most foreign cars produced in the 90s, these fittings are an integral part of the heater radiator. If they are broken during repairs, you will have to replace the entire radiator. But on the other hand, due to this design, the quality of coolant circulation is much worse. And that means comfort from being in the cabin.
In addition, the supply of hot antifreeze for the stove is controlled mechanically on the VAZ 2114 using a cable. And this cable becomes dirty and “pulled out”. The fastening of this cable itself may weaken over time. As a result, the stove will not work properly.
Usually, if problems arise with cold air from the stove, it is recommended to tighten the cable.
Adjusting the heater tap cable
The problem arises due to the general unreliability of the mechanical cable system for controlling the interior heating controls on the VAZ 2114. We have already talked about this. Loosening or pulling the cable over time leads to the fact that the stove tap no longer closes (opens) completely when moving the slider on the control panel. To solve this problem, you need:
- Find the control cable for the stove tap. It runs under the panel near the gas pedal.
- Pull the cable so that when the damper is fully open, it also opens fully. Sometimes, with a strong stretch, the cable is shortened a little for this purpose. Do not overdo it, otherwise the tap will not close. Warm air will continue to blow in summer.
This basically works. But it may happen that you have to tighten it regularly. Often the problem returns periodically. The fundamental measure to solve it is the following method: removing the tap from the system.
Removing the stove tap
This modernization allows you to exclude an “extra” element from the system, improving the overall efficiency of the system (by improving circulation) of the VAZ 2114.
The operating procedure is as follows:
- Remove tap.
- Make (you can’t do without a lathe) a tube of the required shape, connect the pipes to it.
- To improve circulation, a pressure pump is additionally installed in the system (this is standardly installed on GAZelle, you can find it in GAZ spare parts stores). The pump runs on electricity. We recommend turning on power to it through a switch installed in the cabin in order to be able to forcibly turn on the pump if necessary.
We recommend using this tuning method only in regions with cold winters (where the temperature is around -20 degrees Celsius or lower for more than one and a half months a year). In all other regions, a standard stove should be enough!
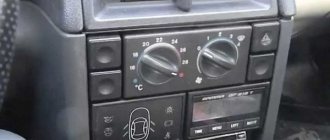
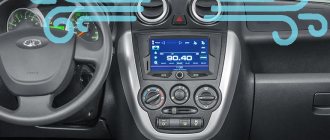
Stove control
The control of the flaps and valve on the VAZ-2114 remains mechanical and remote, just like on the VAZ-2109. The heater control unit on this car consists of three sliders (lever) and a knob for selecting the fan operating mode. The sliders are connected via cables to the stove tap and dampers. To control the heater, the driver moves the sliders, acting on the dampers and tap.
The control mechanism for the VAZ-2114 stove is implemented in an interesting way:
- The lower slider is connected by cables simultaneously to the tap and the main valve. When moved to the extreme left position, the valve opens, and the damper provides hot air into the cabin through the radiator - the stove operates in heating mode. By moving the slider to the extreme right position, the driver closes the tap, and the damper directs air bypassing the radiator - the heating system operates in interior ventilation mode.
- The upper left slider is responsible for directing air to the footwell area or through the air ducts for heating the side windows and supplying heat to the cabin (central deflector).
- The upper right slider is connected by a cable to the air supply flap to the windshield area.
To the left of the sliders there is a fan switch. The control unit is located in the middle of the console, under the central deflector, which ensures easy access.
It is noteworthy that the VAZ-2114 stove does not have a closed air circulation mode in the cabin, which is available on the same VAZ-2107. Due to the fact that on the VAZ-2114 the air flow supplied into the cabin is created only by force (by a fan), the need for a closed circulation mode has disappeared.
How to diagnose the performance of the VAZ-2115 heater
- Turn on switch 1 first, then second and third speeds.
- Using levers 2 and 4, you can adjust the desired direction of the air flow, and the latter also makes it possible to select the desired temperature.
The reasons for the breakdown may be different:
- A faulty fan means the stove does not work at all.
- If the radiator still shows signs of life, then the breakdown may be a failure of the additional resistor or the interior heater does not respond to switch commands.
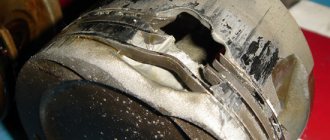
- But the stove tap can also leak or become stuck, in which case it must be urgently replaced.
- When the fan is running at full power and the temperature is at maximum, and the engine is warm, then perhaps the heater radiator is clogged. To clean or replace it, you will need to disassemble it.
Typical malfunctions of the heater (stove) VAZ 2110 2111 2112 and their possible solutions
The VAZ 2110 heater only works in one position, for example “2”. What could be the problem?
Most likely, the following malfunctions are possible. 1. An additional resistor on the heater body has burned out, which allows you to regulate the speed - a fan is connected through it in position “A” and “1”. In this case, you need to get to the heater (this is only possible from the engine compartment) and replace the resistor. 2. The wires inside the controller are burnt out (to fix it, you need to disassemble the controller and replace them). 3. The wire has come loose in the relay block located on the right under the hood.
Heater maintenance
To ensure that the VAZ-2114 heater heats well in winter, carry out maintenance of the heater before the cold weather:
- Remove it from the car.
- Disassemble and clean.
- Check the functionality of the dampers, seal their ends with sealants.
- Seal the joints with sealant.
- Flush the radiator.
- After assembly, adjust the drive cables so that when moving the sliders, the valves and the tap become in their extreme positions.
These measures are enough for the heating system to function normally in winter, providing warmth to the car interior.
Finally, we note that the reasons for the poor operation of the stove were discussed above, but it still continues to function. But this unit also has breakdowns and then the stove fails and stops working completely. Such reasons include breakdown of the radiator, leaks at the joints of the pipes, fan malfunction (open circuit, exhausted motor life or burnout).
Main causes of malfunction
Like any device, the stove can break.
The stove on the VAZ 2114 is characterized by the following malfunctions:
- Leaking air ducts. Heat loss is possible at the joints of the air ducts.
- Radiator leak. If there is a hole in it, it should be replaced.
- Air may stop blowing if the radiator is clogged. In this case, it needs to be cleaned.
New and old radiators
- The air may stop blowing if some air duct hose is clogged. Leaves, grass and other debris can get caught in it. After removing debris, the stove pipes should allow air to pass well.
- The heater does not turn on; the heater motor may be faulty. The motor failure is due to a faulty fuse. The repair consists of replacing the blown fuse with a new one.
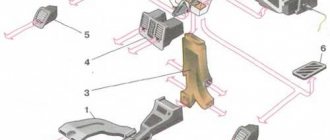
The design and principle of operation of the VAZ 2114/15 stove
The heating system of the VAZ 2114/15 is designed to heat the air entering the passenger compartment. Its design is the same in cars with injection and carburetor engines. The coolant heated by the engine flows from the cooling system into the heater radiator, which is blown by a fan. The flow of warm air created in this way enters the cabin through the air duct system. The intensity and direction of air flow is regulated using deflectors and dampers. The interior heating system of the VAZ 2114/15 can operate in several modes.
The VAZ 2114/15 stove is designed quite simply: 1 - assembled heater; 2 — protective casing; 3 - seal; 4 — front air duct; 5 — rear air duct; 6 — rear air duct; 7 — right nozzle; 8 — right side air duct; 9 — right side nozzle; 10 — intermediate body; 11 — central nozzle; 12 — draft of the windshield heating flap; 13 — heater control levers; 14 — control handle for the heated windshield damper; 15 — heater control handle; 16 — symbol plate; 17 — control handle for the foot heating damper; 18 — right air duct; 19 — interior heating air duct; 20 — heater control damper rod; 21 — heater valve control rod; 22 — heater valve; 23 - leg heating damper rod
Stove design
The VAZ 2114/15 stove consists of the following elements:
- Fan.
- Windshield defroster.
- A distribution flap that directs air flow to the central and side deflectors, to the lower and upper parts of the cabin.
- Control valve.
- Stove radiator.
- Duct that directs air flow to the legs.
- Internal air duct.
The stove consists of a fan, dampers, radiator and air ducts. Blue and red colors indicate the flow of cold and hot air, respectively.
Heater fuse and reasons for its failure
Often the cause of malfunction of most components and systems of a car is a blown fuse. The stove is no exception. Failure of a 30A heating system fuse causes the fan motor to stop and air to stop flowing into the cabin. In this case, find an element marked F7 in the fuse block and replace it. The new fuse should also be rated 30A. If the fan does not work after this, the problem should be looked for elsewhere.
Heater fuse F7 is located in the mounting block under the hood on the driver's side
It is often difficult to determine that it is the fuse that has blown. It can fail due to a short circuit in the electrical wiring, a malfunction of the electric motor, severe clogging of the cabin filter and in a number of other situations. The difficulty lies in the fact that fuse F7 is simultaneously included in the rear window heating electrical circuit and is responsible for the cigarette lighter, glove compartment lighting and headlight washer motor. If it fails, all these components will not work.
Heating system relay location
The cause of a non-functioning stove may be a relay that wears out during operation. It cannot be repaired and is immediately replaced with a new one. The relay is located under the instrument panel in the fuse box.
The heater relay is located under the instrument panel in the fuse box
Stove mode switch
The mode switch or heater regulator is installed on the center console, which will have to be removed when repairing or replacing it. If the switch fails, the fan motor stops working.
The heater control is located on the left side of the center console
Heating system VAZ-2114
The VAZ-2114 interior heater consists of the following elements:
- radiator with pipes;
- supply shut-off valve;
- frame;
- air ducts;
- dampers;
- fan;
- Control block.
Heating of the air supplied to the cabin is carried out by passing the air flow through the honeycombs of a heat exchanger - a radiator, through which coolant heated by the engine circulates.
The VAZ-2114 heater has the ability to shut off the supply of antifreeze to the heater radiator, so the heating system is turned off (for the summer period). The supply is stopped using a tap embedded in the coolant supply pipe to the heater radiator.
The radiator is installed in the heater housing. In addition to housing the component elements of the stove, the housing prevents the dispersion of air flow and directs its movement.
The heater body is connected to air ducts, with the help of which it supplies heated air flow to the areas of the windshield and side windows, to the middle of the cabin, to the feet of the driver and front passenger. To adjust the direction of air flow, deflectors are installed at the ends of the air ducts that supply heat to the side windows and into the middle of the cabin.
The distribution of air flow across zones is ensured by dampers installed in the housing. The design of the VAZ 21-14 stove uses three dampers:
- Stove control damper. It redirects the air flow through the radiator (the stove is operating) or bypassing it (the system is operating in interior ventilation mode).
- Damper for supplying flow to the windshield area.
- Damper for redirecting warm air to the footwell area or to the side windows and into the passenger compartment.
Thanks to the dampers and the heater tap, the driver activates the interior heating system, controls the air flow, choosing which zone it should be supplied to.
The fan included in the heater design creates an air flow. Thanks to the power supply circuit of the fan electric motor being equipped with rheostats, the unit received three operating modes in which the fan rotates at different speeds.
Unlike the heating systems of cars of the classic family - VAZ-2101-2107, the fan in the VAZ-2114 forces air into the heater body, rather than drawing it in, which increases the efficiency of air supply. Therefore, this unit was installed not inside the housing, but on it. Access to the fan has become easier, since on the VAZ-2114 it is located in the engine compartment, in a niche near the engine shield.
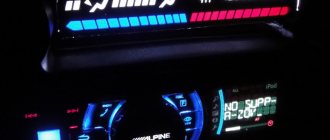
Basic aspects of tuning
Car tuning is not only about illuminating the dashboard with LEDs. Tuning the VAZ 2114 stove is required in situations where cold air blows from the sides of the stove, or the interior is heated unevenly.
To do this, you need to remove the side cover on the gas pedal side. The clamps holding the throttle cable should be loosened. Then you need to pull it back and tighten the clamp. Next, you should install the damper control levers. From this moment on, warm side air should blow, warming the driver and passengers in the cabin.
Heating system repair
At the second stage of tuning, it is necessary to ensure that air coming from outside passes through the heater. The operation of the damper and the tap is carried out by the operation of one engine. It should be ensured that it does not control the damper. To do this, the right cover of the torpedo is removed, and then the one located on the right is disconnected and pulled from the two temperature control cables from the engine. The damper should be in its maximum position. The cable should be tightened and the excess should be trimmed.
Modification of the pipe is required if the air flow from the left deflector is too weak. It needs to be forcibly strengthened. To do this, you need to install a fan with a diameter of about 50 mm in the pipe. You can use a computer fan. First you need to remove the deflector. Then, having made a hole of the appropriate size, insert the cooler and seal it. Next, the pipe with the cooler needs to be returned to its place and the power supply restored.
You can connect the fan directly to the heater contacts. However, in this case, in order for it to work, you need to turn on the ignition.
If you properly modify the stove, it will work more efficiently. This will improve the comfortable conditions in the cabin of any car, both VAZ 2114 and UAZ. LED lighting will give the panel a beautiful appearance, especially at night.
Types of heater radiators installed on VAZ 2114/15
The manufacturer installs its own aluminum radiators on the VAZ 2114/15 with a service life of 3–5 years, after which the radiator is replaced. Selecting a new heat exchanger is quite difficult. There is a wide range of radiators from various manufacturers on the market. Of course, there are fakes.
Heating system radiators for the entire Samar family have catalog numbers 2108–8101060 and 2108–08101060–00 and the same dimensions:
- length - 250 mm;
- width - 158 mm;
- height - 42 mm.
The scheme of their attachment to the body is also identical.
Radiators for the VAZ 2114/15 stove are produced under catalog numbers 2108–8101060 and 2108–08101060–00
The VAZ 2114/15 can be equipped with aluminum and copper radiators, which have their own advantages and disadvantages.
Table: comparison of the main characteristics of aluminum and copper heater radiators VAZ 2114/15
| Aluminum | Copper | |
| Service life, years | 3–4 | 5–7 |
| Heat dissipation, W/mg | 209,3 | 389,6 |
| Maintainability in the event of a leak | Conditionally repairable | Repairable |
| Cost, rub. | 800–1000 | 1600–1800 |
The main advantages of copper products are longer service life, increased heat transfer and maintainability. However, they usually cost almost twice as much as aluminum ones. The technical characteristics of radiators are largely determined by their manufacturer.
Radiators DAAZ
The most popular among VAZ 2114/15 owners are radiators manufactured by Luzar, Hola, Craft, Pekar, etc. They are all in the same price category and have similar performance characteristics.
DAAZ radiators are highly efficient and have a long service life
DAAZ aluminum radiators have improved parameters. They have a service life of 4–7 years and a price of about 1000 rubles. The design features of such radiators include a larger number of lamellas (thin plates), and this significantly increases the heat exchange area. DAAZ radiators are the best option for VAZ 2114/15 owners.
Due to the larger number of lamellas, DAAZ radiators have increased heat transfer
Choosing a new heater radiator
New cars of the VAZ family are equipped with heat exchangers from the Dimitrovgrad Automotive Component Plant. Their production uses technology from the French company VALEO (SOFICA).
The original heater radiator produced by DAAZ has small honeycombs
When purchasing a new radiator, the first things to consider are:
- frequency of installation of transverse plates;
- strength and rigidity of the plates;
- the presence of plastic swirlers in round aluminum tubes.
DAAZ radiators differ from their analogues in their tiny honeycombs, in which the transverse plates are located at a very small distance from each other. Due to this, the air remains in contact with the core for a long time and heats up more. The high rigidity of the plates does not allow them to deform under light impacts.