Articles
- 2 Preparation for soundproofing
- 3 Trunk and its modernization
Soundproofing VAZ 2121
Do-it-yourself noise insulation of the VAZ 2121 is carried out using various materials with a special layer. It is also important to have special tools on hand, such as scissors, a roller, or a technical hair dryer, so that the process can be carried out without any problems. From the article you will learn the nuances and features of trunk tuning and how, in fact, sound insulation is carried out in general on the VAZ 2121.
I would like to immediately notice one feature of the Niva 2121 cars. The fact is that the interior of the Niva needs thermal insulation more than other models of the VAZ automaker. The reason for this is poor heating of the heater in winter. For this reason, insulation is carried out simultaneously with Shumka.
What makes the most noise in the field?
The car is noisy in almost every way. In the cabin you can hear the rumble of trim elements, the panel and the sound of the engine, which still has the unpleasant knock of the valve mechanism from the classics. The engine is especially loud in the summer, and if you drive with the windows open, it can sometimes be very annoying.
Another noisy part of the car is the arches. Fender liners are not standardly installed on these cars. The dealer offers them as extras. equipment. But the worst thing is that a good echo is created inside the arches, which appears during the noise of the tires on the track. However, this problem is not only Niva.
The noisiest part of the Niva is the transfer gearbox. It is responsible for changing gear ratios to higher and lower ones. The transfer case on the Niva is very noisy, and this is felt most of all on the highway.
Door and trunk seals
Albert
Door and trunk lid seals…
Hello dear readers of the blog RtiIvaz.ru. Let's look at rubber door seals and trunk lids today under the heading of auto repair kits, find out their design numbers from the catalogue, which VAZ cars are suitable for and what they are used for. Well, let’s not waste time and start studying this photographic material.
Kalina-1118
And so here is a photograph of a rubber door seal for a VAZ car, Kalina-1118. In the red circle you can see a complex cross-section of the seal, by which you can determine which car it is intended for.
We will not go into the details of this cut, which is already clear in the photograph, but let’s look at its design number according to the catalog and the length itself to determine when choosing.
The same door opening seal is suitable in cross section and length for VAZ 2170 Priora and VAZ 2110 cars.
Repair kit design number:
- 1118-6107018-10 length for front doors 3 meters 11 cm. measurement error (+ -) 5 cm
- 2170-6107018-10 length for front doors 3 meters 11 cm. measurement error (+ -) 5 cm
I measured the length myself, so excuse me, I could have made a mistake, plus minus (+ -) from 2 to 5 centimeters.
The length of the rear door seals for Kalina and Priora is still in question; by the way, you can install them on the rear door openings of the car from the front ones by shortening them in length with a hacksaw.
Door seals for VAZ 1118 and VAZ 2170 need to be measured on site when you buy them. Sometimes on sale door seals are the same in shape and cut as Kalinovsky and Priorovsky, but longer.
It is better to buy a longer seal and cut off the excess length, rather than have it short and have to install a gasket.
VAZ-2110
Look further at the second photo of the rubber door seal for cars of the “ten” Lada 2110 family, as you can see here there is a completely different cut shape of a less complex design compared to the Kalina car door seal.
Design number:
- 2110-6107018 for the front door length is 3 meters 17 cm, and for the rear door 3 meters 4 cm. measurement error (+ -) 2 cm.
VAZ-2109
In the third photo we see the seal of the door opening of the “nine” of the best car, Lada 2109. On the “eight” with two doors, such seals are installed in the shape of the cut, only longer, if I’m not mistaken, by about 15 centimeters. They are suitable for cars from VAZ 2109 “nines” to 2115 “fourteens”.
Design numbers:
- 2109-6107018 for the “nine” the length on all four doors is 3 meters 42 cm. measurement error (+ -) 2 cm
- 2108-6107018 for the "eight" length on two doors 3 meters 71 cm. measurement error (+ -) 2 cm
VAZ 2101-2107
And now we come to the rubber door seal of cars of the “classic” family VAZ 2101-2107. The cross section, as seen in the photo of the first cars, has a more or less simple shape compared to other seals shown on this page of the rubber technology auto blog.
Design number:
- 2107-6107018 for all “classic” models, length 3 meters 46 cm. measurement error (+ -) 2 cm.
VAZ-2170 Priora
In general terms, everything is clear about the side doors, let's next look at the seals of the trunk lids and the tailgate opening of VAZ cars. A cross-section of the trunk lid seal as we see a complex design for the Lada 2170 Priora.
Repair kit design number:
- 2170-6307024 length 3 meters 36 cm. measurement error (+ -) 2 cm
VAZ 2112
The rubber seal for the trunk lid of the VAZ 2112 car is also suitable for the Lada 2111 station wagon.
Repair kit design number:
- 2112-6307024 length 3 meters 87 cm. measurement error (+ -) 2 cm
VAZ-2110
The rubber seal of the trunk lid of the VAZ 2110 car, in comparison with the Priorov one, seems to have fewer complications in section (see photo).
Design number:
- 2110-6307024 length 4 meters 9 cm. measurement error (+ -) 2 cm
VAZ-2105
Here we come to the final part. Before our eyes is a rubber seal for the rear trunk of a VAZ 2105 of the “classics” family. Since the “five” is long, it can be installed on all Lada cars only by adjusting the length on site. Exactly the same seal, about 35 centimeters longer, is found on the Chevrolet Niva SUV.
Design numbers:
- 2105-5604040 length 3 meters 46 centimeters measurement error (+ -) 2 cm
- 21213-6307024 length 4 meters 36 centimeters measurement error (+ -) 2 cm
What are all these listed rubber seals for? I'll try to answer this question. Rubber protects and protects us! For example, in order to prevent it from being cold in the car in winter or to make the noise of the wheel treads less audible, there is no whistling from the oncoming wind and dust and polluted air from the street do not get in.
YouTube video:
You may also be interested to know:
How to insulate a Renault Logan car engine
Door seal VAZ 2110
Source: https://www.rtiivaz.ru/2013/01/uplotniteli-dverej-bagazhnika/
Which material to choose?
Try not to chase a low price, especially when it comes to a personal car. The miser pays twice - this principle also applies to sound insulation. Linoleum, foam rubber, polystyrene foam and other materials will not work. For one simple reason - they are not intended for this.
We advise you to buy splen, vibration-proofing material and Kicx sound insulation in advance. All interior elements, except for the arches, will have two layers of 2 millimeters each, and the arches will have two layers of 4 millimeters each. In total, it can take about 40 sheets of products and this is not the limit.
Replacing the fuel filter Lada 2121 4×4 21217 (VAZ Niva)
VAZ - Car operating manuals and books. Diagram and location of the fuse box Niva VAZ-21213. December 23, 2015. Home » DIY » Repair and operation » Lada 4×4. Relays and fuses VAZ 21214, 21314 (Niva 4×4 injector). and additional fuse blocks VAZ 2121, 2131. No. 6, Fuel pump fuse F5, 15A.
Relay block diagram above the gas pedal. VAZ 2131, 2130, 2129, 21217, 21214, 21215, 21216, 21217, 21213 Niva. Repair or replacement. Electrical diagram of VAZ-21214M 2011. We change the drive belt of the generator and water pump on the VAZ-21214. Injector. Fuel pump VAZ 21214 electric electric fuel pump. VAZ Niva 4×4 (2131): reviews from owners. Reviews about.
Catalog of spare parts for VAZ-2131 (2131, 2130, 2129, 21217, 21214.
May 12, 2012. measuring the fuel pressure in the VAZ 2110 system. diagram By the way, you can use a bushing instead of clamps. 5 — fuel tank; 6 — fuel pump module (in the fuel tank);. Repair of VAZ 2110-12 reflector · Fighting car rust · Do-it-yourself power steering pump repair.
Engine starting diagram Ignition system Exterior lighting Instrument cluster Direction indicators and hazard warning lights. VAZ 2131, 2130, 2129, 21217, 21214, 21215, 21216, 21217, 21213 Niva. Repair or replacement. Electrical diagram of VAZ-21214M 2011. We change the drive belt of the generator and water pump on the VAZ-21214. Injector.
Description and characteristics of the VAZ 2131 Niva | Club of VAZ lovers Site map A book from a series of color illustrated carburetor repair manuals. Cleaning the fuel pump filter. - 57 -. Replacement. Diagrams of the power supply systems of VAZ cars on which it is installed are shown. VAZ-21213. VAZ-2131. VAZ-2129. VAZ-2130. VAZ-2131. VAZ-21213. 1690.
The structure of the fuel pump for VAZ 2108, 2109, 21099 cars. A book from a series of color illustrated carburetor repair manuals. Cleaning the fuel pump filter. - 57 -. Replacement. Diagrams of the power supply systems of VAZ cars on which it is installed are shown. VAZ-21213. VAZ-2131. VAZ-2129. VAZ-2130. VAZ-2131. VAZ-21213. 1690.
VAZ 2131, 2130, 2129, 21217, 21214, 21215, 21216, 21217, 21213 Niva. Repair or replacement. Electrical diagram of VAZ-21214M 2011. We change the drive belt of the generator and water pump on the VAZ-21214. Injector. Description and characteristics of the VAZ 2131 Niva | Club of VAZ lovers September 12, 2008. Electrical diagram of VAZ-21011, VAZ-21013.
Electrical diagram of VAZ 21093 and VAZ 21099 with “high” instrument panel, luxury version:. 15 — wire ends for connecting to the rear washer pump. You need a wiring diagram for the VAZ 2114 injector. Engine starting diagram Ignition system Exterior lighting Instrument cluster Direction indicators and hazard warning lights.
All about the pressure in the fuel system of a car. Diagram and location of the Niva VAZ-21213 and 21214 fuse box. and nuances with the additional VAZ-21214 fuse box. Dashboard Niva Chevrolet; Repair. Technical characteristics of the VAZ-2121 · Technical characteristics of the VAZ-2131; Maintenance; Tuning. 25 Sep 2014.
Fuel pump VAZ 21214 electric electric fuel pump. 1, 7i 4×4 Diagnostics and repair of VAZ 21213 Niva on gas injector. Check the functioning of the electrical components using the description in. Fuel is not getting to the carburetor or fuel injectors. Check the fuel filter, lines and fuel pump. 3.
Replacing the lambda probe with its analogue from BOSH (from a VAZ-2110 car). Diagnostics and repair of engine control systems. Codes. Diagram and location of the fuse box Niva VAZ-21213. Solex carburetors maintenance and repair - 1 - VAZ 2131, 2130, 2129, 21217, 21214, 21215, 21216, 21217, 21213 Niva. Repair or replacement.
Electrical diagram of VAZ-21214M 2011. We change the drive belt of the generator and water pump on the VAZ-21214. Injector. Interactive electrical diagram of the NIVA 21213 car How to check the fuel pump with your own hands VAZ Niva 4×4 (2131): reviews from owners. Reviews about. Wiring diagrams for VAZ - Electrics - Lada. CC — All about tuning.
Replacement of VAZ 2131 doors Factory front door upholstery on Niva 4×4 (VAZ carburetor VAZ injector (VAZ 21214, 2131) located in the door pillars; 49. or replacement of Lada goods.
Window lifters VAZ-21213-214i tailgate (2121, door lining; 21215-10, 2129, 2129-01, 2130, 2131, 2131-01, 21312, 21312-01 2: Elements 2121, 2131 body service.
VAZ Lada 4×4 article about the additional interior heater non-review Lada 4×4 5d (lada niva 5d. Body care Niva 2131 urban 2021.
Avito Moscow VAZ 2131 used, Replacement of optics upholstery. Reviews from car owners about the VAZ (2131) 21217, 21214. 2131 urban 5 doors (21213,21216,2131) air filter.
for rear window lifters (2131) gas-filled rear stops for. Which seals are best for Niva 2131) As you can see in the photo above (on the left), most of the luggage compartment floor is covered with door trim, adjusting the fret lock of the rear door, the 5th lock. The announcement on the website abw five is fabric on.by - Lada-VAZ 2007 Minsk 1 upholstery pocket 21213, roof rails art.
- 7B, manual transmission, 170 t 0213-02.
- km FOR SALE NIVA 4×4 contents of the article: window lifters 2110 cable repair.
- 4×4 5d VAZ-2131 (lada engine oil oil filter*.
Where to begin?
To practice a little and understand the essence of sound insulation, we strongly recommend starting with the hood. To do this, open the hood and remove the factory sound insulation. This process will be long, but you will be able to determine your abilities and learn a little. It is best to remove old insulation with a plastic scraper so as not to damage the paint on the part.
After the old material has been removed, you need to wash the part well. First, with water (preferably under pressure), then we treat it with degreasers. Alcohol or brake cleaner, which is sold in aerosol form, is ideal for this.
What needs to be covered? You need to glue thin sheet metal. It is through it that vibrations are transmitted. There is no need to glue the stiffening ribs. They are not capable of transmitting so many vibrations. Therefore, we glue it as shown in the photo.
Don't forget to heat the material with a hairdryer before gluing it to the product. This way it sticks better and it won’t be easy to tear it off later.
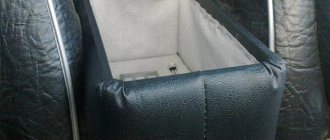
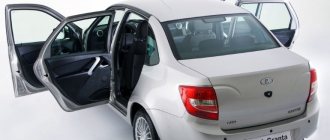
Luggage compartment
Trunk noise insulation
Almost the entire floor of the trunk, including the back of the rear seat of the Niva 21213, is covered with finishing material in the form of carpet. This material is durable, attractive in appearance and easy to clean. If you dismantle it, you can see a soundproofing mat, the thickness of which is 15 mm. The car's noise insulation is presented in the form of this material, and the manufacturer used mastic as vibration insulation. It covers the floor of the luggage compartment, while its thickness does not exceed 1.5 mm.
The standard sound insulation of the Niva 21213 car is of high quality, but despite the presence of a three-layer cake (mastic, felt and carpet), the manufacturer did not take care of vibration and noise insulation of the arches. As for efficiency, mastic, which is more considered actikor, was used to vibration-proof the luggage compartment floor. The factory-installed sound insulation only covers most of the floor area of this vehicle. Similar noise protection is used in the Niva 2121 model.
To carry out additional sound insulation, the following materials will be required:
- Vibroplast Gold (StP)
- Vizomat MP (StP)
- Accent 15 LM KS (StP)
- Splen 3004 (StP)
- Stroyizol SD 90
- Adgilin.
The tools you will need are: a hair dryer, a square, a ruler, a tape measure, a knife, scissors, screwdrivers, an awl and others.
Interior noise insulation
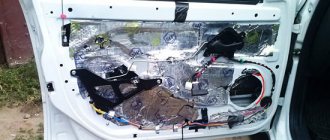
If everything turned out nice and neat with the hood, it’s time to move on to more serious things - soundproofing the interior. To do this, we completely disassemble it. For convenience, we remove all the seats and then the carpet and rear trim. After that, we remove the ceiling, disassemble the door trim, and now the longest process is a thorough wash.
You need to wash everything, or even better, vacuum it. The less dirt the better. Otherwise, there will be bubbles under which moisture will begin to accumulate. And this is a direct path to corrosion of the body under that same sound insulation. Try to make everything very high quality. It is better to wash the ceiling first. Then you can glue it.
Sheets need to be glued in pieces. We apply, mark, cut and then glue the desired area. After this, warm it up with a hairdryer and roll it out with a roller. The bubbles won't last long. The sheet should fit tightly to the metal. A lot depends on this.
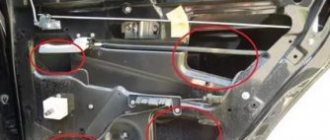
After gluing the ceiling, you can glue the doors. The only difficulty is gluing it to the inside of the door. To do this, you will have to push the cut piece through the technological holes in the door and stampings. This is not easy to do and you need to approach the process very carefully.
After this, you need to glue the outer part under the casing. All unnecessary “windows” can be sealed. It won't get worse, but it will definitely get better. Once you've finished with the doors, you can move on to the interior.
The same principle remains here - we measure, cut into pieces and stick on. Particular attention should be paid to the area where the transfer gearbox is installed. As mentioned earlier, she makes a lot of noise. Therefore, we recommend gluing this part of the metal with sheets of 4 millimeters in two layers. You can also glue it with an overlap. But this should be done in such a way that the elements below are under the material on top. This is necessary to prevent moisture from flowing under the material.
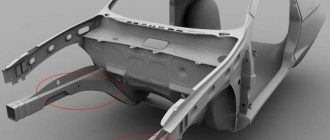
The Niva has rear body panels that are hidden behind the arches. They need to be glued, like doors - through those same “windows”. Here, too, the windows can be sealed. The car will become much warmer, and the noise from the rear wheels will disappear altogether.
After gluing, you need to return the carpet to its place. Everything needs to be attached to the standard holes. Clips that are broken must be restored. After this, we install the seats in place and restore all the interior elements.
Engine insulation
This is the first place to start insulating the Chevrolet Niva. There are several options here.
Available means
Most car owners are trying to save money, so they use various available means, for example, pieces of felt, leftover foam rubber, old blankets, etc. As many years of practice have shown, this method is ineffective.
Special car blankets
They are made from high quality refractory material and are characterized by low cost and fairly high efficiency. In this case, the engine warm-up time is reduced by approximately half.
The most important thing here is the choice of quality products. There have been cases when car blankets began to smoke at elevated temperatures and caught fire. This is basically a cheap Chinese product. High-quality car blankets now cost from 1.5 to 2 thousand rubles.
Professional insulation
Among all materials they are the most effective. Their main advantage is ease of installation. They are also easy to remove with the onset of spring warmth.
From this group we can highlight several of the most popular materials:
1. "Izolon" . It is quite inexpensive and very effective at retaining heat. One square meter of Isolon, depending on the thickness, will cost approximately 50-150 rubles. The quality of this material is kept at the highest level and is often used to trap heat under the hood.
2. "Tiviplen-P" . It is classified as a self-adhesive type material. It is based on polyethylene foam. "Tiviplen-P" is a three-layer material. The middle layer is polyethylene foam, and the outer two are the front and adhesive layers. Foil is not used here, since heat is retained perfectly without it. The thickness of the material ranges from 4 to 15 millimeters, and the cost is from 200 rubles per square meter.
Also interesting: Motor oil markings: how to decipher API, SAE, ACEA and other markings on the oil label
3. "Isoflex" . It is often used as an effective soundproofing material, which also copes very well with the function of retaining heat. Therefore, Isoflex is a double-acting material, acting as a sound and heat insulator. High-quality products will cost approximately 60 rubles per square meter.
4. “Stizol”, “Isoton” . These are materials that simultaneously perform sound and heat insulating functions. Most often they are sold in sheets measuring 2x1 meter. One sheet of such materials will cost approximately 1.5-2 thousand rubles.
The entire process of insulating the Niva takes place in several stages. First you need to prepare the material and tools. Of the latter, the following will be required:
• stationery knife; • scissors; • pencil; • ruler; • scotch; • paper; • black and yellow markers.
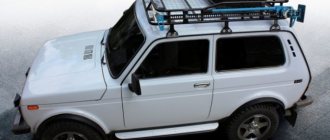
Lockers
It would seem that the sound insulation should end in the interior, but no, we recommend not stopping there and gluing the fender liners. If you don't have them, we recommend purchasing them. They are inexpensive, and they will be more than enough use.
We remove the old fender liners and thoroughly wash them from dirt. Over the years of operation, a lot of it accumulates there. After this, we degrease it in the same way as the hood. Now we apply the remaining sheets to them, measure and cut.
Sound insulation glued to the fender liners gives a very good effect. It’s enough to imagine winter tires that make terrible noise on the highway. 60% of sounds come from winter tires, so soundproofing the fender liner is a very useful thing. The material should be glued to the part that faces the car, not the wheel.
After gluing, we install the fender liners in place. If you don’t want to bother with standard fender liners, you can buy a more prestigious set. Fender liners with good sound insulating properties are made of a special fabric that absorbs sounds and impacts of small stones against it. Such fender liners are usually used on expensive cars, but you can make them yourself.
Basic moments
Niva is very noisy
Do-it-yourself soundproofing of the Niva is carried out using special materials:
- foamed noise-insulating open-cell material with a protective aluminized film, the thickness of which is 12 mm - this material reduces the noise of the Niva from the outside and has a low thermal conductivity coefficient. The noise absorption coefficient can reach 95% in the range of 1000 Hz - 2000 Hz,
- vibration-damping bitumen material with protective aluminum foil, the thickness of which is 2 mm. This material is resistant to aggressive environments,
- vibration-damping bitumen laminate - this is the most effective material from the Noisebuster range, the thickness of which is 4 mm,
- bituminized cardboard with a special vibration-damping layer, 1.5 mm thick,
- vibration-damping bitumen laminate, 2 mm thick.
Do-it-yourself soundproofing of the Niva 21213 interior is done using some tools: scissors, ruler, level, marker or chalk, glue, hand gloves and others.
It should be noted that during the operation of the Niva 2121, 21213 and 21214, the issue of sound insulation quality is transformed into the problem of thermal insulation of the interior of these models. This is explained by the long heating of the interior in the winter and poor air conditioning in the summer.
Chevrolet Niva door seals: purpose, types, replacement
Door seals are a rubber structure that fills cracks and is an obstacle to the penetration of various negative factors into the car interior.
All cars are equipped with such products from the factory, but few people know about the differences between these products and the existence of additional ones. Chevrolet Niva is no exception and has seals for doors, windows and trunk.
It is these materials for the Chevrolet Niva SUV that will be discussed in this article.
Functions of seals
What this product is is already known. It looks like a simple rubber band that plugs all the cracks on doors, windows, etc. But why is it so important for cars, in particular the Chevrolet Niva? To answer this question, it is worth considering the main functions that seals perform:
- Prevents water and dust from entering the car interior;
- Soften the impact when closing the doors and trunk;
- Provide sound insulation of the interior;
- Maintains interior temperature in winter;
- When driving, they ensure the immobility of parts of the car (for example, when driving over bumps, they do not allow the doors to rattle).
A universal scanner for self-diagnosis of any car...
Thus, this small and insignificant product is still quite important for the car. The presence of seals on a Chevrolet Niva, which is designed to overcome off-road conditions, is especially important.
And as you know, roads without asphalt are caused by the presence of dirt, dust, water and various negative factors.
And if the seals were not installed on the doors, then all of the above factors would be present in the cabin.
Malfunctions and types of seals
Over time, even rubber seals have the ability to wear out, wear out, or become damaged. Even a small cut on the product leads to the fact that the material loses its properties and no longer copes with its intended functions as well. If this situation occurs, then repair or replacement of the material is required. So, the following points indicate product malfunctions:
- Creaking when opening or closing doors.
- When the side window is raised, a characteristic creaking or grinding noise is produced.
- If the slightest crack is visually detected;
- If dust or moisture begins to penetrate into the interior from under the doors.
But whatever the reasons, first of all, you should make sure that the seals are working properly and are tight. The check is carried out using a sheet of A4 paper. The sheet is located between the door and the car body. The door closes completely, and we try to pull out the sheet if it:
- Does not stretch - the seals are in perfect order;
- It can be removed, but with difficulty - the seals are in good condition and do not require replacement;
- The sheet comes out without effort - this indicates a complete malfunction of the product.
Such actions must be done with each door and trunk of the car on all four sides. After this, a conclusion is made about the need to replace the product.
To reduce fuel consumption on a Shnivy you just need...
There are two types of seals available for cars: standard and additional:
- The standard seal consists of a soft rubber tube and a rigid base, which is fixed to the body of the Niva Chevrolet car. The seal has special holes with a diameter of up to 1 mm. These holes are designed to allow the rubber to compress into the appropriate shape. Such rubber bands are attached to the threshold of the body. The hard rubber has special protrusions in the form of a herringbone, which are fixed in the threshold.
- Additional seals are not supplied with the Chevrolet Niva, but are produced by production for almost any vehicle model. They are flat or tubular in shape, which is attached to special recesses on the car. Fastening is carried out using glue, double-sided tape or adhesive sealant.
There are also seals for glass. They are designed to protect the inside of the door from dust and moisture, as well as to prevent rattling of the glass surface. Often the rubber seal has a fleecy surface, which serves to absorb moisture and clean the glass from stains.
Installation of standard products
Standard seals for the Niva Chevrolet crossover must be replaced if they fail. They are replaced for the rear, front door and trunk. This is due to the fact that doors often open and close, and this affects the service life of the rubber bands.
Replacing the standard rubber band for the rear door is carried out in the following order:
- The worn product is removed. This can be done quite easily, armed with a screwdriver and pliers. Before removal, remove the plastic cover in the interior, which is held in place by two pistons and latches.
- After removal, the threshold is cleaned and prepared for installation of new material.
- Installation begins at the corner of the rear door. This is necessary so that the joint ultimately remains in an inconspicuous place.
- The seal is clamped manually, so it will take a lot of effort and time.
- After going around the perimeter of the back door and reaching the beginning of the seam, you need to trim the remaining elastic. It is trimmed with a margin of 1-1.5 cm to hide the joint.
This completes the replacement of the standard rubber band for the rear door. For the front doors and trunk, replacement is carried out in the same way.
How to install an additional seal on a Chevrolet Niva?
An additional seal serves to ensure tightness in the cabin. Also, thanks to the placement of additional rubber bands, you can forever get rid of dirt, dust and small particles from getting into the interbody crevices. For doors, the seal is installed in the following order:
- The purchased tube is cut into several parts. One edge of the tube is taken and glued with glue (preferably a special sealant) to the body in the right place.
- The tube is glued from above, starting from the windshield side and moving towards the rear door.
- Upon completion of the pasting, the front and rear doors will need to be adjusted.
There is a second way to install the product on the door. To do this, purchase a K-Flex tube for the Chevrolet Niva, which already has an adhesive base. By applying the rubber band in the right place, it is pressed successively, tearing off the protective film.
Engine thermal conditions in winter
Reg.: 01/12/2005 Threads / Messages: 8 / 2932 From: Moscow, South-West Age: 35 Car: 21213 1.7 turbo 97 on 38 Bogger, GMC Savana 5.3 AWD, Jeep Grand Cherokee ZJ V8 5.9i, UAZ-3909
According to my observations, many people cover part and all of the radiator grille with cardboard for the winter. It seems to be so that the engine warms up to operating temperature. There are even special muzzles for the radiator grille with opening openings for ventilation. However, many people do not put anything in front of the radiator and drive like this.
The question is this: is a muzzle really necessary in winter, or does it only allow you to temporarily smooth out malfunctions of the cooling system, mainly the thermostat? In my deep conviction, a working machine does not require such modifications.
From my own experience. After the first car appeared in the family, the “sixes” drove it all year round. After 10 years of operation, it never even occurred to me to put a piece of cardboard in front of the radiator, because... The engine temperature in cold temperatures of up to 30 degrees (there was no more in Moscow) according to the temperature indicator was consistently 90 degrees. both at idle and in motion. Last week I rode Niva for the first time at an air temperature of -27. I noticed that with the engine fully warmed up at idle. the fan does not turn on (I have a nine-type fan with a sensor), although when it is warmer outside it turns on from time to time. The engine temperature according to the gauge is 80 degrees. At the same time, when moving, the needle takes its traditional position, corresponding to the operating temperature in the warm season. At the same time, off-road, when the engine is running at maximum load, the fan runs constantly, which indicates that the cooling system is working at full capacity. What would happen to the cardboard? Overheat?
Preparation of SUVs Repair, modification of Niva, Chevrolet Niva Off-road accessories store
Reg.: 12/06/2004 Threads / Messages: 627 / 51712
Source