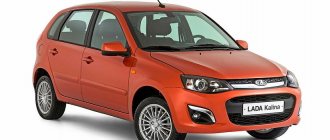
Many owners of the practical domestic small car Lada Kalina eventually face the nagging question of how to remove the instrument panel?
Over the years of operation, the car we are considering has revealed some shortcomings, among which the dashboard is hidden. This interior component annoys the owners of Lada Kalina with squeaks and other noises while driving, and even “does” this with enviable consistency, so many often ask the question: how to remove the instrument panel. Assemblers and manufacturer inspectors make it a priority during the production run to ensure correct clearances. Here it seems that few people are interested in the quality of the panel’s fit and the reliability of its fixation.
This does not stop stubborn owners, and they independently remove the dashboard in order to eliminate these annoying “participants of the interior orchestra”; the main thing is to know how to remove the instrument panel. Removing this product is quite difficult, so we recommend that the subject who dares to undertake such an experiment study the manuals, including the material presented here.
The work itself involves following several mandatory steps, and the removal of each of the structural elements, including the removal of the torpedo, must be performed with extreme caution.
We disassemble the panel on Kalina
How to disassemble the instrument panel correctly? The dismantling procedure on a Lada Kalina car requires the use of a simple set of tools.
Let's take a closer look at it:
- screwdrivers with a Phillips tip and a flat profile;
- head with dimension “10”;
- a marker that allows you to mark the disconnected connectors of the supply wires, which will prevent confusion during assembly.
The algorithm of actions involves starting to perform manipulations on the sides of the panel.
So, let's start.
- We disconnect the rubber sealing component, which is currently preventing the complete removal of the structure. This is done by bending actions and using a flat screwdriver.
- Remove the plastic casing, which is secured with three clips. It is located on the A-pillar. A flat-head screwdriver also comes to the rescue here, because only it can press out the socket.
- We dismantle the linings located directly in front of the glass. We do this by unscrewing the fasteners, from both sides.
- Now you have access to remove the black cover (also under the glass). It is fixed not only with iron clips, but also with screws. After freeing from all the fastening components, we pull the cover towards ourselves and enjoy its slow descent from its seat.
- We proceed to dismantling the linings from the side deflectors. We also do this by unscrewing the fasteners.
- Next, we concentrate on the central sector of the Lada Kalina panel.
Features of choosing a stove radiator
The stove has a simple design. Its main element is the heater radiator. During the first 20-30 minutes, the engine heats the coolant to a temperature of 40-50 degrees, and then it circulates through the cooling system and enters the heater radiator. Warm air is distributed throughout the cabin using fans.
There are two types of heaters installed on cars:
Each type, depending on the properties of the material, has its own advantages. The thermal conductivity of copper is less than that of aluminum, so it heats up more slowly. But it also retains heat for a long time. Copper products have high maintainability and can be soldered a large number of times.
Dismantling the console on Kalina
This stage involves removing the Lada Kalina torpedo into its component components.
- Remove the ashtray: pull it towards you and unscrew the 4 screws. They keep her in her nest.
- Next we get to a pair of plugs, which are located on both sides of the emergency button. They need to be pryed off with the same screwdriver and put aside.
- Let's move on to the screws located under the plugs. It is these mounting components that hold the console underneath.
- Having unscrewed a couple of screws, we begin to pull the console towards us. We do it slowly in order to avoid a break in the electrical connections.
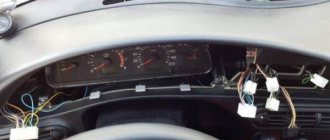
- We disconnect the cable blocks from the sockets of the current collectors, simultaneously marking them.
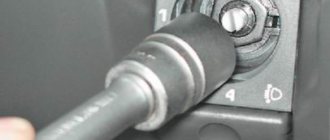
- It's time to unscrew the steering column cover. It is held in place by a pair of size 10 bolts and five screws.
- We unscrew the screws (2 pcs.) holding the casing of the panel itself.
- The upper section of the panel is held in place by nuts, the number of which should be seven. We “defeat” them.
- Removing the stove air duct is problematic. To “surrender” it, we tear off two lock washers, and then unscrew the remaining list of screws. During subsequent installation of this particular small unit, it is enough to use only screws.
- We look for all the “hidden” screws around the perimeter and “sentence” them to unconditionally unscrew them.
- Only now can you carefully pull the panel towards you. If she “listens” to you, then everything was done correctly. If any obstacles appear, it is not difficult to find the “hidden” fastening element.
Let's check: are all electrical connections disconnected? If yes, then the dismantling procedure on the LADA Kalina model has come to an end.
Replacing the Kalina thermostat cover
Replacing the water pump Lada Kalina 8 valves
Where is the cabin filter located in viburnum?
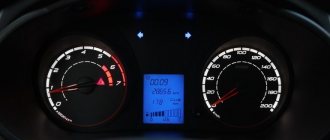
Do-it-yourself replacement of backlight bulbs in the Lada-Kalina dashboard: photo, video
It is important to keep the instrument panel in good condition in order to receive timely information about the components and systems of the vehicle.
The shelf life of lamps is reduced due to vibrations, power surges and temperature changes. As a result, the question of replacement arises regularly. To carry out such work you will need pliers, Phillips screwdrivers and a set of new lamps. It is better to immediately buy a set of 5 pieces of 12 V baseless incandescent. You will also need new cartridges, since the manufacturer solders the backlight to the cartridges with antennae (if you purchase each unit separately, you will need a soldering iron). To preserve the mounting screws, magnetize the screwdriver. This way the small details will remain under your control.
Find out the cost of replacing the backlight bulbs in the Lada-Kalina dashboard online in 3 minutes
Don't waste your time - use the Uremont search and get offers from nearby services with specific prices!
Replacing dashboard light bulbs “Lada-Kalina”
To install new elements you will need to disassemble the “tidy”. For Lada Kalina, work according to the following algorithm:
- lower the steering wheel down (otherwise it will get in the way; the regulator is located behind the column);
- unscrew the self-tapping screws securing the cover (get from below);
- pull the part towards you;
- unscrew the fasteners with a magnetized tool;
- disconnect the wires with the block by tilting the panel.
During the process of replacing the Kalina dashboard lamps, be careful not to lose small parts. When going on a road trip, make sure you have a spare “lighting” kit and a minimum set of tools in your car. Then an unexpectedly faulty dashboard will not become a critical event - you can quickly correct the situation. If you have doubts about your own knowledge, find a video with step-by-step instructions.
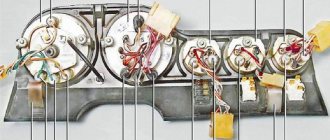
Sequence of replacing the backlight lamps of the Kalina dashboard
The technology is very simple. To remove cartridges, turn them half a turn counterclockwise. Remove the burnt element with your hands or pliers, picking up the shank. Install a new spare part. Install the cartridge (turn clockwise).
Tip #1 for replacing Kalina dashboard lamps from experienced car owners - change all the lamps at once.
This will eliminate the need to repeat the procedure in the near future. Although it is simple, it is still labor-intensive. Another important advantage of this advice is the uniform illumination of the entire “tidy” (the elements produce a glow of different intensities over time). The work is quite simple, but you should not lose your vigilance - there is always a risk of damaging the threads or thin elements.
Let's sum it up
In addition to the irresistible desire of LADA Kalina owners to defeat the “crickets” in the panel, there is another reason for removing the structure, this also applies to the removal of the torpedo. This is a noble goal of tuning, especially since now many people know how to disassemble the instrument panel.
The domestic manufacturer has deprived the LADA Kalina of a chic design and quality of panel material with a variety of lights and electronic gadgets. The diehard owners did not give up here either, and boldly installed fashionable instrument panels with a neon glow into the standard design, repainted individual components, installed lighting (including for the feet), and also performed a great variety of modern “tricks.” The main thing is to achieve a good fit of the parts and the panel will thank the owner with a soothing silence.
Removing the rear door trim
The rear door structures are secured with 10 plastic holders and 2 screws. The first fasteners hold the door panel, and the second fasteners hold the handles. Disassembly technique:
- The handle of the mechanical window lifter is being removed. It is important to note that this element is held in place by a plastic half ring. It is carefully pryed up with an awl.
- The plugs on the door handle are removed, then the fasteners are unscrewed.
- The lower far corner of the panel is pulled back, and then the first piston is removed.
- Hold the door card with your hand and remove the remaining clips.
- The covering is changing.
There are differences between Kalina 1st and 2nd generation. In the first case, the opening handle lever is unscrewed, but in the second option this is not required, since it is screwed directly to the door.
Operation algorithm
Started:
The front door seal will need to be bent and pulled towards you very carefully; The decorated plastic casing must be removed from the front roof pillar. This is easy to do - just remove the 3 clips that secure the cover; Now you will need to find two screws securing the air vent grilles, as well as the trim in front of the glass. The screws are on both sides, and to unscrew them you will need a shaped screwdriver (preferably with a short handle); In front of the glass we also see a plastic cover (it is black). We remove it by gently pulling it towards ourselves.
Note that the overlay is attached using iron buttons;
During dismantling, if you act carelessly, the clips may fall under the panel. It's okay, they can be replaced with new ones; We dismantle the side nozzles on the air vents by unscrewing the screws; We take out the “beard”; It's time to open the ashtray, behind which there are 4 screws; We turn them inside out and take out the ashtray; After that, putting your hand under the ashtray, use a screwdriver to pry off the two side plugs. They are located on both sides of the emergency system key;
They are located on both sides of the emergency system key;
This is done due to the fact that under the plugs there are two screws that are responsible for fixing the “beard” from below. We pull the lower part towards ourselves, but very carefully. You will also need to turn off all the chips, not forgetting where they were; We also remove the cover on the steering wheel and dashboard. The latter is held by 2 black self-tapping screws; We also unscrew the panel from above, using a 10-piece head. The panel is also secured with 7 or 9 screws, depending on the specific machine; At the windshield, the heater air duct sits on lock washers. It is better not to remove them, as the plastic rods will simply come off. For this reason, we tear them ourselves, and instead of them we use self-tapping screws during assembly; You don’t have to remove the steering wheel at all, although the panel comes out with some effort. But in order to reduce time, you can take such an adventure; The time has come to completely remove the torpedo, but we’re in no hurry yet
We carefully check all areas where the screws holding the panel could remain and unscrew them. We pay special attention to the side parts and niches; Carefully pull out the torpedo. It can be easily removed if there is nothing holding it
Let us note right away that it is easier to remove the panel through the passenger door. As for the method of draining the coolant and removing the stove, everything is done almost the same, except with some nuances. After the sound insulation has been carried out, we install the panel in place. Don't forget to first pass the block with wires for the switch. We also insert the glove compartment light in advance, using the appropriate holes. Thus, the operation can be considered complete. Having learned how to remove a torpedo on Kalina, you can safely take on this work, even without the help of an assistant. On the other hand, an extra pair of hands certainly won't hurt.
Without removing the windshield
In this case, the windshield protective cover and cabin filter remain in place. Roughly speaking, there are fewer preparatory operations. But the algorithm for the main stage of work is radically different from the traditional one. It looks like this:
- Disconnect the accelerator pedal cable.
- We remove the pedal.
- We are dismantling the sensor for turning on the rear parking lights.
- We disconnect the brake pedal from its drive by disabling the clamp and the metal pin.
- Remove the steering column.
- Remove the trim on the left side of the dashboard.
How to remove the center console in a luxury package
Let's say it was decided to dismantle the panels located on the center console. You can see that there are two of them. One is the front panel of the air conditioner, the second protects the radio and contains air duct grilles in its design. These two parts are not connected to each other. However, it will not be possible to remove the radio panel unless you first remove the climate control panel. Below it are metric screws (A, B) that secure the media center shield from below.
New Lada: Dismantling and assembling the gearbox | VAZ | VAZ management
Central console of Kalina-2, Luxury package