Instructions for replacing liners
Worn or damaged brake hoses cannot be repaired. If any defect is detected, a replacement will be made. Causes:
- a small crack and leakage of fluid from the pipe can lead to brake failure and a major accident;
- the non-removable design of the hose does not imply restoration or replacement of the damaged part;
- Filling a through crack with improvised means will not yield results - due to the high pressure in the line, the liquid will still leak out when the brake pedal is pressed.
To disassemble and install new flexible hoses, it is advisable to drive the car onto an inspection hole or overpass. If the front pipes can still be changed without a ditch, then getting to the rear is much more difficult - you will have to lie under the car, lifting the left side with a jack.
While on a long trip, my friend encountered a leak in the rear pipe (the car is a VAZ 2104, the brake system is identical to the “seven”). He bought a new spare part at a roadside store and installed it without an inspection ditch, on a flat area. The operation is simple, but extremely inconvenient - during disassembly, a drop of brake fluid got into a friend’s eye. I had to urgently get out from under the car and wash my eyes with clean water.
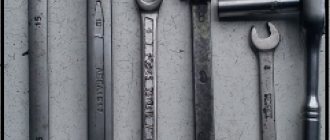
To change worn pipes, you must have the following tools:
- wheel removal kit - wheel wrench, jack, wheel chocks;
- open-end wrenches with dimensions of 8-17 mm;
- brush with metal bristles;
- flat screwdriver;
- head 14 with knob;
- pliers;
- aerosol composition WD-40;
- rags.
To unscrew metal brake pipes, it is recommended to use a special clamping wrench with a slot for a 10 mm nut. If you work with a regular open-end wrench, you can easily lick the edges on the coupling. The nut will have to be loosened using a barbaric method - a hand vice or a pipe wrench, and then change the tube.
During the replacement process, brake fluid loss is inevitable. Prepare a supply of this material for refilling and buy a rubber boot (these are placed on the brake caliper fittings) to block the flow of fluid from the unscrewed iron tube.
Installing the front hoses
Before starting repair work, prepare the liquid brake system of the VAZ 2107 for disassembly:
- Place the car on the inspection hole, turn on the handbrake, open the hood.
- Unscrew the cap of the brake expansion tank and move it to the side, placing a rag. Fill the container with fresh liquid to the maximum.
- Unscrew the cap from the clutch reservoir located nearby.
- Take a piece of plastic film, fold it 2-4 times and cover the neck of the brake tank. Screw the clutch reservoir cap onto the top and tighten by hand.
Now, when the system depressurizes (due to disassembly), a vacuum is formed in the tank, preventing liquid from escaping through the removed tube. If you work carefully and follow further recommendations, air will not enter the disassembled circuit, and very little liquid will leak out.
Purpose of flexible pipes
The contours of the VAZ 2107 liquid brakes are made of metal tubes leading from the master cylinder (abbreviated as GTZ) to all wheels. It is impossible to connect these lines directly to the working cylinders, since the wheel brake mechanisms are constantly moving relative to the body - the chassis absorbs unevenness, and the front wheels also turn left and right.
To connect rigid tubes to the calipers, flexible connections are used - brake hoses made of moisture-resistant reinforced rubber. The “seven” has 3 pipes - two on the front wheels, the third supplies fluid to the brake pressure regulator of the rear axle. Short thin hoses between the expansion tank and the gas turbine engine do not count - they do not have high pressure, spare parts rarely become unusable.
Flexible eyeliner consists of 3 elements:
The first end of the hose, connecting to the circuit tube, is always attached with a fixing bracket to a special bracket on the body. On the rear axle the second tip remains free, on the front wheels it is additionally fixed to the calipers with overhead brackets. To prevent liquid from seeping through the threaded connection, 2 copper sealing washers are put on the bolt.
About choosing pads
Reasons and features of replacing brake hoses on a VAZ 2110
Today on store shelves you can find a lot of pads from a variety of manufacturers, both well-known and not so well-known. In addition, there are a lot of counterfeits that copy products from well-known brands. It is often very difficult to recognize these fakes, so the only criterion for a novice driver here will be the price. You should understand: a set of four high-quality pads cannot cost 200 rubles. So which pads should you choose given the abundance available on the market? Today, the owner of the “seven” has three options:
- purchase and install original VAZ pads. These pads have two advantages: they can be found everywhere, plus an affordable price. Currently, the cost of a set of four rear pads does not exceed 700 rubles;
- pads from the German company ATE. This is the second most popular manufacturer of pads represented on the domestic market. ATE pads last longer than standard VAZ ones, but they are becoming more and more difficult to find every year. In addition, they cost more: the price of a set of ATE rear pads starts from 1,700 rubles;
- PILENGA pads. This manufacturer occupies an intermediate position between the two above. A set of PILENGA rear pads will cost the car enthusiast 950 rubles. Today they are also not easy to find (although literally two years ago store shelves were littered with them). But in terms of durability they are still inferior to ATE pads.
That, in essence, is all the major pad manufacturers represented on the domestic spare parts market. Of course, there are many other, less well-known small brands. But there is no particular point in presenting them here, since buying products from a little-known company is almost always a lottery for a car enthusiast. In addition, there is a high probability of buying a fake, as mentioned above.
The conclusion from all of the above is simple: the main factor when choosing pads is the driver’s budget. If you want to install pads and not think about them for several years, you will have to fork out for ATE products. If you have less money, but have time to go shopping, then you can look for PILENGA pads. And if money is tight and there is no time, then you will have to install VAZ pads. As they say, cheap and cheerful.
Where is the front caliper of the VAZ 2107
Replacing brake pads on a VAZ 21214 Niva: minimum permissible thickness and detailed instructions
On the “seven”, disc brakes are installed only on the front wheels. The rear ones use a drum brake mechanism. Therefore, in the phrase “front caliper VAZ 2107” the word “front” is redundant. There are only two calipers and both of them are on the front wheels.
Access to the brake calipers opens after dismantling the front wheels of the car.
- screwdriver or bit;
- keys for 17, 14 and 10;
- pliers;
- a piece of rubber tube or bolt with a diameter suitable for the inner diameter of the brake hose tip;
- marker.
It is necessary to remove and install the caliper when replacing it in case of deformation or damage. This is also a necessary action in order to repair the VAZ 2107 caliper.
To carry out the work, you must lift the car on a lift or use a jack. The latter option is somewhat more tedious, but ideal for home use.
Removing the brake caliper
Replacing the coolant: how much antifreeze to pour into a VAZ 2107
To remove the caliper you must do the following:
- lift the car on a lift or jack up the wheel on which the brake caliper needs to be removed;
- Using a wrench, remove the bolt securing the brake hose bracket;
- remove the bracket so that it does not interfere with further actions;
Important: under the bracket fastening bolt there is a spring washer, which must not be lost when dismantling the bolt and bracket
- unscrew the bolt securing the brake hose;
- remove the bolt after first removing the two o-rings;
- insert a rubber tube or bolt of a suitable diameter into the hole in the brake hose tip to prevent brake fluid from leaking out;
- Use pliers to remove the cotter pins securing the brake pad pins;
- pull out the pins securing the brake pads and remove them using a bit or a thin, but not sharp, screwdriver;
- remove the retaining springs from the brake pads;
- remove the brake pads;
Advice: if you plan to use the brake pads in the future, they should be marked with a marker so that during reassembly they can be installed in the same place where they were. If this is not done, they will wear out faster and brake worse.
- bend the locking plates of the washers on the caliper mounting bolts;
- unscrew and remove the bolts securing the caliper to the steering knuckle;
- Remove the brake mechanism (caliper) of the VAZ 2107 from the brake disc.
Important: the upper and lower caliper mounting bolts differ in the shape of the head. When installing the unit in place, you must not mix them up.
How to replace the front brake cylinder on a classic
- Remove the wheel and hang the hub
We turn the wheel to the left if we change the cylinders on the right caliper, if on the left, then to the right. Don’t forget about safety measures - put stops or a stump under the lever of the suspended wheel - this will protect you from the car falling off the jack.
- Use a pry bar or pliers to separate the brake pads
This is necessary to easily remove the pads from the caliper, otherwise you will not be able to remove them.
- We unsplint the guides and knock them out of the brake cylinders with a hammer.
- We take out the brackets and pads. How to do this correctly and the points described above are described in detail in the article Replacing the front brake pads of a VAZ 2021. In order to avoid making mistakes, I recommend that you read this lesson.
- In order not to lose a lot of brake fluid, remove the cap from the reservoir, put a bag over the neck and screw the cap into place. Thus, the cover will be sealed and will not allow all the liquid to drain when removing the hose from the front brake cylinder of the VAZ 2107.
Or we pinch the brake hose so as not to lose the entire “brake housing” when unscrewing it from the caliper. In this case, there is a high probability of running into replacing the hose. It dries out over time and when it is forcibly compressed, it can begin to leak.
- Using wrenches or a socket “14” we unscrew the brake hose fastenings
- Using a “17” wrench, unscrew the two fastening bolts and remove the brake caliper from the hub
- We clamp the caliper in a vice, use special wrenches to unscrew the tube
To do this, we put a split wrench on “10” onto the nut securing the brake pipe. If necessary, you can lightly tap it with a hammer so that it is more securely fixed on the edges of the nut. We clamp this key with a screw, thereby its walls tightly compress the nut, and tear it off. This is the only way you will not “lick” the edges of this nut.
After you “tear off” the nut, you can unscrew it with a regular open-end wrench. We do this carefully, making sure that the brake pipe does not rotate together with the nut, it may break.
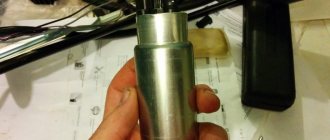
- We clamp the clamp and knock out the old brake cylinder from its seat
It is necessary to fix the clamp so that it does not interfere with knocking the cylinder out of the caliper. Try to save it, since it may not be included with the new brake cylinder. If you can’t fix it, you need to pull it out, no, with one hand we press on it with a sharp, thin object (a nail), with the other, we carefully knock out the cylinder with a hammer.
It is recommended to do this through a soft metal guide, but there may not be a third hand, so first we tap with a hammer so that the place where the latch is located moves and it hides in the depths of the guide. Then with the freed hand we hold the attachment and completely knock out the old part from the caliper.
- We clean the seat for the new brake cylinder.
It “walks” on a slide on which dirt and rust can accumulate. To avoid problems with installing a new part, you need to clean them.
- We remove the old retainer from the cylinder to install it on the new one.
If this is not possible, then we buy new ones for the brake calipers or make them ourselves. An object made of durable material, such as a nail, with a diameter corresponding to the diameter of the mounting hole in the cylinder, is suitable for this.
- Lubricate the cylinder slide with a thin layer of oil or lithol so that it slides better in the caliper. Using the adapter, we drive the new part into its seat until the hole for the clamp aligns with the slot in the caliper body. We insert the manufactured clamp and lightly knock the cylinder until it stops so that it is fixed with it.
- Screw on the brake pipe.
The main thing in order to “get” into the thread is to correctly align the tube nut and the hole for it. If, when tightening the nut, you feel that it is too tight to turn - you have not “got it”, it is better to remove the nut and re-align it with the thread of the hole. There is no need to tighten too much. After installing the caliper on the car and bleeding the system, if fluid leaks in this place, then tighten it with an open-end wrench.
Installation on the car occurs in the reverse order.
Video of replacing the VAZ front brake cylinder:
Repair of brake caliper VAZ 2107
A damaged or deformed brake caliper on a VAZ 2107 needs to be replaced. Caliper repair involves replacing faulty brake wheel cylinders. In some cases, instead of replacing the cylinders, they can be repaired.
The procedure for replacing cylinders is as follows:
- clamp the caliper in a vice;
- Unscrew the fittings of the connecting tube with a 10 mm wrench;
- remove the tube connecting the working cylinders;
- Use a hammer to knock out the working cylinders from the guides, after pressing the lock with a screwdriver;
- remove the clamps and replace them with new cylinders (if they are missing);
- insert the cylinders into the guides;
- install the connecting tube and tighten the fittings.
Repair of working cylinders consists of replacing the rubber sealing rings on the pistons. The order of operations is as follows:
- remove the brake cylinder;
- remove the protective cap from the piston using a screwdriver;
- apply compressed air to the cylinder to push the piston out;
- remove the sealing ring by prying it off with a screwdriver;
- install a new ring;
- lubricate the cylinder, piston and ring with brake fluid;
- insert the piston into the brake cylinder.
Important: before installing new sealing rings and assembling the cylinders, you must make sure that the inner surface of the cylinder and the piston are free of damage, cavities, and deformations. Otherwise, replace the brake cylinder with a new one.
Installing the brake caliper
Installation of the brake caliper on the VAZ 2107 is carried out in the reverse order of its dismantling.
After installing the brake caliper, it is imperative to bleed the brake system, removing air from it. Until this operation is completed, operating the vehicle is strictly prohibited.
The left and right wheel calipers are slightly different, so you need to pay attention to this when purchasing new ones. After repairing and installing the VAZ 2107 brake caliper, it is necessary to check the brake system for fluid leaks and, if necessary, repair them
After repairing and installing the VAZ 2107 brake caliper, it is necessary to check the brake system for fluid leaks and, if necessary, repair them.
Bleeding the brakes
An important step after replacing parts. If the work was carried out alone, then an assistant will be needed for pumping. He must constantly press and hold the brake while air is removed through the fittings using a transparent hose. On each wheel, the procedure should be carried out until there are no air bubbles left.
Replacing brake hoses on a VAZ 2107 is not difficult; you can do it yourself. It is most convenient to do this on an overpass, or from a garage pit, but it is possible to carry out an emergency replacement on a flat area, although this is very inconvenient. Of course, it is better not to lead to such situations, so you need to regularly check vital spare parts for integrity and performance.
Source
Which spare parts are better
The main problem when choosing brake hoses is the saturation of the market with counterfeit parts of low quality. Such eyeliners do not last long, quickly become covered with cracks or begin to leak near the pressed tips literally a week after installation. How to choose the right rubber pipes:
- Do not buy cheap hoses without packaging, sold individually. Usually the front tubes come in pairs.
- Carefully examine the metal surfaces of the fastening fittings - there should be no traces of rough machining on them - nicks, grooves from a cutter and similar defects.
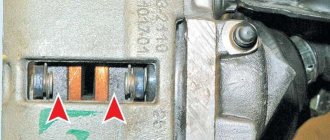
- Examine the markings on the rubber tube. As a rule, the manufacturer puts its logo and indicates the product catalog number, which matches the inscription on the packaging. Some hieroglyphs clearly indicate the origin of the spare part - China.
- Try stretching the pipe. If the rubber stretches like a hand expander, refrain from purchasing it. Factory hoses are quite stiff and difficult to stretch.
The inscriptions on the paper insert must correspond to the markings of the nozzles
An additional sign of a quality product is 2 pressing contours instead of one. Counterfeit pipes are not made with such care.
Trusted brands that produce brake pipes of decent quality:
- BRT - Balakovo Rubber Products Plant;
- DAAZ - Dimitrovgrad aggregate;
- KRAFTTECH;
- Fenox.
The embossed logo and inscription on BRT products are molded along with the rubber shell
Copper washers serve to seal the bolted connection; overhead brackets additionally secure the ends of the pipes
Along with a set of front pipes, it is worth buying 4 new O-rings made of copper 1.5 mm thick, since the old ones are probably flattened from strong tightening. It also doesn’t hurt to make sure there are fixing brackets screwed to the calipers - many drivers don’t bother installing them.
Design and purpose of the brake caliper on the VAZ 2107
To understand why the “seven” needs a brake caliper, you should clearly understand how the brake system of this car is designed. First of all, it should be said that the VAZ 2107 has two brake systems: parking and working. The parking system allows you to lock the rear wheels after stopping the car. The working system allows you to smoothly block the rotation of the front wheels while the machine is moving, changing its speed until it comes to a complete stop. A hydraulic braking system consisting of four cylinders, two brake discs, four pads and two brake calipers allows you to achieve smooth blocking of the front wheels.
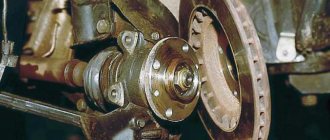
Brake calipers are installed only on the front axle of the “seven”. On the rear axle there are brake drums with internal pads
The brake caliper is a housing with a pair of holes, made of light alloy. Hydraulic cylinders with pistons are installed in the holes. When the driver presses the pedal, brake fluid is pumped into the cylinders. The pistons from the cylinders extend and press on the brake pads, which in turn compress the brake disc, preventing it from rotating. This changes the speed of the car. Thus, the caliper body is the basis of the VAZ 2107 working brake system, without which the installation of brake cylinders and discs would be impossible. It should also be noted here that brake calipers are installed only on the front axle of the VAZ 2107.
Caliper VAZ 2107. Arrows show the location of the hydraulic cylinders
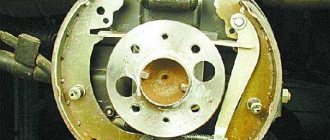
As for the parking system of the VAZ 2107, it is designed differently. Its basis is large brake drums with internal pads installed on the rear axle of the car. When the driver, after stopping the car, pulls the handbrake lever, the brake pads move apart and rest against the inner walls of the drum, completely blocking the rotation of the rear wheels.
The design of the rear brake drum is significantly different from the hydraulic brakes on the front wheels.
Signs of a faulty brake caliper
There are not many signs of malfunction in the VAZ 2107 brake caliper. Here they are:
- The car does not brake fast enough. This usually occurs due to a brake fluid leak. It can escape either through worn hoses or through hydraulic cylinders that have lost their tightness due to wear. The first version of the problem is solved by replacing the brake hoses, the second - by replacing the damaged cylinder;
- constant braking. It looks like this: the driver, pressing the brakes, stopped the car, and when he released the brake pedal, he discovered that the front wheels remained blocked. This happens because the cylinder pistons are stuck in the open position and the brake pads are still pressing on the brake disc, holding it in place. In such a situation, they usually change the entire caliper, since finding new hydraulic cylinders for the “seven” on sale becomes more and more difficult every year;
- squeaking noise when braking. The driver, pressing the brake pedal, hears a quiet squeak, which can intensify with increasing pressure. If you have to brake sharply and at high speed, the creaking turns into a piercing howl. All this suggests that the brake pads in the caliper have completely worn out, or rather, the coating of these pads. The material that covers the front part of the block has increased wear resistance, however, it eventually becomes unusable, being worn down to the ground. As a result, the brake disc is compressed by two steel plates without a protective coating, which leads not only to a loud squeaking sound, but also to increased heating of the caliper.
How to replace the speedometer cable on a VAZ 2101-VAZ 2107?
Note! The brake system has circuits, on the classic they are located transverse to each other, that is, the rear brake circuit (Both rear wheels) and the front brake circuit (Both front wheels), as we said above, if the rear circuit hose breaks, for example, then both the rear wheels stop braking (the circuit completely fails) and vice versa, but we’re not talking about that, we want to say a few words about pumping the brakes, when it comes to the brake system, pumping the brakes is always affected, for pumping you need brake fluid, so stock up on it in advance , also take into account the very contours of the brake system, based on them, when working with the front part (For example, you are changing the brake hoses in the front part), bleed only it, when working with the rear part (For example, you are about to change the rear brake hose), bleed the rear ones You don’t even have to get the wheels close to the front end, don’t forget about it!
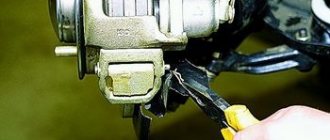
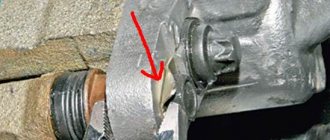
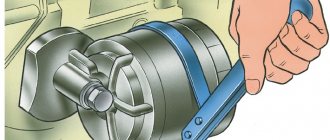
1. Let’s start with the front brake hoses, even if you have them intact and do not need to be replaced, you don’t need to immediately scroll further and look for information on replacing the rear brake hose (It’s given in paragraph 2), because the hoses (both front and rear) ) are replaced in the same way and after reading this paragraph, you will know what we did not indicate in paragraph 2, well, let's start! To replace the hose at the front, remove the wheel (How to remove a wheel, read the article: “Replacing wheels in a car”) and use a wrench to unscrew the bolt that secures the hose to the caliper (see photo below), then remove the bolt and there will be copper washers on it (Two, indicated by red arrows), they must be replaced with new ones, they play the role of some kind of seals, and when installing old ones (Compressed washers), it is possible that brake fluid will flow through the place where the hose is connected to the caliper.
Note! During operation, the brake fluid will still slightly pour out of the brake reservoir so that this is not significant (Be sure to do this operation), while unscrewing the bolt that secures the brake hose to the caliper, pinch it as shown in photo 1, thereby when the hose is disconnected, a small part of the brake fluid will pour out of it, all of it will not pour out since the hose will be pinched, after which you will need to unscrew the brake hose where it is attached to the brake pipe (This is the other end of the hose, for more details on how to disconnect it, read in point 2 below) and after that, you will simply need to disconnect the hose, but here too there is an incident, when the hose is disconnected, brake fluid will flow out of the tube, to prevent this from happening, plug the tube with something, for example, a bolt of a suitable diameter or a plug, See photo 2 for more details! (If you don’t need this, to pinch the hose, to plug the hole, then just take a rubber bulb and use it to take all the brake fluid from the brake reservoir, but after replacing the hoses, in this case you will have to bleed all 4 wheels, and by the way, this fluid don’t pour it back, it will already be spoiled)
2. We proceed to removing the rear brake hose, it is attached in exactly the same way as the front one, only in the place where the front hose is bolted to the caliper, the rear one is screwed on with a nut (see small photo), but at the other end, the brake hose in exactly the same way as the front one is attached (in paragraph 1 we did not describe the process of disconnecting the hose from the brake pipe, but only described how to disconnect it from the caliper), so in order to disconnect the hose from the brake pipe, you will need to unscrew it (Red arrow) but in While you are turning the tube with a wrench, hold the hose nut with the other (Indicated by a blue arrow) and as soon as the tube is slightly loosened, use pliers to remove the locking bracket (Indicated by a green arrow) and disconnect the brake hose from the tube; in the reverse order, the hoses are connected exactly like this when the work is completed, fill in the brake fluid and bleed the brakes in the car (How to bleed the brakes, read the article: “Bleeding the brake system on a classic”), then make sure that the fluid is not leaking from anywhere, and if possible, fix the problem.
Additional video clip: Watch two videos that clearly show the process of replacing the front brake hoses and the rear hose (about the front hoses, the top video, about the rear, the last one).
How to repair brake pipes
This process requires the car enthusiast to have extensive locksmith skills and the ability to use special tools. Repairs are carried out in cases where it is not possible to replace the damaged line; it involves saving money on the purchase of a new pipe system and extends the service life of the old one.
To carry out repairs you must:
1. Unscrew the damaged tube from the cylinder or brake caliper.
2. After disconnecting, it is necessary to cut off the damaged area using a pipe cutter.
3. Clamp the tube 50 millimeters from the edge of the cut and chamfer the edge of the tube using a drill.
4. Remove all that remains of the chips and insert a fitting intended for connecting the tube to the brake operating mechanism into the cut area.
5. Insert the end of the tube into the special equipment and flare it. The main line that has undergone repairs must be purged with compressed air. And only after this is it installed with a working mechanism or another pipeline system using an adapter.
As for the length of the tube, this parameter depends on the car model. On some cars, the brake pipes have a reserve that allows you to shorten the pipe and reconnect it to the working mechanism. The metal from which the brake tube is made is flexible, so there should not be any difficulties with its position.
Brake pipes VAZ 2110, price
The vehicle's brake system should be checked seasonally to identify possible faults, this is especially true after the winter period of operation.
| Photo of a repair kit for brake hoses for a VAZ 2110 car. |
Chemical reagents applied to the roadway against icing have an aggressive effect on the elements of the braking system. Be sure to check the brake pipes and hoses for their integrity.
If the brake pipes are found to be scuffed, swollen, or exposed to impacts, they must be replaced. Often, the replacement of brake pipes is caused by incorrect actions of the car owner himself. So, if you do not use a special wrench for working with the brake system, then you can “lick” the edges on the connecting fittings of the brake pipe and you will need to replace a completely serviceable brake pipe.
There are several types of brake pipes available in car dealerships, where preference is best given to double-layer steel pipes or copper ones. At the same time, the price for VAZ 2110 brake pipes may vary, which is associated both with their manufacturer and the shape of the pipes themselves . Brake lines may be sold pre-molded to the original factory tube configuration, or they may be straight. Moreover, they can be of a certain length for the front or rear contour, with ready-made cones at the ends, or in the form of simply a blank without ends.
When purchasing a new pipe, it is necessary to measure its length using the old brake pipe, if the brake pipe is purchased in the form of a blank of any length, taking into account the margin in case of measurement error.
| Photo of the new main left brake pipe for VAZ 2110. Price 80 rubles. |
The tube must be bent using a spring, the internal diameter of which would allow the tube to be inserted into it. To make connecting cones, you need a special reamer, which can be purchased at auto stores.
First, connecting fittings are put on the tube with threads in the direction of flaring and a cone is made. However, if this is a one-time operation, then it is easier to contact any car service center where they will perform its flaring.
Depending on the length of the VAZ 2110 brake pipes, the price varies significantly. So, for front circuit brake pipes, the price can vary from 17 - 40 rubles (short left) to 65 rubles (long right) per pipe, depending on the material of manufacture: steel, double-layer steel, galvanized steel, copper. For example, galvanized polymer tubes will be more expensive than conventional steel ones.
About flushing the brake system
A person’s life depends on the serviceability of a car’s brakes, and therefore diagnostics must be approached responsibly. The brake system requires periodic inspection. In addition, it needs to be washed from time to time, which many people don’t even realize. Most car enthusiasts will not even remember when their car had a complete brake fluid change. Moreover, there are often those who have not changed the fluid in the system at all since purchasing a new car.
Why flush the system?
Brake fluid tends to wear out over time, that is, with continuous use, over time it begins to lose its basic qualities. Brake fluid serves to transmit pressure through the master cylinder to the working cylinders when the pedal is pressed. In addition, it serves as a lubricant for the components and mechanisms of the hydraulic system.
Brake fluid is hygroscopic, meaning it can absorb water. This means that with constant moisture ingress, after several years of operation, the working fluid begins to boil at lower temperatures. This level can drop to the point where it boils even during moderate driving with infrequent use of the brakes.
The brake fluid that has absorbed moisture ceases to properly lubricate, and the pistons in the cylinders begin to heat up, the sealing collars overheat and leak, and when the brake fluid gets on the friction linings, it renders them unusable. The internal cavities of the cylinders are corroded by corrosion. All this is developing very quickly, and soon a complete repair of the brake system will be required, in particular, replacement of working elements. To avoid such unpleasant consequences, you can change the working fluid in a timely manner. It’s easier and cheaper than having to deal with repairs and replacement of components later.
Washing rules
The procedure for replacing the fluid is specified in the user manual. In addition, replacement is necessary when the fluid in the master cylinder reservoir becomes dark. In this case, flushing is required. To do this, you will need to purchase a special tool, although you can use a simpler method, namely, use a new TZ for these purposes.
There are several ways to wash it. You can use the services of a service station, where washing is carried out using special equipment. But the VAZ 2106 is easy to maintain, and you can wash it yourself in a garage. The work takes more time than turning to specialists, but the results are no less effective, and you will also be able to save money. The only thing you will have to fork out for is to buy a high-quality TZ. You need to take it with a reserve, as some will go away along with the old liquid. You will also need the help of a friend.
The procedure is as follows.
After washing, bleeding will be required, so you need to prepare a transparent silicone hose in advance, which can be pulled tightly onto the bleeding fitting on the cylinder. In terms of technology, flushing is very similar to pumping and is performed according to the same scheme. That is, you need to start with the left rear wheel, then move to the right front, the next will be the right rear and the last one to bleed is the left front. All liquid is pumped out of the tank. You can use a syringe or a medical bulb. If there is sediment or plaque on the walls, the tank should be removed and washed, or, in extreme cases, replaced. Next, fresh fuel fluid is poured into the tank. Then everything is the same as when pumping: one person sits in the driver’s seat and presses the pedal, the second unscrews the fitting and drains the brake fluid into a container
To avoid having to do pumping after washing, it is important to press and not release the pedal until the fitting is screwed in completely. Determining when to switch sides is very simple. This will happen when the color of the leaking fuel fluid changes, it becomes light
In this case, you need to carefully monitor the fuel fluid level in the master cylinder tank and periodically add it to the maximum.
Before starting this procedure, it is strongly recommended that you study the detailed instructions and read the repair and maintenance manual for the VAZ 2106. There are also methods of washing using compressed air and a compressor, with complete disassembly of all parts and washing by hand, but the result will be the same in any case.
Disassembly and assembly of wheel cylinders
| Rice. 7–16. Wheel cylinder: 1 — pad stop; 2 — protective cap; 3 - cylinder body; 4 - piston; 5 - seal; 6 — support cup; 7 - spring; 8 - crackers; 9 — thrust ring; 10 - thrust screw; 11 - fitting; A - slot on the thrust ring |
| Rice. 7–17. Wheel cylinder parts: 1 - piston assembly; 2 — cylinder body; 3 - thrust screw; 4 - thrust ring; 5 - crackers; 6 - spring; 7 — support cup; 8 - seal; 9 - piston; 10 - protective cap |
Install the piston assembly with the automatic device on a special device so that the protrusions of the device cover the head of the thrust screw 3 (Fig. 7–17). Using a special screwdriver, turning piston 9, unscrew the stop screw 3 from the piston. Remove seal 8 with support cup 7 and crackers 5 from the screw. Separate thrust ring 4 and thrust screw 3.
How to replace the rear brake hose of a VAZ.
Assemble the automatic device for adjusting the gap between the shoes and the drum and the wheel cylinder itself in the reverse order, taking into account the following:
— tighten the piston thrust screws with a torque of 3.9–6.9 N·m (0.4–0.7 kgf·m); Slot A (see Fig. 7–16) on the rings should be directed vertically upward; deviation from the vertical is allowed no more than 30°. This arrangement of the slot ensures more complete removal of air from the wheel brake drive when bleeding the brake;
— to pre-compress the thrust rings, press the pistons into the cylinder body using a special device shaped like a cylinder with a conical internal hole;
— the force of pressing the piston into the cylinder must be at least 343 N (35 kgf); if the force is less than 343 N (35 kgf), replace the thrust ring;
— when pressing the piston into the cylinder, it is necessary to maintain dimensions of 4.5–4.8 mm and 67 mm (maximum) (see Fig. 7–16) for a free fit of the brake drum;
— before installing parts into the cylinder body, lubricate them generously with brake fluid.
After assembly, check the movement of each piston in the cylinder body. They should move easily within 1.25–1.65 mm. Replace the protective caps 2 last.
Repair of VAZ rear brake cylinder. Budget renovation.
Replacement of rear brake cylinder cuffs of VAZ 2102
How to replace cuffs on a rear brake cylinder
Checking wheel cylinder parts
Pads
- Carefully check the pads for damage or deformation.
- Check the elasticity of the tension springs, both upper and lower; if necessary, replace them with new ones.
- The springs must not have residual deformations when stretched with a force of 343 N (35 kgf) for the lower springs and 411 N (42 kgf) for the upper ones.
Check the cleanliness of the linings, if dirt or traces of grease are found, thoroughly clean the linings with a wire brush and rinse with white spirit, in addition, check for any leakage of grease or oil inside the drum; eliminate the faults. Replace the pads with new ones if the thickness of the linings is less than 1.5–2 mm.
LADA Kalina engine cooling system diagram
Rice. Rear brake working cylinder: 1 — piston assembly; 2 — fitting for removing air; 3 - cylinder body; 4 - thrust screw; 5 - thrust (split) ring; 6 - crackers; 7 - spring; 8 — support cup; 9 — seal (rubber cuff); 10 - piston; 11.protective cap (“boot”)
On the VAZ-2104, VAZ-2105, VAZ-2106 (since 1986), VAZ-2107 and their modifications, automatic adjustment of the gap in the rear brakes is carried out using split thrust rings 5 (Fig.), pressed into the cylinder.
Therefore, when disassembling, first remove the anthers 11, and then apply light blows with a hammer through a soft metal drift to the piston 10 so that another piston, complete with ring, cuff and other parts 1, comes out from the opposite side.
Then a drift is inserted from the side of the removed piston and the one that was hit first is pressed out. During the operation, the drift should not touch the walls of the cylinder so as not to scratch it. The requirements for cleanliness are the same as when disassembling a VAZ-2101 cylinder (see above).
Then, holding the thrust screw with 4 pliers, using a screwdriver inserted into the slot of the piston 10, we unscrew the parts.
After replacing cuff 9, we assemble the assembly by moistening the parts with fresh brake fluid. The tightening torque of the thrust screw is 0.4-0.7 kgf-M. The pistons are pressed on each side.
When installing in place, ring 5 must be compressed, for which a small clamp is sometimes used.
Remember that the slot on the thrust rings 5 must be directed vertically upward (permissible deviation no more than 30°), otherwise air will not be removed from the cylinder.
After assembling the unit, check the stroke of the pistons. They should move easily by about one and a half millimeters (more precisely 1.4-1.6 mm). If this does not happen, the rear wheels will not release the brakes. Most likely the reason is improper assembly or contamination of parts.
When to change hoses
By regularly diagnosing the system, it is easy to understand when it is time to change spare parts:
- The appearance of cracks in the braid.
Cracks in the braid To see them, just bend it a little. The size of the crack does not matter; even the smallest tear length can quickly lead to serious wear. - The appearance of liquid near the tips.
- Violation of the integrity of the part, the appearance of frayed areas.
Integrity violation - If the brake fluid starts leaving the reservoir too quickly.
- If the car has just been purchased secondhand.
Any of these reasons is a good reason to replace old spare parts with new ones.
Brake hoses
About bleeding the brakes
To carry out the operation in the traditional way, you will need the services of an assistant. Its job is to press and hold the brake pedal repeatedly while you bleed air through the fittings on each wheel. The procedure is repeated until there are no air bubbles left in the transparent tube connected to the fitting.
Before pumping, do not forget to add fluid to the reservoir. Waste material with air bubbles that you have drained from the brake mechanisms cannot be reused.
To bleed the brakes without an assistant, you need to have a mini-compressor for inflating tires and make a fitting - an adapter in the form of an expansion tank plug. The supercharger is connected to the spool and pumps up a pressure of 1 bar, simulating pressing the brake pedal. Your task is to loosen the fittings, release air and add new fluid.
The integrity of the brake hoses must be constantly monitored, especially when the elements are well worn. If you notice a network of small cracks or a tear with protruding textiles, purchase and install a new pipe. Spare parts do not have to be replaced in pairs; hoses can be installed individually.
Source
Basic faults
The brake system itself is quite simple, but some of its elements require special attention. Main types of faults:
- The brake fluid leaks, resulting in a drop in pressure in the system. If a preliminary inspection does not find a leak, it is necessary to check the brake master cylinder. We bend the noise-insulating mat located under the brake pedal and inspect for streaks in the area of the rubber seal of the master cylinder. The presence of drips will indicate that the cause has been found and requires disassembling the cylinder and then replacing the cuff. If there is a vacuum booster, the brake master cylinder must be removed and inspected.
- When you release the brake pedal, the car drives sluggishly. Reason: the rear or front pads are jammed. Seized pads are identified by checking the heat of the corresponding wheel. We touch each disk - the hottest one will be jammed. In the case when these are the front wheels, you can, after removing the wheel, move the brake cylinder. If this fails, you will have to replace it with a new one. In the case of rear pads, the brake wheel cylinder will need to be replaced.
- When you press the pedal, braking does not occur, but it does when you press it several times in a row. This may indicate the presence of air in the system. The solution to the problem is to bleed the brakes to remove air.
- Problem with the handbrake. Most often this problem occurs in winter. It manifests itself in the fact that after a long period of parking, when the handbrake is released, the wheels remain locked. The reason is that the parking brake cable is frozen. During its operation, moisture gets there and freezes in winter. If the casing is severely damaged, it will have to be replaced.
Read this, it might come in handy: Why do brakes squeak?
Brake master cylinder diagram
Vibration when braking
This is a fairly common malfunction that is associated solely with critical or uneven wear of the discs or drums, and the repair will consist of replacing them.
Car shifts to the side when braking
The malfunction is due to either a failure of the working (wheel) cylinder or wear of the pads. Replacing them (or repairing them) will solve the problem.
The VAZ 2107 brake pedal fails: the main reasons
The brake system must be sealed and free of air. If the pedal begins to fail, then, with a greater degree of probability, we can say that depressurization has occurred, that is, air has entered the system.
Other reasons:
- rust formation on the pedal linkage;
- failure of the vacuum booster;
- unadjusted distance between the cylinder piston and the pedal itself;
- lack of fuel fluid in the system.
It is also important to remember that brake fluid is an aggressive substance that can destroy thin pipes and even lines. That is why it is important to use only high-quality TZ
Low-quality liquid can form cracks through which it then flows out safely. But the flip side of the coin is that when you press the brake pedal, air leaks through these cracks.
How to choose spare parts
How long the pads will last depends on the driver’s driving style (aggressive driving) and the conditions under which the car has to be driven. The pads wear out faster if the car moves around the city in jerks: either picking up speed in fairly short sections, or using sharp braking.
Helpful advice: When choosing spare parts, it is not enough to be guided by cost or brand. When purchasing new brake pads, buy them from the same batch. The features of friction lining production are important. If the spare parts are from the same batch and from the same manufacturer, the difference in the physical and mechanical properties of the material will be insignificant.
The procedure for replacing brake pads is carried out on both wheels of the same axle at once. Wherein:
- Be sure to analyze the condition of the parts and mechanisms of the brake system.
- To assess brake disc wear, use a caliper and measure its thickness.
- Check the entire assembly for damage and find out if the geometry of the structure is broken.
Installation nuances
- The fitting of the new hose on the caliper side must be screwed on with a special cut-out downwards. Otherwise, it may rest against the brake pipe of the cylinder and break it.
- If, when dismantling the old front brake hose, the tube fitting was rotated along with the tube, then installation of a new one begins by screwing it to the iron tube. We fix it with a split wrench, and with an open-end wrench we twist the hose and tighten it.
- We tighten all threaded connections carefully so as not to strip the threads. We clearly get into it and try. They should twist without much effort. If you feel that it is difficult to “go”, then separate them and try to get clearly into the thread again.
- You need to tighten everything without any hassle, the threads are small, and the metal is fragile, you can tear it off and then nothing will be able to eliminate the brake fluid leak unless you pull the fittings and bolts.