Front door of VAZ 2109
In this article we will tell you how to remove or install the door, replace the window regulator, the driver's or passenger's side window of the front door, the door opener lock and the outside rear view mirror on a VAZ 2109
Replacing the front door of a VAZ 2109
Open the door and unscrew the two bolts securing the limiter bracket to the A-pillar
Unscrew the bolts securing the upper and lower door hinges to the A-pillar and remove the door
Installing the front door on a VAZ 2109 is performed in the reverse order of removal. Before final tightening the bolts securing the hinges to the A-pillar, close the door and adjust its position so that the gaps in the openings around the entire perimeter are the same. Then carefully open the door and finally tighten the hinge bolts.
Removing and installing the front door trim of a VAZ 2109
Insert a thin screwdriver between the socket and the window handle trim. Press the socket with a screwdriver and move the trim so that the protrusion on it (see note) disengages from the socket
Remove the trim of the VAZ 2109 window lifter handle
Remove the window handle
Using a thin screwdriver, remove the two plugs from the armrest handle
Unscrew the two fastening screws and remove the armrest handle
Unscrew the two screws securing the door pocket of the VAZ 2109
Unscrew the door lock button
Using a thin screwdriver, press and disengage the socket latch of the inner door lock handle
Pull the handle towards you and remove the socket.
Using a screwdriver, press the door trim of the VAZ 2109 so that the fastening pistons come out of the holes in the door
Location of the pistons in the door trim of the VAZ 2109
To remove the upper upholstery fastening pins from the holes, bend the edge of the seal
Remove the door trim. Installation of the front door trim of the VAZ 2109 is carried out in the reverse order of removal.
Replacement of glass and window regulator of VAZ 2109 front door
Lower the window all the way down, remove the door trim and the outside rear view mirror. To remove the door glass of a VAZ 2109, you need to remove the window regulator.
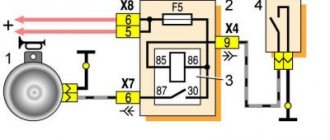
1 – nuts for fastening the window lifter guide, 2 – nuts for fastening the window lifter mechanism
1 – guide, 2 – slider, 3 – window lifter mechanism, 4 – window lifter marking location
Remove the inner and outer lower glass seals. Then use a screwdriver to remove the protective film holders and remove the film from the door
Remove the top glass seal
Position the window lifter handle and lift the glass so that the bolts securing the glass frame to the window lifter slider become accessible. Unscrew both mounting bolts while holding the glass. Carefully lower the glass down
Unscrew the three nuts securing the window lift mechanism
Unscrew the two nuts of the middle fastening of the window lifter guide of the VAZ 2109
Unscrew the nut of the lower guide fastening
Unscrew the nut of the upper fastening of the guide while holding the window regulator
Remove the window regulator from the front door of the VAZ 2109
Turn the glass and lift it up
Check the tightness of the glass in the frame. If the clip does not fit tightly on the glass, replace the glass along with the clip
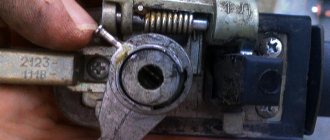
When replacing the front window regulator of a VAZ 2109, pay attention to the part number: the marking “2109” should be stamped on the bracket (the window regulator is different from the model “2108”). The last two digits of the part number (before the dash) indicate: 10 - right, 11 - left. Installation of the front door glass of a VAZ 2109 with a window regulator is carried out in the reverse order of removal.
Replacing the front door lock of a VAZ 2109
Lock diagram VAZ 2109 front door: 1 – lock switch lever, 2 – external drive (handle) lever, 3 – internal drive (handle) lever, 4 – locking lever.
Press out the bottom seal and remove the three spring clips securing the protective film on top and another one on the bottom. Remove the protective film from the door
Disconnect the outer handle rods and the lock switch from the inner lock.
Unscrew the two screws securing the door lock of the VAZ 2109. Since sealant is applied to the threads of the screws, we recommend using an impact screwdriver when unscrewing
Remove the external lock VAZ 2109
Remove the two screws securing the interior door lock handle
Push the inside handle inside the door
Remove the internal lock with internal handle from the door
Remove the rubber holder from the end of the rod. Remove the handle from the rod by turning it
Remove the locking bracket from the lever pin and disconnect the inner handle rod from the inner lock lever
Rotate the plastic holder and remove the end of the locking rod from the lever
Unscrew the two nuts securing the outer lock handle
Remove the outer lock handle with rods
Remove the pin and remove the plastic rod end from the VAZ 2109 lock cylinder
Remove the locking spring by moving its ends out of the slots on the cylinder and on the lock handle
Insert the key into the lock cylinder and remove the cylinder from the handle. Installation of the front door lock of the VAZ 2109 is carried out in the reverse order of removal, having first lubricated all the rubbing parts with grease. Check the ease of opening and the reliability of closing the door lock. Adjust the lock if necessary.
To adjust the door lock of the VAZ 2109, loosen the fastening screws and move the lock: a) outward, if the door closes tightly; b) inside, if the door does not close tightly; c) down, if the door rises when closing. After adjustment, tighten the screws. Use an impact driver to loosen and tighten screws.
How to replace the door trim on a VAZ 2108-VAZ 21099?
Preparation! ● Removing the window handle: ● Removing the door handle: ● Removing the door handle trim:
Basics! ● Removing the door trim:
Removing the window handle:
1) First, insert a screwdriver between the socket and the handle trim, and after threading, slightly bend the “blue arrow” handle trim from the “red arrow” socket, bend it until the protrusion of the trim comes out. (See below for where the trim lip is located!)
Note! The protrusion that is present on the cladding is indicated by a red arrow, and it is due to this protrusion that the cladding is kept in place!
2) After bending the facing, remove it from the handle.
3) And after removing the cladding, remove the handle together with the socket.
Removing the door handle:
1) First, use a screwdriver to pry off the upper and lower plugs of the door handle.
2) Next, unscrew one screw of the upper fastening of the handle, and one screw of the lower fastening.
3) Now take the door handle with your hand and remove it from the car.
Removing the door handle trim:
1) First, use a screwdriver or hand to pry off the door handle trim.
2) And then, bending the door opening handle, remove the trim.
Removing the door trim:
1) First, remove the few screws that secure the bottom shelf to the door.
2) Next, unscrew the top door lock button.
3) And then remove it from the car door.
4) Next, use a screwdriver to bend all the pistons that secure the edges of the casing.
Note! The door trim is attached to eight pistons; in order to bend the top pistons, pry off the edges of the seal with a screwdriver, and only then bend all the top pistons that secure the trim!
5) After bending all the pistons, remove the trim from the door.
Note! When bending the caps, they may be damaged, so if they are damaged, replace them with new ones!
Installation: 1) First install the door trim in its place.
2) Next, in the same way as you removed, install the upper door lock button on the metal pin, and then screw it in with a screwdriver or by hand until it stops.
3) Now tighten the two screws securing the bottom shelf to the door.
4) Then install the door handle in place, and then tighten all the screws that secure it until it stops.
Note! After tightening the screws, insert the plugs into the holes!
5) Next, reinstall the door handle trim.
6) And to complete the operation, install the window lifter handle in the reverse order of removal.
Disassembly and assembly of the front door on a VAZ 2109 car
Work order:
- The socket is pressed out, the window lifter handles are moved (see Installing window lifters yourself) pos. 9 until the lining is released. The handle and lining are removable.
- The armrest and pocket pos. are removed. 10 door trim. Unscrew the lock release button pos. 1.
- Remove the handle for adjusting the rear view mirror pos. 6, interior lining, mirror.
- The door trim, sliding window seals and skid plates are removed.
- The screws that secure the grooves for inserting the sliding glass are unscrewed. The glass clip is disconnected, the nuts holding the window regulator are unscrewed, which is then removed, and the sliding glass is pulled out through the top.
- The latest models are equipped with mechanisms for electric glass lifting. In this case, the glass is raised and lowered by the vertical movement of the cable on which the glass fastening plate is attached. The movement of the cable is driven by a gear motor.
- The rod for opening the door is disconnected from the lock.
- The outer door handle is removed.
- The screws are unscrewed and the lock is removed. The inner door handle is removed along with the bracket.
- If necessary, remove the limiter to open the door.
Repair of car locks VAZ 2109
Repairing the lock on the front door is considered more difficult. Instructions for its repair include:
- The lower door seal is pressed out, three spring clips are removed for fixing the protective film on top, one on the bottom. The protective film is pulled out of the door.
- The lock switch rods and the outer handle are disconnected from the internal lock.
- Unscrew the screws holding the door lock as shown in the photo.
Unscrewing the lock securing screws
- The outside lock is removed from the door.
- After unscrewing the screws holding the inner handle of the lock, the latter is pushed into the door.
- An internal lock is pulled out of the door with an internal handle.
- The rubber holder and handle are removed from the end of the rod.
- The plastic holder is rotated and the end of the lock lock rod is pulled out of the lever.
Removing the end of the locking rod
- The outer lock door handle is removed with rods.
- The pin is pulled out and the plastic rod tip is removed from the lock cylinder.
- The slots on the handle and cylinder of the lock are released from the locking spring.
- By inserting a key into the device, the lock is removed from the handle.
- The new lock is installed in the reverse order.
Tip: Before installing a new lock on the door of a VAZ 2109 car, you must lubricate all rubbing surfaces with grease.
- If the lock is difficult to open, it needs to be adjusted.
- Sanding a new fur coat. The primer applied on top of the door must be sanded using P120 sandpaper until the bare metal shines.
- The part from the old shell where the gum is attached is removed. This can be done by drilling out the welding points or cleaning the welding points with a grinder, and then removing this part of the door.
- The frame for attaching the elastic band is cleaned. The surface should be as clean as possible. Inserts are installed on the rusted areas.
- The entire door is cleaned of rust so as not to apply the shell to bad areas. A grinder is used for this.
- The elastic band fastening frame is welded onto the new shell.
- At several points the shell is sealed by welding.
- The shell is tapped along the contour.
How to open a VAZ 2109 without a key
Method 1
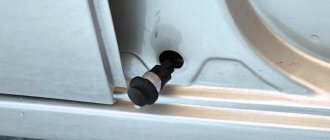
This method is the simplest and most harmless. A prerequisite for its use is the presence of factory door lock buttons in the cabin, or any other ones in the form of a fungus. They look like this:
If you have such buttons, then you are very lucky. Now you need to find a thin rope about 1 meter long, maybe smaller, the main thing is that it reaches from the roof of the car to the door lock lock button and still has about 30cm left. Thin laces from your running shoes may work. We definitely don't need flat laces. Now that we have a rope of the required length, we make a tightening loop at one of its ends, with a diameter approximately twice the size of the door latch cap.
The most important and difficult moment comes. We press the driver's door of the car from above, in the place indicated in the picture.
We lower the prepared rope and, after some attempt, depending on your accuracy, put it on the lock lock. Next, we lower the rope along the doorway so that it becomes parallel to the roof and tighten the loop on the latch. Now all that remains is to pull out the lock latch and your VAZ 2109 will be opened without a key and without damage.
Method 2
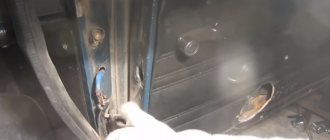
There is another way to open a VAZ 2109. In this case, you can also avoid damage if you do everything carefully. If your door lock latches are not in the form of a mushroom, then you can try doing it differently. In this case, we will need a regular screwdriver or better yet two. The main thing is that they are not “cross-shaped”, moderately thin and relatively durable. We go to the rear window and very carefully insert a screwdriver under its seal. I would advise doing this in the place indicated in the picture.
Together with rounding the corners of the window, the screwdriver should go through. The most important thing is to take your time and act carefully so as not to damage the window seal. After the screwdriver has gone inside, you need to carefully press the window in your direction, using your other hand to help pull the seal. In the worst case, when opening the VAZ 2109 you will damage the glass seal, but not so much that you will not be able to put it back. However, you will have to replace it when the opportunity arises.
Method 3
Using this method, you will definitely not be able to open your VAZ 2109 without damage. If none of the previous methods worked for you and your car has a trunk lock cylinder, then you can try this method. You need to find a good flat head screwdriver that is powerful enough. We insert a screwdriver into the trunk lock cylinder and sharply try to turn it in the opening direction. If you are strong enough and do everything sharply, the lock will turn and access to the car is free. Unfortunately, this method does not always help.
Method 4
This method has not been tested by the author, but was found on the Internet and tested by other car owners. If your car does not have a rotten trunk lid and a standard lock is installed, then all you need to do is pull the trunk lid sharply towards yourself and up. The probability of damage to the cover in those places that you will hold on to is quite high if the cover is not new. But usually, almost any VAZ 2109 opens using the first two methods.
Keep an eye on the condition of the car and don’t forget the keys in the cabin - then you won’t have to learn how to open the car without a key.
Body repair VAZ 2109
Problems with the body of cars from the domestic automobile industry, unfortunately, are not uncommon. A rotting arch, a hole in the bottom, a sill eaten by corrosion - all these are common phenomena on locally produced cars. VAZ 2109 is no exception. As soon as moisture reaches the least protected elements of the body, soon after that the first rust appears on them, and after some time more serious problems appear, such as holes in the metal.
Main rust spots
This model of car suffers the most from corrosion:
- front floor including sills &
- lower part of the fuel tank;
- car fenders and doors;
- jack;
- rear part of the bottom;
- hood in the area of the battery pack;
- muffler, side members, optics reflectors, floor mounts, gas tank, spare tire, etc.
Noticing rust symptoms in a timely manner is the surest way to save your car from premature failure. Although bodywork has never been easy, it is still possible to do it in your own garage. The main thing you need to have for this is a set of tools: several different straightening hammers, a grinder with a set of wheels for working with rusty surfaces, a welding machine with a cylinder (carbon dioxide), fiber, stripping, flap, cutting wheels, anti-corrosion treatment agents, chisels and metal drills, a set of keys, a set of screwdrivers, a pair of jacks, a cord with a plumb line. Instruments for diagnosing car surfaces will also come in handy.
Dismantling works
To start putting the body in order, you must first remove those parts that need repair or interfere with more complex work (in remote areas of the car).
Body disassembly proceeds as follows:
- First, the doors are dismantled: by unscrewing the bolts securing the doors to the racks, the opening limiter is removed. Next, the hinge fastenings are unscrewed. It is recommended that two people do the work so that there is someone to support the doors during removal, otherwise there is a high risk of distortion.
- The next step is to remove the trunk lid. To perform this work, the upholstery is dismantled from the inside, the screws are unscrewed, and the latches are unscrewed. The harnesses are taken from the opened metal cavities, the electrical wiring is turned off in parallel, and the backlight is disconnected. All that remains is to disconnect the stops and remove the bolts securing the trunk lid to the hinges. Now you can freely remove this component from the structure.
Bumpers
It is sometimes necessary to remove the front and rear bumpers to replace them or repair other body elements. Dismantling does not require special skills, so even a beginner can cope with this task
The only difference when removing the front bumper compared to the rear one is that the plastic fender liners will need to be additionally removed in front.
Otherwise, the dismantling and repair procedure is performed as follows:
- There are nuts on the side that hold the bumper to the body. They need to be unscrewed. Mostly on most VAZ 2109 there are 2 of these fasteners on each side;
- Now find the front bumper mounting nuts and remove them;
- When unscrewing the front fasteners, be sure to hold the bumper, otherwise it may fall and be damaged;
- If you remove the front bumper, then remove the fender liners. All removal work is completed;
Dismantling process
- Carefully examine the condition of the bumpers visually. If there are deformations or damage, these areas can be straightened;
- Old peeling paint and traces of rust can be easily cleaned using 200-400 grit sandpaper;
- If the bumper is made of plastic, all damage is repaired using special putty;
- The holes on the plastic bumper are covered with plastic elements from old bumpers or other elements that have suitable dimensions, thickness, and strength;
- Using a soldering iron with a power of 40-60 W, you can weld plastic elements.
Failure to maintain clearances
Connection of bumper elements
To fasten the elements of a damaged plastic bumper, you can use four methods.
- Melt the plastic of the bumper and additional inserts. The seam width should be about 15 millimeters. And the depth of the soldering depends on the thickness of the body element.
- Parallel seams. Wire or nails without heads can help here. These fasteners are soldered on the reverse side. A fairly reliable connection option.
- Flexible copper wire. A more complex, but also more effective method. The connection is made according to the principle of the second method, then the wire is soldered from the inside with a snake or zigzag. Some people also solder it from the front side.
- Lattice. The most reliable and durable option. Using a mesh or a piece of decorative radiator grille, the elements of the plastic body are fastened together.
Body repair is a rather complex and sometimes labor-intensive process. Based on video lessons and instructions, you can complete a number of tasks. But for complex damage, it is better to turn to professionals.
Removal: 1) First, disconnect the door stop from the car body, to do this:
Option one:
1. First, remove the two bolts that secure the door stop to the body.
2. And then disconnect the limiter.
Option two:
1. Using a rod with a diameter of about 5 mm and a hammer, knock out the door stop axis.
2. And then remove the axle from the limiter.
Continuation! 1) Next, have another person hold the door, and then, using an extension socket, remove both bolts that secure the door hinges to the car body.
2) And to complete the operation, remove the door from the car.
Installation: 1) First install the door in place.
2) And then tightly tighten all the bolts that secure the door hinges to the car body.
3) And then screw in the reverse order of removal, or both bolts securing the limiter to the door.
4) Or install the axle in its place.
Important! Before you start removing the door, check if any electrical equipment is connected to it; if it is connected, then before you start removing the door, disconnect all the wires!
More traumatic options
The method described below is suitable if you need to get into the trunk and there is a cylinder on its door. You can open the lock here with a strong flat-head screwdriver. In particular, it is inserted into the well as deep as possible and turned with a sharp, strong movement towards the opening. Usually the mechanism works the first time. It is almost guaranteed that it will then have to be replaced.
A trunk with a standard lock can also be opened using a more barbaric method. It will only work if the metal is still strong enough. A rotten one will most likely just break. To do this, you need to grab the edge of the door with both hands on both sides of the locking device and pull it very strongly and sharply towards you. The problem is that with this method of opening the trunk is often deformed, so you should use it with the utmost caution.
In reality, the better option in a desperate situation is to break one of the rear windows. Here you can use a hammer or a cobblestone. New glass costs little - about 200 rubles, which is not that expensive compared to replacing a damaged trunk door.
Source: ladaautos.ru
Where to begin
Starting with the doors is a good option; the work will take a minimum of time, will not require much effort and will give you the opportunity to practice:
- If you do the job well, you can reduce the noise level inside the cabin by 20-30 percent.
- The soundproofing door no longer allows sounds from outside to pass through and improves the sound of acoustics from the inside.
- In addition, the doors will begin to close much softer, unnecessary noise, rattling and vibration will disappear
- A big advantage of sound insulation for doors is the ability to significantly improve the sound quality of speakers installed inside the door trim
Soundproofing stages
Before we get started, let's first consider all the steps:
Schemes of different degrees of sound insulation of doors
- The first step is gluing vibration insulation, it is necessary to eliminate possible rattling when closing and opening doors, photo above
- If you plan to install good acoustics, this will improve the sound quality and remove unnecessary noise and overtones.
- The second stage is sound insulation on top of the vibration insulation; this stage of work allows you to prevent extraneous sounds from entering the cabin from outside.
- The third stage is the treatment of rubbing parts with anti-squeak (the purpose is clear in itself), here it is necessary to pay attention to decorative and other elements of the interior that are capable of squeaking (for example, upholstery and fixing clips, dashboard elements)
- When you complete all the steps in sequence, you will have a door that is soundproof, acoustic and without squeaks.
Rear door lock
Before replacing the lock on the rear door of the VAZ 2109, you should first remove the trim from the door.
Removing the trim
- Unscrew the bolts of the old device.
- We screw the pin into place of the bolt so that the inner side does not fall inside the door.
- We remove the old lock and put a silent one in its place.
- The bolts must be tightened with maximum force and tightened with an impact screwdriver.
Silent bolts and locking pins can also be installed.
After installing the silent device, it will need to be adjusted. The adjustment procedure is the same as described above. Here you also need to tighten or loosen the screws depending on the movement of the mechanism.
Trying not to damage the adjustment of the clamp, you will have to place a gasket under it made of sanded waterproof sandpaper. Using such spacers, you can adjust the distance between the stand and the latch. This procedure is done in order to prevent the locking finger from touching the cover of the external lock.
How to open a VAZ 2109 without a key
Method 1
This method is the simplest and most harmless. A prerequisite for its use is the presence of factory door lock buttons in the cabin, or any other ones in the form of a fungus. They look like this:
If you have such buttons, then you are very lucky. Now you need to find a thin rope about 1 meter long, maybe smaller, the main thing is that it reaches from the roof of the car to the door lock lock button and still has about 30cm left. Thin laces from your running shoes may work. We definitely don't need flat laces. Now that we have a rope of the required length, we make a tightening loop at one of its ends, with a diameter approximately twice the size of the door latch cap.
The most important and difficult moment comes. We press the driver's door of the car from above, in the place indicated in the picture.
We lower the prepared rope and, after some attempt, depending on your accuracy, put it on the lock lock. Next, we lower the rope along the doorway so that it becomes parallel to the roof and tighten the loop on the latch. Now all that remains is to pull out the lock latch and your VAZ 2109 will be opened without a key and without damage.
The main types of breakdowns of VAZ 2109 locks
The reasons for requiring repair or replacement of the lock on a VAZ 2109 car may be:
- Wire refraction. This is the most common cause of failure. When diagnosing this particular malfunction, in order to repair the lock, you need to find the location of the break and restore the wiring.
- But most often, the reason that the door lock on a VAZ 2109 is jammed is due to the fact that the latch, which attaches the central locking rod to the door lock rod, “falls off”.
- The actuator itself may fail. In this case, you just need to replace it.
After assembling the door and testing the quality of the repairs made, the lock will be fully functional.
How to replace a lock
The design of the locks on the front and rear doors of the car is fundamentally the same, the difference lies in the installation of the lock switch cylinders on the external handles on the front doors. Instructions on how to replace the front door lock are presented below:
- The lower seal is pressed out, and three spring clips are removed from above to secure the protective film and one from below.
- The protective film is removed from the door.
- Inside the lock, the lock switch and external handle rods are disconnected.
Disconnection points for switch rods
- Unscrew the two screws holding the door lock.
Tip: During assembly, sealant was applied to the threads of the screws, so when twisting, you need to use an impact screwdriver.
- The outside door lock is removed.
- Unscrew the two screws securing the internal handle of the device.
- The handle is pushed inside the door.
- The internal lock and handle are pulled out of the doors, as shown in the photo.
The handle and lock are removed from the door
- The rubber holder is removed from the end of the rod.
- The handle is removed from the rod. In this case, it needs to be cranked.
- The locking bracket is detached from the lever pin.
- The rod of the internal handle is disconnected from the internal lock lever.
- The plastic holder is rotated and the end of the rod is removed from the lever to lock the device.
- Unscrew the two nuts securing the outer handle of the lock.
- The handle is removable.
- The plastic rod end is removed from the door lock cylinder and removed.
- The locking spring is removed. To do this, its ends are removed from the slots on the lock handle and cylinder.
Removing the retaining spring
- A key is inserted into the lock cylinder and the part is removed from the handle.
- Repairs and replacement of faulty elements are carried out, or a new lock is installed.
- Assembly of the unit occurs in the reverse order.
- The lock can be adjusted if necessary. To do this, loosen the screws and move the latch:
- outward, when the door is tightly closed;
- inward, if the door is not closed tightly;
- down if the door is raised when closing.
- After adjusting the device, tighten the screws.
Tip: If you need to remove the retainer, you must first trace its outline on the body pillar. This will help maintain the door lock adjustment during installation.
How the door locks are removed on a VAZ 2109 car can be clearly seen in the video.
How to install a silent lock on the door of a VAZ 2109 car
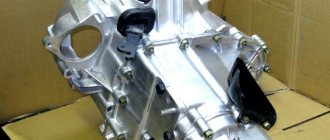
Very often you can hear an unpleasant metallic clang when closing the doors of a VAZ 2109, especially in older models. This is due to the fact that the lock is attached to the outside of the door and when closing it comes into contact with the metal parts of the body and creates a characteristic sound. Manufacturers are now producing silent locks. They are sold in pairs, left and right, their price is reasonable. If the door lock on a VAZ 2109 car is jammed, it is better to immediately replace it with a silent one. To do this you need:
- Unscrew the bolts holding the old lock on the car door.
Unscrewing the fixing bolts of the old lock
- The pin is screwed into place of the unscrewed bolt, otherwise the inside of the lock may fall inside the door.
- The old lock is removed and a silent one is installed.
- The bolts are tightened with maximum force. Tighten using an impact screwdriver.
- You can also install locking pins or silent bolts.
Main types of breakdowns
The first warning for the driver is an extraneous sound when turning the key. Jamming, difficult movement or blocking of the key inside the cylinder will indicate that something is wrong with the device. Variations of breakdowns:
- the pin broke;
- the groove or internal parts are rusty;
- mechanical damage to the door;
- water appeared and froze inside the castle;
- the retaining ring has failed;
- the latch broke;
- the thrust cap collapsed;
- the opening element broke, leaving part of the key inside the device;
- temporary wear of parts.
More often, problems begin in late autumn. Wet snow gets into the core and freezes as the temperature drops. The ingress of water leads to steel deterioration. No less damage comes from dust, dirt, and long-term use. If the unlocking device is inserted into the cylinder with great difficulty, it moves tightly, as if clinging to something, then preventive measures or repairs are required.
In any case, the cylinder will need to be disassembled, then lubrication, repair, replacement or simple inspection is performed.
Front door adjustment
Adjustment is made by changing the position of the door latch. The position of the latch on the stand itself must be marked in advance (for example, with a marker).
If the front doors are loose, the lock will need to be moved slightly to the inside of the structure.
If they open/close with difficulty, on the contrary, move them outward a little.
If the front door “lowers” when closing, the latch requires “raising” its position on the pillar.
If the situation is the opposite, “lower” your position.
For any of these operations, the bolts of the clamp must be loosened, then the position of the clamp must be changed, the position of the door relative to the body must be checked, and the fastener must be screwed back on. The fastening of the clamp will be more reliable if you use a gasket made of waterproof sandpaper, or, at worst, rubber. The gasket maintains a distance between the latch and the post, which prevents contact between the latch finger and the lock cover, and thereby extends the service life of the latch.
Impairments in the door's ability to open easily from the inside can also be corrected. As a rule, the reason is in the internal handle, the position of which can be adjusted in the same way: loosen the screws, move it to a more convenient position, secure it.
Why, after replacing the lock, the door of the VAZ 2109 does not open?
Perhaps you forgot to snap the rods onto the lock, or you need to adjust the lock rod (unscrew it, lengthening the rod).
Rice. Front right door lock: 1 – key guide; 2 — lock switch lever; 3 — shutdown rod; 4 — external drive rod; 5 - key; 6 – button to turn off the lock; 7 – shutdown button rod; 8 and 17 – shutdown levers; 9 – external handle; 10 – bracket for the internal handle; 11 – internal door handle; 12 — lining of the inner handle; 13 — internal drive rod; 14 – internal lock body; 15 - external drive lever; 16 — intermediate lever; 18 - External lock body; 19 — lock drive finger; 20 - dog; 21 - lock retainer; 22 – ratchet; 23 — lock fastening screw
Rice. Door lock fastening: 1- lock fastening screw; 2 – nut for fastening the outer door handle; 3 – lock release button; 4 — external door lock; 5 – reflector
Rice. Tailgate lock 1 — retainer mounting bolt; 2 — rear cross member; 3 – clamp; 4 – hook spring; 5 – hook; 6 – lock body; 7 - lock drive cylinder assembly; 8 – tailgate; 9 – door seal
vote
Article rating