The most popular car of the 90s, the sales leader among domestic cars of those years. The popular Zhiguli-1600 has long been removed from the assembly line, but still appears on our roads. The owners of such a car most likely received it by inheritance. Sometimes students buy it as their first means of transportation, since the price of the Zhiguli is more than attractive. Naturally, when purchasing such a car, the car owner is faced with a number of tasks: installing an alarm system, installing a central lock on a VAZ 2106, a trunk lock, power windows, and so on.
The scope for creativity is great, if there is a desire.
Zhiguli - 1600
You can make this car completely “for yourself”, or you can simply add the necessary options. Of course, specialists can install all this for you, but you can also handle it yourself.
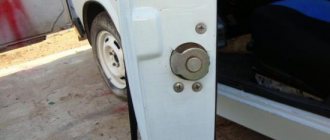
Silent locks VAZ 2107, chocolate and pimpochka
Lack of technical literacy and a stubborn desire to change the design of a car in accordance with the Neanderthal approach to the calculation of components and mechanisms sometimes lead to rather curious situations and unnecessary financial waste. In the struggle for noiselessness and ease of closing the door, some home-made offices deliberately weaken the power part of the lock, in particular, the design of the latches and locking bolts. The so-called silent locks on the VAZ 2107 are the work of domestic home-made workers and the clearest example of how you can screw up even the most reliable design by violating “minor” parameters and replacing “some” materials.
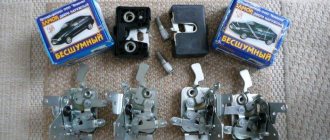
And here we will just talk about chocolates, pimples and unnecessary springs in the design of the VAZ door lock. An interesting way to solve the issue of silently and easily closing a VAZ door has been developed by some tuning studios. A set of locks for classic Zhiguli cars costs only 5.5 thousand; it is installed, however, with a violation of the geometry of the locks, but, thank God, without welding. The element of miracle lies in the use of plastic parts instead of metal ones. Even if you are not familiar with the basics of material resistance, you can guess that any plastic, especially the kind used on silent locks, is inferior in strength to metal. You can provide evidence, but this is already clear to a sane person. In addition, such a silent lock has a number of design flaws, and here we cannot deny ourselves the pleasure of demonstrating in photographic materials the tuned “chocolates”, pimples and removable springs.
What is needed to install locks on a car?
In order to install a silent lock on a VAZ-2107, you must first purchase them. No high-tech operations should be performed to install them. Accordingly, the installation toolset will not contain a long list. You will need a Phillips and straight screwdriver and several wrenches. The main thing is to have the desire and put in a little effort - and the result will not take long to arrive. The result will be the transformation of the process of closing the doors on your pet from annoying and sometimes difficult to pleasant and almost silent.
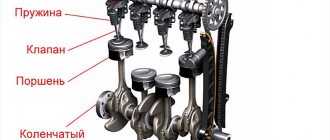
Design and device of the VAZ 2107 door lock
How to open a car if the locks are frozen
The standard Fiat door mechanism was developed almost 50 years ago, and since then it has not undergone any special modifications. Maybe that's a good thing. Nevertheless, we have to put up with some relics of the past, and although there are much fewer complaints about the locking mechanism than about some other parts and components, it can be brought to a state of combat condition without making any special design changes.
The door lock of the classic VAZ 2107 serves to securely lock the door in two positions: closed, latched with one click, and closed, latched completely. Stock DAAZ locks are designed taking into account the emergency loads that the locking mechanism must withstand, keeping the door closed. To do this, the thickness, material and geometry of the latch, as well as the method of its fixation on the lock body, were calculated in a production laboratory.
Another equally important structural element of the VAZ door lock is the fixing bolt, which is screwed into the center pillar reinforcement and into the rear door opening reinforcement. The fixing bolts are made of durable steel and are also designed to securely fix the door when closed. The locks are controlled using metal rods, some of them have adjustable plastic tips. Despite the fact that the lock design is primitive, it is quite reliable and cannot be replaced for the entire service life of the car.
Door adjustment VAZ 2106
In order to adjust the door locks, you just need a key “10” and a marker. The rear and front locks have no fundamental difference in adjustment.
Adjustment process:
- Using a marker, draw an outline around the door lock latch.
- Next, loosen the bolts and adjust as needed.
- After which, safely tighten the bolts.
Where to move the lock:
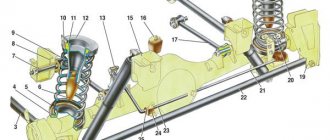
Disassembly and assembly of rear doors VAZ 2101, 2102
Diagnosis of faults and repair of the VAZ 2114/15 stove with your own hands
The operations for disassembling and assembling the rear and front doors are similar, except for the following:
to remove the fixed glass, first remove the guide grooves of the sliding glass, release it from the cable and lower it down; Lift the sliding glass upwards after removing the fixed glass.
Adjusting the door position
1. Use an impact screwdriver to loosen the hinge screws.
2. Set equal gaps; The amount of displacement can be easily determined by the position of the loops relative to the intended contour line.
3. Tighten the hinge screws.
Adjusting door locks
Before adjusting the lock, it is recommended to outline the outline of the lock on the body pillar.
1. If the door closes too tightly, loosen the fastener bolts, move it outward and tighten the bolts. If the door closes poorly, move the lock inward. In this case, there should be no protrusion or retraction of the door relative to the body.
2. If the door goes down when closing, lift the lock. If the door rises when closing (sagging in the open position), lower the latch.
3. If the door is difficult to unlock with the internal handle, then the position of the internal handle of the lock drive is adjusted. To do this, loosen the screws securing the handle bracket and move the handle together with the bracket to the desired position. Then tighten the screws.
Window adjustment
1. To adjust, remove the door trim and lower the glass down. Loosen the screws 3 of the cable pressure plate 4. Then lower the glass all the way into the rubber buffer 2, turn the axis of the window lifter handle in the direction of lowering the windows to the limit, and then half a turn in the opposite direction (1 – clip).
2. With the glass and the cable in this position, secure the cable in the glass holder; This ensures precise movement of the glass from the lower to the upper position.
3. The smooth operation of the window lifter mechanism is regulated by the tension of the drive cable, for which the tension roller moves.
Door trim for VAZ-2106
The VAZ-2106 came off the assembly line in 1976, and until it was discontinued from production, the technologies for arranging the car's interior remained virtually unchanged. Therefore, the basis of the door trim was a material such as fiberboard, which swelled and deformed over time.
To replace the door trim yourself, you need to purchase tension material (imitation leather). You can also use Alcantara or carpet for the door upholstery. Make a new door card from fiberboard or moisture-resistant plywood of suitable thickness; plexiglass or plastic can serve as a “non-killable” material.
Tools needed:
The work is carried out in the following order:
- The door trim is removed. The main thing when dismantling the old casing is not to disturb the base or damage the fastening elements.
- Using a sharp cutting tool (for example, a knife or cutter), we separate the trim from the old door base.
- The old base must be placed on a new workpiece and outlined along the edges of the element (do not forget to cut holes according to the model of the damaged base for the fastening elements).
- Using a jigsaw, we cut out a new base and use a drill to make all the holes provided.
- From the new leatherette we cut out a new covering for the base, adding a few centimeters to the fold.
- We stretch the material onto the base, bend the edges to the reverse side and place it on the glue. If the base material used allows it, it can be additionally secured with staples.
- We install the trim in place, insert new clips and other door elements.
Replacing the contact group and installing the ignition switch
VAZ 2114 stove faucet: replacing the heater faucet with your own hands
Often the cause of a malfunction of the ignition switch is the burning of the contact group. Replacing the contact group is very easy. It is enough to remove the spring ring using a slotted screwdriver, and the contact group will fall out on its own. After this, you need to insert the new part into the device body so that the groove of the contact group fits exactly onto the rod of the secret part, and secure it in the device body with a spring ring. After this, you can install the ignition switch in place.
- First you need to insert the key into the lock and turn it to position “0”.
- Press the latch and insert the switch into the bracket.
- Then you should connect the wires correctly.
- Install the casing on the steering column, fasten the upper and lower parts of the casing with screws.
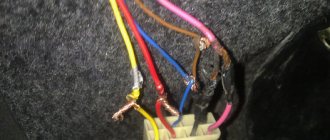
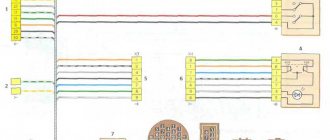
Where should the wires be attached?
The hardest part about installing the switch is connecting the ignition switch to the wiring. Lucky are those VAZ 2106 owners whose wires to the switch are connected through a special block. This block can be connected with your eyes closed.
If your car does not have a special block, a colored wiring diagram will help you correctly connect the wires to the switch.
Video on replacing the ignition switch on a VAZ 2107
If suddenly for some reason the presented video clip does not load, then a photo description of the entire work with a detailed explanation of each repair step will be posted under it.
Since the ignition switch of the VAZ 2107 and all other “classic” models is located under the steering casing, it is accordingly necessary to remove it first, or rather its lower part, by unscrewing several fastening bolts:
After which you can remove the upper part of the casing, since it is no longer attached:
Next, you need to crawl under the panel with your hand and disconnect all the power wires at the back of the ignition switch. But keep in mind that before this you must remove the negative terminal from the battery. It is also better to remember which wire corresponds to each contact of the lock, so that in the future you can connect everything correctly.
Now unscrew the two bolts with a screwdriver, which are marked in the photo below:
But it is also fixed on the left side. In order to release it, you need to use a thin screwdriver or even an awl to press on a certain “lock” as shown in the picture below:
At the same time we pull the lock towards ourselves and it comes out without any problems:
The price of a new lock is about 350 rubles. After purchase, we install everything in the reverse order and at this point the replacement procedure can be considered complete.
Sources
- https://vaz-remont.ru/stavim-besshumnye-zamki-s-vaz-2114-na-vaz-2106-svoimi-rukami/
- https://vaz2106-remont.ru/zamena-ruchki-dveri-i-lichinki-zamka/
- https://zarulemvaz.ru/kak-zamenit-zamok-zazhiganiya-na-vaz-2107/
Durability of silent locks
Operating experience of these mechanisms shows that their service life without any special maintenance is at least seven years.
With careful use of the car, the locks can last until the end of the life of driving this car. Their design features allow them to be used for a long period of time. The lock parts do not break over time, and their wear is completely insignificant. In standard locks, there is constant mechanical contact between the metal parts of the system. In silent mechanisms, the impact is carried out between nodes coated with high-strength plastic, which significantly reduces wear. Also an important factor is the strength of physical contact between the parts of the constipation. Silent locks-2107 have much less impact between nodes than in standard mechanisms. By installing such locks on your car, you can forget about the constant problems associated with closing the doors.
Installing a central lock on a VAZ 2107 with your own hands
Another legendary representative of the Russian automobile industry is the VAZ 2107. Despite the fact that this model went on sale back in 1982, it was removed from the assembly line only a couple of years ago.
Most car enthusiasts who own this vehicle still drive a model of earlier releases. Well, in this regard, a number of questions arise that need to be resolved.
For example, installing a central lock on a VAZ 2107 will make operating your car much more pleasant and easier.
VAZ 2107
There are many ways to solve the problem. You can just come to the service center and the professionals will do everything for you. It is worth noting that in this case much more money will be spent than if you do it yourself.
Having even the slightest idea of how this mechanism works, you can handle it on your own. Familiarize yourself with the materials in advance; for example, you can find a sufficient amount of information on the Internet. Read, watch how the central locking system is installed on a VAZ 2107, video materials. Prepare the necessary tools and get to work.
Installing central locking
Naturally, before we get down to business, we purchase the central locking kit we need. The most important things in such a kit are four motors and a control unit. The box should also contain wires, a key fob, various fuses and strips.
Central locking equipment
The easiest way to control the central locking is a special button on the dashboard. However, its installation and connection will take time. There is also a way to close and open the locks on a VAZ 2107 by pressing a button on the key fob. Well, the most inconvenient thing is turning the key in the driver's door.
Having decided which option you prefer, we assemble the necessary tool:
- Drill;
- Screwdrivers;
- Corrugation;
- Hammer;
- Knife;
- Spanners.
Working with wiring
The most important and important point of installation is the wiring. All wires must be the length you need; they must be laid in places protected from external influences, for example, water. It is also recommended to use corrugated tubes to protect the wires from chafing.
Important! Before you begin, be sure to disconnect the negative terminal from the battery!
Installing a central lock on a VAZ 2107 with your own hands begins with determining the installation location of the control unit. Consider the option of placing the controller between the shelf and the glove compartment.
Next, we lay out the wires along their lengths and decide which of them will go to the rear doors. We will pull them through the lower curb, under the plastic protective sill covers. For the front doors, we will pull the wiring under the dashboard.
We lay a +12V wire from the battery. It will power the entire device.
Wiring for central locking
Installation of motors
In order to install the motors we need, we will have to drill holes in each door. We recommend that you install VAZ 2107 locks, starting with the rear doors.
To get started, remove all unnecessary elements: plastic lining and casing. Take a drill and make a hole in the door. Through it we will subsequently pull the wiring from the stand to the door. Drill a second hole in the rack. Now let's start drawing the wires. Don't forget to use corrugation.
Rear door wiring
Now you can install the engine. When installing, do not forget to check that it does not interfere with the operation of the glass. It's a small matter. We fasten the motor rod and the lock lock rod to each other using a bar. It should be included with the central locking system. Now, actually, it's ready. Let's move on to the front doors.
Installing motors on the front doors will not take much time. In this case, we place them in the left and, accordingly, the lower right corners of the doors. We install according to the example of the rear doors and perform a test.
Installing engines on the front doors
Checking work
Before you rejoice at the completion of the work, you need to connect the control unit to the block with wires. Then return the battery terminal to its place. If the VAZ 2107 locks worked correctly, then everything is connected correctly. Congratulations. If any problems arise, perhaps somewhere during the connection the pin was switched to + or -.
There is no limit to perfection, and in the future you can connect the trunk lock to the central locking, install an alarm or power windows.
Almost all your desires to modernize your favorite car can be brought to life.
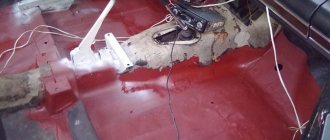
Example of installing a silent lock
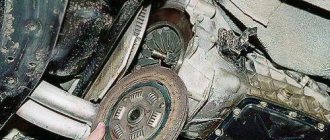
For most classic owners, this is a useful entry. There are so many stupid topics on the drive about silent locks on classics. Either I didn’t search well, or there is no detailed report on installing locks from 2108 on classics, but there are more than enough entries like “I installed locks from 08, I am delighted to recommend it to everyone.” Therefore, I will now try to describe in detail how to install locks from 2108 to 2106. And so for installing the locks we purchased: silent locks, a VAZ-2108-09 door lock mechanism, a gazelle door lock retainer, bolts for fastening the locks and the lock retainer, a rod with plastic, which fits onto the door opening ball from the outside. Well, that seems to be all, it’s only 2 pieces for the two front doors. I started by installing the lock itself, there were no difficulties here, I removed the old lock, drilled out the lower left hole, adjusted the chocolate bar so that it would stand level and sharpened the second hole with a file, then sharpened an oval for the rod.
Then I started adjusting the chocolate bar, I need to grind it down or file it along the bevel that is on the chocolate bar, as in the photo
At first I only sawed off the protruding metal, but this turned out to be not enough; with the back door not fully open, the lock touched the back door. Before installing the lock, you need to grind off the bolts so that they do not stick out and knead the door a little, this is done so that the stand does not wrinkle too much, well, more on that a little later.
The next step is to refine the door, unnecessary holes are puttied and painted over, but since I am wrapping the car in film, I sealed it.
Next we move on to installing the lock latch. We remove the lock from the old lock, saw the stand and pull out the plate from there where the old lock and its fastening were screwed.
Mark the center of the lock bolt using a small pencil with electrical tape wrapped around it and inserted into the lock.
Since I couldn’t find a counter part for the lock retainer on sale, I made it myself from a metal plate. The bolts must be shortened so that they do not rest against the rack.
We drill the mounting holes a little larger so that we can adjust them. And before installing the latch, you need to slightly “adjust” the stand until the latch stops touching the door.
Then we refine everything again
and install the lock
That's it, the lock is installed, the door closes. Now we are making a flag for the handle, I had to tinker with it. Therefore, I drew a sample of this lock and am attaching it in this post in a pdf file, which you can open with Adobe Reader and print it, before printing, check the “actual size” checkbox, after printing the size will be accurate, checked. PDF file
Using this drawing, make a flag from a 1.5-2 mm metal plate. You should get a checkbox like this:
I secured it to the handle with a 4 bolt. The pdf file contains the dimensions of the bend of the door opening rod from the outside. We bend the rod to size, cut off the excess and flatten the end with a hammer, drill a 4.2 hole in it and screw it with a 4 bolt to the flag, you can also tighten the nut to make sure it doesn’t come loose. Photo 14 shows which lever does what.
We install the handle in place, insert the rod onto the lever we need, now our door opens from the outside. We begin to make it so that the door can be opened and closed with a key. To do this, we take the rod that we have left over from the old lock and bend it to the size we need; in the photo you can see how it needs to be bent.
Since my interior door opens with a button, I had to saw off a small part from the lock and, having drilled a hole in the indicated place in the photo, inserted a rod connected to 2 Saturn activators into this hole.
Open/close buttons I don’t have doors on the front doors either, I put the alarm activator directly on the lever that is responsible for opening and locking the door, in the next photo you can see all the rods.
I removed the glass guide; it is not needed with electric windows.
You should also pay attention to the bolts securing the chocolate bar to the lock so that they do not rest against the mechanism. Well, that seems to be all, good luck to everyone in modifying the vase))!
Tags: silent locks for VAZ 2106, silent locks for classics, locks from VAZ 2108 to VAZ 2106
Comments 35
everything is correct, nothing at all, but instead of two activators you can have one reinforced one
I tried, one is not enough. My reinforced ones cost “Saturn” 8 kg. Only they have now doubled the price tag, 500 rubles apiece.
It’s strange that I have only 8 or 10, I don’t remember, but before that the usual ones were also used, they just sometimes didn’t last all the way)
Thank you for the article! added to bookmarks
The mating part of the latch, how does it fit into the rack?
I installed these, but there are already enough of these murzilok on the Internet and the description is no worse. And so - the effect is worth the cost) I liked it)
The man tried) let there be more of these “Murzilkas” it won’t be bad)
On the shelves e.p.t! Is the result alone worth the cost?
Very well painted and laid out, beautiful!
I used to do something like this for a penny, but I removed the spring on the internal lock to make it easier to open.
Respect! exactly what he wrote about: “I installed locks from 08, I’m delighted, I recommend it to everyone”
really well done. Really well described, I encountered this myself and the lack of information played a cruel joke on me
Has anyone thought about body rigidity? And that if suddenly the body is tired or already boiled, then such locks contribute to sagging door hinges, cracks on the pillars, and constant breaking of the lock bracket. I was making a car, everything was fine for the first six months, then the top hinge of the door began to sag... first they adjusted the lock until the door rested against the B-pillar with the frame... then they changed the hinges. A classic lock holds the door as a third fulcrum. this lock doesn’t hold anything, due to the fact that the VAZ 09 family is stiffer, it doesn’t need it, so the engineers made these cool “silent” locks. And the classics are very weak in this regard, especially not fresh ones. In order for classic locks to close well, there are small tricks that, after a couple of days of work (on all 4 doors), close and open, just like on modern, new cars. And it is not limited to sawing off springs, removing stops and lubrication...