Design and location of the hand brake cable for the LADA Granta
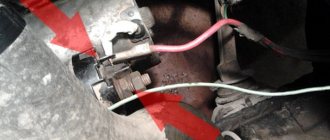
The purpose of the LADA Granta handbrake cable is to transmit force from the lever in the cabin to the rear brake pads. It is enclosed in a multi-layer protective shell and has tips for attaching to the handbrake lever and the rear wheel brake drive. The adjusting nut on the cable allows you to adjust the length of the drive, and the return spring returns the system to its original state after lowering the drive lever. The handbrake cable is located under the bottom of the car and is partially covered by the muffler thermal shield.
We eliminate a creaking noise from the rear, the reason is in the handbrake cable of the Lada Granta and Kalina - RepontoMore
The most easily fixable and fairly common malfunction of the LADA Granta brake system is problems with the parking brake that arise “due to the fault” of the handbrake cable. Replacing the Grant hand brake is easy and does not require special equipment or expensive tools. The only thing that needs to be organized is access to the bottom of the car.
General questions about the parking brake on Grant
Let's look at a few basic questions about VAZ 2190 brakes.
Operating principle of the Granta handbrake
When raising the handbrake lever in the passenger compartment:
- the drive brake cable is tensioned;
- through the equalizer he pulls the cables going to the rear brake pads;
- The pads are pressed against the brake drums through expansion bars, stopping the wheel from moving;
- When the tension is loosened (removed from the handbrake), the tension of the cables also weakens, and the wheels move freely.
Lever 1 pulls cables 3 through cable 2. Those, through levers 4 and strips 5, push the brake pads apart.
Why is it necessary to tighten the parking brake?
When the cable tension is loosened, there is a danger of the vehicle rolling away .
The Granta mechanical handbrake has a conventional device without self-adjustment. The same instructions apply to Lada Kalina, Priora.
This means that as the rear pads wear out, the original parking brake setting will lose effectiveness.
Handbrake on rear disc brakes
In order to pay more attention to the adjustment process and not go into the intricacies of the operating principle of a mechanically driven parking brake on disc brakes, we will list only the main types of device.
- The brake disc is held by an additional pad, which, when the handbrake is raised, is pressed against the working surface of the disc by means of a rocker arm.
- The brake disc design allows individual brake pads to be placed in the internal cavity. The operating principle is similar to that of drum brakes.
- Design with mechanical support of the working piston. In the cavity of the brake piston there is a ratchet (for automatically bringing the pads together), into which a pin with a trapezoidal thread rests. The curved rod drives the pin by turning the shaft with a concentric groove.
Adjustment
In the case of the most common drum type of design, the handbrake can be adjusted by rotating the adjusting pawl. The regulator itself can be located on the side or bottom of the brake mechanism. Access to it is through a technological hole in the shield, which must be covered with a plug.
In some types of construction, the regulator may be locked by a spring element, so it will have to be bent to release and rotate the “pawl”. The handbrake design on the rear disc brakes and the adjustment mechanism are perfectly shown in the video.
One of the elements of the braking system of a car is the parking brake; in motorist circles it is called the handbrake. The mechanism is needed to ensure that the car remains in place while parked (especially on slopes). Every self-respecting motorist simply must know how to tighten the handbrake.
How to change the handbrake cable on a LADA Granta
Replacing the handbrake cable on a LADA Granta is first done as follows:
- install the car on a viewing hole or lift;
- lower the handbrake lever all the way;
- loosen the tension on the handbrake cable by releasing the adjusting bolt;
- unscrew the pins holding the brake drum and guiding the wheel disc during installation;
- if necessary, use a metal brush to clean the place where the brake drum fits on the hub;
- treat the drum landing area with WD-40;
- press the drum from its seat, evenly screwing the M8 bolts into the threaded holes;
Attention: to prevent the pistons from coming out of the brake cylinders, do not press the brake pedal with the drum removed.
- disconnect the thermal shield of the muffler, opening access to the handbrake cable;
- remove the muffler and resonator from the cushions, lowering the exhaust system down;
- Using a 13mm wrench, unscrew the locknut and the handbrake adjusting nut; remove the equalizer from the rod;
- remove the end of the parking brake cable from the equalizer;
- pull out the end of the cable sheath from the bracket on the body;
- Use pliers to bend the cable fastening brackets;
- Using a screwdriver, move the parking brake drive lever forward in the brake mechanism and remove the cable end from it;
- loosen the nut holding the cable on the rear axle beam;
- pull the cable out of the holder;
- remove the cable from the bracket on the body;
- remove the Grant handbrake cable from the brake shield.
Then the cable must also be removed from the other wheel. Installing a new parking brake cable is done in the reverse order. Now you know how to change the handbrake cable on a Grant. But after installing the new cable, it is necessary to adjust the hand brake drive.
Adjusting the hand brake on the Lada Granta ⋆ I Love My Lada
It would seem like a trivial matter to tighten the handbrake. But not the Lada Granta. This frantically budget car managed to surprise many owners this time too. Due to the design features and saving on small things, before pulling up the tame ones on the Grant, you need to have a good dance, and without a pit it will be difficult to do anything. Whether you like it or not, you need to tighten it up.
Hand brake device Lada Granta
Theoretically, the Lada Granta should have replaced the outdated VAZ 2107 a long time ago, but for various reasons its release was delayed.
The car was conceived as the cheapest in the VAZ model range and this idea was fully realized.
The Granta's brake system differs little from the brakes of classic Lada cars, even in layout - the same disc brakes at the front with a floating caliper, the same drum brakes at the rear.
The handbrake drive is also the simplest, but the brake mechanism itself does not even provide a primitive system for automatically adjusting the gaps between the block and the drum.
The force from the handbrake lever is transmitted directly through a cable with an equalizer to lever 9 in the brake mechanism.
Consequently, after wear of the friction lining 8, even by 2-3 mm, the handbrake cable has to be tightened.
Brake mechanism with hand brake drive
Therefore, VAZ engineers decided not to worry and leave the design as is. To adjust the cable tension, the driver must approach the adjusting nut from below, which is not always convenient, especially in cold or wet weather.
In addition, the threaded rod is constantly surrounded by dust and moisture, so it rusts, and it is not so easy to get to it from below.
How to tighten the handbrake on a Lada Granta, when to tighten it
Tightening the handbrake cable is necessary in cases where the parking brake lever does not release the brake pads in the upper position. According to science, the pads should block the wheels at 4-6 clicks and hold the car on a slope of 20-25 degrees. Otherwise, we won’t even be able to pass the technical inspection.
Parking brake design
To tighten the handbrake cable, we need to unscrew and move to the side the protective cover of the muffler resonator. It is attached to four studs welded into the body. The difficulty is that when unscrewing these four nuts with a 10mm socket, there is a danger that the studs will break, since the threads often sour and rust.
Broken heat shield mounting studs
In this case, adjusting the handbrake may result in drilling the bottom and welding new 6 mm bolts up to 25 mm long. As a last resort, they can simply be inserted into the hole in the bottom by inserting a powerful washer and placing a grommet under the head of the bolt. In a word, we have already prepared ourselves mentally, all that remains is to consider the process itself.
We adjust the handbrake on Grant with our own hands, video
If we are ready for difficulties, then for adjustment we will need a standard set of tools, grease for processing threads and lubricating the compensator, as well as an inspection hole or overpass. If everything is ready, let's go.
- Release the handbrake completely and go under the car.
- We find the studs with nuts we need and try to unscrew them with a 10mm socket.
- Remove the rubber muffler hanger from the bracket and move the heat shield as far forward as possible.
- We gained access to a 13 mm nut for adjusting the tension of the handbrake cable.
- Use an open-end wrench to hold the locknut, and with another wrench we tighten it several turns, controlling the tension of the cable.
- We tighten the cables until they are lightly tensioned, and then check the tightening force. The suspended rear wheel should rotate freely when the handbrake lever is lowered.
After this, we check the parking brake in accordance with the regulatory data. Below we have attached a video of the process of extreme adjustment of the handbrake on Grant. Good luck to everyone and strong brakes!
How to tighten the handbrake on a Grant
Step 1. It is necessary to install the car on a pit or overpass, since the adjustment unit is located under the bottom of the car.
Step 2. Determine the current travel of the parking brake lever - raise the lever all the way up and count the clicks. If there are only 2 clicks or less, then it is necessary to lengthen the drive; if there are more than 4 clicks, then shorten it.
Step 3. Raise the parking brake lever 2-3 clicks.
Step 4. Remove the cushions from the additional muffler brackets (position 1).
Step 5. Using a socket wrench, remove the four nuts that secure the shield (item 2).
Step 6. Pull the additional muffler away from the bottom, place a wooden block under it and remove the protective shield.
Step 7. Hold the adjusting nut with one wrench at “13” and loosen the locknut.
Step 8. We adjust the length of the drive using the adjusting nut. When turning it, the length of the drive is shortened and the handbrake is tightened; when turned away, the length increases (if you need to loosen the handbrake on a Lada Granta).
Step 9. During the adjustment process, we periodically check the handbrake movement.
Step 10. After adjusting the lever travel, you need to hang up the rear of the car and check that the wheels rotate easily when the handbrake is released and that they are securely fixed when the handbrake lever is raised.
Step 11. If the brake pads are working correctly, you can check the adjuster and secure the protective shield and additional muffler in place.
Lada Granta Liftback 8kl › Logbook › how to tighten the handbrake cable without a hole
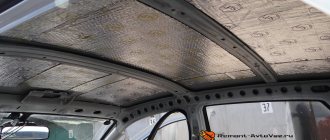
The time has come my friend. The handbrake stopped holding on the last click. As always, you don’t find time to stop by a hundred, and when you do, you don’t find anyone willing. One is up to his ears busy, the other doesn’t even want to get involved (what the hell is that handbrake), the third promises for tomorrow and the next day, and so on. I have as many as 2 holes, but I can’t get to any of them. The father-in-law's pit is blocked by an ancient Muscovite who will not go anywhere. My hole is blocked by a pile of rubble, a pile of sand and a pile of construction debris. I'm having a renovation. And what now. Don't slow down, right? It's decided. We find a day off, don’t sit our ass on the sofa and dress warmly in work clothes. We lift the grant with a jack, not forgetting to place bricks under the wheels. We throw a sheet of penoplex on the ground (who is rich in what). For peace of mind and confidence. so that you won’t be crushed, we put a good stump, log, boards, etc. right in the middle of the body. Look at the photo.
Adjustment process
Required tool:
• Two 13mm wrenches. It is advisable that one of them be a socket one.
• Head for 8. • Partner, but you can do without it. The truth is it’s more difficult without him. 1
.
It is necessary to install the car on a pit or overpass, since the adjustment unit is located under the bottom of the car. 2
.
We determine the current travel of the parking brake lever - raise the lever all the way up and count the clicks. If there are only 2 clicks or less, then it is necessary to lengthen the drive; if there are more than 4 clicks, then shorten it. 3
.
Fully lower the parking brake lever. 4
. We climb under the car and find protection above the muffler. The photo shows 4 nuts that need to be unscrewed. Unscrew the nuts with a 10mm socket. Tip: before unscrewing the nuts, spray them with WD40. Otherwise, the studs may break off.
5
. We unscrew all the screws and hang the protection on the muffler.
6
. Closer to the front of the protection you will see a rubber pad that attaches the muffler to the body. Remove the bottom part of the pillow from the mount.
7
. After this, we move the protection forward, in the direction of the engine. The protection should go over the cushion mounting hook. We move the protection all the way forward.
8
. After the protection is removed, you will see 2 adjustment bolts. Right locking, left for adjustment. Loosen the first nut and use the second nut to adjust the handbrake force. We periodically check the tightness from the interior using the handbrake.
9
. Using a 13mm wrench, hold the left nut and tighten the fixing nut. After that, tighten everything using a 13mm socket.
The entire adjustment process took us about 20 minutes. The location of the adjusting bolts on the Lada Granta is not the best. After all the work, we check the operation of the handbrake on an incline. If the handbrake does not brake, you need to replace the rear brake pads.
A necessary tool for tightening the handbrake.
Head for 8 for ratchet Set of keys for 13 Partner (preferably the coolest car mechanic)
- Two keys for 13. It is advisable that one of them be a socket.
- Head 8.
- A partner, but you can do without him. The truth is it’s more difficult without him.
The principle of adjusting the handbrake
- Fully lower the handbrake lever in the cabin.
Lower the handbrake handle
- Place the car on a pit or lift it on a lift. Some car owners manage to adjust the handbrake “from the curb” - but this is inconvenient and dangerous.
- Find the resonator from the bottom of the car and remove it from the rubber brackets.
- By tightening the adjusting nut, tighten the handbrake cable that comes out of the passenger compartment.
- Ask a partner to check the stroke of the lever handle, or check it yourself.
- As soon as the handbrake moves 3-4 clicks, tighten the lock nut.
- Before the final stage of work, it is necessary to check the functionality of the brake mechanism. To do this, hang the rear wheels and watch how they rotate with the hand brake off. They also check how the wheels grip when the handbrake is raised.
- Next, return the protective screen to its place, screw it onto the seats and put rubber fasteners on the resonator.
Remove the muffler from its mounting to the body
Using a ratchet, unscrew the 4 bolts securing the protection of the handbrake adjustment mechanism (protective screen).
Remove and set aside the protective screen
Next, you can either remove the protective screen, but it seems to me that it is easier to move it forward behind the muffler, which will free up space that is enough for free work.
The mechanism looks like this
Loosen the first nut with a 13mm wrench.
Handbrake adjustment video
Adjusting the handbrake cable on the LADA “Granta”
To carry out the work, access to the cable from the bottom is necessary, so the adjustment of the Grant handbrake cable after replacement is carried out while the muffler heat shield has not yet been put in place. Next you should do the following:
- lower the handbrake lever all the way;
- loosen the locknut on the adjusting device (if it is tightened);
- screw the adjusting nut onto the cable shank until the latter is tensioned;
- make sure that the free play of the lever in the cabin is from 2 to 4 clicks;
- if necessary, adjust the cable tension;
- tighten the locknut while holding the adjusting nut with a wrench;
- Install a muffler heat shield.
Adjusting the Grant's handbrake
Adjusting the parking brake of a VAZ 2190 is no more difficult than on a classic or “chisels”. Let's look at the step-by-step principle , starting with inventory.
Necessary tool for tightening the handbrake
What you will need for work :
- Inspection pit, overpass, lift;
- Keys: open-end and ratchet with long head 13;
- Socket wrench or ratchet with a 10mm head;
- Possibly WD-40.
Parking brake adjustment principle
So, the car is on a pit/lift, the tool is in your hands - the handbrake is loose. What to do?
Step 1 : find a resonator under the bottom. We remove its mount, located closer to the front of the car. Then, using a socket wrench or a ratchet with a 10mm socket, unscrew the 4 bolts securing the heat shield.
This way we get the opportunity to move the screen forward without removing it. Underneath there is access to the parking brake adjustment mechanism.
Step 2 : slide the screen forward to access cable adjustment.
Pull up the handbrake
Adjusting (tightening) the handbrake on a Lada Granta car is a rather troublesome process.
But if you really know how to tighten the handbrake on a Lada Granta standard, this procedure will not take you much time and effort. The only thing that is required for its implementation is a jack or an inspection hole, because access to adjustable components and assemblies occurs from below and you will have to work under the car. To tighten (adjust) the handbrake you will need 3 tools:
- two open-end wrenches for 13, one of them is preferably a socket one;
- one key head for 8;
- a faithful assistant (although in desperate situations you can get by alone).
The process of directly adjusting the manual braking system of a Lada Granta car is carried out in nine main stages:
- We lower the handbrake lever inside the car.
- We climb under the car, unscrew the rubber cushions (brackets) from the resonator, and remove the muffler from its attachment to the body.
- We remove the protective screen of the parking brake adjustment mechanism. To do this, use a socket wrench to unscrew the 4 nuts from the fastening bolts.
- We remove the protective screen or move it to the side behind the muffler - in this case, the necessary space for work is also quite enough. In this case, the muffler can be pulled back with something, for example, by pushing a block of wood under it.
- We take two 13mm wrenches - the first one is to slightly loosen the locknut, holding the adjusting nut. Then vice versa - hold it, and secondly turn (also loosening) the adjusting nut.
- Actually, we adjust the hand brake as follows: tighten the handbrake cable, for which we tighten the adjusting nut (move the key clockwise).
- Next, you should check the travel of the handbrake lever - this is why you need a partner, or you will have to do it yourself. The lock nut can be tightened when the handbrake stroke is 2-4 clicks (see above).
- Then we test the operation of the parking brake mechanism as a whole. To do this, lift the rear wheels and check how freely they rotate when the handbrake is lowered and how completely they lock when fully raised (in this case they should not rotate at all!).
- If the handbrake is working properly, tighten the locknut and replace the protective screen and muffler. The handbrake adjustment is complete!
As the mileage and life of the vehicle increases, the handbrake becomes less and less adjustable. It happens that even after adjustment, the manual braking system does not work properly and does not “hold” the car. This indicates that the wear on the brake pads is too high or the cable stretch is irreversible.
Sources
- https://ladaservice.info/lada-granta/raznoe-lada-granta/zamena-i-regulirovka-trosika-ruchnika-lada-granta/
- https://vgrante.ru/?cat=40&pcat=6
- https://car-fact.ru/marki-i-modeli/otechestvennye/lada-granta/granta-kalina-ruchnik.html
- https://Remladavaz.ru/zamena-trosov-privoda-stoyanochnogo-tormoza-lada-granta
- https://carfrance.ru/podtyagivaem-ruchnik-na-lada-granta-regulirovka-i-podtyazhka-trosa/
- https://new-granta.ru/regulirovka-ruchnika-na-lada-granta/
- https://24techno-guide.ru/regulirovka-ruchnogo-tormoza-lada-granta.php
- https://ubs-rus.com/rukovodstva-po-remontu/granta/granta-zamena-trosov-privoda-stoyanochnogo-tormoza/
- https://ladaautos.ru/lada-granta/kak-pravilno-podtyanut-ruchnik-na-lade-granta.html
Checking the operation of the hand brake
There are two ways to find out if the parking brake system on the Lada Granta is in order. They work separately: if at least one type of test shows something wrong, the handbrake needs adjustment. So:
- Stop the car on an uphill or downhill slope of about 23-25 degrees, then put the handbrake in the raised position and turn off all gears. The car must stand still and not roll down. If this happens, the handbrake is working properly and you are in no danger. Otherwise, the handbrake on your car needs adjustment.
- The travel of the hand braking system lever is checked. If the ratchet mechanism clicks 2-4 times before being completely moved to the parking position, there is no need to worry, the handbrake is working properly.
There are only two reasons why the handbrake on a Lada Granta may malfunction and fail:
- brake pad wear;
- stretching the cable.
This is not least due to the fact that the manual braking system on a budget liftback from the giant of the Russian automotive industry is designed quite simply and consists of only three components:
- the handbrake control lever itself, equipped with a rod and a pair of nuts - one lock nut and one adjusting nut;
- cable equalizer and spacers with a brake pad drive lever;
- the right and left cables of the pad drive mechanism on both rear wheels - on the right and left, respectively.
How much does it cost to tighten the handbrake and can you do it yourself?
Actually the question is rhetorical, as you understand in different regions, the cost can range from 200 to 1000 rubles. For example, in the capital, the price is often 500 – 1000, but in the regions you can raise it for 250 rubles.
And to be honest, the work itself only takes a few minutes, the main thing is to find a hole or a lift, a key of 10 and off you go. You need to tighten the middle bolt, the one that is in the middle, it is the handbrake, tighten the nut and thereby tighten the cables.
Of course, if they are rusty or torn, then everything is much more complicated; it is better to trust the master, because replacing the cables from the rear drums is not at all an easy task.
That's all, read our AUTOBLOG, I think it clarified the situation.
( 7 votes, average: 4.57 out of 5)
Similar news
Rust converter composition. Can I do it myself?
How to unscrew a brake pipe. If it has soured and the edges are torn off.
Anti-squeak plates for brake pads. Why are i needed?
Add a comment Cancel reply
Good day everyone, I decided to write my review of the 2010 Toyota Avensis. Just want…
TOP articles for the month
I have many different articles and videos on various gearboxes, for example here...
I already have an article on the website about choosing memory cards (you can see it here), it’s very...
In the article - is it possible to open windows when the air conditioner is running (you can read it here), I was asked...