Gur gas 3110 DIY repair video
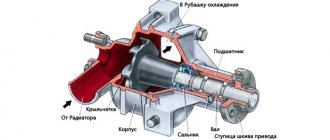
I bought myself a used steering wheel in working condition with 3110. The steering gear itself turned out to be a 100, which has a problem with left turns, much more often than at 103. I was thinking of sending the gearbox to hydrolab for modification. But after reading on their website what exactly is the problem with this gearbox and what they are doing to solve this problem. I decided to try to do something myself, especially for free =). And I trust my hands more than any others. The problem is that the upper oil seal of the bipod shaft (in diagram C1, diagram from Saya Hydrolab) is cut off by high pressure (up to 100 atm) against a thrust metal ring. This is how the brain must work to make such a structure for such a loaded place. =). In the 103rd gearbox there is already a high-pressure bushing, and this problem is much less common.
Power steering gearbox diagram
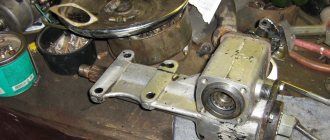
As I wrote earlier, if the part is used and even works properly, it is better to carry out troubleshooting so as not to disassemble it in the near future. The gur has never dealt with gearboxes before. I began to slowly take it apart. It turned out that everything is not so complicated there. The most amazing thing is that when I disassembled the gearbox (they had already climbed into the gearbox, apparently those whose hands do not grow from there) the upper oil seal C1 was installed in reverse and, accordingly, the sealing ring too. I don’t understand how it (the oil seal) worked at all, because the pressure will simply open the spring, press the seal away from the bipod shaft and the liquid will pass through the oil seal, and accordingly turning left will not work. When installed correctly, the pressure, on the contrary, presses the oil seal against the shaft, and the ring protects it from eversion under strong pressure. I won’t write about the disassembly and assembly itself; you can find information about this on the Internet.
After some thought, I decided to replace this ring with a less sharp, more regular fluoroplastic ring (you can also use caprolon). But after thinking for another day...a good idea came to me: is it possible to somehow reduce the pressure on the oil seal itself so that it is less loaded. I machined another sealing ring from fluoroplastic at the location in the gearbox housing. It won't be entirely clear from the photo, so I sketched out a diagram.
Scheme for refining the upper seal of the power steering gearbox
And here are the rings and the seal themselves. The oil seal needs to be trimmed in height (from 10 to 7 mm painlessly).
Well, installed in place.
They fit tightly in the gearbox, and on the shaft itself, too, very tightly, thereby acting as the same oil seal. With this modification, there will not be such enormous pressure on the oil seal; it will be restrained by the upper ring.
I also replaced all fluoroplastic and rubber seals. I put a non-original rubber ring under the piston seal to make it tight.
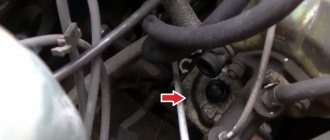
After talking with one good person who is engaged in modifications, the guru advised us to seal drain cavities 1, 2, 3 (they are indicated on the gearbox diagram). And drain the area one way directly from the gearbox housing. These cavities are “parasitic.” Reduce the uniformity of pressure redistribution between the right and left working cavities. The left side already suffers due to the stupid design of the oil seal, plus the pressure in the left working cavity is reduced due to these drain cavities. To plug these drain channels, we cut threads in them and put bolts or something else on fum tape with a thread lock. We plug the small hole in the bipod cover (this way we can block both the technological hole closed by the ball) and the mating part on the gearbox housing.
It also doesn’t hurt to get rid of the technological holes sealed with balls, through which liquid often oozes. In some places it is enough to install a longer bolt, which will block 2 holes at once.
You can’t just make threads on the bipod shaft and the torsion bar shaft, they’re hardened. Therefore, you can hammer a bushing or a soft metal rod into it (I hammered duralumin into it).
We drain from the gearbox itself. We cut the thread and install a thread on the fitting and connect it to the oil reservoir.
I also used a different size lower seal. The internal diameter is 30 instead of the original 32. It sits more tightly on the shaft.
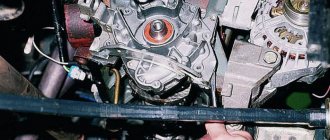
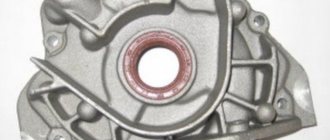
Power steering pump for 402 of 406
Fixed pump fastener, crankshaft pulley for power steering pump High pressure oil seal Corteco 19026831B
Source
Repair of steering column gas 3110 with hydraulic booster
Further questions of the Practical Seminar will address the issue of automatic, planetary and continuously variable transmissions. In addition, gearboxes provide long-term torque interruption and torque variation. During startup, which is the transition from idling to moving the vehicle, maximum torque is required to be transmitted to the drive wheels at the same minimum speed. This is achieved by slowing down, thereby increasing torque.
If the car moves, the acceleration accelerates. Once the engine's rated speed is reached, the gear must be changed so that the vehicle can continue to increase its speed. Ideally, it would be necessary to use a gearbox with an infinite number of gears. In this case, the acceleration of the vehicle will be smooth and without degrees, only in the region of maximum engine torque, so that the ideal torque will be transmitted to the driving wheels of the vehicle whenever the driving speed is requested.
Removal and installation of the steering mechanism of the Volga GAZ-3110 car
Removal 1. Set the vehicle to the parking brake.
2. Place chocks under the rear wheels.
3. Loosen the front left wheel mounting bolts.
4. Raise the front part of the car and place it on supports.
5. Unscrew the bolts and remove the wheel.
6. From the side of the wheel well, remove the mudguard from the left wheel by using a screwdriver to pry the caps securing it.
7. From inside the passenger compartment, unscrew the fastening nut 1, remove the wedge 2 and disconnect the worm shaft of the steering mechanism from the cardan joint 3.
Having previously marked the relative position of the bipod shaft 1 and the steering bipod 2, unscrew the fastening nut and press the bipod off the shaft.
Unscrew the four mounting bolts and remove the steering mechanism.
It is recommended to mark the bolts, as they are of different lengths
Disassembly
1. Clean the steering gear housing from dirt.
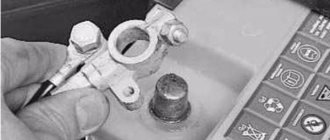
2. Drain the oil from the steering gear housing through the filler hole by unscrewing the plug.
It is advisable to do this immediately after the trip.
3. Clamp the steering gear housing in a vice by the boss to secure the housing to the body and set the roller to the middle position by turning its shaft 1.
Unscrew cap nut 2.
4. Remove lock washer 1 with gasket.
Unscrew adjusting screw 2.
Unscrew the four fastening bolts 3 and remove the side cover 4 with the bipod shaft assembly and the gasket.
Before removing the bipod shaft, thoroughly clean its lower end to prevent dirt from getting into the crankcase.
Repair
Preparatory stage
The final result depends on how well you prepare for power steering repair. The preparation process consists of the following stages:
- Before starting repairs, dirt is cleared from the power steering. All cavities of the unit must be completely cleaned. This is necessary so that when disconnecting the hoses, dirt particles do not end up inside.
- At the second stage, fluid is pumped out from the power steering pump reservoir.
- The screws of the steering shaft coupling are unscrewed. To do this, use a 6-point hexagon. First, the position of the part relative to the power steering shaft is changed by tilting.
- Before repairs, you also need to move the elastic coupling from the splines. To do this you will need a mount.
- The tie rods will be disconnected from the bipod.
- The car is raised on a jack and the left front fender is removed.
- Use a 15mm socket wrench to loosen the wheel fastenings on the arch side. One bolt securing the power steering to the side member is removed and two remain.
- You need to place a container under the power steering hose fittings. Liquid will flow into it.
- Disconnect the fittings one by one.
- Hoses and fittings must be sealed. For this, special plugs are used. As a last resort, you can take a simple rag.
Now it’s time to start dismantling the power steering and repairing it. To do this, unscrew the last bolt, holding the hydraulic booster from below. Be careful, the gearbox may fall out.
This is a general algorithm for preparatory work for repairs. It is different for different cars. Therefore, before disassembling, refer to the instructions to clarify all the technical nuances. This will help avoid structural damage when repairing the power steering.
Repair technology
The power steering repair process largely depends on the model of your car. The general algorithm will be outlined below. Please note that not all models have gearboxes that can be completely disassembled.
To better understand the power steering repair technology, we will divide it into a number of stages:
- To disassemble the power steering you will need a strong 6-point hexagon. Don’t forget to prepare a tray in advance. ATP will flow into it.
- Remove the plugs from the fitting and lift the power steering above the bucket. In this case, you need to rotate the bipod so that the liquid drains down.
- Remove the bipod shaft and unscrew the bolts. They are usually additionally fixed with a special mastic, so you have to make an effort.
- Remove the adjusting screw locknut. Then screw it into the gearbox. At the end, the shaft is pushed out along with the cover and bipod.
- Check the condition of the bipod. If there is no play, the cuff does not need to be changed. Just leave everything as it is.
- Unscrew the check valve plug and remove the spring. The valve itself is shaken out.
- Remove the cover bolts and push the cover out a little from the body. This can be done carefully by turning the shaft.
- Pull out the shaft along with the cover. To do this, you need to pry the gap with something.
- Unscrew the power steering ball nut. Do the same with the shaft.
- Collect all the balls.
- Loosen the locknut and remove the bearing.
- Next, the nut and bearing are removed from the piston body.
- The removed nut is disassembled. To do this, the locking of the bolts is bent, and they themselves are unscrewed. The bracket is removed. The same needs to be done with both parts of the ball guide channel.
Damage analysis
To identify a malfunction, you need to check the crankcase. If there is a crack or chip on it, then it cannot be repaired; you need a new one.
The bushings look worn out. They also need to be replaced. You can find the crankcase assembly at points of sale of parts.
Worm and roller - if deformation is detected - replace. The bearing should be lubricated and without obvious flaws.
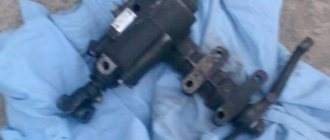
Steering columns removed from the car
If oil leaks occur from time to time, gaskets and seals need to be replaced. Reassembly is carried out in the reverse order, according to the marks made during disassembly.
Repair work
Repair is conventionally divided into several stages: preparation, dismantling the pump, preliminary inspection, replacement of parts and/or elimination of damage, reassembly and installation.
Preparation for repair
To carry out repair activities you will need: tools; rags; comfortable, spacious and clean place. Tools you will need:
To repair you will need: a repair kit from a car dealership, or to replace it with washers, a gasket, O-rings and an oil seal. A suitable service bearing may also come in handy if this is the issue.
Dismantling and inspecting the pump and searching for problems
First you need to remove the power steering pump. Then disassemble and inspect each component of the unit for damage, and then repair it. If the malfunction cannot be corrected, then from the next paragraph you will learn how to replace the pump by dismantling it and installing a new one.
Adjusting the steering mechanism
1. Set the steering wheel to the position where the vehicle is moving in a straight line. In this case, the engine must be turned off.
2. Unscrew cap nut 1 and remove lock washer 2.
3. By slightly turning the adjusting bolt clockwise using hexagon 1, ensure that the free play of the steering wheel does not exceed 17 mm.
The amount of free play is measured at the wheel rim.
4. After adjustment, fill the hexagonal cavity of the adjusting bolt with Litol-24 lubricant.
Place the lock washer with its protrusion into the groove of the adjusting screw and tighten the cap nut.
5. Make a test drive and check that the steering mechanism is adjusted correctly while driving.
If the front wheels are sluggish when exiting a turn, it is necessary to unscrew (counterclockwise) the adjusting bolt 1–2 grooves into the lock washer and adjust the steering mechanism again.
If it is impossible to achieve the required result, the steering mechanism must be repaired or replaced.
Similar chapters from other books
Diagnosis of steering faults and their elimination
Diagnosis of steering faults and their elimination Overdrive but the steering wheel produces road shocks when the car is moving. Vibration and knocking felt on the steering wheel Diagnosis of steering control elements comes down to listening for knocking noises during sudden
Possible faults
Possible malfunctions If the motor does not rotate, check the polarity of the diodes. Make sure you connect them correctly, following the polarity shown in the diagram. If the stepper motor rotates slowly or oscillates back and forth, it may be
Possible driveline malfunctions
Possible malfunctions of the cardan transmission The cardan transmission is two-shaft, with three cardan joints, consists of a rear cardan shaft, an intermediate cardan shaft and an intermediate
Possible malfunctions of the rear axle
Possible malfunctions of the rear axle
Possible malfunctions of tubeless tires
Possible malfunctions of tubeless tires
Possible malfunctions of the brake system
Possible malfunctions of the brake system
Possible generator malfunctions
Possible generator malfunctions Fig. 11. Cleaning the contact rings with sandpaper and replacing the brushes. Rice. 12. Checking the resistance of the rotor field winding. Rice. 13. Stator test circuit
Possible starter malfunctions
Possible starter malfunctions Fig. 14. Commutator brush positions. Rice. 15. Repair of starter traction relay. Rice. 16. Starter switching diagram for checking drive gear positions and adjustments
Possible malfunctions of sound signals
Possible malfunctions of sound signals
Possible windshield wiper malfunctions
Possible malfunctions of the windshield wiper Fig. 17. Electrical connection diagram for checking a windshield wiper without a switch: A – for checking at first speed; B – for checking at second speed; 1 – plug connector for windshield wiper; 2 – control lamp; 3
Possible antenna malfunctions
Possible antenna malfunctions
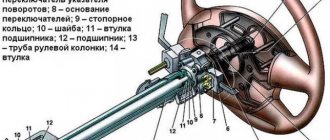
5.3. Design and operation of steering
5.3. Design and operation of steering The steering is used to turn the front wheels of the car while it is moving and consists of a steering gear and a steering mechanism. In order for the movement of the car wheels when turning to occur without lateral
Elimination of power steering pump defects
The faults have been found, now we begin to eliminate them.
Read more: Solaris on credit reviews
We will need rags, white alcohol, sandpaper with grit P1000/P1500/P2000, a triangular needle file, a drill bit of Ø12mm (or more) and an electric drill. With the shaft everything is much simpler, you will need P1500 sandpaper and with it we begin to clean all the edges of the grooves on the shaft (we clean the outer and side ones on both sides) in all possible ways. We work without fanaticism, the main task is to remove only sharp burrs.
For one thing, you can immediately polish both sides of the shaft a little on a flat surface, it is advisable to use P2000 sandpaper.
Next, we need to check the result of our work, we check visually and by touch, everything is perfectly smooth and does not cling.
The most difficult thing will be with the surface of the cylinder; personally, I couldn’t figure out anything simpler than how to make a spherical grinder from sandpaper, a drill and a thick drill (F12). To begin with, we take the P1000 sandpaper and a drill bit that can be inserted into the drill.
Next, you need to tightly screw the skin against the rotation of the drill, two or three turns, there should be no gaps.
Holding the tightly twisted structure, it needs to be inserted into the drill (the skin should also be clamped).
Afterwards, using the most convenient methods for you, we carefully begin to grind the cylinder, you need to grind evenly, press the cylinder tightly and move it relative to the axis of rotation (at maximum speed). As we eat the skins, we change them, eventually we reach the smallest skin P2000.
The desired result is obtained,
Now everything needs to be thoroughly wiped with a trail of white alcohol. The shaft itself with the blades can be rinsed in it.
After we begin the assembly, everything is put in the reverse order of removal.
Repairing power steering is a complex task and painstaking work. The article is intended for those car enthusiasts who are familiar with the structure of the main car systems.
Take advantage of our company's services
There are still many GAZ models in operation, which, due to their age, could be immediately placed in a car museum. Such vehicles have their own unique charm and history, but require appropriate maintenance.
At the Autogur service station they are not afraid of age-related problems. Regardless of the model, mileage and complexity of the work, we will bring your car to the state of a museum exhibit with full driving characteristics. We are different:
By contacting our car service center, you can get the power steering pump repaired for the Gazelle and other models. We will quickly repair steering gears, racks, carry out maintenance and replace working fluids. Having visited the Autogur service station once, you will want to become our regular customer.
Types of faults and their symptoms
The manifestations of pump breakdowns described above may in reality not be related to the pump itself. Therefore, first you need to carefully inspect the entire power steering system. And only if the problem is not found, start working with the pump itself.
Malfunctions are divided into two types:
The first can only be determined by disassembling the power steering pump and inspecting each of its components. As for the second type of malfunction, first of all you need to answer the questions - how much time has passed since the fluid in the system was changed? Is the liquid selected according to the instructions? Is its level sufficient? And in case of airing, it is often enough to pump the hydraulics to restore power steering functionality.
In any case, manufacturers recommend that if any problems arise with the pump, do a complete overhaul and cleaning. This will help reduce the likelihood of wear and tear, and therefore increase the life of the entire system.