Necessary tool
Wear of the oil seal leads to oil leakage from the engine, which should not be allowed on any car. Replacing a part yourself is only possible if you have the tools and detailed instructions. Let's look at the tool needed for the job:
- Set of wrenches and ratchets with heads. You will need open-end wrenches for 10, 13, 19;
- New oil seal for installation;
- Socket wrench;
- Flat screwdriver;
- Container for draining old oil;
- New engine oil;
- Sealant for a secure fit;
- Oil pump gasket;
- Jacks;
- Hammer.
As you can see, for self-replacement you need a fairly extensive list of tools. Replacing the front crankshaft oil seal of a VAZ 2114 is similar to changing the rear element, so the set of tools to replace it will need the same.
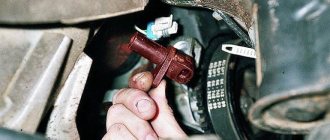
Useful : Where is the DPKV located on the VAZ 2114?
In addition to jacks, you will need wheel chocks to lift the car. You should not use shifting into gear as a way to protect against the car rolling away. Understanding how to replace the crankshaft oil seal on a VAZ 2114 allows even an inexperienced car owner to carry out the work. First, let's look at the instructions with step-by-step actions for changing the front element.
Crankshaft oil seal
Today we will talk in more detail about the crankshaft oil seal, a spare part that is designed to seal (seal - approx.) connections in this moving part of the engine, as well as prevent engine oil from leaking . Below, we will describe in detail how to replace this element as quickly as possible.
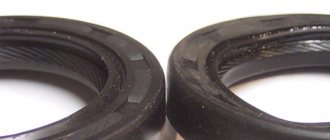
Signs of crankshaft oil seal failure
The very first and main sign of failure of the crankshaft oil seal is considered to be the loss of its tightness.
Oil leak due to leaky crankshaft oil seal
And if in the case of oil seals on other engine elements it doesn’t look so bad, then if there is a malfunction on the crankshaft, oil can leak from the system in liters per 1000 kilometers.
Main causes of wear
- Wear and tear due to natural reasons due to expiration of service life.
- Incorrect installation of the oil seal in advance can cause cracks on its surface.
- Mechanical damage.
- The material is not original, made in violation of production technologies.
Please note that with an increase in oil consumption, due to leaks of the crankshaft oil seal, traces of oil will certainly be observed under the car; they are clearly visible and will not leave any owner unnoticed.
Also think about the presence of oil seal leaks and slight slipping of the clutch. This effect can be observed due to oil getting on the clutch disc and basket located near the gearbox.
Replacing the front oil seal
Useful video:
Having prepared the tools and spare parts, you can begin work on replacing the worn part. The step-by-step repair process looks like this:
- Remove the protective plastic cover from the timing belt.
- The next stage is setting the first cylinder of the engine to top dead center. This manipulation is carried out as follows: the camshaft and crankshaft are rotated until the marks on their pulleys coincide with the marks on the timing case cover.
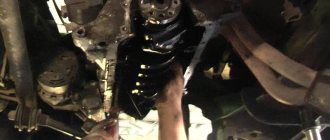
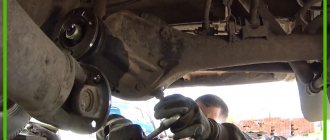
- To remove the timing belt, the front right wheel is jacked up and the engine protection is removed. Before tightening the belt, you need to loosen the tension. To make work easier, you can remove the fender liner and remove the alternator belt. After this, the crankshaft pulley itself is removed and the timing belt tension roller is loosened.
- After removing the crankshaft pulley, drain the engine oil.
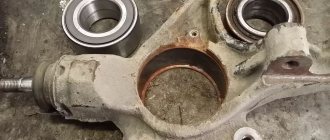
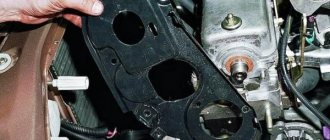
- Remove the engine sump, which is secured with 16 bolts.
- After removing the pan, you need to unscrew the oil receiver. After dismantling, check it for debris. Its channels can be cleaned with a compressor.
- The next step is to remove the oil pump. This element is secured with six bolts.
A gasket is placed where the oil pump is attached to the engine block. Over time, it loses its properties, and when the part is removed, it is completely destroyed. During the reassembly process, do not forget to change this gasket.
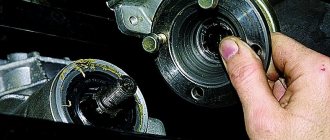
- Having completed dismantling the oil pump, you will have access to the front o-ring. You can pull it out with your fingers or a flat-head screwdriver.
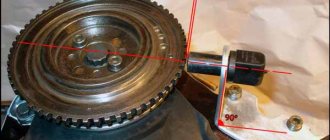
- After removing the old element, clean the surface and seat from oil and dirt. To install the new rubber ring tightly, you can use a 32mm socket socket. Having rested it against the new oil seal, apply a couple of firm blows and insert the rubber ring into the seat. Do not make strong blows, because... The ring is made of soft material.
Helpful : Signs of a faulty crankshaft sensor (9 symptoms)
When completing the installation, reassemble everything in reverse order and fill in with new engine oil. As a recommendation, we note the need to lubricate the internal surface of the part before installation. It is enough to lubricate the surface with a few drops of motor oil. In addition to the front sealing ring, the VAZ 2114 engine also has a rear sealing element. Next, we will consider the step-by-step replacement of the rear crankshaft oil seal of the VAZ 2114 (8 valves).
Replacement process
If you have some auto mechanic skills, you can replace the front oil seal yourself.
The algorithm is as follows:
- remove the protective crankcase and timing covers;
- align the ignition marks so as not to disrupt the operation of the gas distribution mechanism;
- remove the timing belt;
- dismantle the pulley and remove the generator belt;
- remove the crankshaft pulley (you will need a puller, do not forget to purchase it);
- remove the oil pump (drain the oil first);
- assess the condition of the oil seal (it may be “oaky” from time to time or, conversely, softened by oil);
- Press in a new oil seal with a socket of the appropriate size.
Pressing in the front crankshaft oil seal
Replacing the rear oil seal is an extremely labor-intensive process, which is accompanied by checking the condition of important vehicle components - the crankshaft and clutch parts.
Process _
The replacement crankshaft rear oil seal is as follows:
- separate the engine and gearbox;
- remove the clutch and flywheel;
- pull out the old oil seal and press in a new one.
At the same time, we check the shaft for play, examine the condition of the clutch, and after assembling the engine, you should also make sure that the breather is open.
After replacement, observe the car at idle and make sure there are no leaks. For a while, try not to over-spin the engine. It takes time for the seals to “get used” to the temperature conditions. Due to high oil pressure in the system, they can be squeezed out again.
A VAZ car is a complex device, the components of which have different service lives. Crankshaft oil seals can be replaced at home. The article describes the process of how to change the crankshaft oil seal on a VAZ 2114 - a video with step-by-step instructions for replacement.
Replacing the rear oil seal
Useful video:
Changing this part is a little more difficult, because... Removal of the clutch kit and the entire gearbox assembly is required. For comfortable work you will need a lift or pit. The step-by-step replacement process looks like this:
- To begin, dismantle the gearbox and clutch assembly.
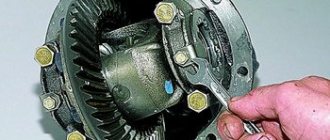
- Using the “17” head, unscrew the six bolts securing the flywheel.
- We note the position of the flywheel relative to the crankshaft.
- We remove the flywheel.
- We remove the element from the landing site using a flat-head screwdriver.
- Using the old oil seal as a mandrel, we insert the new element into the seating area with gentle blows of a hammer.
- We align the flywheel according to the marks.
- Lubricate the fastening bolts with sealant (their threaded part).
- We assemble everything in reverse order.
As you can see from the instructions, it is possible to replace these parts with your own hands, but you will need tools, a lift or a pit. At the service, worn-out elements can be replaced for 1,500-2,000 rubles, which for some 2114 owners is quite an impressive amount.
Algorithm for replacing the crankshaft oil seal
To replace the front crankshaft oil seal, you will need a standard set of wrenches, specialized tools (wrenches for unscrewing the crankshaft pulley bolt), a gear puller (for cars with a timing belt drive), and truings for pressing in a new rubber element.
Video: A simple method for removing the oil seal
If you take cars equipped with engines with a timing belt drive, then the replacement technology is as follows:
- We place the car in the pit and immobilize it.
- We provide access to the attachment drive pulley mounted on the crankshaft.
- Remove the accessory belt.
- We provide access to the timing belt.
- We set TDC according to the marks (on the camshaft gear, crankshaft pulley, flywheel). We fix it in this position.
- Unscrew the crankshaft pulley mounting bolt. Once again we check the installation of marks.
- Loosen the timing belt tension roller.
- We remove the belt.
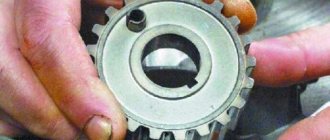
- We pull the drive gear off the crankshaft (carefully so as not to lose the key). Usually the gear is pulled off by hand, but sometimes a puller is required.
- Thoroughly wash and clean the surface near the crankshaft end switch.
- Pry off the oil seal with a screwdriver or pliers. We do this carefully so as not to damage the seating surfaces, since even the slightest scratch will lead to a loss of density and renewed oil leakage.
- We wipe the seating surfaces with a rag.
- Lubricate the new oil seal and put it in place, making sure that the edges do not turn under.
- We hammer the rubber element until it stops using a straightener (a piece of pipe of the appropriate diameter).
- We put everything back together, making sure that the marks match and the drive belts are tensioned correctly.
But this is a general technology. If you take each engine separately, there will definitely be nuances.
How much do crankshaft oil seals cost for a VAZ 2114?
Carrying out maintenance work on the clutch or timing device should be combined with replacing the specified oil seals. Both the front and rear o-rings wear out over time. The price for a new crankshaft oil seal (front) does not exceed 400-500 rubles . The article number of the original spare part from AvtoVAZ is 21081005034 . In addition to the factory manufacturer, there are parts from foreign companies of higher quality.
The price of the rear o-ring also does not exceed 500 rubles . The article number of the spare part has not changed since the release of model 2108. Domestic spare parts can be ordered under article number 2108-1005160 .
The prices indicated are valid for online spare parts stores. At some points of sale, the cost of parts can reach 700 rubles .
Reasons for replacement
The main reason for replacement is oil leakage. But here it is necessary to make one clarification. If oil streaks are visible on the front of the engine crankcase, this does not mean that the oil seal is faulty. First of all, the car owner should make sure that the crankcase ventilation system is working properly. If it (or the hoses) is clogged with dirt, then it is too early to change the oil seal. If the ventilation is in order, but oil still flows, the reason is definitely in the oil seal, and it needs to be changed urgently.