Features of VAZ-classic rear axle gearboxes
All VAZ classic cars are rear-wheel drive, the vehicle moves using the rear axle, which is the drive axle. The VAZ rear axle gearbox is the most important part in the transmission; it is where the main gear is located.
- 1 Device
- 2 Differences in VAZ rear axle gearboxes
- 3 Gearboxes on machine 2107
- 4 Replacing the rear axle gearbox of VAZ 2106, 2107
- 5 Defects in the gearbox
- 6 Adjusting the VAZ rear axle gearbox
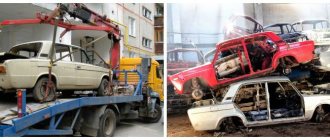
- 7 Repair or replacement, which is better
- 8 Locking the rear axle gearbox VAZ 8.1 Related articles:
How to adjust the gearbox without visiting a service center?
The service and repair manual for most cars has tolerance parameters for each component. For example, adjustment of the rear axle gearbox (differential bearings) of classic Zhiguli cars is carried out in the range of 8-13 hundredths of a millimeter. For such work you will need a micrometer and special devices.
With their help, you can actually work in the conditions of the manufacturer's plant, the installation accuracy is no worse than that of the inspection department's quality control inspector. If you are not a car mechanic, there is no point in buying such precision instruments, but a couple of micrometers and a homemade device for making adjustments with your own hands in the garage will not hurt.
Where is the gearbox located?
On the "sevens", as on all representatives of the rear-wheel drive family, the gearbox is located at the rear, under the bottom of the car. It connects the cardan to the VAZ 2107 axle and causes the wheels of the car to rotate. Rotation occurs thanks to axle shafts engaged in the gearbox, which, due to the technical features of the rear axle of the VAZ 2107, will have to be removed later. If the car is lifted, or when viewed from a garage pit, the gearbox is simply impossible not to notice.
Signs and malfunctions of the classic rear axle gearbox
Replacing a gearbox with your own hands is a labor-intensive process, which includes not only the purchase of a new unit (quite expensive), but also time costs. Therefore, before you start, you need to make sure that the gearbox is faulty. You can define the signs like this:
- gradually accelerating the car, listen carefully and remember at what moment the noise appears;
- while driving, start engine braking (remove your foot from the gas pedal at speed), at this time listen to the gearbox and note the moment the noise appears;
- accelerate the "seven" to hundreds, switch to neutral and turn off the engine - listen to how the gearbox behaves while coasting.
“If the bridge is noisy both in neutral and at speeds, the gearbox has nothing to do with it. If the hum occurs only at speed (regardless of the number), repairs, or, as a last resort, replacement of the gearbox are inevitable.”
When the signs are identified, it is necessary to carry out another check:
- park the car, secure the front wheels with shoes;
- jack up the rear so that the bridge hangs over (it is necessary that the wheels come off the surface);
- start the engine and accelerate the “seven” to the point at which noise occurs, while the wheels should spin without load.
If the noise has not changed, then the gearbox is clearly in good working order and it is not the cause of the trouble. Here other drive units are checked. Well, if there is no noise when driving without a load, then we are talking about worn gears of the gearbox, which make noise only when driving with a load.
The “seven” gearbox itself is a fairly reliable unit that can withstand a period of 100 to 300 thousand mileage, and there is no need to even look into it. Gears, gear spacer, differential adjustment - all these problems arise during improper operation:
- the use of oil with a low viscosity level, as well as failure to comply with the terms of its replacement;
- operating the “seven” with an amount of oil insufficient for this;
- During movement, the bridge is subject to extreme loads (frequent and unsuccessful slips).
Gearbox removal process
In order to repair or replace the rear axle gearbox of a VAZ 2107, you first need to remove it from the car:
- Drain the oil. This, by the way, may be a reason to replace it.
- Separate the flanges of the cardan and gearbox. To do this, you need to unscrew four bolts and nuts. At this time, it is necessary to fix and immobilize the cardan with a screwdriver or by holding the brake pedal. After unscrewing the nuts, you need to tie the cardan to the muffler. You can simply hang it, but this can also lead to negative consequences for the cardan.
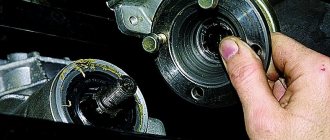
- Remove the axle shafts, because without this the gearbox cannot be removed. At the same time, you can inspect the seals, and if they are worn out, replace them. This will save time and prevent possible malfunctions.
- Separate the beam and gearbox by unscrewing all eight bolts that secure it. When unscrewing the latter, it is necessary to hold the gearbox so that it does not fall. The bolts are unscrewed - carefully remove the gearbox.
Repair and adjustment of the VAZ 2107 gearbox
Before you start repairing the gearbox and its subsequent adjustment, you need to have certain skills, backed up by skills, observe all the nuances and subtleties of this process, and also strictly follow the technological nuances of the process. Therefore, if a person starts work for the first time, then it is better to abandon this idea. In addition, you must have all the necessary tools:
- pullers;
- stands;
- a set of keys, screwdrivers and other accessories.
If something is missing, it’s better not to take risks and trust the professionals. In fact, disassembling the “seven” bridge will not be difficult, but it is one of the few components that requires professional maintenance. The gearbox is disassembled step by step:
- First you need to unscrew the shank nut;
- then the flange itself is removed, the drive gear is pulled out, and the rings responsible for the adjustment are dismantled;
- the oil seal is removed, the oil deflector is dismantled, and using a puller, the inner ring of the bearing is removed;
- the drive gear is disassembled, and the differential is dismantled, and the spacer sleeve, regardless of its condition, is subsequently changed.
To facilitate subsequent assembly, marks are applied to the bearing caps - you can use a pencil, but it is much more reliable to use a core for this. Marks are applied not only to the covers, but also to the body, this will allow them to be assembled correctly later. As for the right and left covers, they also need to be marked, because they cannot be confused; numbers and letters are applied to the covers and body in the appropriate places. The only inconvenience is that you need to carefully clean the covers so that the marks remain in place - that is why, for convenience, it is better to mark the marks.
In order to remove the cage with inner rings, you must use a hammer and drift. By lightly tapping over the entire surface, the process of knocking out the rings occurs. If you only knock on one point, it is unlikely that you will be able to remove the rings.
As a rule, all gearbox repairs consist of replacing the main pair - it takes the main “blow”. The main pair is responsible for determining the gear ratio, and it is produced in various variations. The increase in traction of the “seven” occurs due to the larger gear ratio, and the lower it is, the higher the maximum speed the car gets. Which pair to choose is up to the car owner himself, but there are some tips on this matter.
The bridge with the “deuce” was equipped with a pair with the highest gear ratio (about 4.4), but now it has become almost impossible to find a similar one, since this pair has been discontinued. The most optimal option for the VAZ 2107 is the “three-speed”, it has an indicator of 4.1 - this paired with a 5-speed works great without loss of speed and traction.
VAZ 2106 gearbox repair
Rear axle gearbox VAZ 2106
The VAZ gearbox can be of various types depending on the components. The main gears have an unusual shape, and the teeth are at a variety of angles. This is explained by the fact that a hypoid type transmission is used. Its main advantage is low noise level, jerk-free operation and reduced load on each tooth. Thus, the entire mechanism can be operated for a long time and, as experience shows, quite reliably. The same gearbox is installed on many other models of domestic cars.
Replacement
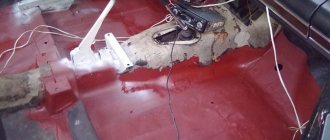
After all the preparatory steps have been completed, you can proceed directly to removing the gearbox. To do this, disconnect the cardan from the shank by unscrewing the 4 fastening nuts:
And lightly hit the cardan with a hammer. The result is the following picture:
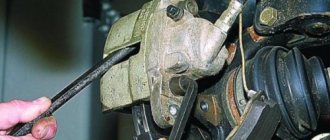
After that, using a spanner wrench, we tear off the bolts securing the gearbox to the rear axle housing of the VAZ 2106, and then you can use a socket and ratchet to unscrew all the bolts completely (there are 8 of them in total):
When the last bolt remains to be unscrewed, you need to hold the gearbox so that it does not fall:
And having unscrewed it, carefully remove the gearbox from the bridge housing, as shown in the photo below:
If necessary, the gearbox is repaired or completely replaced, after which everything is put back in place in the reverse order. It is worth noting that it is better to install a new gasket at the joint, since it is not intended for reuse.
Replacing the hand brake follow the link.
How to adjust
This operation is performed after each disassembly and repair of this part. But not always. You can determine whether the gearbox needs adjustment by the presence of axial play in the drive gears. This is done using an indicator with a division value of 0.01 millimeters. Checking for play is carried out with the propeller shaft disconnected by moving the flange in the axial direction.
The indicator leg is installed in the end part of the flange. By adjusting the tension, the axial play in the bearings is removed. A similar adjustment can be made by selecting the thickness of the adjusting rings. How can the rear axle (gearbox) be changed on a VAZ 2106?
Before final assembly of the gearbox, the meshing of the gears should also be checked. In order to do this, you need to paint the teeth of the device with some bright paint. It is not recommended to use something that is too liquid for this work, since its properties are not suitable (it will simply spread over the teeth). But you shouldn’t give preference to a thick one either - it won’t be squeezed out of the spaces between the elements (that is, there will be no result from it). After applying the paint, you need to rotate the drive gear in different directions. In this case, it is necessary to stop the revolutions when it hits the driven one. This must be done until there is a clear contact mark on the teeth. This is how we determine the correctness of the adjustment.
If during the work you need to move the driven gear, you can do this by changing the thickness of the shim set. The latter are installed between the end of the gear and the inner ring of the rear bearing.
So, we found out how to replace the rear axle (gearbox) on a VAZ 2106 car and how to adjust it correctly. By the way, services charge from 2 to 3 thousand rubles for such work - almost the full cost of the part being replaced.
How to remove
If it is necessary to remove the gearbox:
— first of all, drain the oil from the gearbox housing;
— the rear axle must be raised and placed on supports so that the wheels do not touch the ground;
- Unscrew the axle bearing shields and pull the axle shaft out of engagement with the differential;
— unscrew the driveshaft from the gearbox flange, having marked its positions in advance, place a stand under the gearbox, unscrew the fastening bolts and carefully, so as not to damage the gasket, remove the gearbox from the rear axle housing.
Steps to take when installing the gearbox
Before installation, the rear axle housing must be wiped of oil.
After inserting the gasket into place, install the gearbox in the rear axle housing and fasten it with bolts with sealant applied to them. Bolts and holes in the casing must be degreased. Carefully tighten all the gearbox mounting bolts and connect the driveshaft to it. Place the axle shafts in place and screw on the bearing shields.
After this, install the brake drums and tighten the bolts without much force on the wheel. After removing the stand from under the rear axle, lower the wheels until they are completely in place. Using a torque wrench, tighten all wheel bolts.
After cleaning the oil filler hole in the bridge casing, fill in the required amount of oil.
Malfunctions
Most often, the breakdown of this element of the car transmission is associated with the exhaustion of the service life of some parts that require subsequent replacement. The main causes of malfunctions of the rear axle gearbox are:
wear of the shank oil seal;
wear of the shank or differential bearings;
breakdown of differential elements;
wear or breakdown of parts of the main pair.
Signs of a breakdown of the rear axle gearbox of the VAZ 2106 cannot be ignored. An oil leak from the gearbox or a characteristic “howling” sound emanating from this unit when driving immediately reveals the cause of the malfunction. And if transmission oil leakage can be easily eliminated by simply replacing the shank oil seal, then the noise emanating from a broken transmission is not so easy to deal with.
First, you need to check whether the noise disappears when the car coasts. If it disappears, then the reason is certainly in the main gearbox pair. If the noise or hum remains, the cause of the malfunction is most likely a failure of the shank or differential bearings. The principle of this simplest diagnosis is that when coasting there is no forceful contact between the elements of the main pair, and, accordingly, their condition does not affect the hum emanating from the car.
First of all, it should be noted that most often the main pair is subject to increased wear due to low oil levels. Insufficiently lubricated gearbox parts are naturally subject to severe thermal and frictional overloads. In turn, a drop in the oil level occurs when the oil seal is faulty, which becomes unusable when the shank nut is loosely tightened. The second reason that often leads to replacing the VAZ 2106 gearbox is the increased load on the transmission that occurs during long-term operation of the vehicle with heavy overload. Thirdly, we cannot exclude a factory defect in the parts installed on the rear gearbox, the price of which is unreasonably high.
Differential device
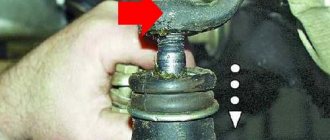
The planetary gear is mounted on the differential housing. The differential consists of two axle gears, two satellites and a pin. The main, most common differential malfunctions are wear of the pinion pin (play) and wear of the splines on the axle gears.
On a car, the play of the pin of the satellites can be determined by turning the driveshaft by a quarter or more; if there is no play, then the shaft practically remains in place when you try to turn it in one direction or another.
It's also worth noting that there is never any noise coming from the differential. When moving forward (in a straight line), the differential rotates as one unit and it turns out that there is simply nothing to make noise there.
The cause of noise from the rear axle gearbox when gas is added and the noise disappears after releasing gas is (almost 99.9%) wear of the teeth of the main pair. This is clearly visible on the removed gearbox. The forward side of the teeth has significant wear, while the reverse side shows little wear.
If, after disassembling and troubleshooting the parts of the main pair, wear of the teeth is detected, then no repair will help and it will simply be a waste of time and money. Only the main pair needs to be replaced.
Home-couple
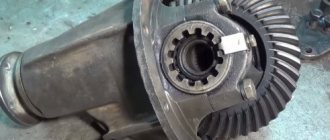
The gears of the main pair are selected at the factory based on contact patch, noise and other parameters and are marked. For example, on the planetary gears it is stamped - VAZ 2103 (model), 10 41 (gear ratio), 4091 (pair number). The main pair number 4091 is also marked on the bevel gear.
After marking these parts, they became the “main pair” and are not installed one without the other, that is, “family”. “- 6” is also marked on the “tip”; this is an amendment for assembling the main pair in the gearbox. When troubleshooting a differential, its bearings are also checked for wear and, if necessary, replaced. Bearing wear is often caused by unprofessional replacement of the gearbox seal.
For example, after replacing the oil seal, tighten the shank nut without observing the tightening torque (pull as much as possible) and the force is transferred not to the spacer sleeve, but to the differential bearings.
These are supports on rotating axes and shafts, which receive loads and transfer them to various structures...
As a result, after a short run after replacing the shank oil seal, noise from the gearbox appears. Only in this case, the “hum” noise in the gearbox is constant and unlike the noise from worn teeth of the main gear. In this case, the hum is constant, regardless of whether gas is added or released.
Rear axle gearbox assembly video
During assembly, the gearbox is adjusted according to 4 parameters:
1. Selection of the adjusting ring
Parameters from 2.6 to 3.5. The ring serves to adjust the depth of engagement of the teeth of the “tip” and “planetary gear”, which is strictly specified. This is where the “correction -6” is needed for this main pair, which was mentioned above. Of course, this amendment will be individual for each main couple.
In this video, the main pair will be adjusted using a special device. It is clear that the vast majority of motorists do not have such a device and this is just a clear example of adjusting the engagement depth parameter. An option will also be given for adjustment without a “device”.
A “device” with a micrometer is also installed on the device, simulating the gear of the main pair. The indicator shows zero. Then the indicator leg is transferred to the bearing bed and in this case the indicator shows a value of 3.25, which is not good, since it should be within the range of 3.0. On the second landing plane it turned out to be 3.45. The arithmetic mean is 3.3. To adjust, we will use the correction at the “tip” - “-6”. In this case (– 3.3) + (-6) = 3.36. The thickness of the adjusting washer required is 3.36 mm. Using a micrometer, select the washer of the required thickness.
Note. When the shank bearing wears out, it begins to rotate on the “tip” body. As a result, the bearing end, adjusting washer and shank gear bodies wear out. It turns out that when replacing the shank oil seal, even with the correct tightening torque, the adjustment of the depth of engagement of the teeth of the gears of the main pair is lost and the “howl” of the pair is ensured, as is its early failure.
Let's return to the gearbox assembly...
2. Adjusting the preload of the shank bearings
The shank bearing sits on the “tip” and a NEW spacer sleeve MUST be installed. The video clearly shows that the new bushing is smooth without any deformation, while the previously installed one is deformed. What happens is this: When the shank nut is tightened to the prescribed torque (from 12 to 26 kgf), the bushing takes on the tightening force and, when deformed, works like a spring, creating tension. The tightening force for the VAZ 2107 gearbox nut is significant and the shank must be secured against turning.
In the video we see what kind of “device” the master uses. It is necessary to tighten the shank nut until there is no play. When the nut is tightened correctly, the shank should rotate with a resistance force of 0.3-0.4 kg, therefore, the bearing preload is correct. This assembly rule applies to old (used) bearings.
The differential with bearings is installed and secured with covers (tightening torque is about 8 kgf) and the adjusting nuts of the differential bearings are tightened.
3 and 4. Simultaneous adjustment of the thermal clearance of the main pair and the preload of the differential bearings
For these purposes, another “device” with two indicators is needed. Using the adjusting nuts in the video and everything is shown well, we move the planetary gear towards the teeth of the “cone” to achieve the required clearance. Factory clearance adjustment data is from 0.08 to 0.12 mm. However, such a gap is provided for the new main pair (“tips” and “planets”). The gap is checked in 4 planes by turning the gear. The gap for the working main pair after adjustment is 0.13-0.14 mm.
After making the adjustment, the adjusting nuts are locked with special plates for this purpose, with one or two “antennae”. This completes the assembly and adjustment.
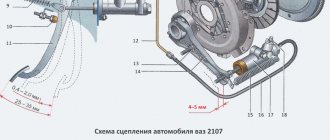
Design and technical characteristics of the gearbox
The rear gearbox of the VAZ 2107 car consists of a massive steel casing with a shank, a driveshaft flange, two main gears mounted at right angles to each other and a self-locking differential.
Rear gear ratio
The main characteristic of any gear transmission is its gear ratio. It is the ratio of the number of teeth on the driven gear to the number of teeth on the drive gear. The driven gear of the VAZ 2107 rear gearbox has 43 teeth. And the drive gear has 11 teeth. Dividing 43 by 11 we get 3.9. This is the gear ratio on the VAZ 2107 gearbox.
Another important point should be noted here. VAZ 2107 was produced for many years. And over the years, gearboxes with different gear ratios were installed on it. For example, the earliest models of the “seven” were equipped with gearboxes from the VAZ 2103, the gear ratio of which was 4.1, that is, the tooth ratio was 41/10. On later “sevens” the gear ratio changed again and was already 4.3 (43/10) and only in the newest “sevens” this number is 3.9. Due to the above reasons, the driver often has to independently determine the gear ratio of his car. Here's how it's done:
- the car is set to neutral gear;
- The rear of the car is raised using two jacks. One of the rear wheels is securely fixed;
- After this, the driver manually begins to turn the driveshaft of the car. It is necessary to make 10 revolutions;
- By rotating the driveshaft, you need to calculate how many revolutions the unfixed rear wheel will make. The number of wheel revolutions should be divided by 10. The resulting number is the gear ratio of the rear gearbox.
Typical gearbox failures and their causes
The rear gearbox of the VAZ 2107 is a reliable device that is very resistant to mechanical wear. However, over time, parts gradually wear out even in the gearbox. And then the driver begins to hear a characteristic crunch or howl heard in the area of the rear axle or in the area of one of the rear wheels. Here's why this happens:
- one of the wheels jammed because one of the rear axle shafts was deformed. This happens extremely rarely, usually after a strong blow to one of the wheels. In this case, the axle shaft is so deformed that the wheel cannot rotate normally. If the deformation is insignificant, the wheel will rotate, but when rotating, a characteristic howl will be heard coming from behind the damaged wheel. It is not possible to fix such a breakdown on your own . To straighten the axle shaft, the driver will have to contact specialists;
- crunching sound in the gearbox when the car is moving. This is a more common problem that every driver of an old “seven” will face sooner or later. The gearbox begins to crunch after several teeth and splines on the axle shafts wear out in the main gear. If the wear is very severe, the teeth may break. This happens both due to metal fatigue and due to poor lubrication of the gearbox (this is the most likely reason, since the lubricant in the “seven” gearbox often escapes through the breather and through the shank flange, which have never been leak-tight). In any case, such a breakdown cannot be repaired, and gears with broken teeth will have to be replaced;
- bearing wear on the axle shaft. This is another reason for the characteristic grinding noise behind the wheel. If the bearing has collapsed, then you cannot drive such a car, since the wheel may simply fall off while driving. The only solution is to call a tow truck and then replace the worn bearing. You can do this either on your own or at a service center.
Why is the gearbox humming and what to do?
The article discusses why the gearbox hums and what to do in this situation. Let's decide on the reasons. Humming sounds and howling in this transmission element occur if:
- the main gears are worn out;
- bearing life is exhausted;
- the shank nut has become loose;
- the adjustment is incorrect.
The reasons are arranged in order of decreasing prevalence; the nature of the sounds will be different in each case. Not only the tonality of the noise differs, but also the driving modes in which it occurs. Owners of Russian-made rear-wheel drive cars most often encounter this problem. Why does the VAZ rear gearbox howl and hum ? Let's figure it out together.
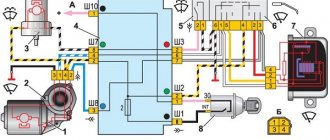
Design and principle of operation of the gearbox
To understand why the gearbox howls and how to “treat” it, you need to understand the device and the principle of its operation. The name of the node comes from the English word meaning “to lower.” In this mechanism, the rapid rotation of the driveshaft shank is transmitted to the wheels with a decrease in speed.
An automobile gearbox transmits torque from the gearbox to the axle shaft through a system of gear mechanisms. The drive gear is mounted on the driveshaft shank and transmits the moment of force to the driven gear of the gearbox. This is the so-called main pair. The reduction occurs due to the fact that the driven gear has more teeth than the driving gear.
The distribution of torque between the axle shafts is carried out through a differential - a system of bevel gears called satellites. This mechanism allows the wheels to move at different speeds as the car makes a turn.
How and when the gearbox howls if the main pair is worn out
If the VAZ gearbox hums when accelerating, and the sound is howling, without crunches or loud knocks, then the problem is the wear of the main pair - the drive and driven gears. An even more obvious sign of this malfunction is that the howl is not audible when braking the engine. Often the sound intensifies when the load changes (pressing or releasing the accelerator pedal). As a rule, the driver begins to notice that the rear gearbox howls when driving at speeds of about 80 km/h. On an all-wheel drive Niva, the front axle sometimes hums, but usually faults “sneak up from behind.” The rear gearbox of a Russian SUV is constantly in operation, so it wears out faster. You can read about what problems can arise in a manual transmission and how to solve them in our article: “Transmission problem - manual transmission, gearbox”
What to do about it
If you take timely measures, you can avoid costly repairs. As soon as you hear for the first time that the rear gearbox is humming , add the tribotechnical compound “Reducer” from Suprotec to the transmission oil.
Getting into the lubricating liquid, the product forms a protective layer on the surface of metal parts. Microdamages are leveled out, and the geometry of the gears is partially restored. The product does not react with lubricants, ceramics, rubber or plastic.
If, despite the fact that the gearbox howls , you continue to drive, having driven 1000 kilometers or more, you will have to change the main pair. It is possible that the entire assembly will need to be replaced. It would be wiser not to go to such an extreme.
Additive Suprotek Reducer, in gearboxes and differentials
Restores the shape of teeth in gear transmissions of gearboxes of any type. This reduces noise and vibration during operation of the unit, makes work easier, and extends its service life by 2.5-3 times.
When and how does the gearbox hum if the bearings are worn out?
If the VAZ gearbox howls constantly, regardless of the driving mode, and the sound resembles a buzzing, there is most likely a problem with the bearings. Moreover, we can say with confidence that the parts on which the drive shaft of the gearbox rotates have exhausted their service life. The fact is that the roller bearings of the shank rotate about 5 times faster than the axle shafts and satellites, and wear out faster. Another reason for accelerated wear is an overtightened shank nut. If the gearbox hums not very melodiously, the sound is more like a crunching sound - the problem should be looked for elsewhere. This is usually how a malfunction of the differential bearings or axle shafts makes itself known. You can verify this by listening to a car with the drive wheels hanging out. The operation should be performed in a viewing hole or on a lift.
How to repair
This malfunction can be treated by replacing the bearings. You should not delay the operation, do it as soon as you notice that the gearbox is humming . Delay will lead to the formation of wear on the main steam. In advanced cases, you will have to replace the drive and driven gears or the entire assembly along with the bearings.
What noise does the gearbox make and when does it make if the shank nut is unscrewed?
If the VAZ gearbox howls only when the car is moving with the gear engaged, but when the accelerator pedal is released, it means that the shank nut has become loose or unscrewed. The hum is reminiscent of the sound of an approaching trolleybus. On Togliatti cars, the shank nut does not have a locking mechanism. When unscrewing the fastener, the shank may move along the axis of rotation. This leads to accelerated wear of the main pair. If this malfunction is not corrected in time, sooner or later the drive gear will hit the differential, which will lead to the axle jamming.
What to do
The recommendations in this case are standard - fix the problem immediately. Have your car towed to a service center. You can get to the workshop on your own, but you must be extremely careful and do not accelerate faster than 30 km/h. After eliminating the malfunction, in order to neutralize possible negative consequences, fill the transmission with the tribotechnical composition “Reducer” from Suprotec. It will help restore the original condition of the surface of the parts in friction pairs.
Additive for SUV gearboxes. Suprotek 'Off Road Reducer'
For gearboxes, transfer cases of SUVs and vehicles operating under heavy loads. Restores gearing, which reduces noise and vibration and facilitates the operation of the unit.
When and how the gearbox howls if it is incorrectly adjusted
The nature of the sound can be different - it depends on the degree of misalignment; it does not matter whether the front gearbox is humming or the rear . Such a hum usually occurs both during acceleration and when coasting, but with the speed turned on. In neutral there is no sound. This is a very rare occurrence, since the gearbox is adjusted only once - when installing the main pair. If initially this transmission unit worked silently, and then began to make extraneous noise, it is not a matter of adjustment. Many car enthusiasts and “garage craftsmen” make the mistake of thinking that the gearbox is howling or humming because of a misaligned adjustment.
If the main pair is incorrectly adjusted immediately after installation, the gearbox will hum from the very beginning. If this malfunction is not eliminated immediately, the main pair will wear out and wear will appear on it, which cannot be compensated for in the future.
If you drive correctly and take care of your car on time, the question of why the gearbox is humming will not bother you even with a mileage of more than one hundred thousand kilometers. Take care of your steel horses and follow the traffic rules.
Diagnostics and causes of malfunctions
The fact that the gearbox is in a faulty condition is indicated by the appearance of a characteristic noise (hum) when the vehicle is moving. To accurately determine the gearbox malfunction, there is the following experiment.
You need to accelerate the car to 25 kilometers per hour and gradually pick up speed, starting from this mark. If suspicious hums appear, be sure to record the speed at which you hear them.
Once you reach the desired speed, slowly release the gas pedal and apply engine braking. Again, listen for extraneous noises and pay attention to the speed at which they appear or disappear.
Certain noises should appear and disappear at the same speed. If this happens, it means that the rear axle gearbox is in a faulty condition. However, to be 100 percent sure, be sure to put the car on the parking brake, put the gear in neutral and try to gain speed, if the noise appears again, then the problem is not in the rear axle gearbox, and if there is no noise, then you can be sure that it is rear axle gearbox.
The cause of malfunctions, most often, lies in the use of low-quality oil, loss of its viscosity, as well as its complete absence. In addition, the gearbox may fail due to failure of oil seals, bearings and special gears. Sometimes, the cause of a rear axle gearbox failure is a broken axle shaft.
Features of using gearboxes on rear-wheel drive vehicles
Cars with rear-wheel drive, as already noted, are equipped with gearboxes with different gear ratios. The transmission configuration of modern cars is difficult to predict.
So, for example, during the years of production of the VAZ 2102* car, one could say with confidence that it had a gearbox with a gear ratio of 4.44. The modern generation of “twos” - VAZ 2104 * - is usually equipped with a gearbox with diametrically opposite parameters - VAZ 2106, 3.9. This is very unusual for a utility vehicle, but the manufacturer is guided by its own considerations. The situation is also the same with the equipment of other models of the classic Zhiguli. In this matter, judging by experience, there are certain patterns, but there are no hard and fast rules. Therefore, in general terms, we can assume that the “classic” can have any kind of gearbox.
In order not to make a mistake, the main condition for replacing a faulty unit with a working one should be observed: whichever gearbox model was removed, this should be installed.
When replacing one gearbox with another, with a different gear ratio, not only the dynamic characteristics of the car change, but also the speedometer and odometer readings.
Example: if there was a standard gearbox 2102 (4.44), and instead of it a 2106 (3.9) was installed, the speedometer and odometer readings must be multiplied by 1.14, i.e. the car will become 14% “weaker”, but “faster” by the same 14%.
“Weaker” means that the engine's effective torque (in this example case) will be reduced by 14%. Outwardly, this manifests itself in a decrease in the car’s throttle response and worsening acceleration dynamics.
It is more convenient to explain the term “faster” using a figurative example: if a car with a 4.44 gearbox, in order to develop a speed of 120 km / h in direct (fourth) gear, it is necessary to “spin” the engine to 4400 rpm. crankshaft, then with a 3.9 gearbox for the same speed you will need only 3900 rpm... But to reach 3900 rpm, an engine with a volume of 1200 cm3 may not have enough torque or, simply put, power. Thus, the term “faster” in this context is used in the following sense: at the same engine speed, a gearbox with a lower gear ratio allows the car to move at a higher speed. However, it should be remembered that a gearbox with a lower gear ratio requires a proportional increase in engine power.
In order for the speedometer and odometer readings to correspond to the actual values, the gearbox must have a speedometer drive that matches the gear ratio of the installed rear axle gearbox.
Warning!
The speedometer drive cannot be replaced from one to another by simple rearrangement, since it is necessary to replace the next gear (catalog number 210*—170 21 5, corresponding to this drive, on the secondary shaft of the gearbox.
It would seem that nothing can be improved on the classics. However, there are 3 options for gearboxes and 4 rear axle gearboxes. The gearboxes come in 2101, 2105, 2106. The gears (1st, 2nd, 3rd) in 2101 are shorter than in 2105, and longer in 2106. Gearboxes come with gear ratios of 3.9, 4.1, 4.3, 4.44.
Adjustment and installation of the VAZ 2107 gearbox
Before assembling the gearbox, all parts must be thoroughly washed in kerosene. They should be inspected before installation. Gear teeth should not be chipped or scored and have the color of metal, and not be covered with a black coating of oil. Minor scuffs on the satellite axle, journal and axle gear seats can be treated with fine sandpaper. If there are large scuffs or large wear, the parts must be replaced.
The gearbox parts are assembled in the reverse order of disassembly. You can press in the bearing rings using a hammer and a special tool (a socket wrench head will do).
The gaps between the gears of the gearbox are adjusted using an adjusting ring, the thickness of which is selected individually. For selection, you need a caliper and probes of various thicknesses. The flange nut must be tightened with a torque of 18 kgf-m.
Adjusting the VAZ 2107 gearbox
Disassembling the gearbox and replacing satellites
The satellites are additional gears installed in the differential gearbox. Their purpose is to transmit torque to the axle shafts of the rear wheels. Like any other part, pinion gears are subject to wear. After this, they will have to be changed, since this part cannot be repaired. To restore worn teeth, the car owner has neither the necessary skills nor the necessary equipment. In addition, any gear in a car undergoes a special heat treatment - carburization, which is carried out in a nitrogen atmosphere and strengthens the surface of the teeth to a certain depth, saturating this surface with carbon. An ordinary car enthusiast cannot do anything like this in his garage. Therefore, there is only one solution: purchase a repair kit for the rear axle gearbox. It costs about 1500 rubles. Here's what it includes:
- a pair of gears for axle shafts;
- a pair of satellites for the differential;
- satellite axis;
- support washer.
In addition to the repair kit for gearboxes, you will also need a set of regular open-end wrenches, a screwdriver and a hammer.
Sequence of operations
To disassemble the gearbox, it is best to use a regular bench vice. Then the work will go much faster.
- The gearbox removed from the machine is clamped in a vice in a vertical position.
- A pair of adjusting locking bolts are unscrewed from it, under which the locking plates are located.
So, an ordinary car owner is quite capable of removing the gearbox from the rear axle of the “Seven”, disassembling it and replacing its worn parts. There is nothing complicated about this. Certain difficulties may arise only at the stage of adjusting the new gearbox. But you can also deal with them by carefully reading the above recommendations.
Source
Common faults
In most cases, disassembling the gearbox is required to replace the oil seal. Like all rubber gaskets, it often begins to leak because:
- loses elasticity over time;
- may have a manufacturing defect;
- was initially installed incorrectly.
In particular, the following signs indicate problems with the oil seal:
- oil stains are periodically detected at the rear axle;
- a backlash (always radial) is formed at the gearbox shank.
The latter also indicates wear of one bearing or several at once.
An atypical noise coming from the trunk will also tell you that the rear axle is faulty. It is important to find out at what speed it occurs. For this:
- accelerate to 20 km;
- continue to accelerate smoothly to 90;
- record the engine speed at the moment the noise appears;
- release the gas, but do not engage the gear;
- When braking with the power plant, pay attention to the nature of the sounds.
The following test accurately indicates that the gearbox is broken:
- accelerate the VAZ-2107 to 100 km;
- set to “neutral”;
- turn off the ignition.
If you still hear a hum, then the gearbox is to blame.
Checking the contact of the working surface of the gear teeth
To check the quality of gear engagement:
- install the adjusted gearbox on the stand and lubricate the working surfaces of the driven gear teeth with a thin layer of lead oxide;
- start the stand and use its levers to slow down the rotation of the axle shafts so that under load, traces of contact with the teeth of the drive gear remain on the surfaces of the driven gear teeth;
- change the direction of rotation and, when braking, get contact marks on the other side of the teeth of the driven gear, which corresponds to the car moving backwards.
The engagement is considered normal if on both sides of the driven gear teeth the contact patch is evenly located closer to the narrow end of the tooth, occupying 2/3 of its length and not extending to the top of the tooth base, as shown in Fig. 139, no.
To adjust the correct position of the drive gear and replace the ring, disassembly of the unit is necessary. During assembly, it is necessary to repeat all the operations for preloading the drive gear bearings, checking the moment of resistance to rotation, preloading the differential box bearings and adjusting the side clearance of the final drive gears.