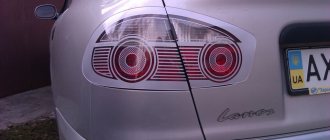
Tail lights VAZ 2109
The rear lights (headlights) of the VAZ 2108, VAZ 2109, VAZ 21099 have the following bulbs: 1) Brake lights.
2) Dimensions. 3) Reverse. 4) Turns. 5) Fog lamp. A wiring harness goes from the mounting block to the rear lights. The purpose of each individual wire in the harness can be understood by its color: 1) Brake lights - red 2) Dimensions - yellow 3) Reverse - green. 4) Turns - blue. 5) Fog light - orange-black.
Naturally, you need to understand that if the car is old and a lot of people have done the wiring, then the color match of the wire to its purpose may be disrupted. That is, the red wire can be converted not to brake lights, but, for example, to dimensions. But in general, this is a very important point: AvtoVAZ developers specifically marked the functional purpose of the wire with a certain color to make it easier to use.
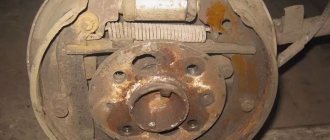
If some light signal in the rear headlight of a VAZ 2109 does not work, then before climbing into the mounting block and opening the electrical circuit, we check the following: 1) The reliability of fastening the rear light mass to the body. 2) Check the reliability of fastening the wire connector to the headlight. 3) Integrity of the light bulb 4) Quality of contact between the light bulb and the flashlight board. It often happens that everything is intact, the light bulb and the mass are good, and 12 Volts come to the light bulb, but it does not light. The reason is poor contact between the light bulb and the board. In this case, you need to clean both the light bulb base and the area on the lantern with fine sandpaper. As one smart person said: “Electrics is the science of contacts.” To disassemble the rear light of the nine, first remove the protective plastic cover. Then disconnect the black wire of the flashlight from ground. Then we remove the connector from the flashlight board and remove the board itself with the bulbs from the headlight housing. If it is necessary to replace the headlight itself, then unscrew the remaining bolts securing the headlight to the car frame and remove it.
There is one important point that many owners of the ninth model Zhiguli do not know. This is the rear fog light. It is turned on by a button between the hazard warning button and the heated rear window. The rear fog light will only work if: 1) The ignition is turned on. 2) Low beam headlights are on. 3) The flashlight power button is pressed. The fog light bulb is the only one that has a reflector inside the headlight. Thanks to this reflector, the glow of the lantern becomes brighter.
Source
The brake lights on the VAZ 2114 do not light up: reasons and methods for eliminating them
According to current traffic regulations, driving a car that does not have brake lights is prohibited, and this should be clearly remembered. True, this rule can be taken into account in practice only when leaving the garage. But what to do if the feet on the VAZ 2114 fail during the trip? Why not call a tow truck because of such a problem? In fact, this problem can be solved even on the road.
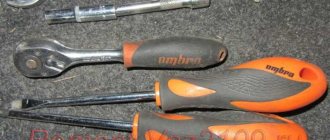
To do this, you only need to have a minimum set of tools:
- multimeter (even the simplest one will do);
- Screwdriver Set;
- sandpaper (for cleaning oxidized surfaces);
- set of wrenches.
In addition, it is good to have a fuse box diagram on hand.
How to troubleshoot?
[flat_ab id=”3"]
The most common reasons that the brake light on the VAZ 2114 does not work are the following factors:
- Fuse failure.
- Broken wires in one of the sections of the circuit.
- Limit switch faulty.
- Bulbs burn out.
- Oxidation of contacts in lamp sockets.
- Damage to the contact board.
The most common and at the same time the most easily removable of the above reasons is a blown fuse. To identify such a malfunction, you need to examine the fuse box. A 10-amp fuse F3 is responsible for the brake lights, which also protects the ignition switch, computer and interior lighting.
Malfunctions in the operation of the latter may also indicate a malfunction of the stop fuse (and in this case, troubleshooting should begin with the block). If it turns out that the fuse has blown, then you should replace it with a new, similar one.
VAZ 2114 fuse box
A new fuse installed in place of a failed one must be designed for exactly the same maximum current. If it is less, the fuses will blow more often, and if it is more, the protected device itself may burn out.
The problem may also be in the fuse block itself - sometimes the tracks on its printed circuit boards burn out or the contact legs oxidize. In order to check its serviceability, it is enough to measure the voltage at the contacts of the newly installed fuse.
Another common reason why the brakes of the VAZ 2114 do not light up is a malfunction of the limit switch that turns on the signals. It is located on the brake pedal bracket and is always in working order, regardless of whether the car engine is turned on or not.
It works automatically when you press the pedal. In order to check its serviceability, it is enough to see whether the power supply is suitable for its contacts (on one of the contacts the presence of power must be constant). In addition, if you press the pedal and thus turn on the limit switch, you can measure the voltage at its connectors.
THIS IS INTERESTING: VAZ 2114 wipers do not work
If there is no current at the switch contacts, you should check the wire going to the limit switch from the fuse box. If the test shows that the wire is faulty (there is a break), then it should be replaced with a new one and the test repeated.
Otherwise (if everything is in order with the wire), you should disconnect it (as well as the other wire suitable for the second connector) from the switch and connect directly. If after such an operation the brake light works, then the limit switch itself has failed and should be replaced.
You should purchase a new brake light limit switch that is exactly the same model as the failed one. Installing a different type of switch may result in incorrect signal operation.
Malfunction of the lights themselves
If during the check from the fuse box to the limit switch no problems are found, then you should move on. Now you should test the wiring from the second limit switch connector to the stop connectors with a tester. If it is working, then you need to check the board. The printed circuit board on which the taillights are mounted is not ideal, and is one of the biggest problems of all VAZ cars.
Its tracks often burn out or peel off, causing the lights to stop working. This problem can be solved in two ways - either re-solder the tracks (which can be done with a regular soldering iron, although not in road conditions) or replace the board with a new one (most motorists choose the second option).
Another reason why the VAZ 2114 brake lights do not work may be oxidation of the lamp sockets. In order to eliminate this problem, it is enough to clean all contacts from oxides that have appeared on them.
This is best done in one of the following ways:
- small grit sandpaper;
- WD-40 solution;
- kerosene;
- purified gasoline (“galosh”).
You should absolutely not use gasoline or other solvents to clean contacts.
Light bulb in the foot of a VAZ 2114
The last option for faulty stops is the light bulbs themselves. It makes no sense to give any detailed advice here - you just need to replace the burnt out light bulbs with new ones.
By following all the tips listed above, the car enthusiast gets the opportunity to check the entire electrical circuit of the brake lights, starting from the fuse box and ending with the bulbs in the lamps. Thanks to this, the guarantee that the fault will be accurately detected and eliminated is 100%.
Additional Tips
Before each trip, especially over long distances, you should check the functionality of all lighting equipment, including brake lights. In order to reduce the likelihood of breakdowns along the way, you need to periodically check the condition of the sockets and bases of the rear light bulbs, and periodically clean them of oxides and dirt.
In case a breakdown does occur, you should always have an additional set of light bulbs and 10 amp fuses in your car, as well as a multimeter to check them.
Source: https://VAZremont.com/ne-goryat-stop-signaly-na-vaz-2114
VAZ-2109 diagram
The VAZ-2109 car was produced at AvtoVAZ from 1987 to 1997. Years of production 21099: 1990-2004 - in Russia, 2004-2011 - in Ukraine. Here are colored wiring diagrams (for the injector and carburetor) with a description of all the elements for various modifications. The information is intended for self-repair of cars. Electrical circuits are divided into several blocks for ease of viewing via a computer or smartphone; there are also circuits in the form of a single picture with a description of the elements - for printing on a printer.
Like the entire car, its electrical equipment was at an average level, so owners of Nines should know the wiring diagram thoroughly for routine repairs with their own hands.
About standard lamps
The rated power of headlight lamps, which are installed on VAZ cars of the “ninth” family, is about 60 watts. The service life of such optics can be 10 years or more, depending on the intensity of use and loads. However, if the headlight was not made by the manufacturer, but is a copy/counterfeit, it will not last more than a few weeks.
Therefore, if you choose standard headlights, you need to focus only on the original manufacturer. As for alternative optics, they are not produced on an industrial scale, and here we can only rely on the integrity of the manufacturer. But we’ll talk about how to choose and install high-quality front and rear lights on a VAZ 2109 a little later. In the meantime, about the features and distinctive features of tuned lamps.
Wiring diagram for VAZ-2109 carburetor
- Headlight.
- Electric motor for headlight glass cleaning system. An optional part, used mainly on export vehicles.
- Limit switch for powering the engine compartment lamp.
- Klaxon.
- An electric motor drives a fan installed on the radiator of the cooling system.
- Temperature indicator that provides a control signal for the electric drive of the fan impeller.
- Alternator.
- Fluid supply valve for headlight glasses. Used in conjunction with paragraph 2.
- Fluid supply valve for the glass of the fifth door.
- Fluid supply valve to the front glass.
- Spark plugs.
- Hall sensor used to distribute ignition pulses.
- Coil.
- Limit switch for reverse gear lights.
- Fluid temperature meter in the cooling system.
- Starter.
- Accumulator battery.
- A sensor that measures the fluid level in the brake booster.
- Switch that controls the ignition system.
- Sensor for determining the position of the top dead center of the piston of the first cylinder. Installed on some export VAZ 2109 with a diagnostic system. Found only on cars before 1995.
- Diagnostic block. Optional element, installed together with item 20.
- Controller for controlling the solenoid valve installed in the carburetor.
- Starter switch contact block.
- Limit switch on the carburetor.
- Economizer valve.
- Sensor signaling an emergency decrease in oil pressure.
- Washer pump drive.
- Fan impeller motor for ventilation and heating systems.
- Resistance providing additional fan speeds.
- Speed shifter.
- Windshield wiper drive.
- Cigarette lighter.
- Illumination system for levers for adjusting heater operating parameters.
- Socket for additional equipment.
- Lamp for auxiliary lighting of the engine compartment.
- Illumination system for the glove box on the instrument panel.
- Relay and fuse link mounting block.
- Instrument panel light switch.
- Parking brake lamp limit switch.
- Brake lamp limit switch.
- Steering column switch lever block.
- Exterior lamp switch.
- Hazard switch.
- Turn on the rear fog lamp.
- Bimetallic fog lamp fuse.
- Heated glass switch on the fifth door.
- Turn signal repeaters on the front fenders.
- Central interior lighting.
- Individual lampshade.
- Switches for backlight operation on the middle pillars.
- Ignition switching unit.
- Egnition lock.
- “Low” type instrument cluster.
- Choke limit switch on the carburetor.
- Rear lights.
- Fuel level meter in the tank.
- Heated glass.
- Rear wiper drive.
- Two lamps for room illumination.
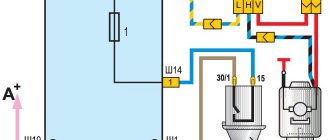
Diagram for turning on the fog light in the rear lights on VAZ 2108, 2109, 21099 cars
Structurally, on VAZ 2108, 2109, 21099 cars and their modifications, the standard version has fog light lamps (21W) only in the rear lights. They are used as additional lighting in inclement weather to the side lights.
Diagram for switching on the fog light in the rear lights of VAZ 2108, 2109, 21099 cars with mounting block 2114, after 1998, “high” instrument panel
Features of the fog light switching circuit
— Voltage to the fog light lamps comes from terminal “30” of the generator after turning the key in the ignition switch to the “│” (ignition) position - its contacts “30” and 15/2 close. Next, through the external lighting switch (the second position of the key, which turns on the low beam headlights), the fuse, the fog light switch on the instrument panel, the warning lamp on the instrument panel, the mounting block to the fog light lamps in the rear lights of the car.
READ How to connect a video recorder to a Philips TV using tulips
— The activation of the fog light is indicated by a warning lamp on the instrument panel (“low panel”) or a lamp on the fog light switch button (“high” panel).
— On cars produced before 1986, the electrical circuit of the fog light was protected by fuse “15” of the mounting block. After 1986, a separately located fuse (8A) is used, located in a plastic case in the wiring harness near the fog light switch.
Notes and additions
— On VAZ 2108, 2109, 21099 vehicles it is possible to install additional fog lights (in some trim levels PTFs are installed at the factory). Voltage to the fog lights will be supplied via a relay (type 113.3747) in the relay and fuse mounting block. The additionally installed fog lights turn on after turning on the exterior lighting button with a special separate button installed on the instrument panel. Read more: “Scheme for switching on fog lights for VAZ 2108, 2109, 21099 cars.”
— If the fog light in the rear lights does not turn on, see “The fog light in the rear lights of VAZ 2108, 2109, 21099 cars does not work.”
More electrical circuits for the rear lights of VAZ 2108, 2109, 21099 cars
Source
Equipment diagram for VAZ-2109 injector
The VAZ 2109 wiring for the injector has many connectors for connecting sensors to the computer.
- TPS (throttle position sensor);
- DPKV (crankshaft position sensor);
- DT (temperature sensor);
- DSA (vehicle speed sensor);
- Canister purge valve;
- MAF (mass air flow sensor);
- DD (knock sensor) and others.
The weak point of the harnesses is the power wiring on the bottom shelf of the radiator, which is constantly exposed to high temperatures and in this place it is in no way protected from water and dirt. Another problem is a harness under the carpet next to the driver's seat. Moisture constantly accumulates there, and in order to remove it, you need to dry the floor, inevitably tugging on the rope.
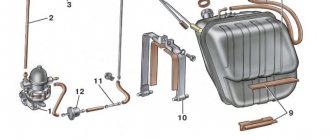
Since the mid-90s, VAZ 2109 began to use engines with an injection system, which greatly changed the electrical layout of the engine compartment and instrument panel. Below is an electrical diagram of a 1999 car with an ECM type GM ISFI-2S and January 4/4.1.
- 1 - nozzle system;
- 2 - candles;
- 3 — ignition control module;
- 4 — diagnostic connector;
- 5 — General Motors or January controller;
- 6 — connector for connecting the instrument cluster;
- 7 — main relay of the system;
- 8 — fuse for power supply wiring of the controller and ignition system module;
- 9 — protection of the speed sensor and air flow meter circuits;
- 10 — fuel supply pump power protection;
- 11 — fuel pump controller;
- 12 — engine temperature meter;
- 13 — idle system;
- 14 — detonation meter;
- 15 — tank purge system for collecting fuel vapors;
- 16 — crankshaft position meter;
- 17 — speed meter;
- 18 — air flow meter;
- 19 — lambda probe;
- 20 — throttle position angle meter;
- 21 — electric fuel pump complete with fuel level sensor;
- 22 — connection of the ignition system;
- 23 — control lamp;
- 24 — ignition switch;
- 25 - switching block;
- 26 — radiator cooling fan.
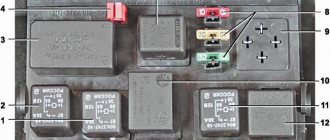
Relay and fuse box diagram 2109
The fuse blocks do not depend on the fuel injection system used - carburetor or injector. BP will differ only by year of manufacture of the car. That is, the mounting blocks for the carburetor and injector are the same. The VAZ 2109-099 fuse box (carburetor, injector) is located under the hood, in the compartment in front of the windshield on the left side.
Fuse block 2114-3722010-18
K1-relay for turning on headlight cleaners; K2-relay-breaker for direction indicators and hazard warning lights; K3 - windshield wiper relay; K4-relay for monitoring the health of lamps; K5-power window relay; K6 - relay for turning on sound signals; K7-relay for turning on the electric heating of the rear window; K8-relay for high beam headlights; K9-relay for low beam headlights; F1-F16 - fuses.
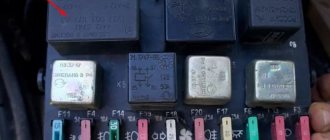
Fuse block 2114-3722010-60
K1 - Headlight wiper relay, K2 - Turn signal and hazard warning relay, K3 - Windshield wiper relay, K4 - Brake light and parking light relay, K5 - Power window relay, K6 - Horn relay , K7 - Rear window heating relay, K8 - Headlight high beam relay, K9 - Headlight low beam relay, F1 - F16 - Fuses, F1 - F20 - Spare fuses.
Attention! The power terminals on the generator often become loose, heat up, spark and melt the wiring. Pay attention to this point when searching for possible faults yourself.
Source
Wires for rear lights of VAZ 2108, 2109, 21099 cars and their modifications
When carrying out electrical repair work on VAZ 2108, 2109, 21099 cars and their modifications, as well as when problems arise such as brake lights or parking lights do not light up, the reverse light does not work, turn signals do not blink, very often you have to understand the wiring , leading to the rear lights.
In such a situation, information about where which wire goes and what it is intended for in the rear lights is simply necessary. In this article, we will take a closer look at the wires leading to the rear lights of VAZ 2108, 2109, 21099 cars. As an example, we will use the left light (the one behind the driver).
Purpose of wires in the connecting block of the rear left lamp of VAZ 2108, 2109, 21099 cars
All wires in the connecting block of the left lamp are located in a certain order. In some cases, they may even be numbered at the end of the block.
Purpose of wires in the connecting block of the rear left lamp of VAZ 2108, 2109, 21099 cars
1. Yellow wire with a black stripe, the topmost one in the connecting block - plus to the parking light lamp.
2. Brown or orange wire with a black stripe, the second in the connecting block (located below the yellow one) - positive for the fog lamp.
3. Blue wire with a black stripe, the third in the connecting block - positive for the turn signal lamp.
4. Green wire, fourth in the block - plus to the rear light bulb.
5. Black wire, fifth in the block (penultimate) - negative for all flashlight lamps.
6. Red, sixth (the very last) - plus for the brake light lamp.
Each wire in the connecting block corresponds to its own track on the rear light board. For more information about checking the rear light boards, see “Checking the rear light boards of VAZ 2108. 2109, 21099”.