For safe driving at any time of the day, low beams must be turned on. Newer cars that are equipped with DRLs do not need to turn on the lights.
The headlights of the VAZ 2114 were not initially designed for constantly switched-on low beams, therefore, with the introduction of new rules that oblige one to drive a car with the headlights on even during the daytime, the load on the headlights and their power circuits increased greatly, which began to lead to breakdowns of the headlights and high heating of wires.
This article describes in detail the possible reasons why the low beam on a VAZ 2114 does not light up, as well as ways to solve this problem.
A little about the design of headlights
The headlights on the VAZ 2114 consist of a block that includes the following elements:
- Turn signals;
- Parking lights;
- Headlights corrector;
- Headlight lamp;
The headlight of the “fourteenth” is made of plastic and glass. A reflector with a hydrocorrector is placed in a plastic case, which corrects the light flux using liquid. This method of adjusting headlights is quite unreliable and for most cars of this model it simply does not work due to seal failure and loss of fluid.
The headlight has one lamp, which is responsible for the high and low beam, that is, it has two spirals, separately for the low beam and separately for the high beam.
The side lights are located under the headlight lamp and are intended for emergency stopping of the car at night.
The high beams on the VAZ-2114 do not light up
Why don't the high beam headlights light up?
How to replace the steering column switch? Video
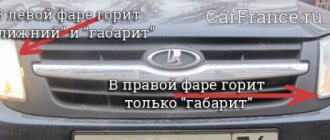
Fact: every third car owner encounters a situation where the low beam headlights are not on, but the high beam is on. Straightforward logic on the topic that if the optics are covered, then there should be no light at all does not work here.
This also happens, for example, to many VAZ owners: on Tolyatti models, for some reason, the right headlight is susceptible to the disease described, even on almost new cars; with the left, this incident happens much less often.
However, you should not blame exclusively domestic, so much-maligned, manufacturers: optics can sooner or later start to act up on any car. And here the point is no longer about the reliability of this or that brand, but rather about the deterioration or fatigue of some parts.
The easiest way, without a doubt, is to entrust everything to the reliable hands of a trusted auto electrician, but it is not too difficult to cope with some problems on your own - if you have the smallest amount of free time and a primitive acquaintance with the basics of electrical circuits.
The low beam of the headlights does not light up, but the high beam is on - this phenomenon can be due to several reasons. And most of them are quite easy to fix. Moreover, this can happen to your car at a completely inopportune moment: on the highway, for example, when you need to switch to low beam so as not to blind oncoming drivers with headlights. Let's try to deal with all the flaws one by one, and consider: what might be the most common options for repairing and troubleshooting such an important segment as low-beam lighting.
Possible causes of failure
There can be many reasons why a VAZ 2114's neighbor fails, and all of them are usually trivial and do not require large material and physical costs to eliminate them.
Causes:
- Burnt out halogen lamp;
- Fuse blown;
- Oxidation of contacts;
- Damage to the power button;
All possible causes of failure of the low beam of the VAZ 2114 were listed above; as you can see, there are very few of them, so making an independent diagnosis is quite simple.
Let's look at each of the reasons in a little more detail.
Non-standard reasons
Sometimes the abnormal operation of headlights is caused by completely unusual factors. There was an indescribable incident when the owner removed the headlight cleaners from his Niva because they had not functioned for a long time. As a result, he lost low beam on both headlights.
And it took me a while to guess the reason! During the experiments, the owner found out that to obtain low beam, the presence of at least one of the motors is required, and it does not matter which one - left or right.
In the end, he simply short-circuited the connector, as if simulating the presence of a headlight cleaner. There were no further problems with light. So if you tapped all the links of the chain, but have not established the reason for the headlights, try to remember if you recently made any improvements to the design of your car. Perhaps in the process of these changes some engineering design was violated, which is the reason for the disappearance of light.
However, if such simple, although usually effective, measures do not produce the desired effect, you will still have to remember the phone number of a familiar auto electrician. Otherwise, you can spend a lot of time looking for reasons and never find them.
Having found out why the low beam of the headlights does not light up, but the high beam is on, and having learned to deal with this phenomenon, one day you may encounter the opposite problem, when there is a low beam, but no high beam. The reasons for these vagaries are, in principle, the same as in the previous case, only supplemented by a possible breakdown of the steering column switch. So if the reason for the strange behavior of the headlights has not been identified, and the low beam is still missing, it is likely that you will have to replace it.
Lamp burnout
The VAZ 2114 uses a H4 type halogen lamp as a head light source. Such a lamp has two filaments of different power inside the bulb. As standard, the low beam filament has a power of 55W, and the high beam filament has a power of 65W. It is the power that depends on the brightness of the lamp, as you can understand, since the high beam filament has more power, which means it will emit a stronger luminous flux. Therefore, the high beam turns out to be brighter than the low beam.
Since the low beam filament has less power, it is made a little thinner, and taking into account the new traffic rules, cars must drive with low beams on if they are not equipped with DRLs.
Since the VAZ 2114 did not have running lights from the factory, it is necessary to move around with light, which greatly affects the durability of the lamps. The filament quickly overheats and fails.
Examination
The lamp can be checked by a simple visual inspection. To do this, you need to remove the lamp from the headlight and inspect its filament for breaks. Also, quite often, when a lamp burns out, a part of the filament appears inside the bulb, which dangles chaotically inside.
Possible causes and diagnostics of the malfunction
- First of all, if the headlight does not light, we check the light bulb itself; it even happens that by the time you discovered a malfunction of the head light, both low-beam lamps had already burned out. This almost never happens with high beam lamps, since they are used very little.
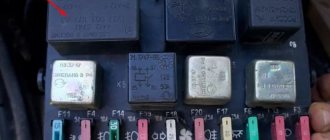
- One of the most common reasons for headlights not working is a melted fuse thread. However, on most modern cars the power supply circuits of the right and left headlights are not interconnected and are protected by separate fuses. Therefore, the failure of one fuse element leads to the failure of one headlight. This headlight malfunction can be diagnosed visually by opening the mounting block and inspecting the fuses responsible for the operation of the failed lighting element. In cases where access to the mounting block is difficult, you should find out which other circuits are protected by this fuse and check the operation of devices receiving power from these circuits. If these devices also do not work, in 99% of cases the assumption about a failed fuse turns out to be correct.
- If the assumption that the protective element has melted is not confirmed, it is necessary to check the head light relay. Typically, a relay failure leads to the cessation of operation of only one of the lighting systems. Either the low beam or the high beam disappears. You can verify the functionality of the light switch relay by carefully listening to the sounds that occur when you try to turn on the headlights. If short, loud clicks are heard from under the instrument panel when turned on, this indicates that the relay is working properly. The absence of a click confirms the assumption that the relay is faulty.
- It is also necessary to check all the connectors of the electrical wires going to the headlight; perhaps, after the last repair, they simply forgot to put a connector on the headlight terminal and, accordingly, it will not burn as a result. This happens if not a single light bulb is on in the headlights.
- If the headlights still do not light up, then further search is carried out under the hood of the car. You should carefully inspect the existing wires and connections, move the terminals suitable for the headlights, and check the lighting lamps. Sometimes, due to a power surge in the on-board network, it happens that both lamps burn out at the same time. Also, due to water entering the engine compartment, they can oxidize and cease to perform the conductive function of the “chips” at the junctions of the wires.
Actually, the search can end here. If it was not possible to find the fault using the measures described above, further diagnostics of the electrical wiring should be carried out using a multitester and the procedure for “testing” the electrical circuits of the car. The last attempt to determine the cause of the malfunction in the field can be to check the presence of current at the terminals that supply the low beam headlights. To do this, just insert a known-good lamp into the socket or strike the “+” wire against the “-” wire. The start of operation of the lamp or a spark jumping between the wires indicates the presence of electric current in the network and a malfunction of the headlights or lamps themselves. The lack of response to the test gives reason to assume that there is a break in the headlight power supply.
Fuse blown
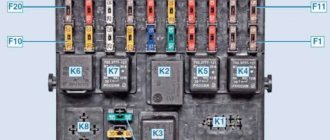
Two fuses F12 and F13 are responsible for protecting the low beam power circuit in the “fourteenth”. Each of them is responsible for a separate headlight. When using a car for a long time with the headlights on, the wiring begins to heat up, this is especially aggravated in the heat, which increases the resistance of the wires and, consequently, the current in them, and the increased current leads to a blown fuse.
The fuse must be replaced with the same rated current as was previously installed. From the factory, the rated current of the low beam fuse is 7.5A.
Reasons for the lack of light
So, we have found out where the headlights and their unit are installed and how they are located in the car, now we will figure out why the low beam does not light up.
The main reasons are:
The lamps that are equipped with the VAZ 2114 from the factory assembly line are ordinary halogen lamps, with two filaments inside. In fact, the same light bulb is a source of both low and high beam - just one or two filaments are lit at once. Other machines may use different lamps for each type of light, and the diffuser may be movable and controlled by a computer. The solution is simple: replace the light bulb with a new one; we’ll talk about how to do this without breaking something else later.
Other problems
The fuse also burns out just as often, which is why the low beam headlights do not light up. A standard fuse is a plastic case on two copper legs that are inserted into the block. Inside the housing there is a wire made of semiconductor material, which, if the current or voltage is too high, simply burns out and the voltage surge does not affect the headlights. The fuse is simply replaced with a new one.
Wires are also checked for oxidation quite simply - near the fuse box, you need to carefully inspect all the pads and relays, remove rust, and if there are disconnected cables, fix them in place. To check the button you need to find any other one and connect the control wires to it. If the headlights come on, then you just need to replace the button with a similar new one.
The VAZ 2114 headlight unit is connected to several buttons at once, since there are also turn signals there, it is advisable to diagnose everything at once; perhaps the problem lies in a banal open circuit somewhere in the routing of wires from the fuse block to the buttons.
Oxidation of contacts
The contacts on the lamp are often exposed to moisture, especially during the rainy season, which often affects their oxidation. An oxidized contact increases the conductivity resistance or may completely make contact impossible, due to which the voltage will not reach the lamp, and this will lead to the inoperability of the car's low beam.
Oxidized contacts must be cleaned and replaced.
Bulb replacement process
- Open the hood, ignition is turned off.
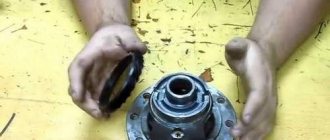
- We find the headlight block and unscrew the headlight protective box on both sides with our hands.
- Having unscrewed the box, we see the picture shown in the figure.
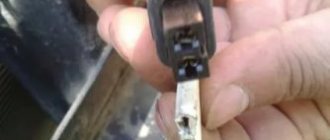
- We take out the contact group from the light bulb (Fig. 1).
- Disconnect the spring holders (Figure 3).
- We take out the light bulb.
Before installation, wipe the lamp bulb with alcohol, otherwise it will burn out. Install strictly in the reverse order and make sure that the lamp sits in its place (one single position).
When carrying out work, it is worth remembering basic safety. If your car's lamp stops functioning on the road, then there is no need to work while standing on the side of the road; it is better to reach the nearest gas station or site. In addition, you should beware of the “treachery” of a burnt-out light bulb, because even the slightest shake can cause the bulb to burst and fly apart, accidentally hitting, for example, the eye, so it is better to work with safety glasses.
We recommend: Autostart without alarm
We can draw the following conclusions: although replacing lamps in headlights is not a very complicated process, there is no need to take it lightly; it is better to study the materials relevant to this topic, and also follow basic safety rules. By following these simple rules, you will replace the lamps yourself and be healthy!
Power button failure
The light on the VAZ 2114 is turned on using buttons separately for the dimensions and separately for the low beam together with the dimensions. Quite often it happens that buttons fail due to burnt contacts or even due to a breakdown of the mechanism inside them.
If all the methods described above did not help in solving the problem, then the light button is most likely faulty. Therefore, it is recommended to replace it with a new one.
The button pulls out, you just need to pry it off with a thin screwdriver.
Design of the rear lights of the VAZ 2114
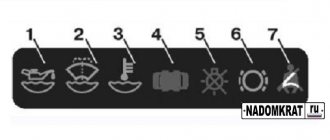
In order to carry out repairs, diagnose and eliminate emerging problems, it is necessary to understand the design and diagram of the rear lights of the VAZ 2114. The rear light design consists of three main elements: - the rear cover; — boards with fasteners, connections for connecting light bulbs; — external decorative cover, light diffuser.
Wiring diagram for components (lamps): 1. direction indicators; 2. overall glow; 3. signaling (brake lights); 4. foglights; 5. designations for reversing.
Causes of breakdowns
The most common reasons for node failure:
- the narrowest point in the entire structure is the elastic board;
- in second place, banal burnout or mechanical damage to light bulbs;
- the third reason is a problem with the fuse or relay;
- oxidation of contacts;
- broken wiring.
First of all, it makes sense to check those elements that do not require removing the entire headlight (for example, fuses, relays). Then check the quality of the connections, the presence of oxidation and the voltage supply level to the illuminator. The last step is to disassemble the taillight, remove and inspect the board.
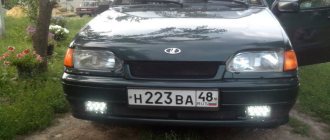
Dimensions of VAZ 2114
The side light signals on second-generation Samaras, which include the VAZ 2114, are located in accordance with the regulations in front and behind the car, two lights on each side of the car, closer to the edge, next to the turn signals.
- The front side lights are white, the rear lights are red. The front ones are located in the headlight block, the rear ones are located in the taillight block.
- The side lights are turned on and off by pressing the “side light switch” key, which is installed in the exterior lighting switch block. The keys are located in the central part of the instrument panel above the on-board computer display. When the side lights are turned on and the side light bulbs come on, a green indicator lamp lights up on the button.
- There is a side light fuse installed in the side light circuit. It is located in the mounting block located in the engine compartment under the hood. There are two fuses, one for each side of the side lights. Fuse F10 is located in the circuit of the left side dimensions, it also controls the operation of the warning lamp on the instrument panel, fuse F11 is the right side dimensions.