We independently change the bearing on the rear axle in a NIVA CHEVROLET car
09/10/2019 mr.Podshipnik 0 Comment
HOME »
- Auto components
- »
- Replacing rear axle bearings
»
In a Chevrolet Niva car, the rear axle shaft performs a rather important function. This is the transmission of torsional torque through the gearbox to the wheel. The rear axle axle bearing in a car is a support that can often break.
How to replace a broken bearing on the rear axle of a NIVA CHEVROLET yourself, without resorting to the services of professionals?
When torque is transmitted to the wheels, in this case the main part of the axial and radial load falls on the rear axle shaft. This is precisely the reason for the failure of this bearing.
In order not to change the entire rear axle assembly, which is quite expensive, it is easier to change the ball bearing separately.
The material in this article will tell you in detail how, step by step, on your own, at home, with a minimum of necessary tools, to replace a faulty bearing part.
Here you will learn:
— how diagnostics and testing are carried out;
— correct actions when dismantling old parts, in particular removing the bridge axle;
— how to reliably install a new part;
— how to choose a high-quality bearing, taking into account reliable manufacturers of these parts, markings, article numbers and sizes;
— you will also read our recommendations on how to easily and without problems carry out repairs in your NIVA CHEVROLET car, such as replacing the ball bearing in the rear axle shaft.
How to find out if the bearing in the rear axle is faulty
Starting this article, we noted that the rear axle of the car bears the main load in radial and axial form. This ball bearing is a radial bearing. In principle, the axial load should not be present, or be completely negligible. The fact is that such a load on the axle can appear when there is play in the inner race where the seating surface is located. Sometimes you may find play in the middle of the faulty part, in the bearing. This happens when the raceway is worn out, or there are problems with the balls and cage.
There are several reasons for a different type of bearing wear:
— the oil seal is leaking and worn out quite badly;
— various contaminants or, possibly, water have entered;
— the shaft beats quite hard;
— the locking (or also called locking) washer of the strip moves along the neck near the shaft, which is why there is bearing play;
- Shaft imbalance may also be the cause.
Before starting repairs, diagnostics are necessary. To do this, carefully read what needs to be done.
Diagnostic instructions:
- The car needs to be lifted using a jack.
- Spin the wheel very smoothly, without making any noise.
- When you move the wheel towards the rear axle of the car, you may feel some play. In some cases it is even more than two millimeters. This means only one thing: you need to remove the axle shaft to directly check the bearing for its functionality.
Helpful advice:
I’ll tell you how to determine for sure that the axle bearing is faulty and worn out. While the car is moving, you hear a loud noise in the rear wheel area. In some cases, at low speeds you feel vibration.
Tightening the shank nut of the VAZ 2107 and Niva gearbox
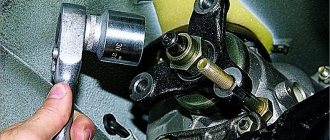
The preload in the bearings of the drive gear of the VAZ and Lada Niva gearbox is created using a S24 M16x1.5 nut with a nylon insert. It is necessary to ensure accurate rotation of the drive gear, and therefore maintain the correct meshing of the gears.
Tightening the nut of the drive gear (shank) of the VAZ and Lada Niva gearbox, symptoms and troubleshooting, diagnostics of the condition of the gearbox
The nut is tightened with a significant torque of 12-26 kgcm. With a wrench with a 300 mm arm, this corresponds to a force of 36-72 kgf; tightening this connection is not easy. It is this force, the nylon insert, the fine thread and the elastically deformable bearing spacer that prevent the nut from loosening itself. However, gradually the tightening of the nut begins to weaken, the elastic spacer sleeve is unloaded and the tension in the thread disappears.
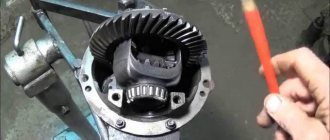
Introduction to the rear axle structure of the Niva Chevrolet
Before you start directly replacing the bearing, you must be familiar with how the rear axle in a NIVA CHEVROLET car is designed. This knowledge will help you make better repairs, and there will be no problems. At the end of this article, in the photo, there is a detailed diagram of this unit.
It consists of a conical plug, a crankcase breather, a magnetic plug, the axle shaft itself, gaskets, bolts, washers, screws, O-rings, cuffs.
Locate the location of the retaining (or locking) ring. It will be necessary to press it out, and only then can you remove the bearing.
In order to make this repair, you must stock up on some tools. This is a set of familiar assistants that many car enthusiasts have in their garages.
So, at hand during repairs you should have at least:
- spanners in a set, or heads with ratchets;
-make sure you have a hammer, chisel, gas torch, and, of course, a jack;
- having a reverse hammer will be very helpful in repairs;
- purchase a pipe with a wall of three mm, and the outside diameter should be about 40 mm;
-don’t forget about lubricant, oil seal, and, of course, a new bearing.
Change of oil
Depending on the nature of the repair or maintenance, the process is accompanied by removal of the part from the machine or without it. The operation preceding other interventions is an oil change. It is carried out on a warm car that has driven at least 10 km. Regardless of the location of the unit at the front or rear, liquid is removed through the drain hole. So, using the front axle as an example, you should: unscrew the plug using a hex key.
Substituting the container, drain the waste substance.
Filling with fresh oil is carried out with a syringe through the filler hole, previously released from the bolt with a 17 mm wrench.
How to dismantle the rear axle assembly and faulty bearing
Whether your new bearing has abs or not, repairing and replacing it is almost the same. The locking rings only have some differences. When replacement occurs, it is sometimes difficult to remove such a washer. You can cut it off or knock it down with a hammer.
Whenever you install a new bearing, replace the retaining ring and seal as well.
I'll share some advice:
The car must be parked on a fairly level surface. Worry about the wheel chocks. Place the car on a jack. When you remove the rear axle shaft, it takes a lot of effort to get it out. To avoid problems, secure your vehicle very firmly and firmly before repairing or replacing parts. Stops must be used.
Now directly about the steps that need to be taken for dismantling:
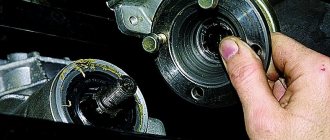
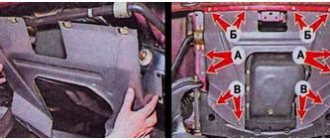
- On the side where the bearing is faulty, the wheel is unscrewed and removed.
- Next, the mounting bolts in the brake drum are unscrewed in order to dismantle it.
- Move the axle shaft in the direction of the axle. This checks whether there is any play in the bearing assembly.
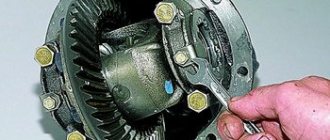
- All four bolts must be unscrewed. Use the 17th key.
- Before removing the axle, do not forget about the stop under the rear axle; under no circumstances should it sag. Otherwise, the transmission oil will leak out.
- A couple of plates need to be placed at the bottom of the flange. It is also possible to use wide keys. Gradually tighten the bolts into the holes provided specifically for this purpose. This way you will transfer the force to the reverse side of the flange.
As a result of such actions, the bearing is removed and the axle is easily removed.
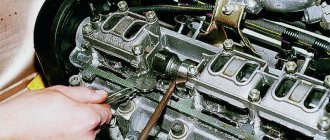
- Next, in order to compress the locking washer, the axle is clamped with a vice. First use tools such as a chisel and a hammer. But, if the parts are stuck to each other, you will not be able to remove the part this way. Heat it and knock it down with a chisel.
Another option is to use a grinder and a small disk.
- We cut and split the clip from the outside. Using two hammers, the washer is knocked out, the inner race and the separator are removed. Be careful not to damage the shaft seating surface.
“Useful modification or money down the drain”: mechanism for disabling the front axle on the Niva
I have a good friend who loves to go somewhere outdoors; he knows many places, winter roads, and little-known bodies of water. He really loves the creation of our AvtoVAZ - Niva, he has this car for the third time, at first he took an old one that was rusty to the point of holes, he suffered through it, took a fresher one, and in the end, a year ago, he took a completely new one with air conditioning. At first I greatly regretted the purchase: “It’s a pity for me to drive it into the mud...”, but as time passed I got used to it and off I went.
And recently he calls me and says: “Listen, I want to install a mechanism for disabling the front axle, it costs 6200 in total, and they promise fuel savings of up to 2 liters and more agility during acceleration, what do you think?” I go to the manufacturer’s website, read the description and arrive in a slight cultural and technical shock...
So, for those who don’t know, today the most popular are three types of all-wheel drive: Part-Time all-wheel drive, Full-Time permanent all-wheel drive and AWD, which is what is used on crossovers when the main drive is front-wheel drive, but there is a power take-off gearbox at the right axle shaft and from it the cardan goes to the rear gearbox. We won’t go into details, just two examples: Part-Time is UAZ, Full-Time is Niva.
On a UAZ there is no differential in the transfer case, in the Niva there is, again just an example - we hang up the rear wheel on the Niva and on the UAZ, start it, engage the gear - let's say on the UAZ we connected all-wheel drive, but on the Niva we left the transfer case lever in the standard position, the UAZ moves out, There is no Niva, and if you hang two wheels diagonally on the Niva, they will rotate together, that is, the moment is transferred to the free wheel. It is to eliminate such a situation that the Niva has a center differential lock.
Let's return to the device, which adds another position to the transfer case control lever in which torque is not transmitted to the front axle.
We are promised a reduction in fuel consumption by about 2 liters, which is not so little, especially with current gasoline prices, count for every 1000 km - 1000 rubles remains in your pocket.
But the problem is that the wheels are rigidly connected by drives to the front gearbox, and the gearbox is connected to the cardan. Even after installing this gadget, the cardan will continue to rotate while moving, only it will not come from the transfer case, but from the wheels - the question is, what kind of reduction in mechanical losses are we talking about? All the “offal” was rotating and still rotating, the losses were and still are.
Let's return to the UAZ, where the all-wheel drive scheme itself does not allow driving on ordinary roads with all-wheel drive, that is, all-wheel drive is used only in mud and, if you follow the manual, only for straight-line movement.
So, there are so-called “hubs” installed on the front wheels, which allow, simply put, to disconnect the wheels from the drives. Here we can talk about reducing mechanical losses, since there is no need to rotate the drive, gearbox and cardan.
In fact, savings can be achieved much simpler and more usefully - we buy good synthetic gear oil and get real savings, especially in winter, when ordinary mineral water in gearboxes turns into solid oil.
But from this toy you can only get the opportunity to have fun in the winter in the parking lot and play as a drifter (although with all-wheel drive it will be even easier) and if the transmission is already badly damaged, then perhaps there will be less noise. Has anyone had experience installing a similar gadget on a Niva, tell us about the sensations, is it worth the money?
Source
Replace the old ball axle bearing with a new one
Before starting work on installing a new axle part, look carefully for defects, dirt and corrosion. Pay attention to the condition of the axle itself, whether it is deformed or damaged.
It's time to replace the new bearing part. What steps are being taken:
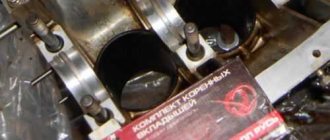
- When you start installing the new bearing, add some grease just in case. First of all, you need to put on the fasteners, and then install the bearing. A suitable mandrel is put on top to press it into place.
- Next, put on a pipe through which you hammer the bearing. From time to time it is necessary to check what position the part is in. Avoid distortions.
- Now we press in until the end of the bearing and the shoulder touch.
- The next step is heating the locking element. It is put on top of the shaft and hammered to the limit. Here you need to see if the bearing rotates easily enough.
- If there is a need to replace the oil seal, do so.
- The axle shaft is put into place in the bridge, all the bolts are screwed on.
What to do with excess noise on the VAZ-2121?
Cardan shafts on CV joints have further reduced the level of vibration and noise, but they have actually become maintenance-free. If a serious breakdown occurs, the complete unit will need to be replaced. It's easy to guess that this is not a cheap unit. Operating the car in difficult conditions only increases the likelihood of damage to the boot, and this is fraught with serious financial costs. So, we get that the noise of the transfer case is a design feature of the car, which you either have to put up with or look for ways to resist. One of the ways is to install a subframe or the same CV joints on previous modifications of the car. Sometimes car owners try to combat howling and humming in the cabin by improving sound insulation. But usually a new Shumka does not help and becomes only a waste of money.
You can modify the car as follows:
- installation of the RK subframe;
- silent RK handles;
- front axle gearbox release brackets;
- replacing the factory clutch with a unit from a Chevrolet Niva.
It is not at all necessary to do all this work on the car. It all depends on the owner’s requirements, assigned tasks and operating conditions. A subframe under the manual transmission and transfer case will reduce vibrations and extraneous sounds emitted by the units to a minimum. It is a natural way to protect the transfer case and increases the possibility of adjustment along the axes. Numerous tests have shown that this particular method of combating howling and humming is the most effective. Typically, the kit is made of structural steel, which allows you to accelerate the car without excessive noise up to 140 km/h, provided that you have the appropriate motor.
Complete sound insulation of the interior with high-quality sound-absorbing materials is advisable if at least one job from the presented list of ways to combat car noise has been previously completed. The operating comfort of the machine can be increased with the help of double-row imported bearings and seals pressed into the rear cover of the transfer case and the front axle disengagement clutch. Such a kit can not only eliminate hum, howl and vibration, but also prevent oil leaks on the transfer case flanges. In general, there are not so few real and effective ways to improve the comfort of an SUV.
Front axle repair video
Front axle Chevy Niva on Niva2121
Shevik #3 Remove the front axle, steering linkage and assemble the 4.47:1 gearbox
disabling the front axle on the Niva
Front axle disconnect unit on the Niva step-by-step installation instructions
Inspection of the Chevrolet Niva suspension after 38 thousand mileage. Harsh operating conditions. Kola Peninsula.
Niva rear gear repair
This is Tough! Removing the right drive Chevrolet Niva. Comparison of Chevrolet Niva and NIVA 21214 in Self-repair
https://youtube.com/watch?v=37tWMi_J69o
Niva transmission play
Increased gear backlash. How to measure gearbox play.