The need to replace the oil seal is determined by reducing the oil level in the rear axle housing (due to oil leakage through the oil seal) to a level that disrupts the normal operation of the gearbox.
Fogging of the crankcase neck and even the formation of individual drops in quantities not exceeding the norm indicated below are not a sign of leakage.
Determining the condition of the oil seal
1. Place the vehicle on a lift or inspection ditch.
2. Clean the breather from dirt and check its condition.
3. Having unscrewed the control plug, check the oil level in the axle housing; if necessary, bring the oil level to normal.
4. Clean the neck of the gearbox housing from traces of oil and wipe dry.
5. Hang up the rear axle and place it on stands.
6. Start the engine, engage direct gear and, at a speed of 90-100 km/h, warm the oil to a temperature of 80-90 ° C (for approximately 15 minutes).
7. With direct transmission engaged, at a speed of 100 km/h, determine the amount of oil leaking out in 15 minutes.
Oil leakage exceeding 5 drops in 15 minutes is a sign of a seal failure.
Downloading a book
After successfully completing the payment (by any method) and returning to the KrutilVertel store from the payment system website, you will be taken to the successful payment page:
The book you purchased will be in your personal account, from where you can always download it.
Please note that after making the payment, you need to return back from the payment system website to the KrutilVertel website. If for some reason you did not return back to the site and closed the payment system tab with a message about the successful completion of the payment, please let us know - we will send you a letter indicating access to download the book
If for some reason you did not return back to the site and closed the payment system tab with a message about the successful completion of the payment, please let us know - we will send you a letter indicating access to download the book.
General information
An oil seal is a type of cuff that serves to seal various rotating (moving) joints in various mechanisms and devices. It is necessary to clarify that the concept of an oil seal is now outdated and incorrect:
- The modern name of the spare part is reinforced rubber cuff
- The concept of an oil seal has remained since those time immemorial, when felt or felt seals, their ancient analogue, were lubricated with oil
- A reinforced cuff is a unified part that is produced in factories that specialize in the production of a variety of rubber products
- Modern cuffs are widely used in industrial units, in the motor transport sector, the national economy and agricultural machinery
- In other words, oil seals (cuffs) are used in our time in all types (types) of units, mechanisms and assemblies where it is necessary to seal moving parts
Functions and purpose of cuffs
The main purpose of reinforced rubber cuffs is to seal the moving joint. In addition, modern oil seals provide reliable protection of the assembly they seal from dust and dirt. So:
- For most cuffs, the working medium is air in direct contact with lubricants, fuel or water
- Temperature range required for stable operation of the engine oil seal ranging from -60C (in northern latitudes) to +100C (engine operating temperature with a small margin)
- The working pressure of the reinforced cuff is 0.05 MPa.
Today, reinforced cuffs are considered important elements:
- Since if the cuff is slightly displaced, an oil leak will certainly appear
- It is believed that replacement of crankshaft oil seals on the VAZ 2105 should be done approximately every three years.
- However, such frequency is not strictly necessary - since earlier, unscheduled repairs may be required
- For example, if the engine overheated
- An oil leak in this case signals you that the cuff should be urgently replaced.
Changing the front oil seal yourself
The first step is to disconnect the protection from the motor. We take an eight millimeter key. It is necessary to unscrew the front, rear and side screws. We remove the protection. If the car is fuel-injected, then removing the additional shield will not be too difficult.
Next, you need to remove the generator, which would make it easier to get to the pulley.
We unscrew the generator nut, then move the generator, the belt will relax and it will be easy to remove it.
Using a special wrench, unscrew the nut that secures the crankshaft and carefully remove the pulley
This is where the seal itself is visible. It may be cut or torn
Carefully remove it with a screwdriver and wipe the area. Lubricate the new oil seal and place it in place
Using a hammer, carefully press the part into the lid.
The work of installing the new oil seal is completed. Then you need to install the pulley and belt. Next, we install the protection back.
Signs and reasons for the need to replace the oil seal
There can only be one sign of this problem - contamination of the engine compartment. When the tightness of the unit is broken, lubricant leaks through the damaged oil seal and the oil, falling on the rotating parts, is sprayed throughout the engine compartment. In particular, replacing the front crankshaft oil seal on a VAZ 2106, or rather, its prerequisite may be the fact that when oil leaks, it gets onto the pulley and splashes on the sides in the front of the engine. If there is a leak from the rear oil seal, oil sprays onto the flywheel in the clutch housing. If there is a large leak, the driven disc linings may become oily, and as a result, the clutch will slip. The reason for the need to replace the oil seal may be the following:
- Natural wear of the oil seal has occurred.
- The oil seal was installed skewed and, as a result of static stress, a crack appeared on its body.
- The oil seal could have suffered basic mechanical damage.
- The integrity of the oil seal working surface was damaged as a result of engine overheating.
- A poorly made oil seal, in other words, a fake.
↑ Replacing the VAZ 2106 axle shaft seal video
ATTENTION!
The electronic catalog of spare parts intended for reference purposes only!
Our company does not sell all spare parts presented in this list. If there is a “Cost” link in the right column, these spare parts are on active sale. Availability in warehouses for details and prices, see the product card. If there is no “Cost” link in the right column, we do not sell such parts and do not accept orders for them.
Rear axle cuff
Probably all motorists know that for long-term service of a vehicle, it needs an eye and an eye. You shouldn’t wait until car parts fail at the most inopportune moment. Experienced drivers carry out preventative maintenance in advance, and their car never fails. One of the most common jobs on the VAZ 2106 is replacing the axle seal. Thanks to its periodic replacement, oil will not leak out of the gearbox. Replacing the axle seal on a VAZ 2106 is a simple procedure and you can handle it yourself.
Consequences
Now, let’s take a look at the consequences that can arise when oil regularly leaks from under the crankshaft oil seal. Located next to the front oil seal: if engine fluid gets on it, the belt may break faster during operation.
Installation of the front SCV
The clutch mechanism is located next to the rear oil seal, and if consumables get on it, the system will lose its friction characteristics. One way or another, in both the first and second cases, fluid leaks and engine contamination are inevitable,
There was a leak from under the front oil seal
It should be noted that a leak from under the oil pump gasket can also be confused with a leaking oil seal. These elements are located next to each other and the motor fluid in both cases will flow from one side. It is also worth adding that in this case the crankcase will be dirty, since any dirt that remains there will stick to the lubricant.
A broken timing belt is the worst outcome if the crankshaft oil seal leaks. Moreover, on many engine models, cases where engine valves were bent were recorded. In this case, the motorist will need:
- replace the timing belt;
- replace the cylinder head gasket;
- replace the valves, and grind them in;
- grind the engine cylinder head, since in 98% of cases it will be uneven and, accordingly, will not fit tightly to the engine, which will negatively affect the reliability of the power unit.
In addition, if the vehicle is regularly used, the pistons may be damaged by a leaking oil seal, since these are the elements that rub against the valves and can be damaged by them. Experienced car enthusiasts know that minor defects and irregularities on the piston surfaces will not in any way affect the operation of the power unit as a whole.
Installation of a new SCV
But in practice, there have been cases when the piston was simply pierced by the valve itself: in this case, the car owner will have to fork out for expensive repairs, almost a major one. After all, you will have to replace:
- directly failed piston;
- broken shaft valve;
- all liners around the circle will also need to be replaced;
- and change the crankcase gasket.
So, let’s summarize the total costs that a driver may experience in the event of a leak of engine fluid from under the oil seal:
- replacing the timing belt;
- changing valves, grinding them in;
- grinding the surface of the cylinder head;
- replacing the head gasket;
- adding lubricant to the engine, as well as antifreeze to the cooling system;
- It is also advisable to replace the cylinder head mounting screws;
- replacing the piston (if it fails);
- it may also be necessary to replace the piston rings;
- replacing the pan gasket.
This is what a new front SCV looks like.
A motorist who operates his vehicle with a leaking oil seal may face such consequences.
Rear oil seal leaking
Now let’s look at the consequences that the owner of a car with a leaking rear oil seal may face. As in the case of the front oil seal, the car owner will not have such catastrophic problems, but a leak in itself is already a significant problem. To solve it you will have to:
- dismantle the gearbox;
- remove the clutch mechanism along with the disc;
- remove the flywheel.
All this is needed in order to simply get to the oil seal. As for the consequences, if the rear element leaks, motor fluid can flood the clutch mechanism, as a result of which the device will lose its frictional characteristics. In this case, the vehicle:
- will significantly lose power;
- fuel consumption will increase (the driver gives gas, and the car also drives, respectively, gasoline consumption increases);
- you will have to add a lot of lubricant to the engine (all of it, of course, will not leak out, but you will have to add enough).
Fluid leak through rear SCV
Why does oil leak from the rear axle gearbox of VAZ 2107, 2106?
It is important to understand when the seal is leaking and when there is simple fogging. If after using the machine no drops of oil are visible near the oil seal, we can assume that the oil seal is simply sweating. In a situation where drops of oil or a trail followed by a drop are visible, we can assume that the oil seal is leaking.
Causes of leakage of the rear gear axle seal of VAZ 2107, 2106:
- Wear of oil scraper elements of the oil seal.
- Rupture of the compression spring of the oil seal.
- Oil seal defect.
- Development on the flange.
- Faulty or clogged gearbox breather.
When the oil seal is just sweating on a VAZ gearbox, you don’t have to change it, but if it leaks, then it definitely needs to be changed! But before changing the oil seal, check whether the gearbox breather is working by simply pressing on its head, and it should move a little. If it is motionless, then the breather is most likely for the leak, because. it does not allow gases to escape from the gearbox, which creates excess pressure and presses the oil out of the oil seal. Also try unscrewing and blowing out the breather before deciding to replace the gearbox seal. Let's now talk about replacing it.
What are seals used for?
In short, the oil seal is a seal that prevents oil from leaking out of the engine. On early models of “sixes” the seals looked like small rubber rings with a diameter of about 40 cm. And after a few years they became reinforced, since pure rubber is not durable and cracks quickly. Oil seals are installed at the ends of the crankshaft, front and rear.
Even a slight displacement of the oil seal in the groove leads to serious oil leakage. And the leak, in turn, leads to the fact that the rubbing parts in the engine cease to be lubricated. The coefficient of friction of these parts increases sharply and they begin to overheat, which can ultimately lead to the motor jamming. A jammed motor can only be restored after a lengthy and expensive overhaul (and even such repairs do not always help). So the seals on the crankshaft are extremely important parts, so the driver should carefully monitor their condition.
About the service life of oil seals
The VAZ 2106 operating instructions say that the service life of crankshaft oil seals is at least three years. The problem is that this is not always the case. For three years, oil seals can operate in conditions close to ideal. But there are simply no such conditions on domestic roads. If the driver drives mainly on unpaved or poorly paved roads, and his driving style is very aggressive, then the seals will leak earlier—in a year and a half or two.
Signs and causes of oil seal wear
In fact, there is only one sign of wear on the crankshaft seals: a dirty engine. It's simple: if oil begins to leak through a worn oil seal, it inevitably ends up on the external rotating parts of the engine and scatters throughout the engine compartment. If the front oil seal of the “six” is worn out, then the leaking oil pours directly onto the crankshaft pulley, and the pulley sprays this lubricant over the radiator and everything that is near the radiator.
When the rear oil seal leaks, the clutch housing becomes dirty. Or rather, the clutch flywheel, which will be covered in engine oil. If the leak is very large, then the problem will not be limited to the flywheel. Oil will also get onto the clutch driven disc. As a result, the clutch will begin to “slip” noticeably.
All of the above phenomena can occur for the following reasons:
- The oil seal has exhausted its service life. As mentioned above, oil seals on “sixes” rarely last more than two years;
- The tightness of the oil seal was broken due to mechanical damage. This happens too. Sometimes sand gets on the crankshaft protruding from the engine. Then it can get into the oil seal. After this, the sand begins to work as an abrasive material, rotating with the crankshaft and destroying the rubber from the inside;
- The seal was initially installed incorrectly. A misalignment of just a couple of millimeters can lead to a leak in the seal. So when installing this part into the groove you need to be very careful;
- The oil seal was cracked due to engine overheating. Most often this happens in the summer, in forty-degree heat. In such weather, the seal surface may become so hot that it begins to smoke. And when it cools down, it will definitely be covered with a network of small cracks;
- long idle time of the machine. If the car is not used for a long time, the oil seals on it harden, then crack and begin to leak oil. This phenomenon is especially often observed in the cold season;
- poor quality seal. It's no secret that auto parts are often counterfeited. Oil seals also did not escape this fate. The main supplier of counterfeit oil seals to the domestic auto parts market is China. Fortunately, it’s easy to spot a fake: it costs half the price. And its service life is half as long.
Identifying the cause of an oil leak
Inspection of the rear axle to determine its technical condition is carried out when installing the car on a lift, overpass or inspection pit. To eliminate a leak, you must first determine its cause. Sometimes it is enough just to tighten the fastening bolts better or replace the washers under their heads with softer options (for example, copper). Instead of a washer, a sealant in the form of a gel or thread can be used on the threaded connection.
Sealants for threaded connections
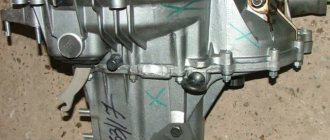
Oil leaks can also be caused by insufficiently tightened filler and drain plugs. If everything is in order with the plugs, the first thing you need to pay attention to is the connection between the gearbox and the crankcase. If the tightness of the connection is broken, oil will ooze from under the gearbox flange. Most likely, the rear axle gearbox seal will need to be replaced: the VAZ-2106 in this regard is no different from other VAZ models, called “classics”. We will tell you how to do this a little later.
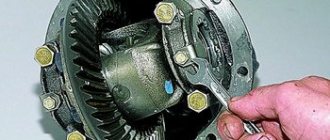
Rear axle gearbox VAZ 2106
If the cuff on the gearbox does not allow oil to pass through, the next cause may be the axle shaft seal. In general, any leaking oil seal must be replaced; no other repair will help. Moreover, the low price of this part allows you to do this without problems. There is another place where a leak can most often occur - this is the breather. It is located at the top of the crankcase, on the right. If there are fresh drops of oil, the breather should be cleaned and check how freely its cap moves. If everything is fine with it, the problem is again in the rubber cuff, which will have to be changed. Whatever the cause of the leak, it helps to lower the oil level, which must be checked and restored after troubleshooting. It is worth noting that an increased oil level can also cause oil leakage.
Changing the gear cuff
So, you have come to the conclusion that you need to replace the rear gearbox oil seal on a VAZ 2106. To get started, you need a tool and a short step-by-step instruction. You will need:
- screwdriver;
- open-end wrenches for 13 and 24;
- mount;
- calipers;
- torque wrench with dynamometer;
- durable cord.
- First, by unscrewing the drain plug and placing any container, you will need to drain the oil from the crankcase. After the procedure, do not forget to screw the plug back.
- To remove the two axle shafts, you will have to remove the rear wheels. Then, having secured the propeller shaft with a pry bar, unscrew the four bolts and release it from the gear flange, and use a screwdriver to disconnect the gear.
Removing the axle shaft and cardan
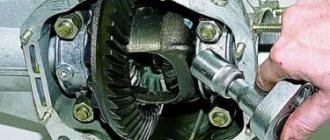
- The next step is to check the moment of resistance. Wrap the cord around the flange of the drive gear several turns. Gradually winding it up, check the value with a dynamometer and remember or write it down.
Checking the torque and removing the gear flange nut
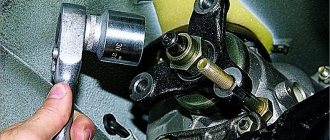
- Next you need to remove the drive gear flange. Unscrewing the nut securing it is not so easy; you need a special wrench. It is quite possible to make it yourself by taking a small piece of pipe and two bolts with nuts . The photo above shows how to use it in this case. The key itself looks like this:
Homemade flange removal wrench
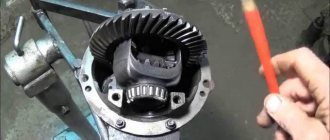
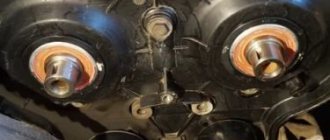
- This key is needed to prevent the flange from turning when the nut is unscrewed. Having removed the flat washer and the flange itself, you will see a sealing collar in the crankcase neck, which needs to be replaced.
- Using a screwdriver, remove the used oil seal . Before putting a new one there, treat it with Litol lubricant on the outside and, tapping the side of the cuff with a hammer, place it in the neck, to a depth of 2 mm from its end.
- Change the oil in the gearbox.
Installing a new oil seal
- If you don’t quite understand how to replace the gearbox seal on a VAZ 2106, the video will help you fully understand this issue.
We hope that everything worked out for you and now all that remains is to mount the removed parts in the reverse order. When tightening the flange nut with a torque wrench, monitor the tightening torque of the nut. It should be in the range of 12–16 kgf/m, a little more than the value of the moment of resistance of the drive gear that you wrote down.
What are seals used for?
In short, the oil seal is a seal that prevents oil from leaking out of the engine. On early models of “sixes” the seals looked like small rubber rings with a diameter of about 40 cm. And after a few years they became reinforced, since pure rubber is not durable and cracks quickly. Oil seals are installed at the ends of the crankshaft, front and rear.
Modern crankshaft oil seals on the “six” have a reinforced design
Even a slight displacement of the oil seal in the groove leads to serious oil leakage. And the leak, in turn, leads to the fact that the rubbing parts in the engine cease to be lubricated. The coefficient of friction of these parts increases sharply and they begin to overheat, which can ultimately lead to the motor jamming. A jammed motor can only be restored after a lengthy and expensive overhaul (and even such repairs do not always help). So the seals on the crankshaft are extremely important parts, so the driver should carefully monitor their condition.
About the service life of oil seals
The VAZ 2106 operating instructions say that the service life of crankshaft oil seals is at least three years. The problem is that this is not always the case. For three years, oil seals can operate in conditions close to ideal. But there are simply no such conditions on domestic roads. If the driver drives mainly on unpaved or poorly paved roads, and his driving style is very aggressive, then the seals will leak earlier—in a year and a half or two.
Signs and causes of oil seal wear
In fact, there is only one sign of wear on the crankshaft seals: a dirty engine. It's simple: if oil begins to leak through a worn oil seal, it inevitably ends up on the external rotating parts of the engine and scatters throughout the engine compartment. If the front oil seal of the “six” is worn out, then the leaking oil pours directly onto the crankshaft pulley, and the pulley sprays this lubricant over the radiator and everything that is near the radiator.
The reason for the appearance of oil on the “six” crankcase is a leaking rear crankshaft oil seal.
When the rear oil seal leaks, the clutch housing becomes dirty. Or rather, the clutch flywheel, which will be covered in engine oil. If the leak is very large, then the problem will not be limited to the flywheel. Oil will also get onto the clutch driven disc. As a result, the clutch will begin to “slip” noticeably.
All of the above phenomena can occur for the following reasons:
- The oil seal has exhausted its service life. As mentioned above, oil seals on “sixes” rarely last more than two years;
- The tightness of the oil seal was broken due to mechanical damage. This happens too. Sometimes sand gets on the crankshaft protruding from the engine. Then it can get into the oil seal. After this, the sand begins to work as an abrasive material, rotating with the crankshaft and destroying the rubber from the inside;
- The seal was initially installed incorrectly. A misalignment of just a couple of millimeters can lead to a leak in the seal. So when installing this part into the groove you need to be very careful;
- The oil seal was cracked due to engine overheating. Most often this happens in the summer, in forty-degree heat. In such weather, the seal surface may become so hot that it begins to smoke. And when it cools down, it will definitely be covered with a network of small cracks;
- long idle time of the machine. If the car is not used for a long time, the oil seals on it harden, then crack and begin to leak oil. This phenomenon is especially often observed in the cold season;
- poor quality seal. It's no secret that auto parts are often counterfeited. Oil seals also did not escape this fate. The main supplier of counterfeit oil seals to the domestic auto parts market is China. Fortunately, it’s easy to spot a fake: it costs half the price. And its service life is half as long.
How to change the crankshaft oil seal on a VAZ 2106
Almost all car enthusiasts get very upset when something breaks in their car. First of all, the upcoming costs for the services of service station specialists are upsetting. Which very often are not of the highest quality. Therefore, it makes sense to learn how to do some work yourself. For example, replacing the crankshaft oil seal on a VAZ 2106 can be done independently in the most ordinary garage conditions.
Oil seals are designed to seal moving elements. The role of oil seals in the functioning of the power unit can hardly be overestimated, and the slightest malfunction in their operation will certainly lead to very serious breakdowns. If the front or rear seal moves even slightly out of place, a lubricant leak will occur.
Car VAZ 2106
Causes of malfunction
- natural wear and tear;
- cracks due to improper installation;
- damage;
On the right is a part damaged during installation. - loss of integrity due to overheating;
- manufacturing defects or poor quality of the product.
Replacing the front oil seal
Before proceeding to replacing the front crankshaft oil seal on a VAZ 2106, place the car in a pit. Pull the handbrake.
All work should be carried out only when the car engine has completely cooled down.
- Using a wrench, unscrew the nut that secures the pulley.
- Using a spatula, remove it.
Assembly spatula - Unscrew all the fastenings of the camshaft drive cover.
- Remove the cover. It must be removed along with the gasket.
- Using a hammer and a bit, we remove the old one.
Extraction barb - After properly lubricating the new one, we put it in place on the outside of the cover.
- With gentle blows of the hammer on the guide, we finally install it in its proper place.
- Replace the cover with the gasket.
- Tighten the bolts, but not too much.
- We turn the crankshaft a couple of times to center the cover.
- Carefully tighten the bolts, the alignment should not be disturbed.
- We install the remaining parts in their places.
At this point, the replacement of the front crankshaft oil seal can be considered complete.
Replacing the rear oil seal
To gain access to the rear oil seal, you will have to work a little more and for this you need to dismantle several components of the car. There are separate articles on how this is done on our website.
- We dismantle the VAZ 2106 gearbox.
- We remove the clutch.
- We remove the flywheel.
- Unscrew the bolts that secure the holder.
- Use a screwdriver to pry up the holder and slowly remove it. You need to remove it together with the gasket.
- We pry up and remove the old oil seal.
- Lubricate the new one thoroughly and put it in place.
- We adjust it with gentle blows of the hammer on the guide.
- We install the holder. It must be installed together with the gasket.
- We insert the bolts, but do not tighten them completely.
- Rotate the crankshaft to center the holder.
- Now carefully tighten the bolts completely. The alignment should not be disturbed.
- Install the remaining parts.
The request returned an empty result.
Follow this scheme and you won’t have any problems replacing this important part. If you have any questions, watch the video
Sorry, there are no surveys available at this time.
Video “One of the replacement methods”
This video presents one of the methods for replacing crankshaft oil seals on a VAZ 2106.
Do you have any questions? Specialists and readers of labavto.com will help you. Support the project - share the link, thank you! Rate the benefit of the article: Rate the author (1
Oil seals VAZ-2101: dimensions
| Designation | Dimensions (mm) | Name | ||
| D | d | H | ||
| 2101-3401026 | 37 | 19,3 | 10 | Steering gear oil seal |
| 2101-1701043 | 47 | 28 | 8 | Gearbox input shaft oil seal |
| 2101-1701210 | 56 | 32 | 10 | Gearbox secondary shaft oil seal |
| 2101-1005034 | 56 | 40 | 7 | Crankshaft oil seal (front) VAZ 2101 |
| 2101-1005160 | 90 | 70 | 10 | Rear crankshaft oil seal VAZ 2101 |
| 2101-2402052-01 | 68 | 35,8 | 12 | Rear axle gear oil seal VAZ 2101 |
| 2101-3401023 | 43 | 28,6 | 10 | Bipod shaft oil seal |
| 2101-2401034 | 45 | 29 | 8 | Axle shaft seal VAZ 2101 |
| 2101-1307013 | 36,6 | 15,5 | 20,3 | Oil pump VAZ 2101 (water pump) |
| 2101-1007026 | 10,5 | 8 | 10,2 | Oil cap (oil scraper) |
| 2101-3103038 | 57,15 | 40 | 10 | Front hub oil seal VAZ 2101 |
Any reinforced cuffs must comply with the technical conditions defined by GOST 8752-79. Also, the material (rubber mixture) must meet AvtoVAZ requirements. Any violations entail serious consequences. You can buy an oil seal that fits perfectly in size, but if it is made of low-quality rubber or has any defects, a quick replacement of the part cannot be avoided. In addition, a seal that does not perform its functions can cause engine failure.
The danger of counterfeiting
The domestic market is full of offers for the purchase of oil seals for Zhiguli cars, but the issue of trust is acutely raised. It is very difficult for an inexperienced consumer to accurately assess the quality of a reinforced cuff and its compliance with standards based on external characteristics. In addition, there are often fakes that are produced under the name of world brands. Risk is considered a noble cause, but not in the issue of oil seals. Therefore, it is necessary to select only products from trusted manufacturers for your car.
If you buy a pump seal (VAZ 2101) or a seal for another unit from MP “CREDO”, no problems arise. And the most important thing in this matter is experience and knowledge of technology. We do not skimp on materials for seals. Our tires fully comply with all technical requirements and demonstrate excellent performance in aggressive environments.
Any of our crankshaft or other assembly oil seals for the VAZ 2101 has a suitable size, according to the catalog. If you buy a reinforced cuff with a larger diameter than necessary, the oil seal holds less pressure. In the opposite situation, when the diameter is smaller, the risk of rapid wear of the cuff edge and destruction of the rubber itself increases.
Advantages of cooperation with MP "CREDO"
MP "Credo" in St. Petersburg and the Leningrad region offers high-quality products that meet the requirements of AvtoVAZ. We use only proven rubber with high mechanical strength and load resistance. Our clients always have the opportunity to consult with specialists about their order, so that they can then receive the required number of products on time.
LLC "mp credo"
195279, St. Petersburg, Revolution Highway, 88
Causes and signs of oil seal malfunction
When the tightness of the sealed assembly is broken, lubricant leaks through the damaged cuff, it gets onto the rotating parts, and is sprayed throughout the engine compartment. The prerequisite for replacing the front oil seal on a VAZ 2106 is usually splashing of lubricant in different directions in the front part of the engine. Why this happens:
- Natural wear and tear of the cuff during use
- Installation of the cuff is skewed and, as a result, cracks appear on its body due to static stress
- Mechanical damage to the crankshaft oil seal
- Damage to the integrity of the working surface of the cuff when the engine overheats
- Poor quality (initially defective) oil seal, in other words – a fake.
Many car owners believe (and not without reason) that replacing the front oil seal on a VAZ 2106 is easy to do with your own hands. This allows them not only to save money and time, but also to gain experience in repairing a personal car. Let's not argue with them
It is only important to know some nuances, and you will be able to do it too.
Replacement procedure
Before you start replacing the cuff, replacing the oil seal on the front of a VAZ 2106 involves some preparatory work:
- Place the car on an overpass or inspection ditch
- Stop it with the handbrake
- Wait until the engine cools down completely
List of required tools:
- Keys “10” and “38” (instead of the key “38” it is better to have a special one to unscrew the nut securing the crankshaft pulley)
- Mounting blade
- Hammer
- Screwdriver
- A beard or something similar
- Mandrel, according to the diameter of the oil seal
We replace the oil seal in the following sequence:
- Removing the generator belt
- Then unscrew the cooling system fan
- Using the “38” wrench, unscrew the nut securing the pulley
- Then, using a mounting blade, remove the pulley.
- After this, a key remains on the crankshaft, be careful not to lose it
- Now, using a “10” wrench, unscrew the nuts and bolts securing the camshaft drive cover to the pan
The numbers “1” indicate the bolts securing the cover to the crankcase, “2” - the bolts securing the pan to the camshaft cover
Then fastening the cover to the engine housing (the photo shows a top view, the cooling fan, generator belt and radiator have been removed)
Numbers “1” indicate bolts, numbers “2” indicate nuts.
- Remove the drive cover together with the gasket
- We knock out the defective cuff from the inside using a hammer and a punch, applying gentle blows
We knock out the defective radial cuff
- Lubricate the new cuff with oil and insert it into place located outside the cover
- Using a hammer and a special mandrel, we seat the oil seal until it stops.
Drive the oil seal all the way in using a mandrel and a hammer.
Inspect the condition of the gasket: A severely squeezed or torn gasket must be replaced
- Reinstall the drive cover and gasket
- Screw in the bolts securing the cover, but not all the way
- Rotate the crankshaft several times to center the position of the cover.
- Next, screw in the bolts securing the cover until the end. However, do this gradually so as not to disturb the alignment again
- Then reassemble in reverse order
It should be noted that some experienced specialists replace the oil seal without removing the drive cover. In this case, however, the space for performing the procedure is very narrow. And it can easily become distorted during the installation of a new cuff. Then the leak will happen again and very soon. As our instructions showed, replacing the cuff is not particularly difficult. If you follow all the steps prescribed above, the result will definitely be excellent. In addition, we suggest watching the video instructions.
What to do with VAZ
Initially, we will discuss these types of repairs in relation to the “classic” Zhiguli. We will tell you how to replace the gearbox seal of the rear axle of a VAZ 2107.
- wrenches;
- screwdriver;
- mounting blade;
- Litol type lubricant;
- sandpaper;
- mandrel and hammer;
- a special key for holding the flange - a tube with two bolts inserted into the holes of the part.
Find out also how to remove the brake drum on a VAZ 2109 and about replacing the coolant on a VAZ 2110. Let's get started.
- First of all, drain the oil from the assembly unit.
- We remove the axle shafts from the beam.
- We use a screwdriver to disconnect the cardan flange from the mating part of the tail gear, having previously unscrewed the bolts. We keep the cardan from turning with a mounting blade.
- We wrap a strong rope around the neck of the counter element of the drive gear and attach a hand scale to it. The force of uniform rotation of the part (kg s) multiplied by the radius of its neck gives the value of the required moment - we write down this value.
- Unscrew the tail gear flange nut, holding the part with a special wrench.
- We remove the detached element and the washer.
- Using a screwdriver, we remove the reinforced rubber product.
- Clean the seat with sandpaper and lubricate it with Litol.
- We press in the new spare part with a mandrel using hammer blows until there is a gap of 2 mm from the end of the crankcase to the part embedded inside. Now the reinstallation of the differential assembly cuff can be considered completed.
- We install and screw the flange element, holding it with a special key. If the initially measured moment of resistance to rotation was at least 6 kg s x m, then the new moment should be greater by 1 kg s x m. In any case, we tighten until the moment reaches 6 kg s x m, but not higher than up to the moment 12 – 26 kg per x m.
- Then we collect everything along the way in reverse.
- Add oil.
This is how a defective oil seal is replaced on a VAZ 2107.
It should be added that the replacement of a defective VAZ 2106 part is carried out exactly according to the same scenario. By the way, as you can see, at the same time we changed the oil in our gearbox.
To completely reinstall the entire assembly unit, immediately after separating the parts according to point 3 of the instructions given, unscrew the bolts securing the beam. This is how the rear axle gearbox of the “classics” – VAZ 2106, 2107 and others like them – is replaced. Let's also consider replacing the leaking oil seal on the VAZ 21213 Niva. Let's take the same tools as for the “classics”.
- We also drain the oil.
- After hanging the drive, remove the wheels, then the brake drums.
- Having disengaged them from the differential gears, we remove the axle shafts.
- We also disconnect the cardan from the counter element of the tail gear.
- Then we measure the moment.
- Everything else, including the tightening torque values, is followed according to the instructions for the “classics”.
If you need to replace a broken gearbox, say, on a Niva 21214, disconnect its housing from the beam after separating it from the cardan. The same can be said about replacing a defective gearbox on a Chevy Niva.
However, here we must remember that an important rule must be observed: both differential elements of the all-wheel drive must have the same gear ratio. Therefore, when replacing a broken VAZ rear axle gearbox on an all-wheel drive vehicle, you need to know the gear ratio of the second unit.
At the same time, changing a bad oil seal on a Chevrolet Niva is carried out according to the instructions already described.
What to do with Gazelle
Now let’s look at the procedure for carrying out these procedures for popular domestic trucks. Let's study the replacement of the oil seal on the Gazelle. For this we need:
- hammer, mandrel;
- set of wrenches;
- mounting blade;
- Litol lubricant;
- sandpaper.
Replacing the drive gear oil seal of the VAZ 2106 gearbox
If an oil leak is detected, it is necessary to replace the gearbox drive gear oil seal with a new one, and for this, prepare the necessary tools for the job. To carry out repair work, you will need wrenches “13” “24”, a screwdriver, a mounting blade, a caliper, a set of torque wrenches and a dynamometer itself to control the tightening force of the bolts. If you have everything you need, then we will proceed directly to the repair work.
- It is necessary to drain all the oil from the rear axle housing into a previously prepared container; to do this, unscrew the plug, and after draining the oil, screw the plug back.
- Remove both rear wheels and take out the two axle shafts.
- Disconnect the propeller shaft from the drive gear flange; to do this, use a mounting spatula to secure the drive shaft from turning and unscrew the four bolts securing the cardan joint flange from the drive gear flange, remove the bolts.
- Using a screwdriver, disconnect the cardan drive.
At the next step of the repair work to replace the drive gear oil seal of the VAZ 2106 gearbox, you will need a dynamometer and a strong cord to check the moment of resistance.
- Wrap the cord around the flange of the drive gear, wind the cord and use a dynamometer to check the moment of resistance to turning the drive gear and remember the value.
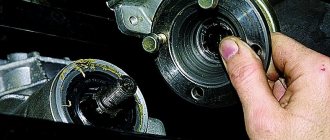
- Next, you need to unscrew the nut securing the drive gear flange, for this you will need a special key, which you need to hold the flange from turning and unscrew the nut, remove the flat washer and then remove the flange itself.
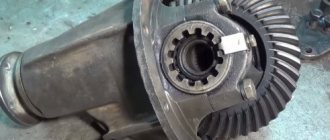
- After you have removed the flange, you will see the oil seal, which is why you are bothered with such repairs, you need to remove it, to do this, pry it off with a screwdriver and remove it from the neck of the gearbox housing.
After removing the inoperative oil seal, prepare a new one, lubricate its outer surfaces with Litol-24 grease and press it into place by lightly tapping it with a hammer through a special mandrel; seat the oil seal to a depth of about 1.7-2 mm from the end of the crankcase.
Reassemble in the reverse order, install the flange in place, to do this, secure it from turning with a special wrench, tighten the fastening nut, tighten with a torque wrench with a tightening torque of 12-26 kg.cm, depending on the moment of resistance to turning of the drive gear. Tighten until the required resistance torque is obtained.
After tightening the nut, install all parts back in place in the reverse order of removal. At this point, the repair of the VAZ 2106 can be considered complete.
Replacing the rear axle oil seal on a VAZ 2107 with your own hands.
First, let's prepare spare parts and tools. Of the new parts we will need:
- The seal itself.
- Oil deflector washer.
- New gear oil.
Spacer sleeve.
You will need 1.35 liters of oil. According to Murzilka, it is recommended to change it together with the oil seal. Ideally you need:
- Head 24
- The key is 17 (you can have a head) .
- A dynamometer (can be replaced with spring scales up to 15 kg) or a torque wrench of at least 150 N*cm.
- Open-end wrench 13.
- A good, thick flathead screwdriver.
- Mandrel for oil seal.
- Hammer or mallet.
- Container for old oil.
- Rags.
- Marker.
- Jack.
We've prepared everything and are starting the replacement!
Preparing and dismantling the gearbox oil seal.
We drive the car into a pit or overpass and drain the oil from the bridge (do not forget to immediately screw the drain plug back). We make a mark with a marker at the junction of the cardan with the gearbox (so as not to throw off the balancing during installation). We take a 13 mm wrench and a strong screwdriver or some kind of mounting tool and unscrew the nuts securing the cardan to the gearbox.
We disconnect the driveshaft from the gearbox and see the 24 nut, but do not unscrew it. This is where a torque wrench or dynamometer comes in handy. We need to measure the force at the input to the gearbox until the suspended wheel begins to spin. Use a jack to jack up any rear wheel and then proceed according to the situation:
- If you have a torque wrench, then simply turn the nut 24 degrees until the wheel starts spinning and look at the readings on the wrench at this moment. We remember them because When assembling, we will tighten with the same force.
- If you have a dynamometer (or scales), then we hook it onto the bolt and pull until the suspended wheel moves. We remember the readings because When assembling, we will tighten the nut until we achieve the same readings.
- if you have nothing at all, then make a mark on the flange, nut and gearbox and count how many turns you unscrew the nut to tighten it the same number of turns.
We remove the wheel from the jack (but do not remove it far) and unscrew the nut by 24. To unscrew it, we place bricks under the wheels as stoppers, or we screw in 2 bolts and make a stop from a mounting or pipe as shown in the photo below.
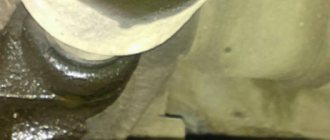
Next, use a mallet or hammer to knock down the gearbox flange through a wooden spacer.
Now you can see the oil seal itself and you can remove it with a screwdriver or wrench.
Installing a new oil seal in the rear axle gearbox.
Wipe the oil seal installation area from dust and debris. Check the flange for wear or rust. Before installation, lubricate the outer part of the oil seal with lithol. Press the new oil seal through the mandrel to a depth of 1.7-2mm from the edge of the gearbox. If there is a large hole on the flange , then it is better to drive the oil seal a little deeper or, conversely, slightly undercut it. Focus only on the outer edge of the oil seal, otherwise you may damage it.
After installing the oil seal, use an oil can to lubricate its inside with oil. And install the flange.
How to tighten the flange nut of the rear gearbox of a classic.
We tighten the nut based on what you had in order to measure the force with which it was tightened. After tightening, check that there is no play either axial (forward-backward), up-down, left-right.