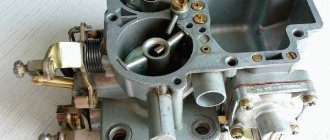
The Solex carburetor (2108, 2109, 21099) is installed on the intake manifold of the car engine. Three gaskets are used to seal this connection. Or rather, two gaskets and one heat-insulating spacer. Gaskets under the carburetor prevent the suction of foreign air into the intake manifold and thereby over-lean the fuel mixture entering the engine cylinders. The thermal insulation spacer prevents the carburetor from overheating.
gaskets and heat-insulating spacer for Solex carburetor 2108, 21081, 21083
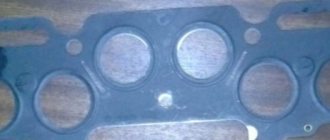
1 - Gasket between the manifold and the heat-insulating spacer. It is the first to be placed on the plane of the intake manifold. Made from paronite.
2 - Thermal insulating spacer.
3 - Reinforced gasket. Installed between the heat-insulating spacer and the lower plane of the carburetor (flange).
Notes and additions
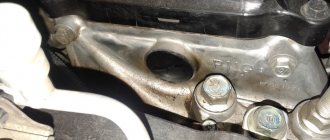
— Tightening the carburetor mounting nuts is done on a cold engine. It is not recommended to use a high tightening torque to avoid warping of the carburetor flange. Tightening torque 13 - 16 N.m.
More articles on Solex carburetors
Step-by-step installation of a carburetor with photos and descriptions:
1) To prevent dirt from getting into the intake manifold and the installed carburetor, you should first wash the engine compartment.
2) Disconnect the rods and drive cables of the standard Ozone carburetor, as well as the heating system hoses and fuel lines.
3) To remove the casing of the air damper drive cable from the back side of the “choke” panel, pull out the elastic bracket.
4) Carefully clean the seating surface on the manifold, avoiding dirt getting inside the engine.
5) Apply sealant to prevent air leaks (if there are small shells on the landing site).
6) Install the gaskets according to the sandwich pattern - thin-thick-thin. Thick padding provides thermal insulation. Thin paronite gaskets should be specifically for the Solex carburetor (the holes for the diffusers do not coincide with the gaskets for the Weber and Ozone), and also, in my opinion, instead of two identical gaskets, it is better to buy one gasket with two holes (placed between carburetor and getinaks gasket) and one with one oval (placed between the getinaks gasket and the manifold)
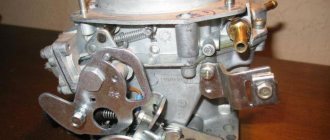
7) For ease of installation, install the carburetor without the top cover so that the throttle valve drive is at the front of the car.
8) We mount the linkage of the throttle valve drive rods from the side of the cylinder head cover. The link of the Solex carburetor (popularly called “helicopter”) may have to be cut approximately in the center between the holes, since it will not lie flat on the carburetor (in my case I didn’t have to cut it :-), but in the photo you can see namely the sawed-off link), also, to avoid sawing through the link, try putting the carburetor on the studs, having previously positioned it in its place.
Replacing the cardboard spacer
Installing a cardboard gasket will not take much time, but when carrying out this operation, care and caution are required so as not to damage the fragile internal parts of the carburetor, as well as to eliminate the possibility of dust and dirt getting inside the float chamber.
Carburetor gasket sets can be purchased at an auto parts store or ordered online. In the latter case, you definitely won’t have to stand in line.
For Solex carburetors you can find cardboard gaskets sold separately. In this case, the cost of repairs will be almost invisible to the budget.
After the carburetor is removed, the five bolts that secure the cover are unscrewed. The cover is then removed and the float is removed, which is held in place by a pin.
The pin should be carefully knocked out of the hole using a thin nail and a hammer.
When the pin is removed, the float is disconnected from the needle and completely removed. The old gasket can now be easily removed from the top cover of the carburetor, and a new cardboard piece installed in its place.
Then we assemble the carburetor and install it in the reverse order of removal.
Tightening the carburetor bolts that hold the top cover must be done evenly and crosswise to prevent misalignment and the possible leakage of air into the carburetor mixing chamber in this case.
Textolite spacer for carburetor
The Solex carburetor (2108, 2109, 21099) is installed on the intake manifold of the car engine. Three gaskets are used to seal this connection. Or rather, two gaskets and one heat-insulating spacer. Gaskets under the carburetor prevent the suction of foreign air into the intake manifold and thereby over-lean the fuel mixture entering the engine cylinders. The thermal insulation spacer prevents the carburetor from overheating.
gaskets and heat-insulating spacer for Solex carburetor 2108, 21081, 21083
1 - Gasket between the manifold and the heat-insulating spacer. It is the first to be placed on the plane of the intake manifold. Made from paronite.
2 - Thermal insulating spacer.
3 - Reinforced gasket. Installed between the heat-insulating spacer and the lower plane of the carburetor (flange).
Notes and additions
— Tightening the carburetor mounting nuts is done on a cold engine. It is not recommended to use a high tightening torque to avoid warping of the carburetor flange. Tightening torque 13 - 16 N.m.
More articles on Solex carburetors
Hi all. Guys, the question is this (maybe it’s stupid for a cavoto, I just haven’t come across it): what is the spacer between the carburetor and the manifold used for and is it possible to use a carb. install without it? Thanks in advance to everyone who responded.
Comments 44
a couple of weeks ago I asked a question myself when handing over the carb for repairs - for thermal insulation - without it, the lower plane of the carburetor could warp and the seal would be compromised... wow!
Carburetor heat insulator from the intake manifold. It is not advisable to do without it.
will you bet 151?
Well, in vain. The 126 is much more “pleasant” in terms of tuning and dynamics.
agree. just a terrible appetite
PM me, look, replied!
Thanks, I'll read it and do it.
the main thing is not to spread the word about it!
They installed a Weber machined for 402 engine without gaskets and return o_O I ask: Why didn’t you attach the return? The carb bottler’s answer was: But he doesn’t overfill anyway. Only XX can disappear, but this garbage can be treated by blowing out the jet. After 126 GM (modified coffin) it flies like an airplane. Everyone is happy and there is no overheating of the carb.
the first is to avoid overheating of the carburetor and subsequent deformation of the “carburetor” itself, including its flange, especially if there is Solex or ozone
Here are a few signs that I myself have encountered and treated: without a gasket - you will oil it for a long time when it is hot, it will be difficult to start - everything is very simple, high temperature, evaporation of gasoline accelerates + higher flow density due to temperature and saturation with vapors
when the carburetor flange is tightly tightened, when the engine first warms up, the flange will move, then a “triple” appears when cold or constant “triple”, air leaks along the flange which can be treated either by straightening or milling, I personally do it this way and that, different situations come across differently No sealant will save you, it will only give you a headache.
I’ve seen a lot of different chips under the carbs, but I’ll say one thing, the textolite must be there, especially nowadays there are different ones, for example, I’ve seen textolites being sold, and in addition to them, they’re also made from some kind of shit, which after a while shrinks and the carb behaves even worse than if they were retightened, also if you drive a gasoline, you put a thick one (standard), if you drive a GAZ, that is, half thinner than a regular one, like for gas, the mixer also plays a role what carb is worth, if a Solex, then take one with two holes; if an ozone, then from the Zhiguli family with one longitudinal window, this I want the gasket to lie on top and so that it does not close the vital channels of the carb, which are located on the heel of the carb (the lower part of the flange), also regarding the throughput, the role is played by the accelerator pump, which must necessarily hit the space between the valve and the wall, also and its dosage-quantity-working period, because if it hits the wall or flap to the side, it forms drops that impair mixture formation and create “blunts” in the engine, I also described above that each carb has its own “textolite” so that it does not block the channels , for example, you have a Solex 2141 24x26 and you take and place a textolite from the basin under the 21x23 holes, you create a step that will dull the car, then it’s better to take a textolite from 151 with two healthy windows, the point is not to interfere with the steps and gaps
Regarding the studs, this is not a problem at all, once I removed 151 and installed Solex studs, they turned out to be kilometer-long inconvenient, however)) I bought a regular raw M8 thread in a store, measured out 4 pieces, cut them off, ran the threads and screwed them into the threads. sealant and didn’t feel any problems :)
Thanks buddy, very informative. Carb. I set it to 151, it was 126 (that’s why the studs are shorter) + the gas spacer is also thicker than the standard one. I figured out the studs (I ran and picked them up, and at the same time caught the air filter :)). What is the question? I don’t know what the spacer is made of, 14 mm thick, double-hole, but the holes are absolutely identical. I looked at the carb, it turns out there is an overlap on one side, but on the other there is about 1mm missing. I understand that it shouldn’t be like this, but in principle will it work or not? and how will it affect the ride?
How to make a gasket yourself
You can make the carburetor gasket yourself. This need arises when it was not possible to find an original spare part. To make the gasket you will need the following tools and materials:
- Thick cardboard;
- Nail scissors;
- Fountain pen refill.
To make the gasket, you can use any thick cardboard. The thickness of the material should be about 0.8 mm. If the thickness is greater, then such cardboard can also be used to make a gasket, but in this case it will be necessary to additionally adjust the position of the carburetor float.
To make the gasket, you will need to remove the carburetor from the engine. Then the lid and float are removed in the manner described above.
The old gasket is removed and the surface of the carburetor cover is cleaned of traces of gasoline.
Then the ballpoint pen is cut with scissors and a thin layer of ink is applied to the surface of the carburetor cap.
The next stage of gasket manufacturing must be performed as carefully as possible. The cardboard must be leaned against the carburetor cover and lightly pressed against the surface of the part, but in such a way that the sheet does not move at this moment. Then the cardboard is sharply separated from the surface of the part with the ink applied.
After this procedure, an exact imprint of the horizontal plane of the lid will be displayed on the cardboard sheet. Using nail scissors, cut out the gasket for the carburetor using this imprint.
Holes for the cover bolts can be made using a spent cartridge case of a suitable diameter. For this purpose, the gasket blank is placed on a wooden board, and the hollow side of the sleeve is applied to the designated places under the holes, and precise blows are applied with a hammer from the side of the capsule socket.
Blitz tips and tricks
- The efficiency of the engine and its dynamic performance depend on how the carburetor gaskets are installed, so if problems arise in the operation of this device, you must immediately begin replacing the gasket;
- It is possible to make yourself not only a product from cardboard, but if you need a homemade textolite gasket, then it is made from a sheet of textolite of suitable thickness. In this case, the material is processed using special scissors;
- If necessary, the rubber gasket for the pipe can be made of dense rubber of suitable thickness. Holes for bolts in the rubber gasket are made using a drill and twist drills, but the gasket must be securely fixed between two wooden boards;
- Before purchasing a gasket in a store, you need to disassemble the carburetor and see what the part costs;
- Thermal insulating gasket can be installed in the amount of 2 pieces, when a suitable thickness of the part cannot be found, or the textolite for self-production is not suitable for this parameter. Thermal insulation, in this case, is not compromised, and the unit can be used under normal load conditions.
Replacing the carburetor gasket or making it from cardboard will not be difficult, but you should be very careful about the selection of material, as well as the accuracy of manufacturing this part. After replacing the product, the carburetor is installed on the engine and the engine is test run, as a result of which it will be clear how correctly all repair operations were performed.
Several advantages of installing a spacer on a gasoline engine
The first and main thing is to prevent deformation when the engine body is very hot and to prevent the carburetor from overheating and disrupting the operation of the device. Models from brands such as Solex and Ozone are most susceptible to such “diseases”.
Here are some more benefits of installing a thick gasket when installing on a gasoline carburetor engine:
- If there is no spacer between the carburetor sole and the cylinder head body, the temperature is transferred to the device, strong heating occurs, so on a hot engine you will have to turn the starter for a long time before the engine grabs gasoline and starts. This occurs due to the acceleration of the evaporation of gasoline vapors; in addition, the specific density of the delivered fuel increases due to the high temperature and saturation of the combustion chamber with vapors;
- Having tightly tightened the nuts on the device to ensure a reliable connection and the impossibility of gasoline leaks, at the first heating the sole warms up and the deformation process begins. With subsequent inevitable heating, the deformation increases. Having removed the carburetor for repair, we get a deformed sole. This will cause the engine to run on three cylinders on a cold engine, and subsequently the engine will constantly fire. There will be air leakage along the lower flange and the intake manifold. Such a malfunction will require correction of the deformed sole; if the damage is severe, the sole or the carburetor itself will need to be replaced. Straightening the flange, and in case of severe deformation, milling - these works may involve a fuel supply system that is not equipped with a platform for the combustion chamber. None of even the most trendy sealants can help here;
- With many methods advertised on the Internet, a textolite sole under the carburetor, in the opinion of many car enthusiasts, should be installed on every car. However, you should be wary of fakes. You can often see a textolite spacer with an additional layer of unknown material on display. After a short period of time, it dries out or decomposes even worse, the performance and power of the engine drops due to a malfunction.
Advice from professionals
When installing a spacer on a gasoline carburetor, calmly install an industrial (standard thickness) gasket with two holes. When the engine is running on gas, it is better to install a spacer that is a little thinner and with one wide groove for the carburetor of the classic Zhiguli type “Ozone”, but for the Solex carburetor a gasket with two separate holes is better suited. This is done to prevent the sealing gasket from closing the channels and holes on the device body on the heel part.
Installing a thick gasket between the carburetor and the engine body increases the fuel flow through the accelerator pump. During this operation, a stream of gasoline hits a certain place between the fuel valve and the housing wall. This operation increases the dosage while reducing the amount of fuel consumed and reduces the combustion time.
If the system is faulty, the stream of oxygen-enriched fuel does not flow correctly, and drops form on the chamber wall. This reduces the quality of the carburetor and causes interruptions in engine operation. When installing a spacer with smaller holes for the chambers, a kind of step is formed, fuel will not be supplied in full, and the car will stall and freeze when revving up. If you cannot find the original gasket, it is better to purchase a spacer with large holes (of course, within reasonable limits).
If the studs are out of order, or the length of the relatives is not enough, there is no point in panic. Buy long studs of the required diameter and thread pitch, screw a nut onto one of the ends. We mark the length of fasteners we need and cut them with an angle grinder. Try to cut straight, but if your hand shakes, it's okay. Grind to a smooth edge and twist the nut. We have a hairpin of the length we need.
As for installing a spacer under the sole when installing gas equipment on an engine, there is still no clear answer to the question of why this part is needed. Car enthusiasts argue about this on forums, and dubious devices based on thick gaskets are also entering the spare parts market, which also does not add to the popularity of this method of improving equipment performance.