How to make the trunk lighting of Kalina independent of its dimensions
| The blessing of Kalina's trunk only works if the dimensions are turned on, and this is not entirely convenient. Let's figure out how to make Kalina's trunk lighting independent. |
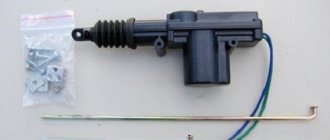
The standard feature of the Kalina trunk light has two wires:
- gray black is a mass
- yellow - +12V appears when the lights are on
Goal: route a constant +12V to the lampshade and connect it instead of the yellow one. As a result, the trunk light will turn on when the fifth door is opened, regardless of whether the dimensions are on or not.
The closest permanent +12V is located under the left rear passenger seat. We lift the carpet, unscrew the black plastic trim, and find the wiring harness. It has the thickest red wire and has constant +12V. We extend the wire from the lampshade to it and connect using a connector. Don't forget to install a fuse in the cut of the new wire.
In addition, a permanent “plus” can be taken from the red wire of the cigarette lighter, or from the red wire of the interior lamp:
By the way, do you know how to make the trunk lighting better?
Source
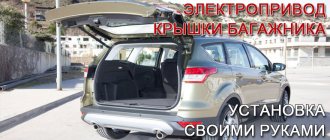
Additional lighting for the trunk of Kalina
| Everyone knows how dim the standard lighting in Kalina’s trunk is; finding anything in it at night is simply unrealistic. Another modification to the trunk is dedicated to the lighting. |
Making Kalina's trunk lighting brighter is very simple, and most often an LED strip or a more powerful lamp is used for this. How to secure and connect additional lighting in the trunk is up to you, here are some examples of how this is done on different types of Kalina body:
Trunk light Kalina Hatchback
Trunk lighting Kalina Universal
Trunk light Kalina Sedan
By the way, if you often have to remove the rear shelf, then it is better to secure the strip with LEDs on the plastic sides, next to the standard lamp. And yet, if you make the lighting independent of the dimensions, then using the trunk will be even more convenient.
Similar materials
Improved connection of trunk lighting for Lada Granta, Kalina and Priora
When opening the trunk, the light comes on only when the lights are on - this is a drawback of the standard connection of the trunk light of many AvtoVAZ cars (including Lada Granta, Priora, Kalina). We offer you a method that will make the lighting in the luggage compartment independent.
You will need : several meters of wire, a multimeter or test lamp, electrical tape.
In order for the backlight to turn on when the trunk lid is opened, regardless of the dimensions, it is necessary to lay a wire from the ceiling (navigator) lamp on the ceiling (where there is a constant + 12V) to the trunk light. It is not at all necessary to remove the roof trim, just bend it a little from the edge or move it out a little from the door seal.
one end of the wiring to the central wire of the interior lamp connector (for Lada Priora) or to the outer wire for Lada Kalina/Granta (white or white-red). The color of the wires may vary depending on the car model or its configuration, so first check it with a multimeter or test lamp. We hide the wire under the door seal and run it down to the lamp in the trunk.
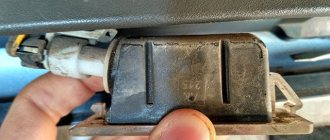
The other end of the wiring goes to the light in the trunk. Two wires come to it, one of them is ground, and the other is + 12V from the dimensions (usually yellow-red or yellow). It is also recommended to check with the device first. Disconnect the second wire and isolate it. In its place we connect the wire from the navigation lamp. Ready!
Lada Priora front lamp diagram:
- far left (red) - “mass”
- central (white) - +12V
- far right (black) - ground (door switches)
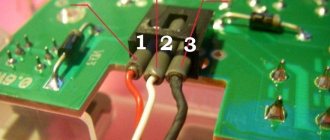
Diagram of the front lamp of Lada Granta (pre-style) and Lada Kalina:
- far left (black) - “mass”
- central (green) - ground (door switches)
- far right (red) - +12V
Diagram of the front lamp with ERA-GLONASS for Lada Granta FL:
- 11 and 14 - +12V appears after turning on the main relay (turning on the ignition, opening the doors). The power goes out 2-5 minutes after removing the ignition key.
- 15 - “mass”.
- 17 - “ground” (door limit switches), which appears for a while when the doors are opened.
By the way, in the “Lux” configurations, the middle wire of the ceiling light has an auto-shut-off function after 10 minutes of inactivity, which is very convenient.
Let us remind you that constant +12V can be taken from other sources, for example:
- From the ignition switch (pin 50)
- ISO connector of the radio (A4 contact)
- Cigarette lighter (middle wire white-red or red-blue)
Have you made the trunk lighting independent of the dimensions? Perhaps you have thought about installing additional lighting in your doors?
Share on social networks:
Found an error? Select it and press Ctrl+Enter..
Source
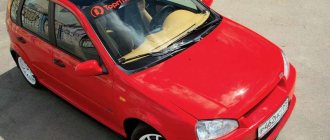
Trunk door Kalina hatchback 1119 in color
Compared to other VAZ cars, the Kalina family has an improved door design that allows them to be slammed easily and softly. Such improvements did not pass by and the trunk door of the Kalina hatchback.
The tailgate of the Lada Kalina hatchback (trunk door 1119) opens more softly and is held in place using two gas-filled telescopic struts. Structurally, the trunk door on the Kalina hatchback has an outer and inner lining connected to each other by an adhesive flange connection. This part is made from low-carbon steel sheet 0.8 mm thick.
Today you can buy a tailgate 1119 already painted in the color of the car. This is more profitable in terms of money than repairing the old one, leaving the car in service for an indefinite period and being left without wheels. The low price of the tailgate of the Lada Kalina hatchback is achieved by high flow rate of painting and a meager markup on the finished product. Replacing a firecracker from an old one to a new one in our repair area will take only one hour.
The tailgate of the VAZ 1119 is painted using technologies and using varnishes, primers and paints used by AvtoVAZ. For transportation, each body part is packaged in a four-layer coating. This reliably protects the paintwork of the tailgate on the Kalina hatchback from damage.
| AvtoVAZ | RUB 11,900.00 | RUB 11,050.00 | ||
| 1119-6300020-240 | tailgate Lada Kalina 1119 hatchback white cloud 240 | AvtoVAZ | RUB 11,900.00 | RUB 11,050.00 |
| 1119-6300020-451 | tailgate Lada Kalina 1119 hatchback Borovnitsa 451 | AvtoVAZ | RUB 11,900.00 | RUB 11,050.00 |
| 1119-6300020-502 | tailgate Lada Kalina 1119 hatchback melon 502 | AvtoVAZ | RUB 11,900.00 | RUB 11,050.00 |
| 1119-6300020-515 | tailgate Lada Kalina 1119 hatchback Isabella 515 | AvtoVAZ | RUB 11,900.00 | RUB 11,050.00 |
| 1119-6300020-104 | tailgate Lada Kalina 1119 hatchback Kalina 104 | AvtoVAZ | RUB 11,900.00 | RUB 11,050.00 |
| 1119-6300020-322 | tailgate Lada Kalina 1119 hatchback Colombian green 322 | AvtoVAZ | RUB 11,900.00 | RUB 11,050.00 |
| 1119-6300020-665 | tailgate Lada Kalina 1119 hatchback space 665 | AvtoVAZ | RUB 11,900.00 | RUB 11,050.00 |
| 1119-6300020-426 | tailgate Lada Kalina 1119 hatchback Muscari 426 | AvtoVAZ | RUB 11,900.00 | RUB 11,050.00 |
| 1119-6300020-620 | tailgate Lada Kalina 1119 hatchback Muscat 620 | AvtoVAZ | RUB 11,900.00 | RUB 11,050.00 |
| 1119-6300020-222 | tailgate Lada Kalina 1119 hatchback Premier 222 | AvtoVAZ | RUB 12,600.00 | RUB 11,700.00 |
| 1119-6300020-610 | tailgate Lada Kalina 1119 hatchback Riesling 610 | AvtoVAZ | RUB 11,900.00 | RUB 11,050.00 |
| 1119-6300020- 478 | tailgate Lada Kalina 1119 hatchback plum 478 | AvtoVAZ | RUB 11,900.00 | RUB 11,050.00 |
| 1119-6300020-650 | tailgate Lada Kalina 1119 hatchback Sauvignon 650 | AvtoVAZ | RUB 11,900.00 | RUB 11,050.00 |
| 1119-6300020- 482 | tailgate Lada Kalina 1119 hatchback Blueberry 482 | AvtoVAZ | RUB 11,900.00 | RUB 11,050.00 |
| 1119-6300020- 651 | tailgate Lada Kalina 1119 hatchback black truffle 651 | AvtoVAZ | RUB 11,900.00 | RUB 11,050.00 |
| 2192-6300020-240 | tailgate Lada Kalina 2192 hatchback white cloud 240 | AvtoVAZ | RUB 13,300.00 | RUB 12,350.00 |
| 2192-6300020-283 | tailgate Lada Kalina 2192 hatchback cashmere 283 | AvtoVAZ | RUB 13,300.00 | RUB 12,350.00 |
| 2192-6300020-790 | tailgate Lada Kalina 2192 hatchback coriander 790 | AvtoVAZ | RUB 13,300.00 | RUB 12,350.00 |
| 2192-6300020-665 | tailgate Lada Kalina 2192 hatchback space 665 | AvtoVAZ | RUB 13,300.00 | RUB 12,350.00 |
| 2192-6300020-221 | tailgate Lada Kalina 2192 hatchback glacial 221 | AvtoVAZ | RUB 13,300.00 | RUB 12,350.00 |
| 2192-6300020-413 | tailgate Lada Kalina 2192 hatchback ice 413 | AvtoVAZ | RUB 13,300.00 | RUB 12,350.00 |
| 2192-6300020-119 | tailgate Lada Kalina 2192 hatchback Magma 119 | AvtoVAZ | RUB 13,300.00 | RUB 12,350.00 |
| 2192-6300020-497 | tailgate Lada Kalina 2192 hatchback Odyssey 497 | AvtoVAZ | RUB 13,300.00 | RUB 12,350.00 |
| 2192-6300020-610 | tailgate Lada Kalina 2192 hatchback Riesling 610 | AvtoVAZ | RUB 13,300.00 | RUB 12,350.00 |
| 2192-6300020-672 | tailgate Lada Kalina 2192 hatchback black panther 672 | AvtoVAZ | RUB 13,300.00 | RUB 12,350.00 |
Glove box
We open the glove box and on the left side we see this small lamp that needs to be removed. To do this, insert a flat-head screwdriver into the groove on the right side of the cover, as shown below:
And we insert the screwdriver until the lid opens, after which we remove it from there. The result of this action is shown in the picture below:
And to get to the light bulb, you need to remove the upper white base; to do this, press on the plastic latch of the lamp cover (in the picture above this latch is clearly visible in the left corner), and pull up the base:
Now you can easily remove the light bulb and install a new one. Then we put everything in the reverse order of removal. At the same time, you can eliminate some extraneous sounds that arise in the glove compartment area from this particular plastic part. I made everything as simple as possible, glued small pieces of sound insulation along the edges, and inserted halves of matches into the wire plugs.
Trunk volume of Lada Kalina station wagon
One of the popular modifications to the trunk is to install a second floor in it in the form of a low box (raised floor). This design will allow you to store things (tools, sound amplifier, etc.) that will not dangle or get in the way during use. Let's consider a classic version of this tuning of the trunk of modern Lada cars.
It is more practical and easier to make a rectangular raised floor, the dimensions of which will depend on the car model. You can draw up a drawing or diagram based on the dimensions from the articles on our website (Lada Priora hatchback/station wagon, Granta sedan/liftback, Kalina station wagon, Kalina 2 hatchback and station wagon, or Niva 4x4). Or pull out the trunk mat and take measurements from the insert glued on the back side, and take the height to be 15 cm.
Let's look at a specific example of making a raised floor with your own hands for a Lada Granta liftback. For other Lada models, all actions are performed in the same way:
1. Cut pieces of plywood (5-6 mm) into pieces of the required sizes using a jigsaw or saw.
2. If desired, the plywood can be painted (in this example, white) or coated with drying oil to protect it from moisture.
3. The top cover is tightened with material (for example, carpet), using a furniture stapler or glue.
4. The box is assembled using corners and hinges. The top lid can be made double so that, if desired, only part of the hidden trunk can be opened.
5. We apply design solutions. For example, when placing amplifiers in such a trunk, it will be convenient to have a viewing window made from a piece of monolith. To install it, we cut out a 5 cm groove along the contour from the bottom of the lid. We place the glass in it and glue it, and secure it with metal slats for reliability. Holes for ventilation can be made in the sides of the resulting box.
As a result, all that remains is to install a false floor in the trunk of the Lada and fill it with the necessary contents. The side niches in the trunk are deeper, which allows you to place additional things in them. Such modification of the trunk will require at least three free evenings, but the result is worth it!
Lada XRAY already has a second floor from the factory. There is a separate article on this topic for the Largus trunk. We offer one more instruction that will improve the lighting in the trunk of Lada cars.
Very easy installation, no additional modifications required. The shelf is designed to improve the sound quality of the speaker system as a whole, as well as to eliminate unpleasant creaks, rattles and overtones when the car is moving.
Instead of plastic sidewalls, wooden ones are installed, and speakers are attached to them.
The main advantage of this design is that when the shelf is removed to transport large items, the speakers remain in the car.
Standard characteristics:
| Upholstery material: | Carpet |
| Upholstery color: |
We produce standard and individual orders, maintain an effective pricing policy, and offer the best price-quality ratio.
If desired, you can purchase fasteners for RUB 130
The manufacturer reserves the right to change the characteristics of the product, its appearance and completeness without prior notice to the seller.
| Holes on the sides: | 6x9″ |
| Speaker installation: | Hidden |
| Net/gross weight: | 10.3kg/11.7kg |
| Dimensions in packaging: | 88cm x 34cm x 20cm |
| Equipment: | Shelf, sides (2 pcs.) |
| Automobile model | Lada Kalina |
| Speaker size | 13 cm, 16 cm, 20 cm, 6x9″ |
| Modification | Solid |
| Automobile model | VAZ 1117 Kalina |
| Basic speaker setup | Hidden |
Trunk
Here everything is done in almost the same order. We open the trunk and on the left side we see the lamp itself, which can be removed in the same way as in the glove box, but in this case there is no need to remove it, since there is access to the lamp itself from the reverse side.
Since access to the lamp is free, replacing it will be even easier than in the glove compartment, simply by spreading the contacts, removing it, and putting the new one back.
Source
Sound insulation of the trunk Kalina 2 (VAZ 2192, 2194)
is the same for all brands and types of cars, however, specific cases have their own characteristics. In the case of the Lada Kalina 2, the whole process begins with removing the trunk trim and tailgate trim, which does not cause difficulties. Next, the entire surface should be cleaned and degreased with White Spirit.
The first layer of trunk sound insulation is vibration isolation material. It is recommended to start installing sound insulation from the rear arches; it is through them that the main noise from the road is transmitted. To soundproof arches, it is recommended to use a material with the highest vibration absorption coefficient, for example, Bimast Bomb. We cut sheets of a suitable size (the larger the pieces, the better), and heat the bitumen side with a hairdryer. We apply the material to the cleaned metal of the body and roll it out with a hard (plastic/iron) roller. We glue the next sheet of vibration isolator overlapping or at the joint. After this, we move on to soundproofing the horizontal surface of the trunk, paying special attention to the part where the muffler resonator passes (for Lada Kalina 2 this is the left side).
To watch online, click on the video ⤵
Lada Kalina trunk light does not go out Read more
Lada Granta. Trunk light does not work, sedan. More details
LADA GRANTA FL Trunk light does not work More details
How to improve trunk lighting? More details
Trunk lighting regardless of size! Lada Granta More details
The trunk light of the Lada Granta does not work Read more
Improved trunk lighting, light without dimensions! And forced shutdown! More details
The Trunk Open Light is constantly on and the light in the trunk does not turn off - Troubleshooting Read more
Organize your trunk | Trunk space Lada Kalina (sedan) More details