Handbrake tightening. — Chevrolet Niva, 1.7 l., 2012 on DRIVE2
Probably one of the simplest tasks... I'm tired of the handbrake not holding, the previous owner didn't seem to bother with this, but I use the handbrake from time to time. In general, we raise the rear of the car on two jacks (if any), and put chocks on for safety...
Full size
Let's jack it up.
You can raise the body, as in my case, so there is more space underneath for work, or you can raise it under the rear axle, whichever you prefer. The car should be in neutral, the handbrake released. We climb under the car and look for the handbrake cable closer to the “tail”.
Full size
We are looking for a cable.
We clean the threads with a car brush, spray some WD-40, loosen the nuts with two “13” wrenches and tighten them.
Full size
Let's tighten up...
Periodically spinning the wheels, see if the pads will rustle as they started, loosen a little until the sound disappears. We get out from under the car, pull the handbrake several times, three or four clicks until the wheels lock. If after this the pads rustle when turning the wheels (usually on one of the sides), we climb underneath and pull the handbrake cables in various ways so that they fit properly. We get out from under the car, pull the handbrake, turn the wheels, there is no shuffling, the tension of the handbrake suits us, we are happy and climb under the car to tighten the nuts. If there is no joy, we repeat the manipulations. On one side the cable came out about half a centimeter, on the other by a centimeter, now everything is blocked as it should be, I tightened the adjusting nuts a couple of centimeters along the threads. Once everything is done from below, we get out from under the car, lower it from the jacks and rejoice at the work done.
Issue price: 0 ₽ Mileage: 43,326 km
www.drive2.ru
Adjusting the manual parking brake Niva Chevrolet
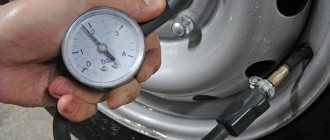
| 1.To check that the parking brake is adjusted correctly, find an overpass, loading ramp, etc. near where your vehicle is parked. height H=1.25 m with entrance length L=5 m. This ratio corresponds to a slope of 25%. |
| 2.If such a ramp is not available, for a simplified check of the parking brake, place the vehicle on a level surface. Place the gear shift lever in the neutral position and fully raise the parking brake lever in the passenger compartment. Get out of the car and try to move it. If you succeed, you need to urgently adjust the parking brake drive. |
| NOTE Adjust the parking brake drive from below the vehicle mounted on a lift or inspection ditch. |
| You will need: two 12mm wrenches, cobra pliers or pliers. |
2.Holding the cable with pliers and tightening or unscrewing the adjusting nut, achieve 7–9 clicks of lever travel.
| 1.While holding the adjusting nut with wrench 1, use wrench 2 to loosen the locknut. | |
| 3.Tighten the locknut. |
| 4.Perform several full strokes of the lever, then lower the lever all the way. |
| Video niva-chevy.ru |
Parking brake malfunction: causes and solutions
- How does the parking brake work in a car?
- Why does the parking brake not work?
- How to solve problems with the parking brake in a car yourself
- How to use the handbrake correctly
The parking (hand) brake is necessary in order to secure the car during long-term parking. The safe operation of a vehicle requires that it be in working order at all times. Parking brake failure is a fairly rare occurrence. In this article we will talk about what problems can arise with the handbrake and how to solve them.
How does the parking brake work?
The parking (hand) brake (“handbrake”) is an integral element of the vehicle’s braking system. It differs from the main braking system in its purpose - thanks to the handbrake, a car standing on a slope is fixed in place. In addition, it can be used to brake in emergency cases when the main brakes fail.
According to the type of drive, the handbrake can be:
- mechanical;
- hydraulic;
- electromechanical (EPB).
The most common is a mechanical handbrake, as it is the simplest and at the same time reliable. You can activate it simply by pulling the lever towards you. This tightens the cables, blocking the wheels and reducing speed. The car is slowing down. Much less common is a hydraulic handbrake.
According to the activation method, the handbrake can be:
- pedal (foot);
- with a lever.
Cars with automatic transmission are equipped with a foot brake. The handbrake pedal in this case takes the place of the clutch pedal.
The parking brake drive can be:
- drum;
- cam;
- screw;
- central or transmission.
Drum-driven designs use a lever that acts on the brake shoes to pull the cable. The car slows down as the pads are pressed against the drum.
Applying the central parking brake locks the driveshaft, not the wheels.
There are also electrically driven parking brakes, in which case braking occurs due to the interaction of the disc brake mechanism with the electric motor.
The handbrake consists of the following main elements:
- the mechanism that operates the brake (pedal or lever);
- cables, each of which, acting on the main braking system, entails braking of the car.
The design of the parking brake drive provides from one to three cables. The most commonly used are three, two of which are rear and one is front. The rear cables are connected to the braking mechanisms, the front cables are connected to the lever.
Adjustable ends are used to connect the cables to the handbrake assemblies. The cables end with adjusting nuts, due to which the length of the drive can be changed. The handbrake is activated and released by a return spring located on the front cable, equalizer or directly on the brake mechanism.
- Hydraulic hand brake.
Although the manual brake system is convenient and reliable, a number of motorists are dissatisfied with its functioning. The modified system obtained as a result of the alterations is almost similar to the main brake mechanism.
To install a hydraulic handbrake, a circuit is used, that is, a mechanism that serves the wheels. The main elements of the mechanical brake are removed. At first glance, the mechanism is identical to a classic handbrake with a lever and a ratchet wheel. However, the cables are replaced by a hydraulic cylinder, reminiscent of the one that is part of the main brake system.
After making such changes to the braking system, pressure can be applied to the rear wheel circuit either simultaneously with the front circuit or separately by activating the manual mechanism. This system is called a hydraulic hand brake.
Many modern cars are equipped with a hydraulic parking brake. However, the classic handbrake can also be replaced with hydraulics, and this can be done either independently or with the help of service center specialists. This service is quite common.
The handbrake will continue to lock the rear wheels of the car, but servicing the system will become easier. A hydraulic brake, unlike a cable brake, does not require tightening. The advantage of such a handbrake is the absence of an equalizer for the right and left wheels, since the pressure at all points of the circuit will be equalized due to hydraulics.
A significant disadvantage of a hydraulic parking brake is less reliability. The functioning of the mechanical handbrake does not depend on the condition of the main brake system, while breakdown of the brake circuit and loss of fluid can lead to malfunction of the parking brake and the entire braking system as a whole.
- Electric hand brake.
The electromechanical or electronic brake is an autonomous element controlled by the on-board computer.
The electric handbrake consists of:
- electric motor;
- belt drive;
- planetary gearbox;
- screw drive.
The rear wheel caliper is equipped with a handbrake. Having received the signal, the electric motor transmits rotational movement to the planetary gearbox, which begins to reduce the speed of the electric motor. The screw mechanism, having received the impact, begins to press the brake pads to the discs.
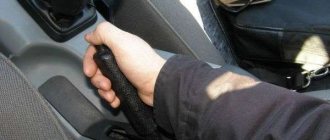
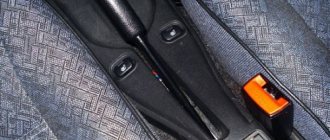
When the driver activates the handbrake by pressing the parking brake pedal under the dashboard or by lifting the lever (3) located between the seats, tension occurs on the cable going to the rear of the car, which acts on the brake pads. After the driver releases the lever, the brake system returns to its original position due to the action of the return spring (11).
The design of the system itself is quite simple - the brake lever is connected to a cable enclosed in a special plastic sheath, inside which it moves freely. The cable ends with an adjusting bolt, which can be tightened or loosened. It then splits into two cables that go to the brakes mounted on the rear wheels.
Simply put, when the handbrake is activated, the cable is tensioned, which connects the pads to each other, and they already stop the car.
How to assess the condition of the parking brake
Before we talk about the parking brake malfunctions, we suggest determining its performance:
- If the car with the handbrake activated is stable when stopping on a steep slope, the brake is in good condition.
- If the car slows down weakly and continues to move, then adjustment and possibly repair of the parking brake fault is necessary.
There is another way to check the serviceability/failure of the parking brake. The handbrake must be raised all the way, engage first gear, and then smoothly release the clutch. A stalled engine will indicate that the brake is in working order.
If there is no slope or hillock nearby, you can check the condition of the handbrake as follows. Having parked the car on a flat surface, activate the handbrake and engage neutral gear. Then get out of the car and try to push it. If the car does not move, the parking brake does not need any manipulation.
6 main parking brake problems
Basically, the problem with the parking brake is that it does not lock the car. In this case, the handbrake should be adjusted (tightened).
The second common malfunction of the parking brake is a non-lit or, conversely, constantly lit brake light.
https://www.youtube.com/watch?v=ZDgQo2otkpk
The causes of parking brake failure are:
- Worn rear pads. In this case, braking is accompanied by a grinding noise. It will not be possible to correct the situation by tightening the cable; you will have to change the pads, and on both wheels at once, since their wear will be the same.
- Incorrect parking brake adjustment. In this case, it is enough to tighten the loosened adjusting bolt.
- Cable jamming in the sheath. This malfunction can be encountered on five-year-old cars and older cars. The cause of the wedge is that moisture gets into the space between the sheath and the cable itself, and the resulting rust causes the cable to jam. There are two ways to fix a parking brake malfunction - by lubricating and developing the cable, or by replacing it with a new one.
- A cable break, which can occur either near the handle itself or under the machine. The problem can be solved by replacing the cable.
- Ice, salt, and reagents getting on the surface of the pads. This malfunction is quite rare and can occur if you drive through deep puddles. The pads are cleared of deposits by lightly pressing the brake pedal while driving short distances.
- Oil or brake fluid gets on the pads. Such a malfunction of the parking brake may be caused by a leak in the working cylinder, for example, the rear axle shaft oil seal. To solve the problem, first of all, eliminate the cause of the leak, and only then clean the pads through several braking cycles. In case of heavy contamination, it is necessary to replace the pads, since there is a possibility that the linings will become completely oiled.
If you cannot determine the cause of the parking brake malfunction yourself, you need to contact a service center. A technician may need to remove the rear wheels and check the condition of the drums. However, if the handbrake fails, it will not require large investments in repairs, since this does not involve the main components and parts of the braking system.
Source: https://www.autocitroen.ru/company/news/neispravnost-stoyanochnogo-tormoza/
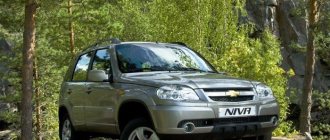
How to tighten or replace the handbrake on a Chevrolet Niva
As on any other car, the Chevrolet Niva parking brake is an integral part of the braking system. Its purpose is to prevent spontaneous movement of the vehicle during parking or temporary parking with the engine running. But the handbrake can also replace the main brake system in the event of its failure, which allows you to safely get to the repair site. You have to use the handbrake quite often, so its cable and brake pads are subject to intense wear. As a result, car owners over time have to take measures to adjust the system or replace its individual parts. While some people turn to a car repair shop for this, others prefer to carry out repair work themselves. If you belong to the second category of car enthusiasts and would like to know how to tighten or replace the handbrake on a Chevrolet Niva, then the material in this article will be useful for you.
The design of the Chevrolet Niva parking brake differs little from similar systems in other passenger cars
The design of the parking brake of a Chevrolet Niva is quite simple and is not much different from similar systems in other passenger vehicles. It consists of the following main parts:
- Handbrake lever - serves to transmit the force of the human hand to the actuator, which, in turn, acts on the brake pads to lock the rear wheels.
- The handbrake cable is a carbide, specially manufactured steel wire that runs under the bottom of the vehicle and operates the brake pads on the rear wheels.
- Brake pads are the final elements of the brake system, made of friction materials. By pressing against the brake drum or disc, they immobilize the wheel.
The manual braking system also includes such functional elements as a spacer sleeve, a brake pad drive lever, a spring, a protective sheath for the rear cable, a cover for the front handbrake cable, and a ratchet mechanism for the lever.
The handbrake system contains many structural elements
How to check and adjust the tension of the handbrake cable
If the parking brake is able to hold the car stationary on a 25% slope, then it is doing its job as expected. If you pull the handbrake lever seven ratchet clicks or more, but the car still rolls, the conclusion is the following: the handbrake system is not working effectively. In such a situation, adjustment of the Chevrolet Niva hand brake is required. This type of repair is simple, performed relatively quickly and does not require the use of special equipment. All you need for work are two keys “12”, pliers and a jack if it is not possible to put the car on the inspection hole.
If you were still not familiar with the structure of the brake system and have never encountered the need to repair the Niva hand brake, this is not a reason to contact service station specialists. Being careful and patient, you can do everything yourself, and the instructions below will provide information on how to tighten the handbrake on a Chevrolet Niva:
To work, you need to put the Chevrolet Niva on the inspection hole
- First, check whether the handbrake really does not hold the car on the road at a slope of 25%. To do this, place the vehicle on an overpass or find a suitable section of road. If the problem occurs, then we proceed to adjustment.
- Setting the optimal parking brake cable tension is done under the car, so it is better to place it above the inspection hole. If this is not possible, use a lift or jack. In any case, the rear of the car must be raised.
- When the vehicle is ready for use, secure it and release the handbrake lever.
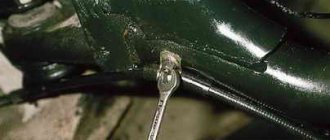
- Next, using a wrench, loosen the lock nut on the handbrake adjusting rod, then use a second identical wrench to tighten the adjusting nut until the cable is properly tensioned. By the way, pliers are needed to keep the rod from turning during the adjustment process.
- Now tighten the locknut and make a full stroke first to the working position, and then lower it. After this, spin each rear wheel by hand. The rotation must be uniform, jerking is not allowed. If any are felt, adjusting the Chevrolet Niva handbrake requires repeating.
And the last stage is a handbrake test in road conditions. That is, you need to carry out a standard check of the parking brake's effectiveness, as described in the first paragraph of the manual.
After assembly, the handbrake must be tested in road conditions.
How to replace the handbrake cable
Sometimes adjusting the handbrake does not bring the desired result due to the fact that the rear cable is overstretched. In this case, the only way out of the situation is to replace the Chevrolet Niva hand brake cable. In addition, the cable will have to be replaced if it regularly jams in the protective sheath or breaks due to wear. If during an external inspection you notice that the cable is damaged, replace it immediately - do not risk your own safety. You will find out how to replace the cable below:
- To carry out the replacement, the rear of the vehicle must be in a hanging position. Therefore, lift it using a lift or jack and remove the brake drums from the rear wheels.
- Using a “12” wrench, loosen the locknut on the adjusting rod and completely unscrew it together with the adjusting nut. You must first remove the spring from the rod, as it will not allow you to unscrew the nuts.
- After this, you can easily remove the cable equalizer and remove the cable itself from it.
- Next, by pulling the cable towards you, remove the ends of the shell from the brackets located on the left and right on the bottom of the body.
- Using manual force, remove the right and left branches of the cable from the rear axle beam brackets.
- Using a wrench, unscrew the bolts securing the holders to the brake flaps.
- Now, having disconnected the cable ends from the brake pad drive levers, pull it to remove it from the hole in the brake shield.
After dismantling, install a new Niva rear hand brake cable. To do this, also use these instructions, but perform all the steps in reverse order. And with this, the replacement of the Chevrolet Niva handbrake cable is completed, and finally, do not forget to adjust the degree of its tension. It is also important to lubricate the adjusting threads on the rod upon completion of the repair work to avoid problems with unscrewing the nuts during the next adjustment or replacement.
carextra.ru
How to replace the handbrake cable
Sometimes adjusting the handbrake does not bring the desired result due to the fact that the rear cable is overstretched. In this case, the only way out of the situation is to replace the Chevrolet Niva hand brake cable. In addition, the cable will have to be replaced if it regularly jams in the protective sheath or breaks due to wear. If during an external inspection you notice that the cable is damaged, replace it immediately - do not risk your own safety. You will find out how to replace the cable below:
After dismantling, install a new Niva rear hand brake cable. To do this, also use these instructions, but perform all the steps in reverse order. And with this, the replacement of the Chevrolet Niva handbrake cable is completed, and finally, do not forget to adjust the degree of its tension. It is also important to lubricate the adjusting threads on the rod upon completion of the repair work to avoid problems with unscrewing the nuts during the next adjustment or replacement.
Why didn't the handbrake work? — Chevrolet Niva, 1.7 l., 2012 on DRIVE2
Everyone knows what a handbrake is. does it work for everyone? pulled it up several times. the nut has reached the end of the thread. put a bushing under the nut. I pulled myself up until the thread ended again. The poor thing’s handbrake worked, as they say, “with all its might.” ran almost 50,000. 2 years old car. According to all parameters, the pads should run out. I bought some and on the “warm” (2-4 degrees in the mornings) May days I decided to restore justice. but disassembly revealed strange things. The pistons of the brake cylinders are pushed to the limit, the pads and drum are almost zero if you do not pay attention to small scratches on the surfaces.
Here's a comparison of new and used pads. measuring the thickness of the pads with a caliper showed 6.7 mm new, 6.5 used. There is no point in changing an awl for soap. Apparently our domestic auto industry has decided to turn on metal saving mode again. a couple of millimeters here, a few grams there, but on a national scale it’s enough for someone to buy a villa in Nice. There is no point in installing new ones. they will not reach the drum. it was decided to weld the missing metal onto the pads. why this decision? Well, maybe it’s just that the pads are really defective. if you weld metal onto the seats, there is a danger that the next “normal” ones will not fit into the drum. And I didn’t want to frighten the electronics with welding on the body.
I also added metal to the release lever. I was afraid to touch the spacer bar for the same reasons. The result was such a not very beautiful product. but this does not affect the speed. and the non-marketable appearance will be hidden inside. so no one will laugh.
Issue price: 0 ₽ Mileage: 46,000 km
www.drive2.ru
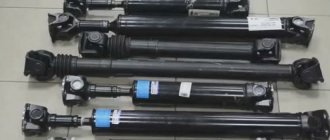
Replacing parking brake cables — Chevrolet Niva, 1.7 l., 2012 on DRIVE2
The parking brake required attention from the moment of purchase; at the very least it worked only in the extreme position and on a horizontal surface. As a result, at one moment, when raising the lever, something went crazy and I was left without a handbrake at all. And since I use a car with LPG and autostart all year round, so that the engine has time to warm up and switch to gas by the time I get into the car, I had to not put off repairs for a long time. I didn’t figure out which cable broke, but bought both of them at once. I didn’t go to the service center, I thought that to replace the front cable I would need to remove the tunnel between the seats, and I didn’t want to trust the mechanics to disassemble and especially put back the interior plastic. And you can’t forget your skills, I changed them myself.
Full size
We put the car on stumps using a GAZel jack
Full size
We climbed under the car and immediately saw the reason, the cable braid rubbed against the rear axle rod, and water and dirt did their job, the cable became oxide and rotted
Full size
We remove the wheels, drums and do not forget to clean the drum seat to the hub from dirt and rust, in order to avoid wheel runout later.
Full size
We disconnect the cable
Full size
We unscrew the bolts securing the cable to the brake shield, remove the brake pads and old cables
Full size
The rear cable has a right and left side, I didn't pay attention to it at first
Full size
We drag new cables without fixing them into the seats on the bridge, we will do this before the final adjustment
Full size
On ShN restyling, to replace the front cable, simply remove the cup holders on the tunnel and unscrew the parking brake lever
Full size
Remove the clamp and the front cable is freed
Full size
I took it out from the bottom
Good luck on the roads. Let's move on.
www.drive2.ru
Parking brake, handbrake
- Go to page:
Re: Parking brake, handbrake
Post by Mir » Jan 26, 2014, 01:16
Re: Parking brake, handbrake
Post by FAUST » 26 Jan 2014, 01:32
Re: Parking brake, handbrake
Post by Captain » 26 Jan 2014, 03:14
Re: Parking brake, handbrake
Post by Anton773 » Jan 26, 2014, 08:47
Yesterday I plugged in the reanimated rear handbrake cable, with lubricant and seven-story outside it was -13, everything worked, I had to wash it in gasoline first, but there was nowhere
today -20, works fine
Handbrake+ — Chevrolet Niva, 1.7 l., 2010 on DRIVE2
I rarely use the handbrake, our terrain is flat, but in winter there is too much salt on the roads and all these factors influenced the fact that the cable itself turned sour in the braid.
After releasing the parking brake, the cable refused to return to its original position, and when it came time to remove the drum, it could not be done. The drum was clamped with blocks and it was impossible to whistle them even through the viewing windows. I bought a new cable, cut off the old one, replaced everything and lubricated it. because I still have a small cable stretched - to the handbrake, or the pad distributing plate is worn out, in order to fully tension the cable I had to put bushings.
And so that the thread for adjusting the cable tension does not rust or become clogged with dirt, I made a protective cover from a bush of the cooling system pipe.
And I would also like to say about the rear brakes and brakes in general. No matter what they say, the brakes, even if they have a drum at the back, and a small, non-ventilated brake disc at the front, are quite effective, but under the CONDITION OF THE REAR PADS SUPPLIED (the handbrake is pulled up to 4-6 clicks). Brake pedal travel is reduced, efficiency increases! So make sure that the cable is tight and there are no distortions.
About the air conditioner, which I decided to turn on and it didn’t blow cold. I decided to fill it up - they connected a bunch of equipment, a cylinder with refrigerant, they said turn it on, like it would suck, pressed the button and tortured me for a long time without results, they pointed to the direct line, they said to replace the compressor, they took 500 rubles and I left. When I found out how much the part cost, I was shocked and decided to even remove this condo for the hell of it. But after a few days, having understood everything and engaged in self-diagnosis, I assumed that this was a scam for money, or an amateur. I found out that the brains do not give the go-ahead to turn on the clutch and one of these reasons was insufficient coolant pressure in the tube. I made a bet of 1.5k and tried to fill it up again, this time in a different place, or rather, we drove up to the house, connected the cylinder standing on the scales and immediately everything worked! For those who have cars with air conditioning, we have the fuse and clutch engagement switch located to the left of the radio (remove the shield at the driver’s right foot). The moral is - “Trust, but verify”, guys, have your head on your shoulders, don’t let them scam you!
And finally, this spring's trend is installing the missing rear door pockets.
Result: -250r - handbrake cable -500r -false diagnosis of air conditioner -1500r - refilling the air conditioner -500r -set of door pockets
www.drive2.ru
Lada 4×4 3D “Niva 022” › Logbook › Replacement of rear pads and handbrake (parking brake lever)
About a week and a half ago, we noticed that when braking the car was pulling to the left and the brake pads on the rear right began to creak. I got tired of this creaking, it was very infuriating when you were driving in a traffic jam at extremely low speed and creaking like a UAZ, and I noticed that after the road the rear right drum was hot and the left one was cold, the boiling point was reached and I decided to work on the brakes. I bought a service brake cylinder, because I remembered that last summer they could not bleed the brake cylinder on the right (due to the fact that the bleeder fitting was stuck and the edges were torn off), and there were also completely new brake pads lying around that were bought last summer. Unfortunately, we don’t have a garage, and I didn’t want to lie in puddles in the snow, so I made myself a “pedestal” from plastic pallets)
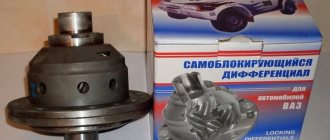
After that, I removed the drums from both sides and noticed that a star came to the right of the cylinder. One of the pistons was stuck in a disengaged state, the brake cylinder was replaced, the system was bled and new pads were installed. The time has come to tighten the handbrake... I think that all the drivers will agree that tightening the handbrake is a hemorrhoid... so I cheated a little. I took this crap for tensioning cables (M8)
and two clamps (M10)
I bent the cable that comes directly from the parking brake lever itself twice and tightened the clamps. This is what happened:
Now tightening the handbrake has become much faster and more convenient, almost by hand. Having tightened the whole thing, I went to check how it holds on the hill and if I raise the handbrake while driving. As a result: it holds up well on the hill, I decided to pull the handbrake while driving and felt a sharp break... I called to my service station) and saw this picture...
It turns out that the parking brake lever could not stand it and burst in the place where the short cable is attached, here
Well, the next day, having bought a new handbrake, I continued... By the way, before that I bought this lever about a month ago (as the old ratchet mechanism was broken) for 300 and a penny rubles, the quality was not very good, I think it will do. This time I bought a factory one in a trusted store for 520 rubles. The quality is fundamentally different, they also gave a 6-month guarantee. Having installed the new lever, I climb under the car and tighten the cable. Then I climb into the car to check how many clicks there are and again it breaks... I think it can’t be! new handbrake... but no, the cable tensioner gave in and the threads were stripped. It’s okay, there are three more of these in stock, but this time M10)
looks much stronger than the previous one) I installed it and adjusted it. I took it for a ride - everything was great! holds perfectly (4 clicks). In all the time the Niva has been maintained, there has never been such a gorgeous handbrake)
Source
How to tighten or replace the handbrake on a Chevrolet Niva
Niva Chevrolet Author: admin
By pressing against the brake drum or disc, they immobilize the wheel.
I tighten the handbrake of Chevrolet Niva 4x4 Chevrolet Niva 2016
This type of repair is simple, performed relatively quickly and does not require the use of special equipment. Release the handbrake and check that the rear wheels rotate freely.
Replacing the fuel filter on a Chevrolet Niva - Duration: Garage. Niva. Here's the handbrake! -...
By rotating the adjusting nuts equally, ensure that the pads barely touch the drums and that the wheels rotate with the same resistance. The handbrake consists of a lever, which is about 15 cm long, and covered mainly with decorative materials.
In such a situation, adjustment of the Chevrolet Niva hand brake is required. After dismantling, install a new Niva rear hand brake cable.
If the lever can be raised above eight, then adjust the handbrake cable as described below.
Remove the handbrake boot. On some vehicles, access to the handbrake mechanism may require removing the center section of the tray.
Loosen one bolt on each rear wheel. Raise the car and place it on stands. Remove each loosened bolt.
Using a flashlight, turn the wheel until you see the adjuster gear in the bolt hole.
Rotate the adjuster wheel clockwise or counterclockwise to spread the brake shoes until they touch the brake drum. Move the pads back so that the wheels rotate freely 3 or 4 teeth on the adjuster.
Warning If the adjuster gear is difficult to turn, remove the wheels and brake disc, then lubricate the adjuster and repeat the adjustment. In the case when you pull the handbrake lever towards you for seven clicks of the ratchet mechanism or more, but the car still rolls, the conclusion is as follows: In such a situation, adjustment of the Chevrolet Niva handbrake is required.
This type of repair is simple, performed relatively quickly and does not require the use of special equipment. If you were still not familiar with the structure of the brake system and have never encountered the need to repair the Niva hand brake, this is not a reason to contact service station specialists. Being careful and patient, you can do everything yourself, and the instructions below will provide information on how to tighten the handbrake on a Chevrolet Niva: To do this, place the vehicle on an overpass or find a suitable section of the road.
10.11. Adjusting the hand brake
If the problem occurs, then we proceed to adjustment. Setting the optimal parking brake cable tension is done under the car, so it is better to place it above the inspection hole.
Chevrolet Niva replacing rear brake pads
If this is not possible, use a lift or jack. In any case, the rear of the car must be raised. When the vehicle is ready for use, secure it and release the handbrake lever.
Next, using a wrench, loosen the lock nut on the handbrake adjusting rod, then use a second identical wrench to tighten the adjusting nut until the cable is properly tensioned.
By the way, pliers are needed to keep the rod from turning during the adjustment process. Now tighten the locknut and make a full stroke first to the working position, and then lower it. After this, spin each rear wheel by hand. The rotation must be uniform, jerking is not allowed. The length of the cable on Niva is approximately 2 meters. And it is located under the bottom of the car, sometimes hidden in a rubber or plastic shell.
Brake pads are an arc backing with a special layer of friction plate that is pressed against the wheel rim, thereby blocking the wheel. Such pads are placed under the wheel rim and are hermetically sealed to prevent the entry of dust, dirt or moisture, which will lead to disruption of the handbrake and damage to its elements.
iaarus.ru
Description of the Chevrolet Niva handbrake
The parking brake in a Chevrolet Niva, as in other cars, is an important component of the braking system. Frequent use of the handbrake leads to wear on the cable and brake pads. Therefore, over time, it is necessary to carry out repairs and replacements of worn-out parts of Chevrolet Niva parking brakes.
The parking brake serves for:
- Parking a car on slopes or slippery terrain.
- Temporary parking of a car, without turning off the engine.
- Additional braking.
- In case of failure of the main braking system.
The Chevrolet Niva parking brake has the same design as on all other car models. The design consists of the following parts that make up a single integral braking system for the rear wheels of the car:
- The handbrake is a lever that is activated by the efforts of a person’s hand, thereby bringing the rear wheels into a locked state. The handbrake consists of a lever, which is about 15 cm long, and covered mainly with decorative materials. The handbrake is located in the Chevrolet Niva (as in all cars) between the driver and passenger seats. It is activated by smoothly pulling the lever towards you. Return to the reverse position by pressing the button and smoothly move it down until it stops. The handbrake has from 3 to 7 squeeze (click) positions, it depends on the tension of the cable. The handbrake operates on the principle of a ratchet mechanism. If the brake cable is loose, the lever is tensioned up to 7 clicks.
- The tension cable is a special steel wire made from a special carbide material that operates the brake pads. The length of the cable on Niva is approximately 2 meters. And it is located under the bottom of the car, sometimes hidden in a rubber or plastic shell.
- Brake pads are an arc (backing) with a special layer (friction plate) that is pressed against the wheel rim, thereby blocking the wheel. Such pads are placed under the wheel rim and are hermetically sealed to prevent the entry of dust, dirt or moisture, which will lead to disruption of the handbrake and damage to its elements. Brake pads wear out quickly when the handbrake is used frequently while driving and require subsequent replacement.
Parking brake adjustment
Adjustment is carried out periodically or if a weakening of the tension cable is detected. It is not difficult to find out that the cable is loose; you will feel that the handbrake does not hold the car in various inclined planes. You can adjust the tension cable and, accordingly, the brake system itself by performing simple sequential steps. It is necessary to drive the car into the inspection hole, or you can do without it, but it will not be very convenient.
To do this, set the handbrake lever to its extreme position towards the floor. In this position of the handbrake, the rear wheels should rotate freely. After this, we lower ourselves into the inspection hole and begin adjusting the cable tension. It is necessary to first unscrew the lock nut with a thirteen wrench, and then begin to tighten the main adjusting nut, while counting the number of turns made.
Tighten the cable three to four turns of the nut, after which you need to squeeze the lever and check at what click the handbrake keeps the wheels stationary. The handbrake is considered normal when the wheels lock at the fifth click. Wheel locking is checked by trying to move the car. After the cable is adjusted, it is necessary to tighten the lock nut all the way to the main nut, and after this the hand parking brake can be considered working.
To be completely convincing, you need to drive up a 25-degree slope and put the car on the handbrake. On the fifth click, the handbrake performs its function - it keeps the car stationary.
Stages of dismantling the hand brake and replacing it
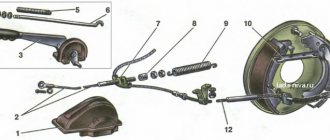
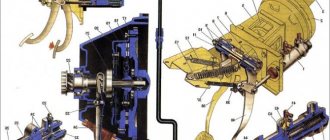
To do this, you need to place the car on a level surface, put it in gear and place chocks under the wheels. The rear wheels must be removed to get to the brake pads. Having reached the pads, it is necessary to disconnect both cables that are connected to the brake pad drive levers. Figure 1 shows the main components of the Chevrolet Niva parking brake.
https://www.youtube.com/watch?v=ZDgQo2otkpk
Figure 1. Parts of the Chevrolet Niva parking brake.
- The handbrake or lever that operates the brake system.
- A button on the end of the handbrake that helps release the car from the brake.
- Traction spring.
- Latch pull.
- The case in which the cable is located.
- Cable.
- A cable guide that goes directly to the brake pad.
- Spacer sleeve.
- Spring.
- Spacer bar.
- A lever that moves the pads into working position.
- Rear cable in a case.
To remove the handbrake elements and subsequently replace them, it is necessary to remove the ends of the cables, and the cables themselves 12, which fit directly to the pads. The lever is removed along with the front cable and all elements. The front cable is pulled out of the lever and replaced with a new one. In the reverse order of removal, all elements of the parking brake are assembled. Replacement is made only of elements or parts that have failed.
During assembly, it is recommended to lubricate the cables and guides together with the bushing with Litol-type lubricants. This is necessary to reduce the likelihood of corrosion.
Replacing the handbrake — Chevrolet Niva, 1.8 l., 2007 on DRIVE2
Today I got around to replacing the handbrake cable, which should have been done a year and a half or two ago. I engaged comrade zzzzdoroviak to help in this event and got down to business. Kosher flyovers in cheerful colors helped a lot in this matter. 
During the process of disassembling the rear drums, a leak was discovered from the seals + a strange coating on the pads. Andryukha was sent to the nearest auto storage facility for oil seals and pads, and in the meantime I removed the pads and inserted a new parking brake cable into the drum. When Andryukha returned with spare parts, I pulled off the axle shafts and changed the seals and pads.
One nut on the left axle shaft did not want to come off, and a special tool was made for it. With his help, she unscrewed easily and without constraint
But the trash started further. To change a short cable on a Chevy, unlike a short one, where the cable clings under the bottom, you need to disassemble the tunnel. This is exactly what Andryukha was doing while I was finishing the second side
Since the old cable had soured very thoroughly, I stupidly cut it off with a grinder.
And the event ended with group sex under the car . I couldn’t connect the short and long cables at the same time. I did n’t have enough hands. As a result of the event, rear brakes appeared. Apparently they haven't been around for at least a couple of years, because... Since the last removal of the drums a couple of years ago, the wear and appearance of the pads have not changed at all. While the drums were removed, the cylinders were checked. They look dirty, but they work. Additionally, we were convinced of this with the installed drums - when you press the brake, the rear wheels are blocked. Well, and most importantly, a normally working handbrake appeared. So now it will be possible to realize the long-standing desire to change the alarm system to a model with auto start
PS: as it turned out, on FAM a short cable from a Shevik and a long one from either a Shevik or from 2121 fit perfectly, although both the officials and the Mosnivites unanimously said that they have their own cables
www.drive2.ru
Replacing a short handbrake cable on a Chevrolet Niva
As I wrote earlier, slowly but surely, my handbrake cable was getting damaged, and the cable jacket was calloused. Finally, it got warmer outside from -25 to -3, and it was stupid to miss the last days of vacation.
I didn’t think that you might not find spare parts in stock for a Russian-made car, but ShNG is a different story. I drove around all the shops in the city, and everywhere I say that I have one cable like on 2106 or 2121, they stare at me and either snub 2 cables, or try to sell me from 21 Niva. Somehow I managed to find the required cable from catalogs in the store and order it. The factory DAAZ arrived, with notes that for 2123 and when compared with Tos 2121 it turned out to be 5 cm longer, and the shirts were about 2 cm longer.
A week ago, I poured motor oil into the cable jacket and hung it so that it spread along the entire length. On the third day, it started dripping from the second end of the shirts, which means everything was lubricated as it should. Now the cable will not freeze if water gets inside, and it will not rot either. I also cut the springs on the cables, an old technique worked on the nine and six, why not do it on the field.
How to repair the handbrake on a Chevrolet Niva
Page 1 of 2
The mechanically actuated parking brake system acts on the brake mechanisms of the rear wheels.
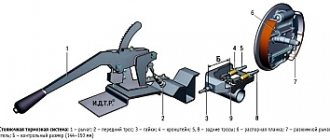
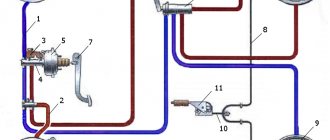
The parking brake is mechanically driven from lever 1 (Fig. 1).
The middle part of the rear cable passes through the groove of guide 7, the tension of which is adjusted with a nut screwed onto the threaded end of the front cable.
A spacer sleeve 8 is installed between the guide 7 and the adjusting nut.
At the rear ends of the cable there are tips, each of which is connected to the hook of the lever 11 for the manual drive of the shoes.
This lever is pivotally attached to the brake shoe with a finger and its upper part rests against the groove of the spacer bar 10.
The rib of the brake pad is installed in the opposite groove of the bar.
Replacing the rear parking brake cable
Replace the rear cable if it is excessively stretched (impossibility of adjusting the parking brake), mechanical damage and loss of mobility in the sheath.
You will need: keys “8”, “13” (two), cobra pliers, pliers.
1. Remove the brake drum (see “How to repair the rear brake of a Niva Chevrolet”).
2. Loosen the locknut on the front cable end.
3. While holding the tip from turning with pliers, unscrew the locknut and adjusting nut to the end of the tip.
4. Remove the spring.
5. While holding the tip from turning, remove the lock nut, adjusting nut and spacer from the tip
6. Remove the guide from the end and disconnect it from the cable
7. Take the cable out of the rear axle beam bracket and...
8. ...from the hole in the body bracket.
9. Remove the two bolts securing the cable sheath holder to the brake shield.
10. Disconnect the end of the parking brake cable from the drive lever
11. Pull the cable out of the hole in the brake shield.
autoruk.ru
Chevrolet Niva | Replacing the rear parking brake cable
Replace the rear parking brake cable if it is excessively stretched (impossibility of adjusting the parking brake), or if there is mechanical damage to the cable strands or its sheath.
Each brake mechanism of the rear wheels is driven by a separate cable. Removal and installation of the left cable are shown. The right cable is removed and installed in the same way.
You will need: a wrench and a 10mm socket head, a flat blade screwdriver, and pliers.
1. Loosen the tension of the drive cables by unscrewing the adjusting nut to the very end of the threaded end of the front cable (see paragraphs 1 and 2 “Replacing the front parking brake cable”), but without removing the nut completely.
2. Disconnect the end of the rear drive cable from the equalizer by moving it out of the equalizer slot.
3. After unscrewing the fastening nuts, remove the cable support bracket on the fuel tank shield...