Repair of trunk lining on Kalina.
Owners of a Lada Kalina car occasionally have to deal with such a problem as a breakdown of the plastic trunk lining. The most common causes of such failure are poorly thought out design of the part fastening and poor quality of plastic in the fastening area.
This most often affects station wagons and hatchbacks, where the massive door requires a little more effort when opening. For this reason, it has to be replaced or repaired. How to do this correctly will be discussed in the article presented to your attention.
Tools you will need for the job
In order to replace the plastic trunk lining of a Lada Kalina car, you will need the following tools:
- Ratchet
- crosshead screwdriver
- Flat head screwdriver
- extension
- open-end wrench
- head for 8
Removing and installing the plastic lining of a Lada Kalina vehicle
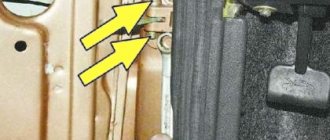
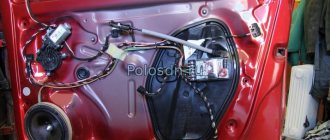
The first step is to remove the trim on the lid by unscrewing the door closing handle.
Then unscrew the two nuts that secure the plastic trim on the sides of the car trunk. This is done with the help of a ratchet, onto which an extension is attached, as well as a head of 8. Only after this it will be possible to begin fastening according to class=”aligncenter” width=”960″ height=”439″[/img]
The lining must be removed along with the lock cylinder. Next, remove the trim from the trunk lid of a Lada Kalina car. To do this, just slightly pull it towards you from the outside. The next step will be to disconnect the power plugs from the lampshades that illuminate the license plate of the Lada Kalina car. For this purpose, you will need to pull up a little a special plastic hook, which acts as a latch.
In order to remove the elements that illuminate the number, you will need to pry it from the outside using a flat-head screwdriver, and from the inside, slightly press the latch on the right. After this, the lampshade should pop out on its own, that is, without any extra effort on your part. After this, you can change the plastic trunk lining of a car of this brand, unless, of course, it is absolutely beyond repair.
If the lining has come off from the fastenings, then do not rush to change it. There is an easy way to repair it.
The fact is that the fastening of the bolts is not very successful and with some effort they simply jump out of their places, crushing the plastic.
For repairs, you need to purchase bolts slightly longer than standard ones, as well as four square washers.
Drill a through hole, as in the photo.
Insert the bolts and washers and screw the cover into place.
You don't have to buy new bolts, but use old ones. Their length is quite enough to attach the pad in this way.
How to install the activator
The only way for the viburnum to get into the trunk is to turn the key and press the button. Naturally, doing this is not always convenient. Weather, busy hands and other troubles contribute. At this stage, many car enthusiasts begin to think about the trunk activator. It is quite possible to do this, you just need to try a little.
The Kalina station wagon trunk lock activator is easy to install. It is enough to take a self-drilling screw and secure it on one side with it and on the other with a wire holder. To check the device, you need to connect it to the standard connector.
The only problem in all this work may be the back door being picked up at the wrong time. After the current stops supplying the activator, it closes with the first latch, but the trunk is not completely closed. In order to get into the so-called fifth door, you will have to use the key again.
A lock with a button is not difficult. But during work it is necessary to assemble the circuit and stretch the wires. In this case, one programmable alarm channel (additional) should be used.
There are two main connection options. First: the button goes to +12 on the activator, bypassing the relay. The advantage of this connection is its simplicity and the absence of unnecessary elements, the disadvantage is the need to run additional wires.
Installing the activator using the second method is more labor-intensive. You will have to use additional elements, namely diodes. In addition, there is a need to search for “mass”. The main advantage is the use of a minimum number of wires.
Many experts prefer the first option due to its simplicity. The wire can be copper PV-3 with a square cross-section. It must be pulled along the left side and thresholds. The switching can be crimping and electrical tape on top.
A standard pink-red wire is used to control the activator. It must be connected to the relay, wrapped and hidden under the BUS mounting frame. All operations are carried out with the negative battery terminal removed. This is how the electric trunk lock drive is mounted.
Soundproofing the trunk of Lada Kalina
If you are the owner of a VAZ 1117 car, then the question of trunk soundproofing has probably never arisen in your mind.
But if you have a VAZ 1118 or 1119, then soundproofing the Kalina trunk is simply necessary for a comfortable ride and spending time in the car. It’s worth saying right away what points you need to pay special attention to when installing sound insulation. The stages of the technological process for soundproofing the trunk in all cars, regardless of their model and type, are approximately similar. But in order for sound insulation to be carried out efficiently, each specific case should be approached individually.
ATTENTION! Now you can buy a completely new radio with a Pioneer AVH-3100DVD monitor for only 2990 rubles! Don't believe me? Then follow the link and see for yourself! Read more"
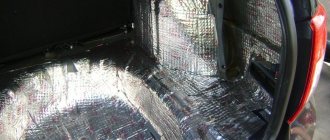
Soundproofing the trunk of a Kalina hatchback begins with removing the trim inside the trunk itself. In addition, the side and center shelves must be removed. The trunk roof trim is also removed. After this, you should thoroughly wipe the entire working area, for example, with White Spirit, degreasing and cleaning the surface from dust and excess debris.
The most optimal and simplest option for installing sound insulation is considered to be the option in which sound insulation is made using layers. Soundproofing Kalina with your own hands of this type will take you no more than 10 hours of work. The necessary materials will be the following:
- Vibration-absorbing sheets – 8-9 pieces;
- Splen sheets – 2 pieces;
- Modelin - 1 m 2;
- Bitoplast – 1 m2.
How to remove the trunk trim of a Kalina hatchback
This page will discuss the process of removing and installing the tailgate of cars 2192 and 2194.
If you purchase a replacement door, keep in mind that it will need to be painted to match the body color. This must be done in advance, because... Painting an already installed door on a car is problematic.
We prepare the car as usual - turn off the power and ensure its immobility.
Removing the tailgate on a station wagon
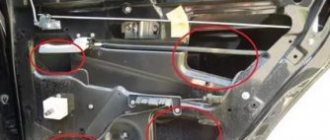
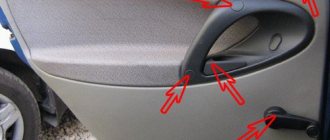
Use the button or key to open the tailgate. First, we dismantle the upholstery. To do this, remove the inner handle by unscrewing two screws (2) and remove the six clamps for its fastening (3).
Next, disconnect the rod (4), unscrew the two fastening nuts (1) and remove the lock drive. Unscrew the two bolts securing the lock (7) and remove it. Disconnect the wiring harness block. Then unscrew the four nuts securing the license plate light trim (5) and disconnect the tailgate wiring harness block.
Now let's move on to the outside of the door. To do this, lower the trunk lid. Lift the cap of the nut securing the windshield wiper arm (2), unscrew this nut (3) and remove the arm (1). Now unscrew the three nuts (2, in the previous photo) securing the windshield wiper and remove it.
Next, returning to the first photo, unscrew on each side two bolts securing the tailgate (4) to the movable hinge links. With an assistant, remove the door.
Removing the tailgate on a Hatchback
On the Kalina-2 hatchback, removing and installing the trunk lid is done in a similar way.
Installation is in the reverse order. At the same time, do not forget to lubricate all rubbing parts with lubricant (LSTS-15). Before final tightening of the fastening bolts, we check the uniformity of the gaps between the door and the body, as well as the operation of the lock. Adjust them if necessary.
If you are the owner of a VAZ 1117 car, then the question of trunk soundproofing has probably never arisen in your mind. But if you have a VAZ 1118 or 1119, then soundproofing the Kalina trunk is simply necessary for a comfortable ride and spending time in the car. It’s worth saying right away what points you need to pay special attention to when installing sound insulation.
The stages of the technological process for soundproofing the trunk in all cars, regardless of their model and type, are approximately similar. But in order for sound insulation to be carried out efficiently, each specific case should be approached individually.
ATTENTION! A completely simple way to reduce fuel consumption has been found! Don't believe me? An auto mechanic with 15 years of experience also didn’t believe it until he tried it. And now he saves 35,000 rubles a year on gasoline! Read more"
Soundproofing the trunk of a Kalina hatchback begins with removing the trim inside the trunk itself. In addition, the side and center shelves must be removed. The trunk roof trim is also removed. After this, you should thoroughly wipe the entire working area, for example, with White Spirit, degreasing and cleaning the surface from dust and excess debris.
The most optimal and simplest option for installing sound insulation is considered to be the option in which sound insulation is made using layers. Soundproofing Kalina with your own hands of this type will take you no more than 10 hours of work. The necessary materials will be the following:
- Vibration-absorbing sheets – 8-9 pieces;
- Splen sheets – 2 pieces;
- Modelin - 1 m 2;
- Bitoplast – 1 m2.
First vibration-isolating layer
Following the standard trunk noise insulation scheme, the first layer means covering the surface inside the trunk with vibration material. The highest quality vibration-absorbing materials are considered to be materials from STP and Shumoff.
First, you need to cut several sheets of a certain size and shape from a single sheet of vibration-isolating material, and then slightly warm up the bitumen side using a technical hair dryer.
Then the heated sheets of vibromaterial are carefully laid on the cleaned and degreased trunk frame and carefully rolled out with a hard roller made of iron or plastic.
After the first sheets fill most of the trunk area, the next sheets of vibration material should be prepared in the same way. They must be overlapped.
As a result of the manipulations performed, the metal surface of the body should be covered by 55-100%, depending on the material used.
Second soundproofing layer
The second layer of sound insulation is designed to suppress unnecessary sounds and retain heat, depending on the material used. The basic principle of operation at this stage is to glue sound-absorbing Accent and heat-insulating Splen on top of the vibration-insulating material. Both materials have a self-adhesive base, so their installation does not require significant effort and special knowledge in the field of sound insulation.
It is necessary to cover the surface with soundproofing material 100%. The only exceptions are technological openings, namely ventilation openings. Only in this case will it be possible to achieve the greatest effect.
The final stage of soundproofing the trunk
In order for the soundproofing of the trunk to be most effective, at the final stage of the technological process it is also necessary to soundproof the plastic in the trunk. Following the algorithm described above, the trunk roof lining is made heavier, which is subsequently covered with bitoplast. Then all wiring is wrapped in Anti-creak. And to avoid unnecessary squeaks, the side shelves and plastic linings of the window mullions are also glued with modelin.
Do not forget that sound insulation of Kalina will be effective only if sound insulation was carried out not in one of the components of the car, but in the entire car as a whole. If you soundproof one trunk, you will certainly notice a certain difference. But things will be completely different if your iron “horse” is soundproofed in all parts of the car.
Sound insulation of the trunk Kalina 2 (VAZ 2192, 2194)
Car soundproofing technology is the same for all brands and types of cars, however, specific cases have their own characteristics. In the case of the Lada Kalina 2, the whole process begins with removing the trunk trim and tailgate trim, which does not cause difficulties. Next, the entire surface should be cleaned and degreased with White Spirit.
The first layer of trunk sound insulation is vibration isolation material. It is recommended to start installing sound insulation from the rear arches; it is through them that the main noise from the road is transmitted. To soundproof arches, it is recommended to use material with the highest vibration absorption coefficient, for example, 'Bimast Bomb'. We cut sheets of a suitable size (the larger the pieces, the better), and heat the bitumen side with a hairdryer. We apply the material to the cleaned metal of the body and roll it out with a hard (plastic/iron) roller. We glue the next sheet of vibration isolator overlapping or at the joint. After this, we move on to soundproofing the horizontal surface of the trunk, paying special attention to the part where the muffler resonator passes (for Lada Kalina 2 this is the left side).
The second layer is sound-absorbing material. Most often, due to its availability and low price, SPLEN (a largely thermal insulating material) is used, but we recommend that you use an accent. Both materials have a self-adhesive base, so their installation will require significantly less time. We glue 100% of the surface, joint to joint. The only exceptions are technological openings (openings for interior ventilation).
The trunk lid of Kalina 2 must also be soundproofed. Unlike the trunk, you should use a lighter material for vibration isolation, for example, StP Aero. We glue the material between the stiffeners. We set the accent on top in the same way.
Fighting squeaks and crickets. It is worth paying special attention to the sound insulation of the rear shelf. To prevent it from making squeaks, you should stick an anti-squeak (modelin) on all rubbing surfaces, for example, the attachment points of the trunk shelf, the fifth door trim, etc. The soundproofing of the trunk of the Kalina 2 hatchback is completed, we carry out the assembly in the reverse order. The station wagon trunk is treated in a similar way.
one working day to soundproof the trunk
- On the trunk shvi there are 8 sheets of 'Bimast Bomb' (0.53*0.75m) and 2 accent sheets (1.0x0.75m)
- On the trunk lid there are 2 sheets of Vibroplast and 1 sheet of accent.
The effect of sound insulation is significant; firstly, the exhaust pipe becomes less audible. Secondly, it became almost inaudible how the rear suspension worked. And also, if you have tuned the trunk of Kalina and installed a subwoofer there, then soundproofing the trunk is required!
Remember that the best sound insulation is when a set of works has been carried out aimed not only at insulating from external noise (noise from wheels, wind, etc.), but also eliminating creaks and crickets inside the car.
Electric drive: easy installation option
The technique is simple, the only thing needed is to make a rotating plate and a rod for it yourself. The wiring should be routed to the electric lock and connected to a special control unit. When disarming the car, the electric trunk lock will be activated after the fifth door opening button is unlocked.
The entire installation task is based on connecting the electric lock to two wires. You can purchase the part at any auto store. The trunk end must be additionally hidden to prevent water from getting into it. Otherwise, it will periodically short out during rain.
An important attribute is the trunk hinges. Wires are often broken in this place, so their condition must be carefully monitored.
Before installing the electric drive, the trunk lid trim is removed. The main thing is not to damage it during this process. It is recommended to choose a lock that will not need to be modified during operation.
An important step in the installation process is wiring; you can use those wires that are standardly suitable for the fifth door of the car.
Power is taken from the cigarette lighter. An important point is the installation of a protective fuse. The wire is laid along the threshold; it will take approximately 3.5 meters. Then the installation takes place.
It is advisable to choose an option that does not require drilling additional holes. The procedure consists of connecting the wires according to the diagram. Important: you can use the wire that goes to the trunk light.
Installing an electric drive is not difficult, but for the first time it is a labor-intensive process. If difficulties arise, you can seek help from a service station.
Why is the door trim removed?
The technology of disassembling and replacing a decorated panel was first used by VAZ specialists in 2008. The main problem with self-dismantling is the mobility of the door, which is why in this process you will need an assistant who will hold the structure. Removing the Kalina rear door trim is necessary when:
- It is necessary to get to the elements that are inside the door in order to dismantle the window lifters.
- You need to install music speakers that are mounted in door structures.
- The electric window lifts have broken down or the mechanism requires lubrication.
- Glass tinting or replacement is carried out.
- The cladding has lost its appearance due to long-term use of the vehicle. The panels are worn or have scratches.
- The driver wants to change and refresh the interior.
- Body work is carried out: rotten fragments are cut off and then welded.
- Anti-corrosion treatment is carried out.
- Car painting is provided.
- Vibration and sound insulation of the body part is carried out.
Any of these procedures requires removal of the trim. Without disassembling the inner panel, it will not be possible to replace the lining or gain access to the internal mechanisms of the door card.
Preparation for dismantling
Our instructions will help you understand how to remove the rear door trim on Kalina and determine the further algorithm of actions. Before this, dismantling is carried out. Required::
- slotted screwdriver;
- awl;
- flat screwdriver;
- sharp knife.
The door of the Lada Kalina Cross and other sedans is held on by plastic fasteners, so dismantling is prohibited at sub-zero temperatures. If there is a need to remove the casing in winter, then this should be done in a heated room to eliminate the risk of breaking the connecting clips. For the front door you will need 8 pieces, and for the rear door 10. Preparing for dismantling step by step:
- The handles are removed, the latches, which are designed to lock the door lock, are unscrewed.
- The speakers are unscrewed using a Phillips screwdriver. To do this, you need to unscrew the four bolts and then disconnect the wires.
- The blocker and acoustics are turned off. Sometimes the elements of the music system are attached to a metal frame.
After 5 years of operation, car fastenings become brittle, so it is better to purchase additional parts in advance.
The task is to remove the trim: front and rear doors of Kalina
Long-term use of the Lada Kalina contributes to wear and tear of the interior upholstery. Due to the design features of the rear door, passengers cannot enter/exit the car without touching the trim. Therefore, it takes on an unattractive appearance and needs to be replaced. To remove the Kalina door trim correctly, you need to study the nuances of doing the job.
Removing the rear door trim
Places for fastening the casing
The rear door trim is damaged in many Kalinas. In some cases, such defects can be easily eliminated without the need to remove it. In case of more serious damage, the upholstery is dismantled for restoration or complete renewal. Removal of the door trim is also carried out during repair work or replacement of elements located behind it. A similar procedure is necessary for installing speakers, repairing power windows, and laying soundproofing material.
To remove the rear door trim, you will need the following tools:
- curly screwdriver;
- flat screwdriver;
- 10 mm socket wrench.
The trim of any Lada Kalina is fixed with bolts and special plastic holders - clips. When dismantling (especially in winter), clips tend to break. It is recommended to purchase them before carrying out repair work.
According to the instructions, the technician must first remove the door lock locking latch. Using a flat-head screwdriver, press out and move the window mechanism lock to the side. After dismantling the device and socket, the lock is pulled back.
The next step is to unscrew the fastening screw and remove the handle. Use any sharp object to dismantle its 2 plugs. Using a Phillips screwdriver, unscrew the fixing screws and remove the handle. A slotted screwdriver is inserted between the cladding and the door. The clips located along the entire perimeter of the structure are snapped off one by one. The upholstery is removed from the Kalina door. Using a special diagram, you can find out how the pistons of this product are located.
Removal from passenger door
Once the music system is removed, you can begin the main part of the repair. You need to remove the door trim on Kalina in the passenger seat in a certain sequence:
- The decorative panel is removed. To do this, unscrew 8 clips and 2 screws. The inner handle is held on by two self-tapping screws.
- An awl is used to pry up the edge of the plug for removal. There are two of them, so you need to remove both.
- The opening mechanism is pulled back to remove the securing screw. After this, two screws are unscrewed from the inside of the handle. They are located opposite the cavity of the plastic pocket.
- One edge of the panel is pryed off; you can use a screwdriver to do this. When it becomes possible to grab the edge, all that remains is to pull the element towards you.
- The wires from the electric window lifter are disconnected, the block is removed.
To avoid scratching the panel with a screwdriver, wrap the tool in a soft cloth.
Removing the trim from the driver's door
The algorithm for disassembling the driver's door structure is similar, but there are some subtleties of this process:
- First, the plugs are removed from all fasteners. They are pryed off with a screwdriver.
- The panel plastic will be easier to remove if you first unscrew the fragment for adjusting the mirror structures. Unlike the passenger door, the driver's door has one screw. It is located under the plug.
- The opening mechanism is removed last.
- If your car is equipped with electric mirrors with remote control, then to remove the rear view adjustment panel you need to unscrew the screw located at the bottom.
Removing the rear door trim
The rear door structures are secured with 10 plastic holders and 2 screws. The first fasteners hold the door panel, and the second fasteners hold the handles. Disassembly technique:
- The handle of the mechanical window lifter is being removed. It is important to note that this element is held in place by a plastic half ring. It is carefully pryed up with an awl.
- The plugs on the door handle are removed, then the fasteners are unscrewed.
- The lower far corner of the panel is pulled back, and then the first piston is removed.
- Hold the door card with your hand and remove the remaining clips.
- The covering is changing.
There are differences between Kalina 1st and 2nd generation. In the first case, the opening handle lever is unscrewed, but in the second option this is not required, since it is screwed directly to the door.
How to disassemble the trunk lid on a hatchback and station wagon
To unscrew the fasteners on a station wagon or hatchback, remove the trim and disassemble the luggage compartment lid, you will need a standard set of tools. The rear hatch is held in place by 4 clips, 2 retainers and a metal tab with two brackets. Step-by-step algorithm of actions:
- The connectors for the power window buttons are disconnected.
- To remove the handle, two latches are unscrewed. They must first be unlocked.
- The latches are removed. To do this, the panel is pulled along the entire contour.
- After removing the staples, the trim around the locking mechanism is pulled out.
- The panel is detached from the glass side. This action is performed along the entire perimeter, moving towards the castle.
If you follow the instructions, the process of dismantling the upholstery takes no more than ten minutes. To return the door card to its place, you need to fix the clips, install the handles, and secure the plastic elements. At the end, the connectors are connected.
Removing the trunk (rear door) trim
If you have a Lada Kalina station wagon or hatchback, then this guide will be a clear example of how to remove the rear door trim (trunk lid) on your car. To do this you will need a Phillips and flathead screwdriver. This activity should not take you more than 5 minutes.
- So, first of all, open the trunk and unscrew the two bolts securing the plastic inner handle with a Phillips screwdriver with a thick blade. The figure below shows everything clearly:
- After this, we take a flat-head screwdriver and begin to remove the casing, and the next step in this work will be the removal of plastic parts - fasteners (pistons) that secure the entire casing in different places around the entire perimeter. It is more convenient to pry first, starting from any angle. And then we continue to remove these latches in a circle, prying each of them with a flat screwdriver and slightly pulling the casing towards ourselves.
- After all the latches are removed, carefully pry up the trim and remove it from the latches, which are located along the entire upper side, where the trunk lock is located.
- We remove the entire casing and put it aside, nothing else holds it. Now we have access to the windshield wiper motor, the rear door lock and the plastic trunk trim mount. Read about replacing the above parts in the following blog entries about repairing the Lada Kalina.
We remove the trim on the doors of the Lada Kalina - what is the complexity of the process?
The car door trim, officially called the door panel, is most often removed to access the window lift mechanism for repair or lubrication. Much less often, this operation is carried out to install speakers, install noise and vibration insulation, replace facing panels or perform body work. But in any case, sooner or later, almost every car owner has to dismantle the door trim. At the same time, many of them, without resorting to the services of a service station, do it themselves, since this operation is quite simple and can be done by most car enthusiasts.
Dismantling the rear and other door trim on the Lada Kalina
When removing the trim, the division into front and rear doors is not accidental. Although at first the process is identical for them, then some differences begin to appear.
What tools will you need?
To unscrew the fasteners and remove the door trim, simple tools are required in the form of:
- Phillips screwdriver;
- flat and long screwdriver;
- sharp awl.
Step-by-step description of the process
The first three stages are similar for both front and rear doors:
- Use your fingers to unscrew and remove the latch that locks the door lock from the inside.
- Using a Phillips screwdriver, you need to unscrew the 4 screws that secure the audio speaker.
- Then it should be removed and the wires disconnected from it.
To dismantle the trim on the front right door, it is necessary to free the decorative panel from 8 clips, 2 mounting screws holding the inner handle, and 2 screws located under the plastic pocket. Then follows:
- Using an awl, pry off the plastic plug under which there is a screw in the door handle. In a similar way, remove the second plug and unscrew both screws (3).
- Pull the handle that opens the doors towards you, then unscrew the fastening screw, remove the lever and then the entire handle.
- Under the plastic pocket at the bottom of the door, unscrew the 2 screws (2).
- Using a flat-head screwdriver, pry the lower right part of the decorative panel (5) to disengage the first latch. Holding the panel in your hand, use your other hand to release the remaining latches.
- Separating the panel from the door, disconnect the wiring connecting the electric lift button and its mechanism. To do this, use a screwdriver to pry up the detachable tongue and remove the block from the button block.
The decorative panel from the driver's door is removed in the same way as from the passenger door. However, there are some minor differences:
- To facilitate removal of the trim, it is necessary to remove the plastic panel that covers the rear view mirror adjustment lever.
Removing the trim from the rear doors, which is secured with 10 plastic clips and 2 mounting screws, proceeds as follows:
- First of all, the handle of the mechanical window lifter (7) is dismantled, for which the plastic half-ring (5) is pryed off with an awl, which fixes the lever on the axis. After removing the half ring, the handle can be easily removed.
- 2 plastic plugs are removed from the door handle (3) and the fastening screws (1) are unscrewed.
- Using a flat-head screwdriver, the lower far part of the decorative panel is pulled out, after which the first latch is snapped out.
- Then the remaining clips are released from the panel supported by one hand with the other.
And in order to remove the door card from the trunk lid of the Lada Kalina on a station wagon and hatchback, which is held on by 4 clips, 2 special clamps, 2 fastening screws on the handle and 2 brackets hooked onto a metal protrusion, you need to:
- Using a Phillips screwdriver, remove the 2 screws and disconnect the handle.
- From the glass side, insert a flat-head screwdriver under the panel and unlock the lock.
- Use your fingers to disengage the clips, pulling the panel around the perimeter.
- Remove the trim, releasing the staples near the luggage lock last.
- It should be taken into account that the panel is detached from the glass side, since if this is done from the lock side, the clips can be damaged.
Instructions for removing the cladding on Kalina
The first three operations are performed the same way for all Lada Kalina doors. The exception is the trunk hatches of hatchback and station wagon cars, where the disassembly procedure is much simpler. Here's what to do:
- By hand, unscrew and pull out the cap of the latch designed to lock the door lock from the inside.
- Using a Phillips screwdriver, remove the 4 screws holding the music system speaker.
- Remove the speaker and disconnect the wires from it.
Unscrewing the blocker and acoustics
Advice. The acoustics can be attached either to the door card itself or to the metal door frame. If, after removing the speaker, you observe the first option, then during assembly it is better to redo the fasteners by drilling holes for self-tapping screws. The acoustics should be mounted to the door, not to the upholstery.
Attaching the speaker to the casing is wrong
The further procedure of work differs depending on the location of the door that you are disassembling.
Front passenger door
Here the decorative panel is held on by 8 clips, 2 screws securing the internal handle and two self-tapping screws located under the plastic pocket. The algorithm for dismantling it is as follows:
- Using an awl, carefully pry the edge of the plastic plug hiding the screw in the door handle and remove it. Remove the second screw cover in the same way.
- Remove both handle screws.
- Pull the door opening handle towards you, unscrew the fastening screw and remove the lever. After which you will be able to remove the entire handle.
- Unscrew the 2 screws at the bottom of the door card, under the plastic pocket.
- Take a flat head screwdriver and pry the top right corner of the trim panel to disengage the first tab. Grab the casing with your fingers and release the remaining pistons manually.
- After separating the panel from the door, disconnect the wires coming from the power window button. To do this, pry the connector tab with a screwdriver and pull the block out of the button block. Dismantling of the cladding has been completed.
Passenger side panel removed
Advice. When prying up the edge of the door card with a flat-head screwdriver, you should place a rag under it so as not to scratch the paintwork on the inside.
Photo instructions for disassembling the door trim on a Lada
Self-tapping screws holding the door card from below
The plugs are pulled out using an awl
Screws holding the handle
The opening lever must be pulled back and the screw underneath must be unscrewed.
Once unscrewed, the handle can be removed
Removing the cladding by hand
Power window connector that needs to be disconnected
View of the casing with the handle removed
Video: How to properly remove the trim
Nuances of disassembling the driver's door
On this side, the decorative panel is removed in the same order as on the passenger side. But due to small differences in the design, it is necessary to take into account the following nuances:
- To make the trim easier to remove, you need to remove the plastic panel covering the rear-view mirror adjustment lever;
- the first screw for securing the armrest is located under the plug, and the second is in the recess of the handle;
- the door opening handle is located on top of the armrest and is removed after unscrewing the fastening screw.
The plastic socket for the mirror drive can be easily removed by hand
The panel on the rear view mirror adjustment is removed using a flat screwdriver, which is used to pry it off from below. On vehicles equipped with electrically controlled mirrors, there is no adjustment lever, and instead there is a plug on the panel.
On the driver's side, the screw is hidden in the armrest
Reference. Some drivers unknowingly try to pick out this plug to disconnect the panel. The action is useless, since the element is easily removed by hand, but unsuccessful attempts leave unsightly scratches on it.
Screw securing the lever for opening the door
Removing the driver's side trim - video
Rear door trim
Here the upholstery is pressed to the door by 10 plastic clips and 2 screws securing the handle. The disassembly technology is as follows:
- The first step is to remove the mechanical window lifter handle. Use an awl to pry up the plastic half-ring that secures the lever to the axle. Pull it out and remove the handle.
- Pull out the 2 plastic plugs on the door handle and remove the fastening screws. After this, the element will be easily removed.
- Using a flat-head screwdriver, pull out the lower far corner of the decorative panel and snap out the first piston.
- Grab the door card with your hand and remove it, releasing the remaining clips along the contour. The casing has been successfully dismantled.
Scheme for dismantling the decorative panel
Note. Please note that the opening handle lever on Kalina 1 will have to be unscrewed and removed, but on Kalina 2 there is no need to remove it, since it is screwed directly to the door and is not connected in any way to the decorative panel.
To remove the window lifter handle, you need to pull out the half ring
Otherwise, the upholstery on the doors of the second generation Lada Kalina car is removed in the same way, there are no differences.
This is what the removed rear door trim of Kalina looks like
How to remove rear door panels - video
Advice from car enthusiasts and recommendations from experts
Removing the door card, being a popular operation, fits into optimal action algorithms based on the experience of numerous car enthusiasts and auto repair specialists. At the same time, in addition to general recommendations, advice is also useful that takes into account the specific features of removing door trim related to climatic conditions, the age of the car and similar variations:
- In cars whose age has exceeded five years, the plastic retainers dry out and become brittle. Therefore, when separating the trim from the door, some of the clips inevitably break. Hence the advice that before this operation, take care of purchasing a certain number of new latches, based on the fact that there are almost 40 of them on the front and rear doors.
- In regions with low winter temperatures, it is extremely undesirable to dismantle upholstery in the cold, since the plastic of the fasteners under its influence becomes brittle and therefore easily destroyed. It is better to carry out this operation in a heated garage.
- In summer there are no temperature restrictions, however, in windy weather it is not recommended to remove the door trim, since an open interior can cause a lot of dust.
- Although the speakers are attached to both the door trim and the metal part of the door, experts advise that when replacing the trim in place, if the acoustic devices were previously attached to the door frame, attach them to the door metal. Here you must adhere to the following rule: the speakers should be mounted on the door itself, and not on its trim.
- When prying up the door trim with a flat screwdriver, be sure to place soft material under it so as not to damage the paint surface on the metal.
- It is recommended to combine the removal of the door trim with the subsequent installation of noise and vibration insulation, after which the car acquires more comfortable qualities for passengers and the driver.
How to Remove the Rear Door Trim of a Kalina Universal
Do it yourself by removing the Lada Kalina door trim
Door
Any car, including Lada Kalina, is lined with special decorative panels from the inside.
Remove the door screen from the door to install speakers or repair windows, it can be removed from the front or back door. Due to various circumstances, there is a need for this skin to take off , and here uninitiated motorists are faced with the problem of installing the door card from the outside there.
In fact, disassembly is simple, although there are a few aspects to consider. Content
Why do the doors fly off the casing?
Most often, the front or front door trims are removed to reach the interior cavities where the power windows are installed. Although there are other situations during the life of the vehicle when it is necessary to take off
frame:
- install speakers built into door cards;
- in case of failure of electric window buttons;
- for disassembling glass for tinting or replacement;
- For repairing or lubricating windows;
- Replace worn or scratched panels over many years of machine use.
Lada Kalina entrance door maps
It is also impossible to do without removing the cladding during body work, when you need to weld rotten elements, update a paint machine, or carry out anti-corrosion treatment.
READ How to Remove a Torpedo on a VAZ 21099 Video
The note. Many motorists remove the gasket to add additional vibration and sound insulation to the body.
Rear door trim Lada Kalina
Preparing for disassembly
Unscrew the fastenings and take off
Door trim, you need to prepare a simple set of tools:
- a screwdriver with slots in the shape of a cross;
- long flat screwdriver;
- sharpened tool, for example, sewing.
Door disassembly tool
Since the Lada Kalina door card is supported by plastic clips (otherwise known as clips, plugs), there are warnings about operating conditions. It is strongly not recommended to disassemble door freezers when the plastic becomes brittle and breaks easily. Therefore, there is a risk of breaking all the clips when removing the decorative panel. Therefore, in winter, perform this operation in a heated or boxed garage.
Removing the rear panel door Lada Kalina Cross (Lady Kalini Cross)
It was easy to replace, except for one thing. It was difficult to get the handle back in place!
Replacement door handle Lada Kalina
disassembling and gluing vinyl boots Kalina
2 hatchbacks.
There are no summer residency requirements; remove skin even outdoors. There is only one recommendation: in windy weather it is better to drive the car into the garage, otherwise it will cause a lot of dust when opening the doors.
This is what a door card
Advice. In cars over 5 years old, the plastic from which the locks are made dries out and becomes brittle. Separating the Trim from the Door With a machine like this, you're bound to ruin some of the clips. Removing the Trunk Trim provided a video link on how to remove the trunk lining. Where can I find out more about how to remove the trunk lid with my own hands? So it's worth buying new ones in advance, 8 at the front door and 10 at the back.
READ How to Remove Door Trim Kalina 2
Instructions for removing cladding in Kalina
The first three operations are the same for all Lada Kalina doors. The exception is the hatchback hatch in hatchback and station wagon bodies; the disassembly procedure is much simpler. How to remove the front and rear door trim on a Kalina Lada. Here's what to do:
- Unscrew and remove the lock cover designed to lock the door lock inside.
- Using a Phillips screwdriver, remove the 4 screws that secure the music speaker.
- Remove the speaker and disconnect it from the speaker.
Unlocking the blocker and acoustics
Advice. The acoustics can be attached either to the door card itself or to the metal frame of the door . If, after removing the speaker, you stick to the first option, it is better to repeat it when installing the mounts, drilling holes for the screws. The acoustics should be installed on the door, not on the trim.
Incorrectly attaching the speaker to the case
The further procedure depends on the location of the door you are disassembling.
Front passenger door
Here the decorative panel is supported by 8 clips, 2 screws for attaching the internal handle and two screws located under the plastic pocket. The disassembly algorithm looks like this:
- Carefully support the awl with the edge of the plastic plug that covers the screw in the door , gave it away. Remove the screw with the second cover in the same way.
- Remove both handle screws.
- Pull the handle to open the door, turn the locking screw and remove the lever. Then succeed in taking off the whole pen.
- Remove the 2 screws at the bottom of the door card
, under the plastic pocket. - Take a flathead screwdriver and support the top right corner of the trim panel to close the first latch. Grasp the skin with your fingers and remove the rest of the cap by hand.
- After removing the panel from the door, disconnect the wires coming from the power button. how to remove the door trim from the viburnum on the carriage door (rear). To do this, turn the screwdriver on the protrusion of the connector and pull the block out of the button assembly. Dismantling of the cladding is completed.
READ How to remove the rear bumper of a BMW x5 e53
Passenger side panel removed
Advice. When you pin the edge of the door card
Use a flathead screwdriver to place a cloth underneath to avoid scratching the paintwork inside.
Video: the process of dismantling the door trim on the Lada Kalina
On average, dismantling a car door trim takes about 10 minutes. However, the simplicity of this operation is accompanied by the need to be careful in its implementation. Haste in movements and carelessness can provoke not only the deterioration of the latches, which is quite easily compensated for, but also more dangerous scratches on the plastic facing panels or on the paintwork of the metal doors. With due care and precision, removing the door trim on the Lada Kalina is possible even for not very experienced motorists.
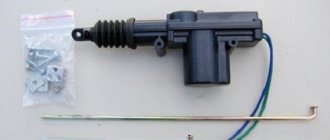
Installing an activator for locking/unlocking the trunk lock on a Lada Kalina hatchback
I have long wanted to open the trunk with a button, everyone knows that in Kalina it is very difficult to do this, for example, I got into the car, started the engine and need to throw something into the trunk, to do this you need to turn off the engine, get out, insert the key, open the trunk, in general it is very inconvenient! And after washing in winter, the lock may freeze so much that you will have to drive until spring)
The question, as always, began with studying the topic, there are 2 types of lock buttons, the old and the new (since 2010) model.
I can say I was lucky, the old-style lock button and the trunk operation algorithm I need looks like this (if yours is different, then the new-style button)
What is most interesting in any Kalina is almost everything to unlock the trunk with a button, everyone saw a third button on the key fob just for opening the trunk (the button needs to be pressed and held for 3 seconds), wires are laid in the trunk for the activator and the standard place for its installation is in trunk, you need to add a little!
General view under the trunk trim:
Connector for connecting the activator:
In general, you will need to buy an activator, absolutely any one, I took this one:
I modified the ends of the wires a little so that they fit into the standard connector:
You will need to make the following part, it is called a rotary washer:
Then you can remove the trunk trim (attached to the pistons), take out the retaining ring and the plastic pusher (see photo 1) and try on the parts, they should look like this:
In these 2 photos below the principle of operation, the activator pushes the rotary washer:
You will also need a regular washer with an internal diameter = the internal diameter of the plastic pusher. The thickness of the washer must be very small so that the entire system can be assembled, here is a photo:
After that, we put everything back together, first insert the plastic pusher, then the rotary washer, then the nut. We fix everything with a locking ring (if it doesn’t fit, then you need to make the washer even thinner)
We insert the activator into a place specially prepared for this:
We connect the wires (I wrapped them with electrical tape just in case so that they would stick better)
Installing and adjusting rods:
Video of how it all works:
Now I’ll tell you how everything works in words!
Firstly, the door does not open on its own, you still need to press the open button, but the key is no longer needed! (If you wish, you can use the key if the battery is suddenly disconnected). Here are some examples of work:
— On the remote control, press the door open button once, only the driver’s door will unlock. Press the button again - the passenger doors and trunk will unlock! When we close the car, all the doors and trunk are blocked (it’s no longer possible to leave the trunk open, but this has happened)
— If you press and hold the trunk open button on the remote control for 3 seconds. then only the trunk door will unlock!
— You can also use the door open/close button from the interior. You can open/close the trunk together with the doors!
In general, now everything has become the way I would like it to work initially! But why hasn’t AvtoVAZ done this at the factory yet?!
Issue price: 150 rubles
The placement has been agreed upon with the author Timofey Golubev.
Installation of a 2-level shock sensor on a luxury Kalina on a Lada Kalina hatchback
I will continue to talk about what has been done with the machine until today. It all started with the fact that for insurance
Repair of the trunk lock of Lada Kalina Hatchback
A reliable way to repair the Kalina trunk lock
Hatchback and Station Wagon.
The trunk door lock of the Lada Kalina Hatchback and Station Wagon is a rather capricious unit that can seriously spoil the blood of its owners.
As soon as you put a large load in the trunk that puts pressure on the lid, for example a couple of bags of potatoes, and drive a dozen kilometers on a bumpy road, it stops opening.
If, after pressing the button, the mechanism does not return back, then you will have to open it from the interior by pressing the latch with a screwdriver. The plate on the lock body has disengaged and the thrust stroke has sharply decreased, which does not allow the force to be transferred to the latch.
The design of the drive is puzzling. Even if the developers were faced with the task of minimizing the cost and high manufacturability of the assembly, this is not an excuse.
Any component of the car must work out its service life without failures. The plastic insert in the pressure unit is fixed by bending the latch on the lock body.
The lug is a few millimeters in size and easily breaks after several disassemblies necessary to clean the rotating mechanism.
The new case is sold only assembled; you most likely will not be able to buy the sleeve separately. Moreover, such a solution to the problem will not ensure durability. There are descriptions online of repairing a unit using a self-tapping screw screwed into a hole drilled in the eye.
That's exactly what I did, after having to open it from the inside with a screwdriver a couple of times. As it turned out, this method is too short-lived. The ear broke very quickly.
Replacing the trunk cylinder Kalina hatchback
In order to gain access to the rear door (trunk) lock, you first need to remove the inner plastic trim, which is attached to two bolts at the handle attachment points and latch pins, which are pryed off with a flat screwdriver and removed.
Removing the lock and replacing the cylinder
The design of the trunk lock on the Lada Kalina consists of two parts: the cylinder where the key is inserted and the door locking mechanism itself. All this is disconnected separately and will be written about this in more detail below.
- If you need to replace the larva, it is quite easy to remove it. You can do this using an 8mm socket and a flathead screwdriver. Below is shown which bolts need to be unscrewed to release this part along with the body.
- Now that the bolts are unscrewed, take a plastic screwdriver and use it to pry off the plastic retainer that secures the rod to the body of the cylinder. For clarity, below is a photograph that clearly shows what needs to be done:
- Then, carefully take the larva so that its spring, which is located inside, does not jump out. If you need to replace a part, then replace it with a new one and assemble everything in the reverse order.
- If it is necessary to completely remove the entire mechanism, then you will have to do a little more work. We unscrew the door locking mechanism itself with a large Phillips screwdriver, there are only two bolts:
When everything is done, you need to pull it a little towards yourself and it can be easily removed; all that remains is to disconnect the plug with the power wires from this structure:
That's all the repairs, which will take about half an hour if you have the right tools and this manual. We install all the removed parts, which can be bought at absolutely any auto store, in the reverse order. I hope that I helped someone with this photo report using the example of my Lada Kalina station wagon.
“We are not looking for easy ways,” I thought, and decided to restore the larva of the castle. firstly, there won’t be another key hanging on the keychain, and secondly, this is interesting) Like many people, my key stopped inserting into the lock, I sprayed LM-40, after some time the key was inserted but the lock would not turn. I removed the trunk trim, removed the lock and began disassembling the lock. We unlatch the lock and take out the “giblets” while remembering the sequence.
To remove the cylinder, press the lock with a screwdriver and push the cylinder out
Next, you need to remove the plates from the larva (they are fixed on both sides with wire), you can carefully pick them up with something sharp or gently squeeze them out with the plates.
In order to successfully replace the trunk lock in a domestic car Lada Kalina in a sedan, station wagon and even a hatchback, you will need to stock up on some tools and accessories. The algorithm of actions is simple, so such work is available to owners subject to responsible preparation.
Next, we will consider in detail the nuances of the replacement process.
How to dismantle the lock to replace the cylinder?
You can gain access to the lock mechanism by removing the plastic upholstery inside the luggage compartment. This protective component is fixed by means of two bolts, which are located in the places where the special handle is installed. They are also called latch caps. They are pryed off with an ordinary screwdriver.
Structurally, the trunk lock in the Lada Kalina is made of two parts, regardless of the body type, hatchback, station wagon or sedan. They are presented in the form of a cylinder and the unlocking mechanism itself. If it is necessary to replace the trunk lock, then the dismantling of these components is carried out in a separate order.
When you only need to replace the larva, this can be done in a few simple steps. Here you will need a screwdriver and a socket.
- By unscrewing the bolts, we release the necessary part of the body.
- Next, remove the retainer using a screwdriver. It is attached directly to the body of the larva itself.
- It is recommended to remove it very carefully, while holding the spring.
- Installation of a new element is carried out strictly according to the reverse manipulation algorithm.
If there is a need to replace the lock itself, the operation becomes a little more complicated due to the need for additional actions.
- First, the door lock is unscrewed using a screwdriver. This is not difficult since the element is held in place with only two screws.
- Now we pull the trunk lock outward, and it freely comes out of the landing niche.
As you can see, removing the trunk lock is not difficult.
How is the activator installed?
The only way to get inside the trunk of a Lada Kalina is this manipulation - turn the key and press the button. This action is not always associated with convenience. For example, in bad weather or when your hands are full, this is not easy to do. This circumstance prompts owners to consider purchasing and installing an activator. Installing this useful element is quite simple. Here you will need a self-tapping screw, which will secure the device we are considering. To check the functionality of the activator, you should connect it with the standard connector from the on-board network.
After the current supply to the activator is stopped, the door is locked with the first latch, but remains not completely closed. To get back inside the luggage compartment you will need to use the key.
Installing a push-button lock is not a very difficult task. To implement it, you will need to assemble a circuit, which requires wiring. Here you will need to “attract” the programmable channel present in the alarm.
You can connect the device using two options.
- We connect the button with the positive output of the activator (12 V), bypassing the relay. The advantage of this scheme is the absence of unnecessary components and simple connection. As a negative aspect, it should be noted the need to lay additional wire lines.
- The second method is more labor-intensive. Here you will need to use additional components (diodes). You also need to find the ground connection point. The main advantage is the need for a minimum number of wire lines.
Experts prefer the first method because it is simpler. For switching, you can use copper wire type PV-3, the cross-section of which is 1 mm2. Laying should be done on the left side along the thresholds. You can connect by means of a clamp and subsequent wrapping with electrical tape.
The control wire of the activator may be a standard red-pink cable. It is subject to commutation with the relay, followed by winding the contact and placing it under the BUS fixation frame. The entire list of manipulations is performed with the battery disconnected.
Electric drive: easy installation
The manipulation algorithm is very simple. Here you will need to make the rotary plate together with the rod yourself. The wiring is laid directly to the lock and connected to a special control unit. When the car is “disarmed”, the electric drive of the luggage lock is activated following the unlocking of the button responsible for opening the rear door of the Lada Kalina.
The whole essence of the action comes down to connecting the electric lock to two cable lines. You can buy the product at a specialized retail outlet. The end of the luggage compartment will need to be hidden in order to prevent the risk of moisture getting into it. If this is neglected, then with the penetration of water a short circuit will be observed in the designated area.
Much attention should be paid to the area near the door hinges, because broken wires are a common occurrence here. To prevent this, it is recommended to regularly monitor this section of the highway.
Before starting the procedure for installing the electric drive in a Lada Kalina car, you will need to remove the plastic trim. Here you need to be careful not to damage the specified protective element.