From the moment of purchase, the owner of the car must understand that now a significant part of his time and effort will be spent on taking care of this vehicle. Especially when your favorite “wheels” become not only a means of comfortable transportation, but also the main source of income. Constant trips are always fraught with wear and tear on the car, while a significant part of the repairs can be done yourself. Replacing the bearings of a VAZ-2114 generator is not as simple as, for example, replacing a flat tire. But a real driver should be able to repair this breakdown himself.
AvtoVAZ is the largest automobile manufacturer in the CIS and other Eastern European countries. It has reached the point that some spare parts and assemblies for foreign companies (such as Nissan and Renault) are produced by this company. The high popularity of the car, alas, does not insure it against accidents, breakdowns, and, as a result, the need for repairs. But the large number of sales of VAZ cars guarantees that many young drivers need advice and recommendations for repairs.
A number of such standard breakdowns as a flat tire and a cracked windshield were discussed more than once. But how to replace the bearings of a VAZ-2114 generator is a question that is often ignored, although the problem is still not uncommon.
Correct replacement of generator bearings on a VAZ 2114
The generator on the car serves to ensure the normal operation of all elements of the electrical circuit in its composition, as well as to recharge the battery while the engine is running. All its malfunctions lead to the fact that the engine eventually stops starting, and it becomes impossible to move the car.
Replacing the generator bearing on a VAZ 2114
see also
Battery charging lamp is on
- 3 0 3k
Car generator circuit
- 90 2 150k
Strut support bearing
- 73 0 86k
Repair of VAZ 2115 generator
- 3 0 7k
Generator malfunctions - signs, diagnostics, causes, testing
- 773 12 611k
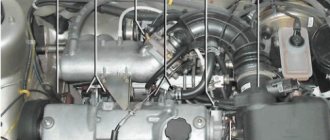
In a modern car, the generator provides current to the entire power supply system: powering the engine, lighting devices, and recharging the battery. On VAZ 2113/2114/2115 cars, generators of type 5102.3771 and 94.3701 are installed. Both generators are a three-phase AC electric motor with electromagnetic excitation, with a built-in rectifier unit and voltage regulator. The generator on cars of the Samara and Samara-2 family is traditionally located in the same way as on the “Classic”, on the right side of the engine compartment - near the headlight on the passenger side.
GENERATOR MODEL ON VAZ 2114 CAR
If on early VAZ 2108-09-099 models a generator of the 37.3701 series was installed, then on the VAZ 2110-2115 the brand 94.3701 began to be used. Generators of this series have significant power - the rated current (maximum output current) of such units can be 80A, 90A, 105A, and even 120A (manufacturer StartVolt). The price of the device starts somewhere from 3,500 rubles and can reach 5,000 rubles or more. The price depends on the manufacturer, the technical characteristics of the generator, the region of sale and the seller himself. Other main characteristics are:
- Rated rotation speed;
- efficiency;
- Rated voltage;
- The frequency at which self-excitation occurs.
Generator 94.3701 is an electrical machine that generates alternating current; direct current is obtained through a rectifier (diode bridge) located at the output of the electrical circuit of the machine. Type 94.3701 is used on VAZ passenger cars with an electronic engine control system (ECM), the units are capable of operating at temperatures from – 40º to + 45ºC, permissible humidity 90%. Products are sold both on the domestic market and exported to countries with different climatic conditions.
Generator set model 94.3701
BEARINGS
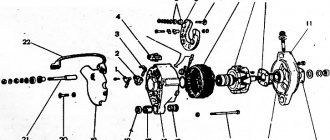
The generator on a VAZ 2114 car consists of the following main parts:
- A housing consisting of two aluminum covers (front and back);
- Stator (winding located inside the housing);
- A rotor rotating inside the stator;
- Diode bridge;
- Voltage regulator.
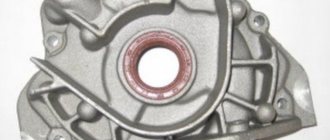
The armature (rotor) rotates in two bearings, which are installed: one in the front cover and one pressed onto the rotor. Both bearings are press-fit and therefore are not that easy to replace.
There are usually two main problems with a generator:
- Charging disappears;
- Noise occurs: whistling, grinding or humming.
If there is a whistling noise under the hood, a worn alternator bearing is often to blame. Due to such a malfunction, charging is not lost, but you still shouldn’t drive with noise, since as a result the generator will jam because the rotor will stop rotating.
Before changing or starting repairs, you need to buy the necessary spare parts. And before purchasing, you need to find out what bearings are on the VAZ 2114 generator. A bearing of brand 180202 (a foreign analogue of 6202-2RS) is installed on the rear of the rotor, and 180302 (an analogue of 6302-2RS) is installed on the front cover. The cost of Russian parts is low - in the range of 50-80 rubles per piece, imported spare parts are noticeably more expensive - from 200-250 rubles. Bearings are often sold as a set, that is, in pairs. Imported analogues are of much higher quality, so when choosing parts it is better to buy brand 6202-2RS and 6302-2RS.
Bearing 6302-2RS
What bearings are on the VAZ 2114 generator - how much, what numbers and sizes
When choosing spare parts, motorists have the following typical questions:
- What are the generator bearing numbers?
- Answer : Markings (numbers):
- according to GOST: 6-180303 C17, 6-180203 C17;
- according to ISO: 6303.2RS, 6203.2RS.
- What bearings are on the VAZ 2114 generator?
- Answer : In the VAZ 2114 generator (injector), the manufacturer provided closed single-row radial balls with lubricant.
- How much does a generator bearing cost?
- Answer : The cost of a set of two Russian-made ball bearings will be 300-350 rubles.
- Generator bearing dimensions?
- Answer : For detailed information on the dimensions of the parts, read the article “Replacing the bearings of a VAZ 2110 generator”
I drive a Ford Focus ST in Moscow
The engineers did a great job - 15 devices in 1 case.
An entire car on-board computer with FULL HD footage. We are pleased with the clear rear view camera and GPS navigator with 32 satellites.
I've been using it for 6 months and already forgot about the fines
I am sharing a link to the official website of this miracle recorder: MORE
Table of recommended bearing manufacturers
| No. | Factory | Catalog number (article) | Price 2021, rub. | ||
| Front | Rear | Front | Rear | ||
| 1 | VBF Russia | 6303.2RS | 6203.2RS | 160 | 120 |
| 2 | SPZ Russia | 6-180303 C17 | 6-180203 C17 | 170 | 130 |
| 3 | SKF Sweden | 6303.2RS | 6203.2RS | 370 | 330 |
| 4 | FAG Germany | 6303-2RSR | 6203-2RSR | 320 | 310 |
REPLACEMENT
If there is a whistle coming from under the hood, and it turns out that the generator is the cause of the whistle, then it’s time to change the bearing on the VAZ 2114 generator. It is better to change them in pairs, because the second one may soon whistle too.
At a car service center, they will charge approximately 600-700 rubles for the replacement work, plus removal and installation of the generator - approximately the same amount of money. But you can change the bearing on the generator yourself; you only need minimal plumbing skills, tools and care when disassembling and reassembling. Alternatively, you can buy a new assembled generator, but replacing the VAZ 2114 generator bearings will cost much less.
So, let's look at how to change the bearing on a VAZ 2114 generator. To replace it, you will need the following tools:
- Set of combination keys;
- Screwdrivers – slotted and Phillips;
- Puller for pressing out the rear bearing;
- Hammer;
- Vise;
- A drill bit with a diameter of approximately 4 mm and a drill (not needed if the entire front cover is being replaced).
Replacing the generator bearing yourself is done as follows:
- We turn off the engine, remove the battery terminals;
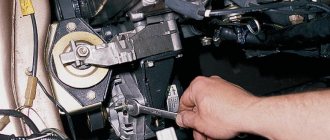
- Loosen the belt tensioner nuts and remove the tension belt;
- We completely dismantle the belt tension bar, disconnect the wires, unscrew the mount and remove the entire device itself.
Bearing replacement, instructions
To remove the generator from the car you will need an inspection hole, a lift or an overpass (author of the video channel “In Sandro’s Garage”).
Tools and materials
To remove the VAZ 2114 generator, you need to prepare the following tools:
- wrench for “10” and “13”;
- open-end wrench 17x19;
- mount;
- head at "15".
You should prepare a rag to clean surfaces from dirt.
The removal procedure includes the following steps:
- First you need to remove the protection from the engine.
- Next, loosen the drive belt tension roller placed on the pulley.
- Then first unscrew the upper mounting bolt of the generator, and then the lower one.
- Loosen the air conditioning compressor mount.
- We remove the drive belt from the pulley and dismantle the generator, moving it to the right side closer to the battery.
- After unscrewing the bolt securing the air conditioning compressor, we hang the device.
- Unscrew the generator set mounting bolts.
- Having disconnected the terminals of the generator, we remove it for repair.
Next, you can repair the removed unit.
Disassembling the unit for repair is a sequence of steps:
- By releasing the three latches, remove the protective casing from the housing.
- We make marks of the relative positions of the two covers and the stator to facilitate assembly.
- Having unscrewed the fastening screws, we dismantle the brush assembly.
- Next, you need to disconnect the wires from the regulator terminal.
- We unscrew the fastening bolts and dismantle the diode bridge, while disconnecting the winding terminals.
- After unscrewing the four tie screws, you need to remove the cover from the side where the generator slip rings are located.
- We fix the rotor shaft from turning using a vice and unscrew the pulley mounting nut. Now remove the generator set pulley and washer from the rotor shaft.
- At the last stage, we dismantle the rotor cover of the unit.
Then you can inspect the parts and repair or replace them. The brushes, diode bridge, bearings, three-level voltage regulator and other parts of the generator set may be faulty.
Modern cars are equipped with a large number of electronics, which requires a more powerful generator set for stable operation of the on-board network. Low voltage can affect the operation of the valves. Under heavy load, the generator heats up.
The generator is installed on the VAZ 2114 in the reverse order. After installing the unit in its original location, all connectors and wires are connected, and the drive belt is put on. To tension the drive belt with a volume of 1.5 liters, the generator housing is removed from the motor block using a mount.
This video explains how to remove a generator set from a VAZ 2113, 2114, 2115 (video author: fedot580).
Sorry, there are no surveys available at this time.
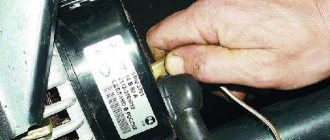
1. First of all, disconnect the negative cable from the battery, as well as absolutely all wires from the generator itself. By the way, so as not to get confused later, when installing the generator, I recommend marking them all - even at this stage.
DETAILS: DIY installation of fog lights
2. Next, you can begin dismantling the generator, to do this, unscrew the 3 points of its attachment, loosen the drive belt and turn the part towards the engine.
3. After the generator is removed from the engine, work must continue on the workbench. Here I want to make a reservation right away: before you start replacing the bearing, be sure to first purchase a new bearing that is identical in size to the previous one.
4. If you have already taken care of everything, disconnect the brush holder, unscrew all the bolts and remove the back cover. Then remove the generator bearing along with the cover from the rotor shaft.
5. Carefully remove the stator and unscrew the nut from the pulley side.
6. Remove the impeller and pulley.
7. The final step is to remove the front cover, this is best done using a press, remove the bearing from it and install a new one. Even if the bearing looks very good, it is still necessary to replace it.
8. Reassemble all removed parts in the reverse order.
Of course, contacting the service is always safer, and the driver will be more confident that everything will go right. But it is precisely for this confidence that you often have to overpay, and by very substantial amounts. As already written, even some of the parts that do not need to be replaced, like the top cover of the generator, often also become a reason for extra payment (especially in non-professional service stations).
Let's get started:
- The generator must be disconnected from the power supply (battery).
- We remove the belt.
- Using wrenches, unscrew the fastening nuts.
- Next, remove the film and take out the sleeve.
- Carefully remove the generator.
Next, we will proceed to more sophisticated and complex work, directly disassembling the generator. This is not an easy task, but if you try, even a person with no experience can handle it.
- After unscrewing the nuts on the generator housing, remove the cover and carefully remove the regulator responsible for the voltage and brushes.
- We separate the stator from the cover, doing this extremely carefully so as not to disturb the copper winding. There are cases when the housing is affected by rust and the stator cannot be separated. You need to take a hammer, an impact screwdriver and make very precise blows to separate them into blocks.
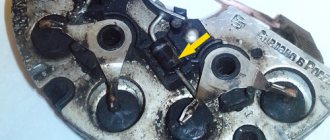
- Once the generator is separated from the stator, the rear and front bearings can be seen. Now you can change the bearing on the VAZ 2114 generator.
- Then everything is simple, remove the deformed generator bearing and install a new one.
- Installation and assembly of the generator is performed in the opposite order.
Now for the procedure. There should not be any particular difficulties in dismantling the generator. Now that we have the generator in our hands, we can start disassembling it, but we will have to disassemble it completely. To do this, it is advisable to have a vice, and the process itself schematically looks like this:
- Remove the back cover.
- Remove the diode bridge.
- Remove the brushes.
- Unscrew the pulley nut, holding it in a vice through an elastic spacer so as not to damage it.
- Attention! Be sure to mark the covers with a marker so as not to disturb the alignment.
- Use brake fluid or magic WD40 to treat the tightening bolts and the cover mounting areas.
- Unscrew the tightening bolts and remove the covers.
- Use a wooden punch to knock out the anchor from the cage on both sides.
- Use old bearings instead of mandrels to press in new ones.
It is done. The bearings are pressed in, now all that remains is to put everything back together so that the rotor does not touch the stator. After installing the generator and a new belt, we check the voltage at the battery terminals, if as a result the generator runs quietly, the voltage is at least 14 V, we can consider the mission completed. Good luck to everyone!
Instructions for replacing generator bearings on a VAZ 2114
The generator is an incredibly important component of the car, the functioning of which determines the performance of the entire car.
If you hear a grinding noise coming from under the hood, you can immediately suspect that the generator bearings are faulty. This metal element often becomes deformed during operation and loses its performance characteristics.
This may manifest itself as annoying grinding, ringing or whistling noises. If the situation is really bad, the bearing may be even louder than your running engine.
Generator bearing
Article on the topic:
Ways to solve the problem
If such a malfunction occurs, you need to solve the problem as quickly as possible. Basically, there are three main ways to do this.
- Seek assistance from specialists at the nearest service station.
- Replace the complete prefabricated generator, rather than trying to solve the issue with a more budget-friendly method.
- Purchase a new bearing for the generator and replace it yourself.
What nuances does one or another method presented above have?
- The first option is reliable, but requires costs not only for the part itself, but also for the expensive services of craftsmen.
- The second option is more financially accessible, but you will have to do quite difficult work.
- Option number three is the most difficult from the point of view of independent execution, but is the most budget-friendly. Consequently, you will be able to save an impressive amount of money.
Repair
So, you have decided to purchase new bearings and follow a difficult but fairly economical path. For cars like the VAZ 2114, self-repair is a common thing. Such work, even in the absence of impressive experience and knowledge, is not difficult to do. Simple follow the instructions.
- Disconnect the generator from the battery to deprive it of power.
- Remove the timing belt.
- Using wrenches of the appropriate size, remove the fastening nuts.
- The film is removed, after which the sleeve is removed.
- The generator itself is carefully removed from its seat.
Subsequent work is more subtle and complex. After all, you have to disassemble the generator in order to get to the bearings. The task is not an easy one, but you can handle it yourself.
- There are nuts on the generator housing that need to be unscrewed;
- Remove the cover and remove the regulator from under it. This element is responsible for brushes and tension;
- Disconnect the stator from the cover. This operation should be done as carefully as possible so as not to damage the copper winding;
- Sometimes the housing can become rusty, making the stator difficult or even impossible to remove. In such a situation, arm yourself with a hammer and an impact screwdriver. With the help of these tools it is necessary to deliver the most accurate blows. This way you will be able to divide the element into blocks;
- Separating the generator from the stator, you will see both bearings - front and rear;
- Remove the damaged component and install a new alternator bearing in its place. Don't forget that there are two of them. For prevention, you can replace both at once, even if one of them is in completely good condition;
- Assembly is performed strictly in reverse order.
Instructions for carrying out work
Let's get started:
- The generator must be disconnected from the power supply (battery).
- We remove the belt.
- Using wrenches, unscrew the fastening nuts.
- Next, remove the film and take out the sleeve.
- Carefully remove the generator.
Next, we will proceed to more sophisticated and complex work, directly disassembling the generator. This is not an easy task, but if you try, even a person with no experience can handle it.
Replacing the VAZ 2114 generator bearing
- After unscrewing the nuts on the generator housing, remove the cover and carefully remove the regulator responsible for the voltage and brushes.
- We separate the stator from the cover, doing this extremely carefully so as not to disturb the copper winding. There are cases when the housing is affected by rust and the stator cannot be separated. You need to take a hammer, an impact screwdriver and make very precise blows to separate them into blocks.
- Once the generator is separated from the stator, the rear and front bearings can be seen. Now you can change the bearing on the VAZ 2114 generator.
- Then everything is simple, remove the deformed generator bearing and install a new one.
- Installation and assembly of the generator is performed in the opposite order.
Generator bearing VAZ 2115
The generator on the car serves to ensure the normal operation of all elements of the electrical circuit in its composition, as well as to recharge the battery while the engine is running. All its malfunctions lead to the fact that the engine eventually stops starting, and it becomes impossible to move the car.
Replacement
How to remove the generator bearing?
On devices from different manufacturers, this process is carried out in different ways, and the bearings of the Bosch generator are most easily replaced. Car enthusiasts often ask the question of how to change a bearing in a generator. So, this is done in the following way:
Do-it-yourself repair versus service repair
Of course, contacting the service is always safer, and the driver will be more confident that everything will go right. But it is precisely for this confidence that you often have to overpay, and by very substantial amounts. As already written, even some of the parts that do not need to be replaced, like the top cover of the generator, often also become a reason for extra payment (especially in non-professional service stations).
Of course, doing a DIY repair is not an easy task, especially when you get to parts like a generator. But sometimes everything is done for the first time. And the significant amounts of money to pay for the robotic service can be spent on more pleasant things. In addition to economic indicators, a clear advantage will be the fact that the car owner will be able to feel like a real professional, realizing that he is the one who is able to repair his own car.