Device
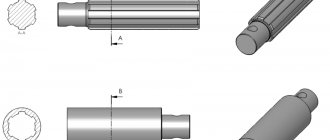
The design of the unit is no different from those installed on other models of AvtoVAZ cars. The clutch slave cylinder (CLC) consists of the following parts:
- Frame.
- Connection for pumping fluid.
- Piston with plate and sealing rings.
- Pusher.
- Boot (cap).
- Washer.
- Spring.
The RCS is installed next to the plug and works as follows:
- The driver presses the pedal.
- The pusher displaces the clutch master cylinder piston, increasing the pressure in the pipeline.
- The brake fluid that fills the hydraulic drive pushes the cylinder and pusher.
- The latter moves onto the fork, which presses on the clutch basket and breaks the connection between it and the disc.
When the driver releases and stops pressing the pedal, the pressure in the system drops and the piston and pusher return to their original position under the action of a spring.
The part has article number 2123-1602510-01 and is sold at a price of 600 rubles.
For what faults does the clutch need to be replaced?
The task of the clutch is to transfer rotation from the engine to the input shaft of the gearbox, ensuring smooth driving and starting. When squeezing the dial, you can smoothly engage the speed or shift without jerking.
To extend the life of the clutch, do not constantly keep your foot on the pedal; this greatly reduces the life of the driven disk and release bearing.
The clutch can have two faults:
- Slippage – when the driven disk is not tightly pressed against the drive disk due to wear. In this case, when you release the pedal, the car will not move. The malfunction can also be detected when driving fast, when when you sharply press the gas pedal, the speed first increases and then drops slightly.
- The clutch drives - when you depress the pedal while driving, the car continues to move. If the breakdown is serious, you simply will not be able to turn off the speed.
The first signs of clutch wear are increased noise, jerking and difficulty shifting gears. If these “symptoms” appear, repair work is necessary.
Possible faults
The main sign of a breakdown of the working unit is the failure of the clutch pedal. This happens when the seals wear out. However, other malfunctions are also possible:
- Damage to the boot protecting the rod and working surface of the cylinder.
- Spring breakage.
- Rust on the working surface (appears when operating a hydraulic drive with old brake fluid containing a lot of moisture from the air).
The operation of the unit can be restored using a repair kit. Replacement is only necessary when rust appears in the cylinder.
Clutch replacement
First you need to provide access to the machine from below. It is not possible to replace the clutch mechanism without dismantling the gearbox.
In addition to the standard set of keys and screwdrivers, you will need a edit for centering the driven disk and a marker. This can be the gearbox input shaft or a tube (rod) of the appropriate diameter.
Work order:
Important: inspect the condition of the friction linings. If chips or cracks are visible on them, the depth of the rivets (distance from the heads to the surface) does not exceed 0.2 mm - the driven disk must be replaced.
Based on the results of the inspection of each clutch part, a decision is made: leave the old one or install a new one. After this, all that remains is to assemble the unit and install the gearbox. When installing the basket, the driven disk should be centered using a mandrel. Next, you need to set the pressure bearing so that the edges of the coupling are positioned strictly horizontally.
After replacing the driven disc, as well as after installing a new fork, it is necessary to adjust the clutch.
Replacement
To change the cylinder you will need brake fluid, a wrench with a 13 socket head, and a 17 wrench. Operating procedure:
- Using a 13mm wrench, unscrew the bolts securing the control center to the clutch housing.
- Disconnect the spring, bracket and the working cylinder itself from the machine.
- Remove the fork pusher.
- Remove the protective cover.
- Using a 17 key, unscrew the hydraulic drive hose.
Installation of the RCS is carried out in the reverse order of removal. After installing a new or restored RCS, it is necessary to
Important: if only one boot is damaged, it is enough to replace only it without disconnecting the hose. Part number – 2123-1602518. The boot costs from 45 rubles, but it is better to buy high-quality spare parts at a price of 140 rubles and above.
Chevrolet Niva clutch
- Repair manuals
- Repair manual for Chevrolet Niva 2002+.
- Clutch
Design Features
| Rice. 5.1. Clutch assembly: 1 – clutch housing; 2 – flywheel; 3 – bolt securing the clutch housing to the flywheel; 4 – driven disk; 5 – pressure disk; 6 – clutch casing; 7 – clutch release clutch; 8 – gearbox input shaft; 9 – clutch release fork; 10 – central pressure spring |
The vehicle has a single-disc, dry, permanently closed clutch with a central diaphragm spring. The clutch device is shown in.
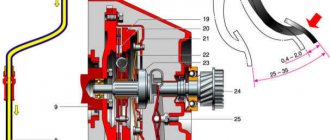
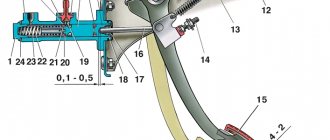
| Rice. 5.2. Clutch release drive: 1 – tube; 2 – main cylinder; 3 – master cylinder fastening nut; 4 – pedal bracket; 5 – clutch release clutch; 6 – ball joint; 7 – clutch release fork; 8 – clutch release fork cover; 9 – bracket fastening bolt; 10 – bracket; 11 – working cylinder; 12 – valve for removing air; 13 – clutch pedal axis; 14 – clutch pedal; 15 – locking bracket; 16 – master cylinder pusher; 17 – bushing; 18 – locking bracket; 19 – bushing |
The clutch drive is hydraulic, backlash-free, with automatic compensation for wear of the friction linings of the driven disc. The drive consists of 2 main ( ) and 11 working cylinders, a clutch pedal, hydraulic clutch release tube 1 and a hose.
| USEFUL TIPS To ensure clutch service, do not constantly keep your foot on the clutch pedal. This bad habit is often acquired while learning to drive in driving schools for fear of not having time to disengage the clutch while stopping the car. In addition to the rapid fatigue of the leg, which is always above the pedal, the clutch is depressed at least a little, and the driven disk slips and wears out. In addition, although the release bearing is designed to operate in constant rotation mode, when the pedal is pressed slightly, it is under increased load, and its service life is reduced. For the same reason, we do not recommend keeping the clutch disengaged for a long time (for example, in traffic jams). If you don’t have to move away right away, it’s better to put the gearbox in neutral and release the pedal. Clutch slipping can be easily determined using a tachometer. If while driving, when you sharply press the accelerator pedal, the speed rises sharply, and then drops a little and the car begins to accelerate, the clutch requires repair. |
Checking the technical condition of the clutch
Check the technical condition of the clutch using the following methods.
| 1. Put the gearbox in neutral, start the car engine and warm it up to operating temperature. When the engine is running at minimum engine speed, disengage the clutch (press the pedal) and engage reverse gear. The transmission should engage without grinding, knocking or other extraneous noise. |
| 2. While the car is moving, change gears. All gears should be engaged without grinding, knocking or other extraneous noise. |
| 3. When accelerating a car, there should be proportionality between the increase in engine speed and the increase in vehicle speed ( the clutch should not “slip”). Clutch slipping can be easily determined using a tachometer. If while driving, when you sharply press the accelerator pedal, the speed rises sharply, and then drops slightly and the car begins to accelerate, the clutch requires repair. |
If the indicated signs of normal clutch operation are absent, try removing air from the clutch hydraulic drive. If bleeding the hydraulic drive does not lead to the desired result, remove the clutch for repair.
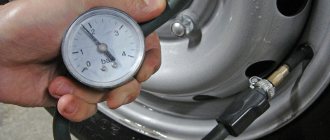
Bleeding the hydraulic clutch
If, when the pedal is pressed all the way, the clutch does not disengage completely (“drives”), which is accompanied by a characteristic grinding of gears when engaging reverse gear, there may be air in the clutch hydraulic drive. Remove it by bleeding the drive.
In addition, pumping is performed when the hydraulic drive is filled with fluid after its replacement or after repair of system components associated with its depressurization.
You will need: an “8” wrench, a bleeding hose, a container for brake fluid, brake fluid .
| USEFUL ADVICE Carry out the work with an assistant in the inspection ditch. |
| 1. Pour (or add) liquid into the tank to the bottom edge of the filler neck. |
| 2. Place a bleeder hose onto the slave cylinder valve. Place the other end of the hose in a container with a small amount of brake fluid so that it is submerged in the fluid. |
| 3. Press the clutch pedal 4-5 times and keep the clutch pedal depressed. |
| NOTE The assistant must press the pedal sharply, with intervals between presses of 2–3 s. |
| 4. Open the bleeder valve to bleed air from the system. Liquid with air bubbles will come out of the hose into the container. |
| 5. After the flow of fluid from the hose stops, tighten the fitting and release the clutch pedal. |
| 6. Repeat steps 4, 5 and 6 several times until liquid begins to emerge from the hose without air bubbles. |
| WARNING Do not allow the fluid level in the reservoir to drop below the “min” mark. Add fluid in a timely manner, otherwise when the bottom of the tank is drained, air will enter the system and the pumping will have to be repeated again. |
| 7. Remove the hose from the bleeder valve and put on the cap. |
| 8. Add brake fluid to the master cylinder reservoir to the “max” mark. |
Removing and installing the hydraulic clutch reservoir
Remove the reservoir if the brake fluid is excessively contaminated and deposits appear on the walls of the reservoir.
You will need: a 10mm wrench, pliers, a container for brake fluid, brake fluid .
| 1. Unscrew the tank cap. | 2. Unscrew the nut securing the tank bracket. |
| 3. Remove the tank from the bracket. |
| 4. Drain the liquid from the reservoir. |
| 5. Inspect the tank. If deposits are detected... | 6. ...loosen the hose clamp and disconnect it. |
| NOTE The tank can be washed and reused. |
| 7. Install the tank in the reverse order of removal. |
| 8. Fill with fluid and bleed the hydraulic system (see “Bleeding the clutch hydraulic drive”). |
Removing and installing the clutch master cylinder
Remove the master cylinder for replacement or repair if there is a fluid leak, the clutch is not fully disengaged (can be caused by a fluid leak or cuff wear), as well as when the clutch is not fully engaged (as a result of the compensation hole being clogged or blocked by a swollen cuff).
You will need: a 13mm wrench (socket head with extension), pliers, a rubber bulb.
| 1. Use a rubber bulb to pump out the liquid from the tank. |
| 2. Loosen the hose clamp and disconnect it from the master cylinder. |
| 3. Move the hose to the side. |
| 4. Remove the nut securing the pipeline from the master cylinder. Remove the pipeline from the master cylinder hole and move it to the side. | 5. Unscrew the two cylinder mounting nuts and... |
| 6. ...remove it from the car. |
| 7. Install the cylinder in the reverse order of removal. |
| 8. Bleed the clutch hydraulic drive (see “Bleeding the clutch hydraulic drive”). |
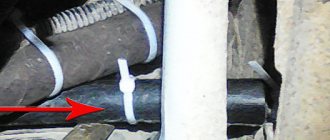
Removing and installing the clutch slave cylinder
Remove the slave cylinder for replacement or repair if the clutch does not disengage completely due to a fluid leak.
You will need: keys “13”, “17”.
| 1. Loosen the slave cylinder hose end. | 2. Remove the two bolts of the bracket securing the slave cylinder to the clutch housing. |
| 3. Remove the bracket. |
| 4. Remove the slave cylinder pusher from the clutch release fork and remove the protective cap along with the pusher. | 5. While holding the hose tip from turning and rotating the cylinder, separate them. |
| 6. Drain the fluid from the drive and cylinder into a prepared container. |
| 7. Install the new slave cylinder in the reverse order of removal. |
| 8. Bleed the clutch hydraulic drive (see “Bleeding the clutch hydraulic drive”). |
Replacing the hydraulic clutch hose
You will need: key “14”, “17”, “19”.
| 1. While holding the hose fitting from turning with wrench 1, use wrench 2 to unscrew the pipeline nut and disconnect it. | 2. Remove the bracket securing the fitting to the body bracket. |
| 3. Drain the fluid from the drive into a prepared container. |
| 4. Unscrew the hose end from the working cylinder. |
| WARNING Be careful not to lose the sealing washer. |
| 5. Install the new hose in the reverse order of removal. |
| 6. Bleed the clutch hydraulic drive (see “Bleeding the clutch hydraulic drive”). |
Removing and installing the clutch
The main malfunctions that require removal and disassembly of the clutch to eliminate are:
– increased (compared to usual) noise when the clutch is engaged;
– jerking when the clutch operates;
– incomplete engagement of the clutch ( the clutch “slips”);
– incomplete disengagement of the clutch ( the clutch “drives”).
| USEFUL TIPS The work of removing and installing the clutch is very labor-intensive, so first make sure that the malfunctions are not caused by defects in the clutch drive. If, after disassembling the clutch, no obvious signs of malfunction of individual components are found, replace all components at the same time. Since the transmission must be removed before removing the clutch, work with an assistant. |
| You will need: an “8” wrench, two screwdrivers, a mandrel for centering the driven disk (can be made from the input shaft of the gearbox by removing the gear). |
| 1. Place the vehicle on a viewing ditch or lift. |
| 2. Remove the gearbox (see “Removing and installing the gearbox”). |
| 3. If you are installing the old pressure plate, mark in any way (for example, punching) the relative positions of the disk housing and the flywheel in order to install the pressure disk in its previous position (to maintain balance). | 4. Remove the six bolts securing the pressure plate to the flywheel, holding the flywheel from turning with a mounting blade. |
| 5. Remove the pressure and driven disks, while holding the driven disk. | 6. Inspect the driven disk. Cracks on the parts of the driven disk are not allowed. Check the wear of the friction linings. If the rivet heads are recessed by less than 0.2 mm, and the surface of the friction linings is oily or the rivet joints are loose, then the driven disk (or friction linings) must be replaced. |
| 7. Check the reliability of the damper springs in the driven disk hub sockets. If the springs are broken, replace the disc. Check the runout of the driven disk if warping is detected during a visual inspection. If the runout value exceeds 0.5 mm, replace the disc. | 8. Using an external inspection, evaluate the condition of the pressure plate diaphragm spring. Cracks on the diaphragm spring are not allowed. The contact points between the spring petals and the clutch release bearing must be in the same plane and have no obvious signs of wear. |
| 9. Install the clutch in the reverse order of removal. |
| NOTE Before tightening the pressure plate mounting bolts, carefully center the drive plate using a mandrel. If this is not done, installation of the gearbox will be difficult. |
Replacing the clutch release bearing
A sign that the clutch release bearing needs to be replaced is increased noise when the clutch pedal is pressed.
| 1. Remove the gearbox (see “Removing and installing the gearbox”), if it was not removed to repair the clutch. |
| 2. Disengage the bearing from the fork. | 3. Pull back the fork and... |
| 4. ...remove the bearing. |
| 5. Install the new bearing in the reverse order of removal. |
| 6. Lubricate the splines of the input shaft with a thin layer of lubricant LSC-15 or Litol-24. |
| 7. Install the gearbox and removed components in the reverse order of removal. |
↓ Comments ↓
1. Car structure
1.0 Car structure 1.1 General information about cars 1.2 Passport data 1.3 Car keys 1.4 Controls 1.5 Heating and ventilation 1.6 Doors 1.7 Seat belts 1.8 Adjusting the position of the front seats 1.9 Adjusting the steering wheel
2. Recommendations for use
2.0 Recommendations for operation 2.1 Safety rules and recommendations 2.2 Tools and accessories 2.3 Running in the car 2.4 Operating the car during the warranty period 2.5 Checking the car before leaving 2.6 Replacing the air filter entering the cabin 2.7 Using a jack 2.8 Towing the car
3. Problems along the way
3.0 Malfunctions along the way 3.1 The engine does not start 3.2 Malfunctions of the fuel injection system 3.3 No idle speed 3.4 Interruptions in engine operation 3.5 The car moves jerkily 3.6 The car accelerates poorly 3.7 The engine stalls while driving 3.8 The oil pressure has dropped
4. Engine
engine piston of the fourth cylinder to the TDC position of the compression stroke
5. Transmission
5.0 Transmission 5.1 Clutch 5.2 Possible malfunctions of the clutch, their causes and solutions 5.3 Gearbox 5.4 Possible malfunctions of the gearbox, their causes and solutions 5.5 Transfer case 5.6 Possible malfunctions of the transfer case, their causes and solutions 5.7 Driveshaft 5.8 Possible malfunctions of the driveshaft , their causes and solutions 5.9 Front wheel drives
6. Chassis
6.0 Chassis 6.1 Front suspension 6.2 Possible malfunctions of the front suspension, their causes and solutions 6.3 Rear suspension 6.4 Possible malfunctions of the rear suspension, their causes and solutions 6.5 Shock absorbers
7. Steering
7.0 Steering 7.1 Design features 7.2 Inspecting and checking the steering on the vehicle 7.3 Checking the tension and adjusting the power steering pump drive belt 7.4 Replacing the fluid in the power steering hydraulic system 7.5 Replacing the power steering hydraulic system reservoir 7.6 Bleeding the power steering system 7.7 Adjusting the gap in the roller engagement with worm 7.8 Removing and installing the steering wheel 7.9 Replacing steering shafts
8. Brake system
8.0 Brake system 8.1 Device features 8.2 Useful tips 8.3 Checking and adjusting the brake system 8.4 Replacing brake fluid 8.5 Bleeding the hydraulic brake system 8.6 Master brake cylinder 8.7 Vacuum brake booster 8.8 Pressure regulator 8.9 Replacing hoses and pipelines of the hydraulic brake system
9. Electrical equipment
9.0 Electrical equipment 9.1 Design features 9.2 Fuses and relays 9.3 Generator 9.4 Possible generator malfunctions, their causes and solutions 9.5 Starter 9.6 Possible starter malfunctions, their causes and solutions 9.7 Ignition switch (lock) 9.8 Replacement and maintenance of spark plugs 9.9 Engine control system
10. Body
10.0 Body 10.1 Design features 10.2 Removing and installing front fender liners 10.3 Removing and installing front fenders 10.4 Removing and installing decorative trims on the front fenders and doors 10.5 Replacing buffers 10.6 Removing and installing radiator trim 10.7 Removing and installing the hood 10.8 Removing, installing and adjusting the lock and hood lock drive 10.9 Tailgate
11. Vehicle options
11.0 Vehicle options 11.1 Clutch release master cylinder 11.2 Electromechanical power steering 11.3 Brake system
12. Car care
12.0 Car care 12.1 Checking the car before leaving 12.2 Washing the car
13. Purchase of spare parts
13.0 Purchasing spare parts 13.1 Engine oil 13.2 Greases 13.3 Coolants 13.4 Brake fluid
14. A trip to the service station
14.0 A trip to the service station 14.1 Useful tips
15. Winter operation of the car
15.0 Winter operation of a car 15.1 How to prepare a car for winter 15.2 Recommendations for starting the engine in severe frost 15.3 What is useful to buy for winter 15.4 Useful winter tips
16. Preparation for technical inspection
16.0 Preparation for technical inspection 16.1 Recommendations 16.2 List of malfunctions and conditions under which the operation of vehicles is prohibited 16.3 Changes to state standards regulating the maximum permissible content of harmful substances in the exhaust gases of vehicles 16.4 Standard form of diagnostic card for instrumental control points
17. Applications
17.0 Appendix 17.1 Appendix 1. Tightening torques for threaded connections 17.2 Appendix 2. Basic data for adjustments and control 17.3 Appendix 3. Fuels and lubricants and operating fluids 17.4 Appendix 4. Filling volumes 17.5 Appendix 5. Lamps used on vehicles 17.6 Appendix 6. 17.7 Appendix 7.
Replacing the clutch yourself
When the cause of the malfunction is identified, it will be necessary to carry out repairs and take measures to eliminate the breakdown .
If you do such work yourself, then this is a long process that will take a lot of time. And also all activities should be carried out according to the instructions.
Sequencing:
Mandrel for centering the driven disk.
We remove the gearbox.
We mark the relative positions of the disc casing and the flywheel.
We unscrew the six bolts securing the pressure plate to the flywheel.
Let's remove the pressure and driven discs and do a visual inspection.
We check the reliability of the damper springs.
We evaluate the condition of the pressure plate diaphragm spring.
When all these indicators are missing, then the disk can be left old , changing only the release disk. Assembly is carried out in reverse order.
Video about replacing the clutch on a Niva Chevrolet
Niva Chevrolet and clutch slave cylinder: diagnostics, repair and replacement
The presence of a clutch in cars is not accidental, and its absence makes it impossible to travel in a vehicle. For most novice drivers, the clutch is the leftmost pedal in the car. But few people know its design, and therefore in this article we will pay attention to one of the main elements of the clutch - the working cylinder on a Chevrolet Niva. What is this product, why is it needed, where is it installed and how is it repaired and replacement parts carried out? You can learn about everything from this material.
What is clutch?
This is the unit through which torque from the engine is transmitted to the gearbox.
When the clutch does not work at the proper level, it will not only make it difficult to engage a particular gear, but will also negatively affect the operation of the engine and gearbox itself.
Clutch Niva Chevrolet VALEO.
On the Niva Chevrolet the clutch drive is hydraulic . And it also has automatic compensation for lining wear. The clutch drive is also of great importance, since it is with its help that the driver can control the clutch.