How does the parking sensor work?
The parking sensor device is quite simple, and it can be divided into several components. These are an indication unit, a control unit and special sensors. There are models in which the control unit is single. In this case, the indicator unit can be either a buzzer or an LED or liquid crystal display.
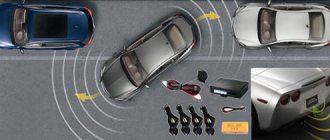
So what is parking sensors, and what is its operating principle based on? The operation of an acoustic parking system is based on the properties of sound waves. Ultrasonic radar is able to correctly determine the distance from the car's bumper to the closest obstacle. The system transmits an impulse using a transmitting device; upon reaching an obstacle, it is reflected. The device receives the reflected signal, and with the help of a controller, based on the time it takes the beam to travel to the obstacle and back, calculates the distance to the obstacle.
Information about the distance between the vehicle and the obstacle is instantly displayed on the display. It is usually attached to the car's dashboard or rearview mirror. If desired, it can be mounted in any other place. The system is also equipped with speakers that warn the driver with sound. Typically, the parking sensors emit the first signals when the car approaches an object closer than 1-2 meters. If the obstacle is at a distance of 0.1-0.4 m, the signal does not stop until the reason for the system’s response is eliminated.
If you engage reverse gear and start moving backwards, the parking sensors also engage simultaneously with reverse gear. The system, with sensors mounted on the rear bumper, will receive power from the reversing light circuit.
If the car has corner or front parking sensors, the system is activated when the car is moving at low speed, namely up to 20 km/h.
Installing a parking radar is not difficult - usually a wire is laid along the car body, which connects the display unit with the sensors. In addition, there are wireless systems. This type of parking sensors is much more convenient to install than wired ones.
Installation process on video
Almost all car owners have at least once heard information about fake accidents.
Such information is often reported by newspaper media and television channels, while giving a large number of recommendations on exactly how to behave if you find yourself in such a situation. However, people quite often completely forget all the advice they received, giving scammers the opportunity to make themselves an unwitting participant in such an accident, including the culprit. How should you act to minimize the likelihood of getting into such a situation?
Principles of choosing a “victim”.
First of all, it is worth deciding what type of car owners most often falls for such schemes and becomes their victim. The most optimal targets for scammers are those drivers who drive inexpensive, budget foreign-made cars or high-quality domestic cars. They select car owners who drive alone, which means they do not have unnecessary witnesses in the car. The second, most suitable option is female drivers. They cannot offer physical resistance, and they are much easier to intimidate. But there are also several categories of cars that are almost never touched by scammers. These include, for example, cars that have “thieves” license plates installed. In addition, in their criminal schemes they do not use “processing” of owners of expensive SUVs or business class sedans. Attempts to “divorce” them may cause problems for the criminals themselves. Another type of car on which such schemes are rarely used are cars with tinted windows. Simply put, they are not touched for the reason that there is no way to see the number of people who are inside. And the last ones that car substitutes will not touch are cars with several people in the cabin. The reason is that they do not need extra witnesses, in addition, the need to intimidate several people makes the task much more difficult.
Carrying out a fake accident.
When performing such actions, attackers use cars from fairly well-known manufacturers that have a spectacular appearance. Their peculiarity may be the complete absence of numbers, or the fact that they are smeared with dirt. The second option would be to use fake license plates. On the left side of such machines there are often damages that were sustained in previous operations, or were inflicted on purpose. The total number of participating cars is most often two. The task of the first of them is to push the victim’s car out of the lane, while the second is to collide. They adhere to this principle almost constantly.
Driver behavior in such a situation.
Should we try to resist such actions? Of course yes.
- To do this, you should definitely purchase a DVR for the car interior. Such a witness is quite difficult to intimidate or bribe.
- You should always call the traffic police on your own, without trusting anyone;
- While waiting for the squad to arrive, you should definitely film the location of both cars and the damage they received. Don't forget about the appearance of the criminals themselves.
- If you are threatened, you should simply lock the car from the inside and immediately call the traffic police.
Bottom line.
One of the rules that can help avoid getting into such a situation is compliance with traffic rules. Often, criminals, seeing that everything is not developing according to their planned scenario, leave the scene without waiting for the traffic police officers to appear.
I think there is no need to explain the practicality of having parking sensors in a car. Especially if the car is operated in a metropolis. And if there is also a spoiler installed on the car...
Parking sensors were selected according to the following criteria: the presence of 4 sensors and a display reflecting the distance to the object, low price. The Falcon BPS-4i parking radar was selected.
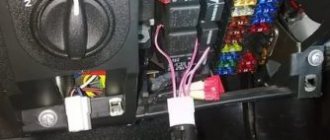
Connection does not raise any questions because there are instructions... We connect the parking sensors to the positive wire that goes to the reversing lights.
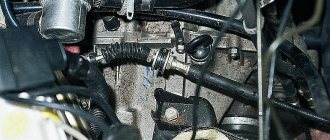
Removing the bumper is described in detail in the Operation and Repair Manual VAZ 2110-11-12. The only problem that arose was when choosing the location for installing the sensors. According to the manufacturer's recommendations, the distance between the sensors should be about 30-33 cm, and the installation height should not be lower than 30 cm from the road - otherwise false alarms are possible. Therefore, the recess in the bumper skirt was excluded from possible installation locations. The only place suitable for installation was the recess under the number. But with this arrangement of parking sensors, it is necessary to install small spacers to ensure perpendicularity to the road surface. We lay the wires from the sensors through the standard hole along with the license plate light wires. The control unit can be mounted on the stiffener of the right panel supporting the luggage compartment shelf. We run the display cable on the right side under the ceiling trim. And we fix the parking sensor display itself with a self-tapping screw to the panel covering the rear view mirror mount.
During operation, some features were identified, both pleasant and not so pleasant: + information about the distance to the object is displayed quite accurately, both sound and visual indication; + when parking, the sensors even distinguish the gratings of embankment fences; — instead of the 1.5 meter distance to the object declared by the manufacturer, the beeper starts working only at a distance of 1 meter; — at low temperatures (below -15C), the parking sensors slow down a little, i.e. works with a certain delay.
The presence of parking sensors in cars makes the life of modern drivers much easier. This part has been installed on foreign cars for several years now. It's hard to imagine a Ford Mondeo driver who parks by eye. Problems with parking spaces have become one of the most popular topics of discussion today. You can find a place to park your car, but if it is small, you can scratch the body. Parking sensors are needed precisely to avoid problems of this kind. A sensor installed in the car scans the space and reports if an object is approaching the car. Why are owners of domestic cars worse? Why don't they install such a device? Since the factory doesn’t want to do this, you have to install everything yourself.
How to connect
There are no particular difficulties at the installation stage of parking radars. At the same time, the sequence of actions itself remains similar for both front and rear models. But in the case of connecting the front parking sensors, there are differences. They are related to the design of the device, the presence or absence of a button and other features.
If the design is equipped with a power button, connecting it to the standard system will be much easier. And this option is characterized by expanded functionality and increased operating efficiency. One of the disadvantages is the need for manual start.
The node to which the lighting lamp or video recorder is connected is used as the power source. The specifics of the connection are quite simple; when the engine starts, the system operates, demonstrating a lot of display or beeper signals. When the vehicle stops, the parking radar is switched off.
This installation method has weaknesses, because According to established standards, the device should start working automatically when the speed decreases to 20 km/h.
There may be difficulties when connecting radars to the checkpoint. First you need to find the sensor that starts the first gear. It can be replaced with a button made by yourself. When the gearbox is in first gear, the selector activates the parking sensors.
Installing front parking sensors
Installing the front sensors is no different from the procedure performed for the rear axle. The difference will be in the power connection. Since the installation of additional devices is largely a creative process, there are several options for how to connect the front parking sensors to the on-board network. The simplest of them is power from the ignition switch. The front parking sensors will turn on after turning the ignition key to position 3 (On). This feeding method is one of the simplest.
You just need to find a wire near the mounting block that will receive power when the ignition is turned on. This can be determined using a special test. Since the system will always be on, in winter, when snow and a dense layer of dirt accumulate, a false signal may be given about approaching an obstacle. This will cause significant inconvenience. We invite you to watch the video of the installation process.
Inconsistent nutrition
- Power supply from the brake pedal. Power to the brake switch is also supplied only when the ignition is on. But the system will only work when the brake pedal is pressed. Since the limit switches react to even the slightest touch of the pedal, you can activate the front parking sensors by lightly touching the brakes. The connection method will remain the same. You just need to find the positive wire that will come from the end switch;
- from turning on the first speed. A rather extraordinary method, the essence of which is to install a button in the place where the manual transmission knob is in the extreme position when engaging first speed. You will have to build a bracket by calculating the position of the lever. In order to avoid having to constantly hold the lever pressed against the button, the system must be equipped with a time relay. After pressing the button once, the sensors will be powered for the programmed period. You can build such a relay with your own hands;
- output to a separate button, pressing which will trigger the supply of power to the sensors. Plus, in this case, you can take it from any convenient source that has voltage after turning on the ignition. The button can also be installed in any place convenient for you.
installing partronics
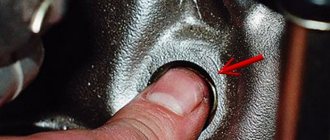
To install the parking sensors system, four identical holes should be made in the bumper at the same level. It is not necessary to remove the bumper, but if it is more convenient, then why not. Make a mark and drill 4 holes along it. You don’t have to guess about the size of the holes; in the kit you will find a special crown, the size of which is designed for sensors. We install the sensors in the same plane. It's time to run the wires. This is very convenient to do through the trunk. You will have to drill a hole in the body to insert the wires into the luggage compartment. We will install the parking sensor control panel in the corner of the trunk and power it with a positive wire from the reversing light. This will allow the system to turn on only when the car is reversing. Everything worked out, check everything carefully before completely trusting the robot.
Installation of parking sensors with 4 sensors. Features of sensor installation
Parking sensors with 4 sensors are one of the most common and popular modifications of a device that helps the driver when parking. In this article we will talk about the features of installing these sensitive elements.
About the installation location
Parking sensors only work after the sensors that transmit and receive sound signals are correctly installed. These sensitive elements are built into the front and/or rear bumper of the car. Also called sensors. Most parking sensors come with 4 sensors that are responsible for calculating the distance to an obstacle by measuring the amount of time it takes for sound to travel from the sensor to the obstacle and return in the opposite direction.
Installation features
Preparing holes for sensors is one of the most difficult jobs when installing parking sensors. On some cars it is not necessary to remove the bumper. However, when dismantling this body element, it will become easier to solve the problem.
1. Drilling holes;
Before drilling, you need to mark the locations of the holes on the bumper. It is recommended to read the operating instructions. It will provide detailed information about the required distance between the sensors and the optimal height to the ground. After the measurements have been taken, you should stick mounting tape onto the sensor installation sites and mark the holes with an awl.
Using a milling cutter we prepare the mounting locations. The holes must be positioned strictly horizontally. Thus, you should drill perpendicular to the plane of the body element.
2. Installation of sensors:
Sensitive elements are installed with the sensors facing outwards. The wires must be inside. Some car models have a lining under the plastic bumper - a damper. In this case, you should insert the wires using a regular nail. You must first make a hole in the damper for the wire, secure the cable to a nail using electrical tape and pull it inside.
Then we install the sensors in the prepared holes. It is necessary to fix the sensors using locking rings, which are supplied with the parking sensors.
Most sensors are black or gray. If desired, these elements can be repainted to match the body color. Application of paint does not in any way affect the durability or sensitivity of the sensors. At the same time, the installed sensors will look invisible.
- mortise;
- tape
- the front radar is connected separately and is activated only at low speeds, when braking, and usually has two sensors;
- the rear parking radar is accordingly responsible for driving without interference when the reverse speed is engaged;
- The combined parking sensor system has a common circuit and is equipped with two front and four rear sensors that have different sound signals.
How does the parking sensor work?
There are several types of these devices, and in this article we will look at the most popular of them - ultrasonic. The operating principle of parking sensors is simple: special sensors are installed in the car’s bumper, which transmit and receive acoustic signals.
The device calculates the distance to obstacles based on the time it takes for sound to travel from the sensor to the obstacle and return. This is possible due to the fact that the speed of sound is a constant value. The driver receives a visual, audio or complex signal.
Some types of parking sensors have an LCD display that displays the position of the car relative to obstacles and the distance to them. As practice shows, it is the sound signal that is best perceived, but this rather depends on habit.
New parking sensor doesn't work
At the beginning of the article, we recommended checking the functionality of the device before installing it on the car. If it worked before installation, you should check the connections of all main components. All components must be connected according to the instructions that come with the kit.
The parking sensors worked, but something went wrong
The fastest and most reliable way to find out the cause of a breakdown is computer diagnostics. Nowadays, many auto repair shops provide this service. If you decide to find the cause of the breakdown yourself, we will try to help you. Sensors are often the cause of all problems, and they are the ones you should pay attention to first.
The sensors are also sensitive to water and may give false signals during rain or after washing. In this case, drying, for example with compressed air, will help. At sub-zero temperatures, especially in severe frost, the sensors may also lose sensitivity. But this does not affect their further performance.
DETAILS: Replacing the brake lamp for Ford Focus 3. Photo, instructions on how to change the brake lamp for Focus 3
Finally, before heading out on the road, you should test the parking sensors with different obstacles and in different modes. This will allow you to understand in which situations the system can give a false signal and in which it is real.
Required tools and materials
To create a parking sensor, some materials and tools are required. Cars for sale are often supplied with this option, which is considered one of the most useful. To carry out the work you need:
- The controller is called "Arduino Duemilanove". This device is represented by a hardware computer that processes all incoming information.
- Ultrasonic sensors that act as a device that determines distance.
- To protect important elements of the system, a plastic case or box is used. It is often placed in the luggage compartment.
- It is recommended to use special adapters to connect individual elements. The use of the soldering method complicates the installation and dismantling procedure.
- LED light sources. The diode is installed in a visible place inside the car. It acts as a signal by which the degree of proximity to various obstacles is determined. Instead of a diode, it can set a PWM signal timer.
- Bread board.
- Wires of the appropriate length, which are used to connect all elements. Connecting the parking sensors located in the bumper to the controller requires extensive wiring. The cable is laid under the body trim or various plastic panels.
- 9V power supply. In some cases, power is supplied from the standard radio or multimedia system, since they are turned on with the ignition.
To carry out the work, a soldering iron, knife, pliers and insulation are required. To remove the bumper and other elements, you need screwdrivers with different tips and a set of keys.
How to connect the device
To connect parking sensors to 4 sensors, you need to route the cables from the ultrasonic elements to the control controller, and then connect the information display. The control unit requires power supply only when reverse gear is activated. Installation of equipment for 8 sensors differs in the installation of an additional cable braid from the sensors located in the front bumper. The controller is attached to the wall of the luggage compartment using screws or plastic clamps; the device can be mounted under decorative trims.
For example, the schematic diagram for connecting the SPARK-4F assistant controller provides for the input of cables from the sensors; a positive power signal is supplied from the reverse gear lamp. This technique ensures that the equipment operates only when the vehicle is in reverse. The negative wire is attached to special bolts welded to the body. The control unit has a block for switching direction indicator lamps; the signals are used to enter the programming mode and switch menu sections.
The parking sensor circuit involves activating a quiet mode, which allows you to determine the distance to cars standing behind or in front. The controller is additionally connected to a limit switch located in the brake pedal. It is allowed to supply power from the brake lamps located in the rear lights. When you press the pedal and the gear selector is in neutral, the display shows the distance to obstacles. The display design includes a button to force the display to turn off.
Some assistants support the function of warning the driver about cars in blind spots. The sensors turn on when a warning signal is given by the turn signal; when a car or motorcycle is detected, the warning LED on the pillar trim turns on, and the signal is duplicated on the display. It is possible to permanently or temporarily disable the function by sending a signal to a separate contact (performed with a toggle switch or by pressing the brake pedal).
Composition of the parking sensor kit
Knowing the configuration of the device will help you initially get a picture of how the parking sensors are located on the car. Installation is carried out in different parts depending on the purpose of the components.
The required list includes the following elements:
- Control block. Performs the function of processing information from sensors, conducts system diagnostics and gives signals to the car owner about the current state of the device.
- Ultrasonic sensors are perhaps the most important elements of the system, which detect obstacles and send a primary signal about approaching them to the electronic unit.
- Indicator light that alerts the driver to danger.
- A display that displays video information in detail.
- More modern models are also equipped with special systems that provide projection of information from sensors onto mirrors or windshield.
It has already been noted that there are systems without sensors - these are parking sensors, the installation of which only requires the installation of a special antenna and a control unit. In terms of ease of installation, this is the most advantageous solution, but the real help from such devices is minimal.
How does he work
Many of you know that parking sensors are a device that can be purchased and installed in the front or rear bumper, or in the front and rear parts of the car at the same time. When you approach an object while parking, it beeps, signaling that if you don't brake now, there will be trouble.
But these are general words. In fact, parking sensors are an acoustic parking system. That is, a device designed to facilitate the process of parking a car. The function is to warn the driver about obstacles and the distance to the object. The standard parking sensors are installed from the factory, and the built-in one is mounted separately, that is, by the car owner himself.
The device circuit is based on an electromagnet. This electromagnetic acoustic system creates an electromagnetic field in front of the bumper. Therefore, all objects that fall within the range of the field change their resistance parameters, which activates the operation of signaling devices.
This is not just a sensor with a rear view camera. This is a whole block, a system that includes a set of equipment:
- Control block;
- a set of sensors;
- devices for sound notification;
- monitor.
The main component is the ECU, that is, the electronic control unit. It is extremely necessary for a car, because simply with a monitor and cameras in the bumper you will not get full-fledged parking sensors. The unit controls the operation of sensors that detect obstacles. This is achieved due to the effect when ultrasonic waves are reflected. This way the system understands that there is an obstacle ahead and determines the distance to it. That is, the device is smarter than many drivers, to be honest. And sometimes they look in the rearview mirror, but stubbornly do not see anything. I'm talking about that smart guy who decided to park in my front bumper.
The sensor emits waves that reflect off nearby objects and return back as a signal. The system calculates how long it took the wave to leave, reach the object and return. This way she will know how far away it is from him.
How much do parking sensors cost? Many people think that there is only one. But no. The simplest version is equipped with a pair of sensors, and modern advanced models have 8 sensors at once.
Kinds
Purchasing and installing parking sensors in Moscow, St. Petersburg and even small cities is not a problem. The other question is which one is better. Price is not always an objective indicator. Although I’ll say right away, it’s not worth buying cheap Chinese devices.
There are companies Parkmaster, Aviline, Sho Me and many others that perform well and are trustworthy. You can purchase them through an online store, Aliexpress, or simply in a regular automotive electronics store. Be sure to ask for certificates and all documents so as not to buy a fake that does not work properly.
But think carefully about which parking sensor to choose. They are distinguished depending on the number of sensors.
- Two sensors. Budget, simple and affordable devices. But they have dead zones, so such parking sensors cannot always detect some objects. For example, vertical pillars.
- Four sensors. If we take the price-performance ratio, then this is the best option for almost any car, from cheap to expensive. There are no blind spots, the sensors perfectly monitor everything that happens behind.
- Six sensors. This is for those who need control from the front and rear. 4 devices are behind, and two are in front.
- Eight sensors. The principle is the same, only there are the same number on each side - four devices.
- Any option that works in conjunction with a rear view camera.
Whether you need front parking sensors is a purely individual question. I personally don’t see the point in spending a lot of money on it. But if you think you will need it, then go ahead and buy it.
How to choose parking sensors
The main criterion for choosing parking sensors is the number of sensors that report danger. Consultations about product quality with salespeople in showrooms usually lead nowhere, since few people understand this issue. When choosing a system, the kit should not contain less than two sensors. But the best option would be a kit with four sensors. It scans the surrounding space in the best possible way. The most difficult task is choosing the correct location of sensors in car bumpers. If you make a slight mistake with the calculations, most likely the system will incorrectly notify you of obstacles. Perhaps too early, even worse if too late. Or it might not work at all. When choosing parking sensors, take into account all operating conditions of the vehicle. The temperature of your area, car wash traffic, etc. etc. So that various kinds of problems do not arise later. Please note that many parking sensors work well with on-board computers. This usually happens when the system and computer are from the same manufacturer. The part itself is not picky about external processing. You can repaint it to match the color of the car. Its performance will not deteriorate from this. Prices for such a device vary greatly. You can buy an option for 1000 rubles, or you can buy it for much more. Everything depends on quality.
Installation of parking sensors using the example of the BEA 300 model
For those who are interested in how to install parking sensors using alternative methods, there is one such method.
For example, you can take a fairly popular, in demand and inexpensive device called BEA 300. The sensors of this device are often mounted in the bumper, and the parking sensor itself will cost about 6,000-7,000 rubles.
1. Before starting work, you need to find all the necessary tools so that you don’t interrupt the process later. It is best to keep on hand special cutters that are used to create specific holes in a bumper made of plastic.
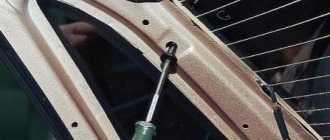
2. It is necessary to dismantle the bumper. Removing the plastic trims that are located in the trunk is also a fairly important step. You should also peel back all soft upholstery. This is necessary in order to see the bolts that are responsible for fastening the bumper.
3. Then remove the bumper trim, unscrew a couple of bolts from the luggage compartment, and also unscrew the mudguard screws. To do this, use a special 6 star key. To mark the places where the sensors are intended to be installed, you can use ordinary masking tape.
It is very important to maintain certain distances: 41 cm between each individual sensor, 124 cm is the distance between the first and last element. 4
You need to carefully check the markings and make sure that you will be drilling in the right place. To do this you need to use special drills. It is necessary to use water as a coolant so that the plastic is not damaged by the operation of the cutter
4. You need to carefully check the markings and make sure that you will drill in the right place. To do this you need to use special drills. It is necessary to use water as a coolant so that the plastic is not damaged by the operation of the cutter.
It is best to use the services of a partner - he will be able to pour water on the plastic elements while you work with the drill. The minimum hole size is 18 mm, otherwise the sensor simply will not fit.
5. The bumper with drilled holes must be placed on a soft cloth bed, and all the necessary wiring must be laid. The surface must be thoroughly cleaned and dried. Next you need to use liquid from a special bottle to treat the areas for gluing.
6. Glue all the sensors. You need to install the bumper in its place, pull the wire through the pre-prepared holes.
7. Install the central control unit and connect it to the electrical circuit of your vehicle. It is best to install the tweeter in a place so that the driver can definitely hear this sound.
8. After completing all work, you need to test the entire system to make sure it is working.
Video instructions for installing parking sensors with your own hands:
Video example of installing parking sensors with your own hands
To install parking sensors with your own hands, you do not need any professional skills. An ordinary car enthusiast can cope with this task. All you need to do is drill a few holes evenly and connect the wires correctly. Most of the necessary tools can be found in any driver's garage.
The set of most parking radars consists of:
- sensors (from 2 to 8 pieces)
- connecting cables
- screen
- signal processing unit.
Also included with some models is a cutter for drilling holes for sensors and various useful little things. But if it is not included in the kit, this is not critical - you can measure the diameter of the sensor and purchase a drill at the nearest store. However, it must be taken into account that the diameter of the cutter should be 1-2 mm larger than the diameter of the sensor.
To install and connect the parking sensors we will need:
- the device itself
- cutter for drilling holes for sensors (often included with parking sensors)
- drill (you can also use a screwdriver)
- a set of keys
- pencil, electrical tape or clamps, tape measure and tester.
All cars are different and each case is unique, so you may need other little things, such as pliers, a soldering iron or a car electrical diagram.
Before starting installation, we recommend that you make sure that the device is operational. Connect the signal processing unit and sensors with wires and check whether the parking sensors react to obstacles.
Parking sensor installation diagram
This installation scheme is universal and suitable for most cars. Sensors and a camera are mounted in the front and rear bumpers, which are connected by wires to the control unit. The parking sensor display can be installed either on the dashboard or in the rear of the cabin and is also connected to the unit.
DETAILS: Instructions for replacing the generator on a VAZ 2107-2101 with your own hands
Parking sensor operation diagram
Gadget with a display for parking
If you decide to install parking sensors yourself on the body or bumper of a car, then first we’ll figure out how the device works. Its main purpose is to signal to the motorist using sound and light pulses that the vehicle is too close to an obstacle. Today, there are many types of such devices, including those equipped with cameras that display images on the display of the radio, a separate monitor, or even the windshield.
So, if you decide to install parking sensors, then familiarize yourself with its operation diagram below:
- The circuit is equipped with several sensors, which, once connected, allow you to detect obstacles using an ultrasonic pulse.
- When the regulator detects an obstacle, a wave is returned to it.
- The regulator transmits an impulse about existing interference to the control unit, which subsequently processes the received data.
- As a result, if the connection and configuration were made correctly, the driver is notified of interference. This can be an audio signal, visual or complex. The distance to the object of interference can be displayed on the display of the radio or the device itself. But in fact, our car enthusiasts usually perceive only sound impulses.
How to install parking sensors on a VAZ 2110, 2111
A vehicle part such as parking sensors, parking sensors, and so on is not something unusual on modern vehicles that are equipped with this part from the manufacturer’s factory. However, car models such as VAZ 2110, 2111 do not have parts, which means that if you wish, you will have to install them yourself. In order to do the job correctly, you first need to go to a car store and purchase a suitable element. A parking system has a large number of positive benefits, so its installation is an extremely necessary step. Domestic cars, in turn, are technically simple, so even a beginner who has not previously encountered the work can install the system. It is especially important to install the system on cars that have difficult rear visibility. After disassembling the car, install the new system in place and connect it as indicated in the instructions. Also, if difficulties arise, you can watch a video that explains in detail how to quickly and efficiently get the job done.
Please note that it is important to take into account all the nuances that the master indicates. The first thing you need to do is make a plan for yourself to install the part. You may especially need it if you have not previously encountered this task.
After completing all the work and making sure that everything works as it should, you can assemble the car in its original position and continue operating your vehicle using the newly installed system. In conclusion, we will say that if, after installing the system, any difficulties arise with its use or it becomes faulty, you can repair the system yourself, but in order to carry out all the work more easily, it will need to be removed. In general, the system is very easy to use, so don’t worry, you’ll definitely be able to handle everything, the main thing is to take your time. Of course, you don’t need a lot of time, but the final result directly depends on how accurately and accurately you perform all the work, so pay attention to this important nuance. As for the cost of purchasing the system, it may differ depending on the manufacturer and this must be understood
You may especially need it if you have not previously encountered this task. After completing all the work and making sure that everything works as it should, you can assemble the car in its original position and continue operating your vehicle using the newly installed system. In conclusion, we will say that if, after installing the system, any difficulties arise with its use or it becomes faulty, you can repair the system yourself, but in order to carry out all the work more easily, it will need to be removed. In general, the system is very easy to use, so don’t worry, you’ll definitely be able to handle everything, the main thing is to take your time. Of course, you don’t need a lot of time, but the final result directly depends on how accurately and accurately you perform all the work, so pay attention to this important nuance. As for the cost of purchasing the system, it may differ depending on the manufacturer and this must be understood.
Director of JAC Motors: “We are planning our activities in Russia for the long term”
See all photo news >>
Caffer › Blog › Installing parking sensors (the most complete guide)
Parking radar, or parking sensors, as it is commonly called, has become a common choice among car owners due to its practicality, reliability and inexpensive price.
Many car dealerships offer to equip your car with parking sensors immediately upon purchase, but what to do if the car you are buying is not equipped with this system? After all, there is still an opinion that installing parking sensors is far from simple and requires a lot of knowledge, skills and abilities in electronics and plumbing, because even if you look at a typical parking sensor installation kit with the naked eye
You can see meters of wires, terminals, fuses, sensors, a drill... But, oddly enough, the process of installing a parking radar is incredibly simple, and today I will tell you how to do it using the example of a Mitsubishi Lancer X =)
First, remove any taillight, preferably the one on the side of the trunk light
Then we loosen (unscrew) the bolts securing the bumper so that we have the opportunity to bend it
Important point: carefully mark the position of the sensors on the bumper
And we make holes with a drill, which usually comes with parking sensors and corresponds to the exact dimensions of the sensors
Now, with a special tool No. 1 (any hard wire), in the sequence indicated in the instructions (usually these are colored numbered marks), we thread the wires from the sensors into the previously made holes
And we bring them out into one ponytail from the side of the removed headlight
Since we have our own paint booth and color matching workshop, we additionally painted the parking radar sensors in the color of the car body, but if you don’t have a camera or the “correct” color at hand, don’t worry, this will not affect the performance of the device in any way
After our sensors have dried, we proceed to install them in place; to do this, we connect the sensors to the wires so that the markers on the sensor coincide with the markers on the wiring wire
We stretch the wiring and fasten the sensors in place
In order not to make unnecessary holes in the car body, we thread all the wires from the sensors into the standard technical hole for wiring the headlights
And for convenience, we twist them into one bundle using electrical tape