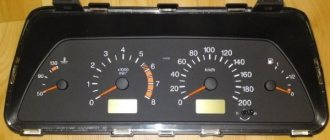
The instrument panel of the VAZ 2114 car helps the driver to timely monitor all the necessary data on the state of the power unit, the availability of fuel, the time period of the journey, and the speed of the vehicle.
It is important to keep the panel in good condition so that the driver can easily see the readings of all indicators located on it. If the panel malfunctions, emergency situations may arise, since the driver will not be able to monitor the condition of all vehicle systems, including car alarm equipment, the operation of the brake system, will not be able to take into account engine speed, determine the speed of the vehicle, etc.
The panel also shows time, temperature, and indicates the operation of signal and light lamps. That is why you should always monitor the serviceability of this device.
Instrument panel lighting VAZ 2114
Tips for motorists
If on a VAZ-2114 car on the instrument panel none of the indicators installed on it work (speedometer, odometer, tachometer, fuel level and coolant temperature indicators), then the first thing the driver will have to do is check the integrity of fuse F3, which is located in the mounting block. If it has burned out, then before replacing it, you need to find the reason why it burned out, otherwise the newly installed new fuse will have the same fate as the previous one. Most often, fuses burn as a result of a short circuit.
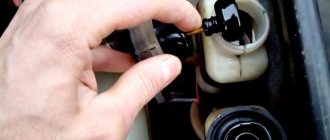
Even if the fuse is intact, then do not be lazy to take it out and check the condition of the contacts. There are cases when the contacts oxidize, and the electrical circuit in this place is interrupted. After making sure that the fuse is intact, the next step is to check the ignition relay, which is located inside the car to the left of the steering column. It is attached to a pin upside down. In the block where this relay is inserted, you can try to short-circuit the power wires using a jumper. If the instrument panel comes to life, the ignition relay will have to be replaced.
If the ignition relay is working properly, there are only two possible reasons for the instrument panel not working: the ignition switch and the mounting block. Before installing the ignition relay on the VAZ-2109 car, the lock contacts burned quite often, and they had to be cleaned by disconnecting the contact group from the lock itself. After changes were made to the principle of supplying voltage to the ignition switch, its contacts began to burn very rarely, but the likelihood of this phenomenon still remained. On the mounting block, in its board, tracks may burn out; in order to see this, the mounting block will have to be removed from the car.
In addition to the reasons listed above, which can lead to failure of the instrument panel, it is also necessary to check the reliability of fastening the ground wire.
Hello! Today, on the 14th, I changed the main lighting bulbs in the cabin and after that the instrument readings stopped showing readings of revolutions, speed, fuel level and fluid temperature... I replaced the F3 fuse as written on your website and everything began to show. But the lights still don’t light up in the cabin. Thank you!
the person clearly explained the problem +1 to him. I also accidentally shorted the interior lighting contacts.....
The car starts, but the instruments do not respond! + Turn signals and wipers do not work. The relay and front are normal. Give me some advice ;)
I had the same thing! did you find the reason?
The dashboard on the VAZ 2114 allows the driver to control engine data, monitor the remaining amount of fuel, his speed, and other data. The panel should be maintained in working condition so that the backlight not working does not cause discomfort, and the sensors show real values.
Bright backlight
But quite often, VAZ 2114 owners discover that the instrument panel lights do not light up. If such a situation occurs, appropriate action should be taken immediately to eliminate it.
Troubleshooting steps
To diagnose and repair the backlight system for the instrument panel on a VAZ 2114, you will need a pair of wrenches, sizes 8 and 21, and a set of screwdrivers. The general procedure for dismantling and adjustment work boils down to the following steps:
- Remove the trim by first unscrewing the three fastening screws and removing the protrusion from the body part bracket.
- Remove the five mounting screws from the right side of the console and remove the screen.
- Disconnect the terminal with the battery suitable for the negative power source, as well as the block with the bundle of wires from the cigarette lighter system.
- The handle of the lever mechanism is removed.
- The stove ventilation system clamp is dismantled.
- The screws securing the steering column brackets are removed.
- The sockets are unscrewed, the light guide and the decorative panel insert are removed.
- The light bulb for illuminating the hydraulic corrector is removed using a 21 key.
- Finally, the screws that secure the top and bottom of the instrument panel itself are unscrewed so that it can be removed.
Why the instrument panel does not work
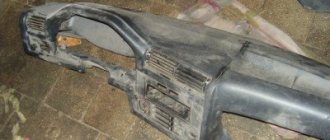
Disassembled dashboard
The first thing you need to figure out is why the instrument panel on the VAZ 2114 does not work. If the backlight goes out, there may be several reasons for this:
- The incandescent lamps burned out, the LED lighting groups stopped working;
- The connectors have oxidized;
- The electrical wiring is faulty, there are defects in the circuit;
- The fuse box has stopped working;
- Damage appeared on the common contact board;
- The dimensions system is damaged;
- There is no minus on the body (weight).
Reasons for turning off the dashboard on the VAZ 2114
Turning off the dashboard lights does not bode well for either the driver or the car. Because this malfunction is usually followed by others. Therefore, the backlight should be repaired immediately.
Many drivers install LED lights instead of standard incandescent lamps. It should also be understood that if the lights on the dashboard go out, then the problem must be looked for somewhere in the on-board electrical network. This means you can’t do without a multimeter, a soldering iron and electrical tape. Here are the main reasons for turning off the backlight:
- fuse burned out;
- the light bulbs have burned out (or LEDs - in later VAZ 2114 models the panel is illuminated by them);
- the wiring in the on-board electrical network is damaged;
- The common contact board of the instrument panel burned out.
Let's consider these points in more detail.
Removing the dashboard
To replace the light bulbs in the dashboard of the VAZ 2114, it will first have to be dismantled. Without this action, you will not be able to access the problematic device.
Panel disassembly diagram
Therefore, now we’ll figure out how to disassemble the instrument panel on a VAZ 2114:
- Unscrew the three screws, remove the trim and the protrusion from below. It comes out of your car's body bracket;
- Now remove five more screws located on the right console trim;
- Remove the screen; Disconnect the negative terminal from the battery;
- Disconnect the wiring harness connector from the cigarette lighter;
- Remove the handle from the lever;
- The fasteners for the electric fan of the heating system, that is, the stove, also have to be removed;
- Unscrew the steering wheel block bracket fixing bolts;
- Remove LEDs, lamp sockets and decorative inserts on the panel;
- Unscrew the hydraulic corrector illumination lamp. For this you will need a key for 21;
- Now all that remains is to remove the screws at the top and bottom.
Thus, we figured out how to remove the dashboard on your VAZ 2114. Be sure to cover the electrical circuit with something after the measures have been taken to prevent moisture, dust and all kinds of contaminants from getting there.
Proceed to replace the lamps that turned out to be faulty. At the same time, many are interested in how many light bulbs are in the dashboard of the VAZ 2114. There are 13 of them, but only 8 can be replaced. Do not forget to clean the contacts if there are traces of oxidation on them. In some cases, it is not the lamp itself that has to be replaced, but the socket for it.
Why might the dashboard lights not light up?
There are many reasons for this malfunction. The electrical wiring of the VAZ-2114, like all domestic cars, is not the strongest part. The most common reasons for backlight failure:
- failure of a group of LEDs;
- the light bulb burned out;
- the appearance of oxide on the connectors;
- broken or shorted electrical wiring;
- fuse failure;
- faulty common contact board;
- dimensions are damaged;
- lack of supply of “mass” to the body.
A voltmeter and tester will help you find the cause of the malfunction. With its help, you can check sections of electrical wiring and lamps. The device will also help you find out which fuse has failed. In most cases, you will have to remove the dashboard. We will talk about this procedure further.
Selection of light bulbs
Wiring ringing
Today, the market offers a wide range of lamps that can be used for the dashboard of the VAZ 2114. Among the most well-proven devices, we note a few. Their name and cost are presented in the table.
| Manufacturer | Price |
| LED lamps Sho-Me SM-T5 (blue, white and red (Korea) | 80 rubles - pair |
| High Brightness SMD LED Module | 20 rubles |
| LED Sho-me SM-T5-cap-super (white) | 50 rubles |
| Osram and Philips halogen lamps | About 40-80 rubles per unit |
Replacing the backlight
In analysis
To improve the quality of your dashboard lighting, it is advisable to install new LEDs in place of the old ones. They provide excellent illumination, consume minimal energy, and guarantee a high level of data reading.
- Buy a set of LED lamps, having previously calculated the number of devices needed for each sensor.
- After removing the block, install the resistors and lamps in specially designated places on the VAZ 2114 - in the sockets. To dismantle the cartridges, they are carefully unscrewed counterclockwise. New sockets are installed in their place and light bulbs are inserted. Respect the polarity and position the LED heads. They will have to be carefully ground off.
- Connect the power and check how the new backlight works.
- Reassemble step by step. Be sure to route the wiring to the board and carefully secure it to it. This way, the backlight components will not interfere with the reassembly process.
- Make sure the instrument panel arrows are positioned correctly. When trying to quickly complete a job, they often become deformed and bent.
- The backlight structure is fixed with screws.
- The power for the LEDs is connected to the power supply for the light bulbs, the arrows are put on and set to zero.
- Using the on-board computer, check the operation of each sensor and device. If the IDs are functioning correctly, return the instrument panel to its original condition. That is, assemble the entire assembly.
The search for possible reasons why the VAZ 2114 instrument panel may not work periodically worries one or another owner of cars of this model. It’s clear that if you don’t see a single parameter on the dashboard, you can only drive, as they say, by touch. True, there are certain specialists who still managed to somehow crawl to the base without all the evidence, but somehow I don’t want to follow their example.
And is it necessary to create possible troubles for yourself and increase the risk of getting into an accident? I think no! In today's article I want to tell you about the possible causes of a malfunction in the VAZ 2114 dashboard, and give some ways to repair it yourself.
VAZ 2114 – why doesn’t the dashboard work?
Why does the VAZ 2114 dashboard not work? There can actually be many reasons, here are some of them:
- Blown fuse
- Burnt tracks on the board cannot be repaired. In this situation, everything can be solved by installing a new circuit. You shouldn’t be afraid of this, its cost is not high, and you can replace it yourself.
- A break in the electrical wiring can be called the most complex, unpleasant and difficult to identify type of breakdown. In this case, power is not supplied to the instrument panel or one of the indicators, and it stops working. The fault is determined using a multimeter. The required wire is called back, the location of the break or poor contact is determined and, if necessary, replaced or cleaned.
Main conclusions
If the instrument panel backlight on a VAZ 2114 car does not light up, most likely the light bulb has burned out or the LEDs have failed. However, there are several other possible causes for this problem:
- The wiring is damaged.
- Oxides have formed at the contact points.
- The safety side has failed.
- The electrical circuit burned out.
To establish the exact reason why the backlight does not light, you must, following the instructions, carefully disassemble the instrument panel and sequentially ring the entire circuit using a tester. The found faulty element, depending on the degree of damage, must be repaired or replaced with a new one.
Previous
Car lightPurpose, selection and replacement of bulbs in the dashboard
Next
Car lightReplacing low beam lamps Ford Focus 3
The dashboard of the VAZ 2114 is out of order, what should I do?
If on a VAZ-2114 car on the instrument panel none of the indicators installed on it work (speedometer, odometer, tachometer, fuel level and coolant temperature indicators), then the first thing the driver will have to do is check the integrity of fuse F3, which is located in the mounting block. If it has burned out, then before replacing it, you need to find the reason why it burned out, otherwise the newly installed new fuse will have the same fate as the previous one. Most often, fuses burn as a result of a short circuit.
Even if the fuse is intact, then do not be lazy to take it out and check the condition of the contacts. There are cases when the contacts oxidize, and the electrical circuit in this place is interrupted. After making sure that the fuse is intact, the next step is to check the ignition relay, which is located inside the car to the left of the steering column. It is attached to a pin upside down. In the block where this relay is inserted, you can try to short-circuit the power wires using a jumper. If the instrument panel comes to life, the ignition relay will have to be replaced.
If the ignition relay is working properly, there are only two possible reasons for the instrument panel not working: the ignition switch and the mounting block. Before installing the ignition relay on the VAZ-2109 car, the lock contacts burned quite often, and they had to be cleaned by disconnecting the contact group from the lock itself. After changes were made to the principle of supplying voltage to the ignition switch, its contacts began to burn very rarely, but the likelihood of this phenomenon still remained. On the mounting block, in its board, tracks may burn out; in order to see this, the mounting block will have to be removed from the car.
In addition to the reasons listed above, which can lead to failure of the instrument panel, it is also necessary to check the reliability of fastening the ground wire.
Dashboard VAZ 2114 – autotest
Some VAZ cars have a “dashboard check” function, which allows the arrows to make a full turn from start to finish. Such an auto-test of the tidy when the ignition is turned on is available on some foreign cars (Nissan, Subaru). In this article we will tell you how to do an automatic test of the instrument panel on a VAZ. Let's start with the fact that it is not possible to implement the function of checking the tidy when you turn on the ignition on every model. If you turn on the ignition while holding the mileage reset button and the arrows describe an arc, then this panel will work. As a rule, such calibration of the instrument arrows is available on AutoPribor models with one window (single-line), but again not on all versions. To modify the instrument panel you will need:
- Electromagnetic relay, small-sized (12V). For example, Tianbo HJR 1-2C.
- Transistor KT 503. Can be replaced with almost any npn structure.
- Capacitor 100uF, electrolytic (16V).
- Resistors for 1koma, 6.8koma, 22koma.
Solutions
First of all, you need to check the backlight bulb; if it does not work, it needs to be replaced. Also, the reason that the instrument panel does not light up in the VAZ 2114 may be a violation of the integrity of the wiring. She should be called. A damaged fuse and electrical circuit, as a rule, cannot be repaired - they simply need to be replaced. Let's look at quick ways to solve these problems.
One or more light bulbs do not light up
One of the most common reasons why the instrument panel lighting on a VAZ 2114 stopped working is burnt out light bulbs. The electrical circuit in this model is designed in such a way that if one light source fails, all of them stop working. To determine exactly what is broken, you will need to ring the entire system using a tester. Another reason for the lack of lighting may be the independent installation of LEDs instead of standard incandescent lamps. In this case, an error is often made in the distribution of power or the electrical parameters of the led elements are calculated incorrectly.
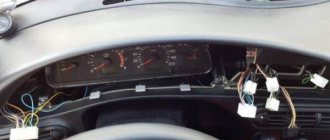
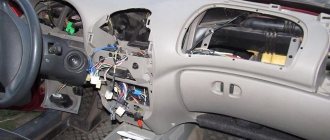
How to disassemble the dashboard of a VAZ 2114
Before embarking on this complex process, the driver must carefully familiarize himself with the design and arrangement of the instrument panel on his car. When disassembled down to the cogs, it looks like this:
If you carefully study this diagram, it becomes clear how to remove the panel on a VAZ 2114. Having determined the order for yourself, you can begin the process.
- Using a Phillips screwdriver, you need to unscrew the three screws holding the left console screen. For convenience, when doing this work, it is better to use a screwdriver with a short handle and blade.
- When removing the screen, carefully remove the lower edge of the trim from the body bracket.
- The right console screen is secured with five self-tapping screws. Using a Phillips screwdriver, carefully unscrew all the screws while holding the trim with your hand.
- Remove the screen without allowing it to get caught in the wiring harnesses that are hidden behind it.
- Disconnect the ground from the battery by disconnecting the connectors. If your car has a radio, disconnect it from the main bundle of wires by pulling out the connecting connector. If there is no radio installed on the car, then simply pull the wires out of the panel; they should be closed with a plug. Be sure to turn off the cigarette lighter and remove the socket with the ashtray light bulb.
- Remove the handles from the heater damper control levers. To make the process easier, pry them off with a flat-head screwdriver.
- Despite the apparent simplicity of this item, removing the handles from the levers can take a lot of time. To do this, a clear example is given of how this should be done on a removed unit.
- Remove the electric heater fan handle by simply pulling it towards you.
- Unscrew the cross-head screws securing the instrument panel to the brackets on the right and left with a screwdriver
- In the window on the instrument panel, where the instrument unit is located, there are two self-tapping screws at the top and two at the bottom - under the window. It is necessary to turn them out, loosening the cover (2) and the shield (8).
- Pull out the plug and unscrew the screw located behind it
- Remove the two screws from the bottom that hold the trim and remove it.
- Having marked the wires suitable for the switches, disconnect them.
- Remove the bolts from the steering wheel bracket
- Using the “8” key, unscrew the screws of the lower bracket fastening.
- Unscrew the self-tapping screw and remove the light guide.
- Remove the fasteners from the heating control unit and remove the cartridges from the back of the unit.
- remove the decorative insert, removing all external parts.
- Unscrew the nuts with a key set to “21”.
- Remove the hydraulic corrector illumination.
- Unscrew the upper and lower fastenings of the panel, and remove the fastening to the cross member on the left side.
- Now you can remove the VAZ 2114 torpedo.
- Installation is in the reverse order.
In order to clearly see the whole process in motion, you can watch a video on how to remove the dashboard on a VAZ 2114.
How to fix problems
Prepare for work a set of screwdrivers (straight and curved), keys 8 and 21, special plastic tweezers for removing fuses and a tester. Next, disassembly should be carried out according to the instructions:
- Disassembly begins with removing the cover. To do this, you need to unscrew 3 screws. There is a protrusion under it that needs to be removed from the body bracket.
- To remove the screen you need to unscrew 5 screws, they are located in the console lining on the right.
- Remove the terminal from the battery (usually the negative terminal is recommended) to disconnect the power to the car. Only after this, disconnect the wiring harness block from the cigarette lighter.
- Remove the handle from the lever. Disconnect the fastening of the electric fan located on the heating unit.
- After this, remove the bolts on the steering block brackets. Remove the light guide, lamp sockets and decorative insert of the instrument panel.
- Using a 21 key, remove the hydraulic corrector illumination lamp.
- Remove the screws from the bottom and top so that you can remove the dashboard.
It is important that the electrical circuit is in a place safe from dust and moisture. Cover it with a cloth or thick film to prevent the entry of aggressive substances.
Test the light bulbs first. If they fail, they must be replaced with new ones; in most cases, this is enough to restore the panel’s functionality. However, do not exclude other causes, for example, check connections and conductors for the presence of oxide. Carbon deposits often form on lamp sockets, which also leads to a lack of panel illumination.
If only the instrument panel stopped working, but all the lamps showed operability during testing, then the reason is hidden in the fuse block. In this case, check each fuse and replace the ones that are broken. When purchasing components, you must be guided by the marking of the failed fuse. You should not replace it with homemade products or components with higher current strength.
If the fault lies in damage to the board itself, which is extremely rare, then you simply need to replace this element.