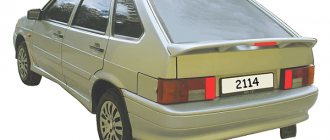
VAZ 2114 (2113) stops do not work
The VAZ 2114 (2113) car is equipped with brake lights in the rear lights (one in each light). Plus, an additional brake light in the spoiler on the rear door. There are few reasons why the brake lights of a VAZ 2114, 2113 car do not work. Let's list them all and try to figure out this problem ourselves.
Stop lights (brake lights) of VAZ 2114 (2113) do not work, reasons
Either one brake light or two at once may not work.
The brake light bulb in the rear light is burnt out.
Most often, only one lamp burns out, but sometimes two lamps burn out.
Brake light (stop) lamp in the rear light of a VAZ 2114 (2113) car
In this case, you will have to replace the lamp with a new one or a known good one. The brake light uses a P21W lamp. Similar lamps for the turn signal, reverse light, and fog light are in the same rear light. They can be used to check the brake light by replacing it.
The contacts in the stop lamp socket have oxidized
In this case, a “break” occurs in the electrical circuit of the lamp. Most often, in this case, one brake light will not work, while the other will be on.
Cartridge and contacts of the brake light lamp in the rear light of VAZ 2114, 2113
To restore contact, you need to turn the light bulb in the socket several times, or remove it and clean the oxidized contacts with fine-grained sandpaper.
The wiring block for the rear light is faulty (chip)
Either it is not securely fastened, or the contacts have oxidized. In any case, there will be an open circuit in the electrical circuit.
It is necessary to remove and put the block on the terminals of the rear light board several times to restore oxidized or unreliable contact. Subsequently, you can clean the pins on the board and the wire tips in the connecting block.
The fuse in the mounting block has blown
If the fuse is blown, both brake lamps in the taillights will not light.
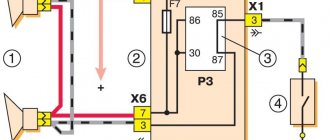
The electrical circuit for turning on the brake lights of the VAZ 2114 (2113) is protected by fuse F3 (7.5A) in the fuse and relay mounting block. Check the integrity of the fuse. If faulty, replace with a new one. If the fuse is blown again, you should look for a short circuit in the circuit. According to the connection diagram shown below.
The track in the rear light board has crumbled
As a result, the electrical circuit will be broken (“open”), and the brake light lamp will not light up.
Tail light board tracks for brake light
It is necessary to remove the rear light board where the brake light is not illuminated and inspect it for damage to the tracks. If you cannot visually detect the location of the damage, you should “ring” the tracks with a multimeter or test lamp. Wiring is soldered to the damaged track and the board continues to function. For details, see the article “Checking the rear light board.”
The rear light ground is missing
In this case, one or two lights may not work. The negative wire of the lamp of each of the rear lights comes out of its connecting block of wires (chips) and is attached to the body next to it. Over time, this connection oxidizes and the contact disappears (the circuit opens).
It is necessary to unscrew the nut securing the tip of the negative wire to the body. Clean the pin and tip. After which the contact will be restored and the stop will light up.
Brake light switch faulty
If it malfunctions, both brake lights will not light up. The switch is located under the brake pedal and, after pressing it, closes the contacts of the electric stop circuit.
We remove two wires from it - white-red and pink-red, and connect them together with a piece of wire. The brake lights are on fire - we change the sensor, no, then we check the electrical circuit. In addition, we check the adjustment of the free play of the brake pedal, since the position of the switch may be broken, it does not work completely and the contacts do not close.
“Open” in the electrical circuit of the stop lamps
The cause of the “break” may be insecurely fastened wire harness chips, oxidation of the contacts in them, breaking of the circuit wires or their damage as a result of repairs.
Using a multimeter in voltmeter mode, you can check the presence of voltage in various parts of the electrical circuit and determine the damaged area. The best way to do this is to use a diagram.
Stop lights (brake lights) in the rear lights of a VAZ 2114, 2113 car, wiring diagram
First of all, we check the presence of voltage at the tip of the red wire in the rear light blocks to understand the malfunction in the lights or circuit. Then we check for voltage at the tip of the white-red wire of the brake light switch under the brake pedal.
Notes and additions
Before carrying out a detailed diagnosis of a malfunction of the VAZ 2114, 2113 stops, it is necessary to visually inspect the accessible sections of the brake light switching circuit and its elements, and also remember whether any repairs have been carried out on the car, since often the solution to the problem is on the surface.
TWOKARBURATORS VK -More information on the topic in our VKontakte group
What to do if your car's rear brake light doesn't light up?
Car with brake light on
To correct a problem with a car's electronics, you need to look for the cause in the device itself or in the system that provides power to this device. Most often, the brake light does not work precisely for such a banal reason.
If your rear brake light doesn't come on, there are a few options to check. The most common:
- The signal fuse has broken or oxidized.
- The lamp installed in the place of the brake light has burned out.
- The signal activation mechanism is broken.
- The contacts that go to the brake light are faulty.
- Wiring is damaged. Only the last reason will require a lot of effort and time, comparable to taking the vehicle for repairs. The remaining reasons can be eliminated on your own; it won’t take much time.
Tail light circuit [ads-pc-1]
Purpose of fuses in the block installed in the passenger compartment
Note: On various vehicle modifications, some of the fuses shown in the images may be missing.
more details:
| Protected circuit | |||
| F1 | 20 | Yellow | Windshield wiper, windshield wiper switch, heated tailgate relay |
| F2 | 5 | Beige | Instrument cluster, fuel pump relay, engine control unit (ECU) |
| F3 | 10 | Red | Brake light switch |
| F4 | 10 | Red | Diagnostic connector, immobilizer antenna unit, body electrical control unit |
| F5 | — | — | Reserve |
| F6 | — | — | Reserve |
| F7 | — | — | Reserve |
| F8 | — | — | Reserve |
| F9 | 10 | Red | Instrument cluster, left low beam |
| F10 | 10 | Red | Middle sows right headlight |
| F11 | 10 | Red | Instrument cluster, left high beam |
| F12 | 10 | Red | High beam right headlight |
| F13 | 30 | Green | Rear door window motors |
| F14 | 30 | Green | Front door power window motors |
| F15 | 10 | Red | ABS electronic control unit, acceleration sensors, steering angle sensor |
| F16 | 15 | Blue | Electrically heated front seats |
| F17 | 15 | Blue | Sound signal |
| F18 | 10 | Red | Left front and rear parking lights |
| F19 | 10 | Red | Right front and rear parking lights, glove compartment lighting, instrument cluster lighting, hazard warning switch, HVAC control unit, audio system, cigarette lighter, central locking switch, front door power window switches, license plate lights, right lights front and rear position lights |
| F20 | 7,5 | Brown | Rear fog light |
| F21 | 5 | Beige | Electrically heated exterior mirrors |
| F22 | — | Reserve | |
| F23 | — | — | Reserve |
| F24 | Reserve | ||
| F25 | — | Reserve | |
| F26 | 5 | Beige | SRS system |
| F27 | 20 | Yellow | Tailgate wiper motor, horn, TDC sensor, reverse light switch |
| F28 | 15 | Blue | Interior electrical control unit (energy saving mode) |
| F29 | 15 | Blue | Interior electrical control unit, diagnostic connector |
| F30 | 20 | Yellow | Interior electrical control unit |
| F31 | 15 | Blue | Fog lights, fog light relay |
| F32 | 30 | Green | Heated tailgate glass |
| F33 | — | Reserve | |
| F34 | — | Reserve | |
| F35 | — | Reserve | |
| F36 | 30 | Green | Electric motor for heating, air conditioning and ventilation systems |
| F37 | 5 | Beige | Electric exterior mirrors |
| F38 | 15 | Blue | Audio system, cigarette lighter |
| F39 | 10 | Red | HVAC Motor Relay |
How to troubleshoot?
The most common reasons that the brake light on the VAZ 2114 does not work are the following factors:
- Fuse failure.
- Broken wires in one of the sections of the circuit.
- Limit switch faulty.
- Bulbs burn out.
- Oxidation of contacts in lamp sockets.
- Damage to the contact board.
The most common and at the same time the most easily removable of the above reasons is a blown fuse. To identify such a malfunction, you need to examine the fuse box. A 10-amp fuse F3 is responsible for the brake lights, which also protects the ignition switch, computer and interior lighting.
Malfunctions in the operation of the latter may also indicate a malfunction of the stop fuse (and in this case, troubleshooting should begin with the block). If it turns out that the fuse has blown, then you should replace it with a new, similar one.
A new fuse installed in place of a failed one must be designed for exactly the same maximum current. If it is less, the fuses will blow more often, and if it is more, the protected device itself may burn out.
The problem may also be in the fuse block itself - sometimes the tracks on its printed circuit boards burn out or the contact legs oxidize. In order to check its serviceability, it is enough to measure the voltage at the contacts of the newly installed fuse.
Another common reason why the brakes of the VAZ 2114 do not light up is a malfunction of the limit switch that turns on the signals. It is located on the brake pedal bracket and is always in working order, regardless of whether the car engine is turned on or not.
It works automatically when you press the pedal. In order to check its serviceability, it is enough to see whether the power supply is suitable for its contacts (on one of the contacts the presence of power must be constant). In addition, if you press the pedal and thus turn on the limit switch, you can measure the voltage at its connectors.
If there is no current at the switch contacts, you should check the wire going to the limit switch from the fuse box. If the test shows that the wire is faulty (there is a break), then it should be replaced with a new one and the test repeated.
Why do the reverse lights on the VAZ 2114 not light up?
If the brake lights and parking lights do not light up, the most likely loss of contact is at the point of their connection to the body (“ground”) of the car or in the socket.
This can happen due to a broken wire or oxidation. The broken end is connected to the terminal by soldering or crimping. Oxides are cleaned off with a sharp tool (knife or screwdriver); after repair, it is advisable to cover the joint with paint or grease to prevent re-oxidation. It is quite rare to encounter a malfunction when not only the brake light, but also the other indicators on the car do not light up.
This is usually observed in “drowned” cars that have somehow been in water (as a result of careless driving or an accident).
Even after thorough drying, moisture still remains inside the interior trim and electronic components.
Its presence leads to increased oxidation of conductive surfaces.
Main reasons
Almost all problems related to automotive electrical systems can be solved in approximately the same way. You need to look for a potential or probable cause of malfunctions in the problematic object itself, or understand the system responsible for supplying power.
The situation is exactly the same with devices called brake lights. If they stop working, then you should look for the reason in one of the following points:
- There were problems with the fuse. It has oxidized or completely failed;
- There are faults in the lamps themselves or in one lamp, depending on how many stops are not working;
- The reason lies in the mechanism responsible for turning on the warning signal when the brake is applied;
- In the socket where the stop light is installed, the contacts have oxidized;
- More serious problems appeared related to damage to the wiring.
Based on the stated reasons why the feet may stop working, we can draw a completely objective conclusion. A truly serious malfunction concerns only wear or damage to the electrical wiring. Solving such a problem with your own hands is not always correct.
When the rear brake lights (left and right) or the additional central brake light repeater fail, do not rush to look for an auto electrician and offer him money to fix the problem.
There is a high probability that you will be able to do everything on your own. You will only need a standard set of tools for a motorist, as well as an understanding of how the lighting equipment in general works in your vehicle. Start with the most likely and fairly simple to solve possible malfunctions. Only if it turns out that the problem is bad or damaged electrical wiring, then it makes sense to visit a good car service center. It is better to entrust such tasks to experienced craftsmen. The main components for restoring the operation of brake lights on your own, you will need a spare working lamp, a control unit or a multimeter, as well as suitable tools.
It would be a good idea to study the owner's manual and understand how to get to the stops on your car.
Fuse
The first place to start is by searching for the mounting block in which the fuse responsible for the brake light is located.
Moreover, each machine has its own electrical circuit and specific location of fuses.
These can vary significantly depending on the vehicle, such as:
- VAZ 2110;
- VAZ 2107;
- Toyota Rav 4;
- Ford Fusion;
- VAZ 2114;
- VAZ 2115;
- Ford Focus;
- Chevrolet Lacetti;
- Lada Granta;
- Hyundai Accent;
- Renault Logan;
- Hyundai Solaris, etc.
A blown fuse quite often causes the failure of a number of equipment, including lighting devices. Check fuses visually and using a multimeter.
But there is a simple and effective way to check that takes a minimum of time. To do this, start the engine and hold down the horn button. This is not suitable for all car models, but on many vehicles the same fuse is often responsible for the sound signal and brake lights.
If this is not the case, we continue our search further.
Brake lamps and their sockets
Next, you should switch to the brake lights themselves. In most cars, to gain access to the feet, the luggage compartment is opened, the rear light bulb is removed, after which you can get to the feet themselves.
But the dismantling process may differ on different brands and models. Here, start from your car specifically; if necessary, look for hints in the operating manual. There are examples of cars where you can get to the brake light without removing the rear optics at all. You still have one main task ahead of you. It consists of gaining physical access to the faulty device, the lamp and the socket in which it is located. Not everyone can try to determine the problem by eye. Here it is better to take a different route.
The optimal solution would be to use new, similar lamps instead of potentially faulty ones. Therefore, you will have to buy a light bulb in advance and screw it in. If you can't find a lamp of a similar size, use a marker or turn signal repeater. Make sure these conditional controls work first.
When everything worked after installing the new lamps, you found the reason. You can confidently buy new matching stop lamps, replace old ones and reassemble the unit in reverse order.
It is extremely important to take into account one feature. Some modern cars have such a principle of operation of brake lights, in which when one car brake light fails for one reason or another, the second one automatically stops functioning. That is, sometimes checking one lamp does not give a result, since in fact the chances are 50/50 of replacing the burnt lamp, and not the one that simply turned off in tandem.
If replacing the light bulbs did not give anything, check the sockets themselves. It happens that they oxidize, this breaks contact, and the device does not turn on, although power is supplied to it. Also make sure that the socket is connected to the vehicle wiring. If necessary, the contacts are disconnected, cleaned with fine-grained sandpaper, and then returned to their place. Even during this procedure, it is recommended to apply a special lubricant to the contacts after cleaning.
One more thing. When checking the sockets, it is also worth taking new light bulbs. It happens that due to oxidation of the cartridge, the lighting device itself fails. That is, in fact, 2 malfunctions occur simultaneously.
Problems with the switch
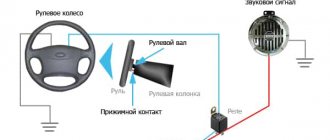
The brake light on a car lights up the moment the driver presses the brake pedal with his foot while sitting behind the wheel. When pressed in this way, the force is transferred to a special mechanism. It is popularly called a frog. It is also a limit switch and it is also a classic brake light switch.
There are 3 main reasons why a frog or limit switch may not work:
- contacts have oxidized;
- carbon deposits appeared;
- corrosion has formed.
Despite the slightly different processes, the essence of the problem is the same. It can be eliminated by stripping the frog, or by replacing the stop switch.
If none of the options are suitable, there is a high probability that the problem lies in damage to the vehicle's electrical wiring. Here it’s up to you to decide whether to try to resolve the issue on your own, or seek help from qualified specialists.
Considering the complexity of the electrical circuits of modern cars, a better solution would be to visit a trusted auto electrician. But the final choice is yours.
Additional Tips
Before each trip, especially over long distances, you should check the functionality of all lighting equipment, including brake lights. In order to reduce the likelihood of breakdowns along the way, you need to periodically check the condition of the sockets and bases of the rear light bulbs, and periodically clean them of oxides and dirt.
In case a breakdown does occur, you should always have an additional set of light bulbs and 10 amp fuses in your car, as well as a multimeter to check them.
Either two brake light bulbs (in both headlights) or one (in one headlight) may not light up at once. Let's look at the causes of this very common malfunction on VAZ 2108, 21081, 21083, 2109, 21091, 21093, 21099. Causes of the malfunction - brake lamps do not light on VAZ 2108, 2109, 21099 and their modifications 1. Check the fuse. No. 6 for mounting block 17.3722, F3 for 2114. If it burns out, replace it with a new one. Subsequently, it will be necessary to find out the reason for the blown fuse, perhaps a small short circuit somewhere. 2. The contacts in the brake light lamp holders have oxidized. Rotate the lamp in the socket several times to knock off the oxidized layer. To enhance the effect, you can remove the bulbs and clean the contacts with sandpaper. 3. The brake light bulbs in the headlight have burned out. In appearance, the lamp may appear to be in good working order.
Where to start your search
The brake light lamps are protected by a 10 Ampere fuse F3; in addition, they are connected to the interior lighting, the ignition switch, and the trip computer. In the event that their failure is noticed, the check begins with the fuse box. A blown fuse must be replaced with a new one, but at the same time check for voltage on its legs. There are known cases where the printed circuit board tracks in the fuse box burn out.
When no problems are found in this unit, you need to go to the inside of the car, to the brake pedal. A lamp switch signaling the start of braking is installed on its bracket. The power supply circuit of these devices is designed in such a way that the warning lamps turn on even when the ignition is turned off. Therefore, you should check the power at the switch connectors. It should be permanently on one of the wires.
If there is no voltage at the connector, you should check the wires from the brake pedal to the fuse box. When power is supplied to the connector, short the wires together and check the light of the lamps in the rear lights. The appearance of the brake light lamps will be a sign of a malfunction of the switch, and if it is still not there, continue to look for problems.
Fault localization
Understanding the operating principle allows you to determine exactly why the brake lights may not light up:
The fuse has blown. In the diagram, the fuses are marked with the letter F (from English - Fuse) and the serial number of the seat in the fuse block, for example, F3;- poor contact at connectors;
- the light bulbs have burned out, but since the lights are connected in parallel, the likelihood that 2 lamps will burn out at once is extremely low;
- poor contact on the negative terminal of the lights. In this case, problems may begin not only with the feet, but also with the lighting of the remaining lamps in the lanterns;
- Damage to the negative track in the lamp board. From the total mass directly to the brake light lamp, the minus goes along a special path on the board. The path may collapse from water or mechanical impact;
- malfunction of the brake light switch, the so-called frog;
- broken wiring, oxidation of contacts.
Troubleshooting algorithm
To detect a fault in the electrical network, you will need a multimeter or a tester, which you can make yourself. Previously, we told you how to use a multimeter, so we won’t focus on that.
The sequence of searching for the cause of the breakdown:
- Check the fuse for the brake light circuit. The location diagram of the fuse links can be found in the repair and operating manual for your car; often the symbol of the protected circuits is located on the back of the cover covering the fuse mounting block. If the installed fuse of the required rating immediately blows, there is a short circuit (short circuit) in the circuit. Please note that the fuse can protect not only the feet, but also other circuits. Installing a fuse with an increased rating is fraught with the risk of a car fire;
- If oxidation is detected on the terminals, clean the contacts mechanically or use an aerosol contact cleaner.
- Having turned on the ignition first and holding the brake pedal depressed, check whether there is power on the positive wire that goes from the limit switch to the rear light connector. If there is power, there is a malfunction in the lights themselves;
- check whether the positive signal is coming from the mounting block to the limit switch. If + comes, but when you press the brake pedal it does not appear on the second terminal of the limit switch, then the problem is in the “frog”;
- If there is no + at the limit switch terminal, examine the circuit up to the mounting block. If the wire is intact and securely fastened in the connectors, then the problem is in the mounting block.
If, for example, there is a + on both terminals of the limit switch when you press the brake pedal, but it does not come to the headlamp connector, then you need to look for the location of the wiring break. You can check the existing “frog” with a multimeter. Simulate the state of the brake pedal being pressed, attach probes to the terminals, turning the multimeter into resistance measurement mode. If there is no resistance between the terminals, the limit switch is faulty. If you removed the brake pedal limit switch for diagnostics, adjust its position correctly during installation. The brake lights should light up at the slightest touch of the brake pedal. The search principle we considered is suitable for most cars. But, for example, in some cars, a relay is also involved in the operation of the brake lights, due to which the brake lights may also not light up. That is why it is always necessary to start by reading the electrical diagram.
What else are they checking?
With the brake pedal depressed, check the voltage supply to the rear light connectors. Their design is far from perfect and often creates problems for owners of this model. The printed tracks at the connector connection points oxidize, which leads to a loss of power supply to the lamps. Some owners take a soldering iron and resolder the connectors, others change the rear light board assembly.
The sockets for connecting electric lamps are also not very reliable. Quite often it is necessary to disassemble the taillights to eliminate contact oxidation or troubleshoot other problems. Rarely, but sometimes the problem can be a break in the wires of this circuit, which break off at the places where they bend.
Share this article with your friends:
Malfunction of LED brake lights
If, after carrying out the measures described above, it is not possible to determine the reason why the brake lights do not light, you should clarify the type of lamps used. They can be made using LEDs. Their installation has a number of features. Typically, LED lamps have a certain polarity for connecting to the vehicle’s on-board network.
Manufacturers always take this into account when developing. Incorrect connection results in the lamp not lighting up. In some cases, such inclusion may lead to damage. If a connection polarity violation is detected, this indicates that the repair on the vehicle was carried out by an unqualified person.
Lada 2114 › Logbook › Brake lights disappeared...
After almost a year of operation without any breakdowns, the brake lights disappeared. The fuses are intact, the frog is also normal in appearance, the lamp contacts are all ok, how can I check the circuit? The stop light in the spoiler also does not light up. At the same time, when you turn on the right turn, the right fog light blinks, if the rear fog lights are on, the right turn signal does not blink))))
Removing the backplane board
First you need to remove the rear lights on the VAZ 2114, and for this you will need:
- Open rear trunk
- Remove unnecessary things
- Remove decorative trim
- Unscrew the plastic casing
- Take out the back panel
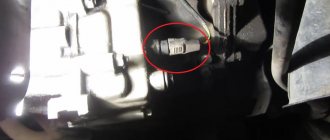
Now you have access to the socket and lamp of the rear license plate lamp, which also needs to be removed. The frog mounting pins are removed and the flashlight is already in your hands. The main thing is not to confuse it with the speed sensor, which is also located on the gearbox.
What to pay attention to
The brake light in the bumper must perform its function as correctly as a regular VAZ-2114 brake light. This kind of tuning can attract attention with its unusual animation. Drivers and other road users may pay more attention to this animation than to the actions of the driver himself in terms of actual braking on the highway. Therefore, not everyone has time to immediately assess the situation and may confuse turning with braking. In this case, a traffic accident may occur.
When you press the brake pedal, all the brake light bulbs should light up at the same time in order to attract the attention of the driver behind as much as possible, and only then you can turn on the necessary animation for visual display. Basically, for drivers, the brake light performs a completely different function.
If the driver makes a turn, he must first slow down before turning in the direction he wants, after which the brake light comes on. For safety, it is recommended to turn on 2 animations at once for at least 2 seconds, so that other drivers understand that the car will first slow down and only then turn. Many people act differently: first they turn on the turn signal, then they brake, so it is not always clear that the driver will brake or turn, because the flashing turn signal is difficult to see on the LEDs, although it is on.
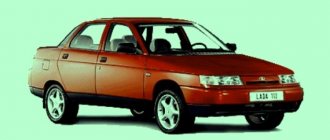
The brake lights on the VAZ 2111 do not light up: reasons
The brake light indication is one of the most important signals indicating driver actions. Therefore, it is impossible to postpone repairs if the brake lights are not on. If you notice a malfunction along the way and you are unable to eliminate the cause of the breakdown, turn on the hazard lights and drive at low speed to the nearest service station or a place suitable for DIY repairs.
SEARCH PRINCIPLE
To find a fault in any vehicle on-board network system, you should use the method of sequential elimination of elements. The point is to consistently check electrical appliances and sections of the circuit, excluding elements from the list of reasons that could cause a breakdown. To do this, you need to clearly understand the design and operating principle of the system. When troubleshooting, you need to move from the components that require the least effort to check, to the most difficult to diagnose elements.
Communities › VAZ: Repair and Improvement › Forum › Need help, brake lights are not on...
I don’t know what the problem is. I changed the stacks from prosport to stock and now I can’t wash the brake signal on the wires. I changed the circuit boards, the plug, the relay, the frog and nothing else. The power reaches the frog and that’s it. I rang the wires, everything is fine. Help with advice, thanks in advance. Auto VAZ 2114.
Each board has additional mass on the body, look at this wiring!
If only the feet do not burn, and the rest is normal, then I think everything is ok with the mass. Does the interior light shine? =) I have 1 fuse for the ceiling lamp and the feet - it’s blown. Until I looked at the table in Murzilka to see what the previous one was. for which he is responsible, and did not look into the installation room, and did not replace the one he was looking for - a week without stops and drove... Check it out too =)
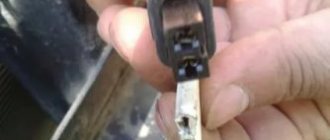
Thank you, but the lampshade is shining and is intact, I tried it now: I disconnected the frog, there are 2 wires hanging, the cable is connected, everything is fine, but I have an additional stop signal, I insert it to these 2 wires and no hello... fuck it
I haven't dug deeper yet. Now I’m wondering why my left feet don’t burn, but my right feet do. Those. If you just close it, do the stops light up? Maybe the frog itself wasn't very successful? Or the current/voltage is not correct. Did the previous ones burn without problems? I don’t really know what good advice to give, I’m not a pro. Yes, and my VAZ is 099 ^_^
when they play about sports, they can switch them completely! that is, the wires themselves are on the connectors! If both don’t light up, then take the + to the exit from the frog and look! if it doesn’t light up, then you take the test and at random)) and if it doesn’t work, then use the Tseshka device to check the wire for integrity!