Starter problems and their elimination
If the traction relay clicks and the car does not start, then the culprit of the situation is most often not the starter, but a discharged battery. Its charge is not enough to start the power plant. In addition, the problem may be hidden in oxidized contacts or damaged wires.
The weak point of the unit is the power wire loop connecting the electric motor and the traction relay. It does not connect securely to the terminal and is prone to oxidation and rot. If it breaks, the starter does not turn, despite the fact that a characteristic click of the traction relay is heard from the engine compartment.
To fix the problem, it is recommended to solder a new copper conductor to replace the damaged one. Some car owners resort to welding. To increase the reliability of the unit, some drivers add an additional connection between the relay and the electric motor even before installing a new starter.
The weak link in the electrical circuit of the VAZ 2121 starter is the brushes. They are the most susceptible to wear, so the unit often loses its functionality due to their insufficient length. To determine the remaining life, you need to take out the brushes and measure their size. It must exceed 4 mm.
A large current flows through the brush assembly. This causes heating and thermal destruction of the elements. Upon visual inspection, you can often detect melting of the brushes and the appearance of chips. Minor defects can be eliminated by grinding. In case of serious damage, the brush must be replaced.
Damage to the armature is also found in VAZ 2121 starters. Among the most popular breakdowns is a breakdown of the winding to the housing. The malfunction can be identified by “continuous testing” with a multimeter or ohmmeter. If the specified devices are not available, the breakdown should be checked with a regular lamp. You need to assemble a circuit as shown in the image below. Its ends should be connected to the commutator plate and the armature core. If the light comes on, it means that there is a breakdown in the winding. It is extremely difficult to repair insulation damage, so such an anchor must be replaced.
The collector is also subject to wear. If there is minor damage, the defects can be removed by grinding. If the collector plates are seriously worn or burned out, the armature must be replaced.
Starter replacement or repair
Algorithm of action: Use the key set to “thirteen” to loosen the fastening of the conductor connected to the traction relay. Discard the tip.
To check the VAZ-2121 relay, apply a voltage of 12 volts to the relay output, and apply “-” to the body. Connect a resistance meter to the contacts. If the relay is intact, then the armature pushes out the overrunning clutch, and the contacts close. If a part is found to be faulty, replace it.
- To remove the traction relay, remove the three screws using a slotted screwdriver.
- Pull the rod with the spring out of the device casing, and install the new traction relay using the reverse algorithm.
If the problem persists, continue repairs:
- Take a Phillips screwdriver and tighten a couple of screws, then remove the casing.
- To check the integrity of the brushes, twist the fastening screw of the contact conductor, and then use a screwdriver to press out the spring. Next, it remains to remove the brush.
- In a similar way, remove the remaining three brushes and inspect them. If at least one of the brushes is up to 1.2 centimeters high, then it must be replaced (further use of the part is not recommended).
- Connect a multimeter to the starter windings (one at a time) and check them for a short circuit. The task is to make sure that there is no short circuit between the turns and on the housing.
- Using a screwdriver, lift the locking ring, remove the washer from the shaft and, using a ten-socket wrench, tighten a pair of tightening bolts.
- Separate the starter elements and remove the insulating tubes.
- Inspect the appearance of the windings and commutator. Remove burn marks from the collector using sandpaper. If this part is severely worn or charred, then repair is useless - the device is replaced. Remove burrs using fine-grained sandpaper, then polish the product.
- Use a multimeter to check the armature for a short circuit. If a problem is found, replace the unit.
- Remove the rubber seal from the drive cover and remove the washer to adjust the armature.
- Remove the cotter pin of the lever axle and select the last one. Next you need to remove the armature along with the drive.
- Pry up the drive lever of the screwdriver and remove it.
- Check the car's gear - it should turn easily left and right. Also inspect for nicks and chips. If the gear is worn out or the clutch is out of order, then it is useless to carry out repairs - replace the assembly.
- Support the shaft on a wooden block and knock out the limiting ring.
- Use a screwdriver to pry up the ring and remove it.
- Remove the restrictor ring and the overrunning clutch together with the gear.
- Assemble the starter using the reverse algorithm.
Article number and approximate price for the original VAZ 2121 starter
The original starters for the VAZ 2121 can be either independently started units or purchased from third-party manufacturers. The starter with the factory number 35.3708 is widely popular in cars. It has a rated power of 1.3 kW. The unit goes on retail sale with article numbers 2213708000 and 57223708. The price for the product starts from 2400 rubles.
Also, a more powerful 1.55 kW starter is installed on the VAZ 2121 car. It has the factory number 5722.3708. It is quite difficult to find this starter in retail sales. The cost of the unit is from 3400 rubles.
On export versions of the VAZ 2121, a diesel power unit is installed, which comes with a 2.2 kW starter. The VAZ company does not produce this unit independently. The branded original product is the products of the VALEO PHC and HC Parts brands. In free sale, these units are found with article numbers 436068 and D9R122. The price for a native 2.2 kW starter starts at 5,600 rubles.
Selection of components
The original starter is produced by LADA and comes in the original blue packaging. It is marked with article number 21214-3708010-01. The cost of this part is from four to five thousand rubles, depending on the store.
To avoid stumbling upon a fake, carefully examine the box. The presence of extraneous logos, absence of an article number on the box, or color mismatch is unacceptable. The low price should alert you.
Alternative options are produced by companies such as Fenox, Krauf, Valeo. The listed brands are distinguished by high quality products and fairly affordable prices. The price for starters varies from 2200 to 4700 rubles.
What original or analogue can I supply?
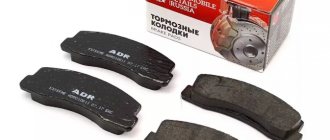
If the starter does not turn, you can simply replace it. Typically, in a store, the buyer has a choice between two options:
- original;
- analogue
They differ not only in their quality, but also in their durability. The easiest way to study visual differences is in the photo.
But the cost of the original starter is usually at least 3.5 thousand rubles. That’s why many people opt for analogues. There are many other manufacturers on the Russian market that are not certified by AvtoVAZ. If possible, you should choose well-established brands.
It is important to remember: all starters have different resources and may differ in size. It is advisable to arm yourself with a ruler and tape measure before going to the store. This will allow you to avoid purchasing a device that is not suitable in size. Some manufacturers produce equipment that can be installed on various vehicle models. The price depends significantly on the manufacturer.
Before purchasing an analogue, you need to familiarize yourself with the brand. For example, Bosch has proven itself to be good. The equipment he produces is durable and does not cause difficulties in repair. There is a list of manufacturing companies recommended by AvtoVAZ itself. It is advisable to familiarize yourself with all the nuances and subtleties of installation in advance. This will allow you to select it at the start and install it later yourself.
This is interesting: How Chery Tiggo is repaired and tuned
Catalog number and cost of a good starter for VAZ 2121
Original VAZ 2121 starters are of unstable quality, so experienced car owners do not recommend installing them. It is more advisable to purchase an analogue from a third-party manufacturer. The table below presents brands that produce decent starters at an attractive price.
Table - Good analogues of the original VAZ 2121 starter
| Manufacturer | vendor code | Approximate cost, ruble |
| Startvolt | LST0101 | 2600-3400 |
| Krauf | STB0139 | 2400-3100 |
| As-pl | S0128 | 3500-4900 |
| Bosch | 986011910 | 3900-5500 |
| Unit | 1100352 | 3000-4100 |
Removing and installing the starter
The starter on a Niva rarely has to be changed, but if you have a need for this, the instructions below will be very useful. First, it’s worth considering the necessary list of tools with which doing all this will be very simple and will not take much time.
Detailed guide to replacing the starter on Niva VAZ 2121
As you have seen for yourself, there is nothing complicated in this repair, the main thing is that you have all the necessary tools at hand and then any work on your Niva will be done quickly and without unnecessary nerves.
We install the VAZ 2121 starter in the reverse order of removal. If necessary, we replace it with a new part.
Source
Required Tools
In order to remove or install the starter on a VAZ 2121, you need tools, the list of which is presented in the table below. Table - Tools required to replace the front strut
| Name | Note |
| open-end wrench | "at 13" |
| Head | "at 15" |
| Ratchet | With extension |
| Penetrating lubricant | For example, WD-40 |
| Metal brush and rags | For cleaning fasteners |
Chevrolet Niva LC › Logbook › Replacing the starter (car with air conditioning)
With God's help, I drove a little over 170 thousand km and when I started the car again I heard something like the squeal of Kaspersky of earlier versions (the exclamation of a frightened pig for those who don’t know =)). And this began to happen with enviable regularity. After consulting, they decided on the starter - it does not immediately disengage. The service asked for a kilo-ruble (1000 rubles) for the replacement procedure. ***After the operation I realized that I couldn’t have done it cheaper myself***
I went to buy KZATE (aka KATEK) without any doubt. For some reason I thought that it was he who should have been on the car. What prompted me to do this feat were the comments to this www.drive2.ru/l/464844929995112589/ entry that everything can be unscrewed and screwed in, removed and inserted without any problems with the wheels turned all the way to the right. I don't have a protective screen either! ))
When unscrewing, the 82-piece tool set helped a lot:
The contents of all of these are the same, the difference is in the layout of the suitcase. We used both ratchets and all their extensions and universal joints so that we could reach the bottom bolts and a “13-socket” for the top bolt.
I removed the “-” from the battery. I unscrewed the bolts and lowered them a little to make it easier to unscrew the wires:
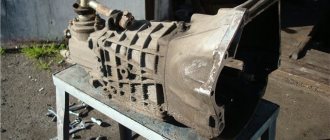
I pulled this miracle down: it really squeezes between the suspension parts)) And now let’s compare...
Not a very good angle: the original starter is closer to the phone, because of this its size is slightly exaggerated. In reality, it is noticeably smaller - both shorter in length and smaller in diameter.
Starter replacement process
In order for the replacement of the starter on a VAZ 2121 to be successful, it is recommended to use the step-by-step instructions given below.
- Secure the vehicle by applying the parking brake to the rear wheels.
- To gain access to the place where the starter is located, you must open the hood.
- The starter is located under the exhaust manifold. Use a ratchet with an extension to unscrew the nuts securing the terminals.
- Remove the wires from the stud.
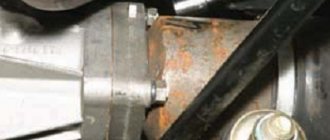
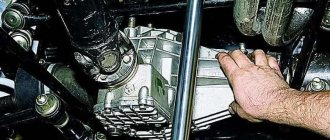
- Remove the bolts that secure the starter to the gearbox, as shown in the photo below.
- Remove the starter from the engine compartment.
- Install the new starter in the reverse order of removal.
- Check operation by starting the power unit.
[Solved] How to remove the starter on a Chevrolet Niva?
This is what the starter looks like from above. The Niva Chevrolet key has a starter replacement since the cap part is slightly bent, otherwise it would be impossible to get to these bolts. The middle bolt is also more or less accessible. But in principle, the key was easy to throw onto it, only the key stroke was very small and it took a long time to turn.
These are sheets of metal around. On the side of the box, the starter rested against the protection with its protrusions into which bolts were screwed. Location of the Starter unit on a Chevrolet Niva If you open the hood of a Chevrolet Niva, the starter will be located to the left of the engine, immediately under the intake manifold. However, you won’t be able to see it, since it is covered with a heat-protective casing on top.
It is also impossible to see it from below, since the crankcase protection covers it there. So the only way to get to it is to remove all these protective devices. Tools needed: Medium flat blade screwdriver.
This puts a lot of stress on the trigger mechanism. If you successfully started the engine, replace the starter with the Niva Chevrolet starter, as the overrunning clutch may jam due to frequent rotation of the starter drive gear by the flywheel. Anyone who has already removed and reinstalled the starter at least once is unlikely to want to do this a second time.
Although this work is not difficult, it requires a lot of effort and sometimes money. Follow these simple rules to avoid such breakdowns. There is a special offer on our website. You can get a free consultation with our corporate lawyer by simply submitting your question in the form below.
We remove the starter protection on a Niva Chevrolet with our own hands. An automobile engineer is a person who receives a meager salary and hiccups for the rest of his life, because grateful Niva Chevrolet starter replacement remembers his work with warmth and love.
What we mean is that the Niva Chevrolet car has several components and assemblies that are not assembled in the way that seems optimal to users. Take, for example, starter protection. Filming it is hellish work, directing it is the same. But you can’t go anywhere without protection. Why is starter protection needed on a Niva Chevrolet? Apparently the engineers thought that the thermal protection of the starter should remind of itself, so they made such a short-lived mount.
Due to the fact that the protection flies off the eye, a nasty rattling sound appears. The layout of the attachments under the Niva's hood was clearly adapted to the shape of the wheel arches; some components remained out of reach. Starter, including. The exhaust manifold hangs above the top of the Chevrolet Niva replacement starter; below it is covered with a mudguard and front axle protection and sandwiched between the engine support cushion and the pump.
The shield is attached to two nuts and is a casing stamped to the shape of the starter. Its task is to protect the starter from overheating, since in injection engines with a catalyst the temperature of the exhaust manifold is an order of magnitude higher than in carburetor engines.
How to quickly and without errors replace the starter on a Chevrolet Niva
The danger of driving without starter protection The danger of driving without a protective shield is that under high loads and in difficult operating conditions, the starter can critically overheat, which will lead to melting or cracking of the plastic insulation parts on the windings, as well as burnout of the insulation on the wires that power the Niva Chevrolet replacement The starter is controlled by the starter.
This may be due to a failure, for example, of the electrical or fuel system. The most common breakdown is when the Chevrolet Niva replacement starter fails. But in order to correctly and fully carry out diagnostics, it is necessary to remove the starter; the Chevrolet Niva is no exception.
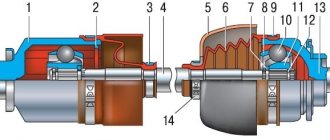
This device is an electric motor with direct current, which is activated by a permanent magnet, which is combined with a planetary gearbox, plus a two-winding electromagnetic relay.
Therefore, before dismantling the Niva Chevrolet starter replacement, you should understand whether it is the reason that the engine does not want to start. This can be determined both visually and by replacing the battery. Preliminary diagnostics It is necessary to do a number of actions: We check all the existing electrical connections that connect the starter and the battery, since it happens that poor contact between ground and positive leads to poor operation of the device, and the click of the solenoid relay is heard, thus there is not enough power to turn the crankshaft in the engine.
how to remove the starter on a Chevrolet Niva
This problem is eliminated by cleaning the contacts of the starter, battery, and various groups of contacts. We check the battery itself; it is necessary to replace the load plug itself with a proven one that is working.
Removing and installing the starter
The starter on a Niva rarely has to be changed, but if you have a need for this, the instructions below will be very useful. First, it’s worth considering the necessary list of tools with which doing all this will be very simple and will not take much time.
Detailed guide to replacing the starter on Niva VAZ 2121
As you have seen for yourself, there is nothing complicated in this repair, the main thing is that you have all the necessary tools at hand and then any work on your Niva will be done quickly and without unnecessary nerves.
We install the VAZ 2121 starter in the reverse order of removal. If necessary, we replace it with a new part.
Causes and symptoms of starter malfunctions
The causes of a malfunction or poor performance of the starter may be:
- winding damage;
- faulty (erased) brushes, due to which they no longer reach the anchor;
- oxidation and burnout of contacts and battery terminals (removed by lubrication with Vaseline);
- retractor malfunction;
- hull destruction;
- malfunction or discharge of the battery (the problem is resolved by charging or replacing the battery);
- the presence of severe wear on the armature with the spring;
- knocked out guide bushings.
Signs of a starter malfunction or failure:
- the bendix (overrunning clutch) does not return when starting the Niva engine, as evidenced by the buzzing sounds under the hood;
- when turning the ignition key, the driver hears something clicking, but the car’s retractor does not rotate;
- An attempt to start the car results in a strange “unhealthy” squeal or squeak coming from under the hood, but it does not turn on.
How to remove the heat shield without removing the starter?
How to remove the heat shield without removing the starter?
Post by Niva867 » 08 Jun 2012, 16:52
There is a problem. You need to get to the wires to the starter, remove them, and clean the contacts in order for it to start. I don't need to remove the starter at all, I just need to remove the heat shield. The heat shield is secured with 3 bolts, 2 at the top, 1 at the bottom. I unscrewed them. But the heat shield cannot be pulled out. I tried it in front, and back, and up and down. Then he turned it around and went to drink beer.
Re: How to remove the starter heat shield?
Post by Anton » Jun 08, 2012, 04:57 pm
Re: How to remove the starter heat shield?
Post by Captain » 08 Jun 2012, 17:06
Re: How to remove the heat shield without removing the starter?
Post by Niva867 » 08 Jun 2012, 20:18
Captain
If you move the shield forward, it will rest against the hose. (the size of the hose is the same as from the expansion tank to the radiator) Does this hose need to be removed?
Re: How to remove the heat shield without removing the starter?
Post by Captain » 09 Jun 2012, 02:32
Re: How to remove the heat shield without removing the starter?
Post by Niva867 » June 14, 2012, 07:07 pm
Why didn’t anyone tell me that the battery needs to be turned off? There was a firestorm there today.
In short, I removed the starter, the bottom bolt was the easiest, the middle one the most difficult. He unplugged it and pulled it out. Then, using pliers, I bent and broke the screen, took it out and threw it away.
Now if something happens to the starter, it will be easy to loosen the wires!
Electrical equipment VAZ 21213, 21214 Niva
Electrical equipment
The electrical equipment is made according to a single-wire circuit: the negative terminals of sources and consumers of electricity are connected to the “ground” - the body and main components of the car, which serve as the second wire.
The on-board network is DC with a rated voltage of 12 V. When the engine is not running, all consumers are powered by the battery, and after the engine is started, by an alternator with a built-in rectifier and electronic voltage regulator.
When the generator is running, the battery is charged.
Most electrical circuits are protected by fuses. Electric motors of gear motors (windshield wipers, tailgate glass, headlights - if installed) are protected by automatic reusable bimetallic fuses.
The power supply circuit of the injection system (VAZ-21214 engine) is protected by a fuse-link made of wire with a conductor of reduced cross-section (1 mm2). The battery charging, ignition (VAZ-21213 engine), engine starting, and the “generator – ignition switch – fuse box” circuits are not protected.
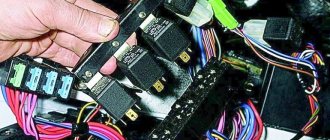
The fuses are grouped in two fuse blocks located on the left under the instrument panel. The fuse ratings and the circuits they protect are shown in the table.
The injection system fuses (VAZ-21214 engine) are located in a separate block on the left side panel under the instrument panel.
A 30 A fuse protects the power supply circuit of the electric radiator fans, and three 15 A fuses protect the electric fuel pump, the control unit (constant power input) and the injection system main relay circuits, respectively (see also Injection engine control system).
When repairing the electrical system, disconnect the negative terminal of the battery (with the engine off). Before installing a new fuse to replace the blown one, find out and eliminate the cause of the burnout. Do not use oversized or homemade fuses - this may cause a fire. Due to the risk of short circuits, do not pry open fuses with metal tools (screwdrivers) unless the corresponding circuits are de-energized.
Circuits protected by fuses
Fuse No. Circuits protected (current)
1 (16 A) Heater fan motor. Relay (winding) for headlight cleaners and electric motors for headlight cleaners in all brush positions except the initial one. Relay (coil) for turning on the heated glass of the tailgate. Electric motors for cleaning and washer of the tailgate glass. Electric motor for windshield washer
2 (8 A) Relay and windshield wiper motor. Turn signal lamps and relay-interrupter for turn signals and hazard warning lights (in turn signal mode). Turn signal indicator lamp. Rear lights (reversing lamps). Generator field winding (when starting the engine) and battery charge indicator lamp*. Differential lock warning lamp. Relay breaker and warning lamp for the parking brake system. Warning lamp for insufficient brake fluid level. Oil pressure warning lamp. Coolant temperature gauge. Fuel level indicator with reserve indicator lamp. Tachometer
3 (8 A) Left headlight (high beam). High beam indicator lamp
4 (8 A) Right headlight (high beam)
5 (8 A) Left headlight (low beam)
6 (8 A) Right headlight (low beam)
7 (8 A) Left front lamp (side light). Right rear light (side light). License plate lights. Side light warning lamp
8 (8 A) Right front lamp (side light). Left rear light (side light). Instrument cluster lighting lamps. Illumination panel for heater control levers. Cigarette lighter lamps. Switch illumination lamps
9 (16 A) Direction indicators and relay-breaker for direction indicators and hazard warning lights in hazard warning mode. Rear window heating element and relay (contacts) for its activation
10 (16 A) Sound signal. Plug socket for portable lamp. Interior lamps. Rear lights (brake lamps)
13 (8 A) Rear lights (fog light). Electric motors of headlight cleaners at the moment of start-up and at the moments when the brushes pass the initial position. Relay (contacts) for headlight cleaners. Headlight washer motor
15 (16 A) Cigarette lighter
* On cars produced before 1996, a voltmeter was installed in the instrument cluster instead of a warning lamp, which was also protected by fuse No. 2.