VAZ 2114 and VAZ 2115 are considered a kind of “star” of AVTOVAZ in the early 2000s. These models are truly distinguished by their unpretentiousness and durability. Every owner who closely monitors his four-wheeled friend understands how important it is to provide timely care for the mechanisms. To maintain engine operation in normal mode, it is enough to change the oil on time and monitor the cooling system. However, if changing the oil usually does not present any difficulties for drivers, working with the cooling system and, in particular, with the pump can cause some difficulties.
Why do you need a pump in a car?
Speaking about engine operation, one cannot help but appreciate the functionality of the cooling system. After all, it is thanks to its high-quality work that it becomes possible to operate the engine in any weather and in any mode.
The engine is a very complex component of any car. Constant friction of the pistons leads to the fact that the engine parts quickly heat up, this can lead to their “jamming”. There is only one way to prevent engine overheating - by constantly maintaining the standard temperature. It is for this purpose that the cooling system was created in the machine.
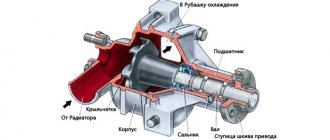
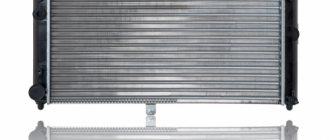
Coolant is poured into the expansion tank (on VAZ 2114, VAZ 2115 cars, both antifreeze and antifreeze can be used with the same success). From the tank, the liquid flows through tubes into the water pump (its second name is a pump), and from there into the radiator and to the cylinder block. It is the circulation of liquids that ensures high-quality and timely cooling of the engine.
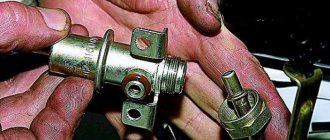
The standard product in a metal case is equipped with an impeller to create antifreeze pressure in the system
The water pump is set in motion after the power unit is started. On VAZ 2114, 2115 it is located in the timing system, that is, the pump impeller is driven by the timing belt. The impeller rotates the blades, due to which the antifreeze begins to circulate throughout the system. If there were no pump, then there would be no point in the entire cooling system.
The pump serves one single purpose - to create the necessary pressure in the system for uninterrupted circulation of antifreeze.
How to determine pump wear
Experienced motorists will easily notice wear and tear on the water pump. It is difficult for beginners to identify a faulty part. Signs of wear are described below.
Engine overheating
When the engine temperature on the dashboard is above 90 degrees, the pump is faulty, especially if overheating occurs in winter.
This symptom, accompanied by a light on the dashboard, indicates a faulty part. Antifreeze boils and steam comes out of the radiator. The car cannot be driven.
To verify the source of the malfunction, you must:
- Warm up the engine to 90 degrees.
- Set the stove control panel to hot air and turn it on.
If the pump is working properly, heat should flow. If cold air comes out at the operating temperature of the engine, this is a sign of a broken impeller. The pump needs to be replaced.
Uneven timing belt wear
The mechanism is started by the timing belt. If there is a problem, the neoprene product may wear unevenly. You can verify this by removing the belt and inspecting the product. On one side there will be more wear.
The problem is related to the exhaustion of the life of the pump bearings. The part itself may still work properly.
Uneven wear may be due to a bent fastener. You can check for misalignment by holding a ruler or other flat object to the belt.
Leakage
The most common pump problem faced by VAZ 2114 owners is a leak. It can come from under the oil seal, impeller or housing. Liquid will be observed on the device body, mounts or engine protection.
If you notice drops that accumulate for a long time, the problem is not critical and does not need to be fixed urgently. If there is a lot of fluid, intervention is necessary.
Sometimes antifreeze leaks after replacing the pump. This means the gasket is installed incorrectly.
Another indicator of a pump malfunction is the smell of antifreeze in the cabin. It may also indicate other faults.
Attention! The listed signs indicate not only a pump malfunction, but also a malfunction of the cooling system, which is recommended to be checked.
The water pump is a non-repairable part of a car. If it breaks, only replacement will help.
Replacing the pump on a VAZ 2114 (8 valves)
Replacing the water pump is a rare procedure that any car will need sooner or later. The design of the pump is a very simple device, which is why it breaks down infrequently. However, over time or due to aggressive driving style, any unit can fail.
How to check the pump
On VAZ 2114,2115 it is very easy to identify a faulty water pump. You do not need to have any special knowledge, since there are only three signs that you need to pay attention to.
Engine overheating
If even in the winter, when driving short distances, the fan cannot cope with cooling, then this sign may indicate that not everything is in order with the pump. If the gauge needle at the engine temperature is constantly above the operating mark of 90 degrees, then it’s time to carry out checking work:
- Start the engine and warm it up to operating temperature.
- Turn on the stove.
- If cold air immediately begins to flow from the stove, then the circulation in the cooling system does not work normally.
- It is necessary to replace the pump, as the malfunction is associated with damage to the impeller.
The appearance of fumes and heat from under the hood is a clear sign of severe engine overheating
Timing belt wears unevenly
When examining the hydraulic distribution mechanism of a VAZ 2114, VAZ 2115, you may notice uneven wear on the belt. Indeed, due to the fact that the pump is directly driven by the timing belt, it wears unevenly (for example, only on one side) - this symptom also indicates a breakdown of the water pump.
You will need to remove the belt to verify the reality of your guesses. Due to wear of the pump bearings, it can become loose and therefore quickly break. While the pump itself can still perform its function normally for some time.
Ideally, the timing belt should wear evenly on both sides
Pump leaking
If the water pump sits on the car for a very long time, then sooner or later the oil seal will wear out so much that it will begin to leak. An antifreeze leak in the timing belt under the pump is one of the signs of a pump malfunction. When a few drops are released per day, the situation cannot be considered critical: the pump generally copes with its job, providing high-quality cooling of the engine. However, if a large amount of antifreeze leaks from under the pump, you need to change the pump urgently.
Abundant leakage indicates a loss of sealing of the pump and its failure.
In some cases, leaks can occur both due to wear of the oil seal, and due to improper installation of the gasket when replacing the pump.
Results of the work carried out
After the work is completed and the time allotted for the sealant to harden, we start the car (VAZ-2115) and conduct a test drive a short distance, preferably on an uneven section of the road. If you don’t smell antifreeze in the car’s interior, and there are no extraneous noises or knocking coming from the engine, then the work to replace the cooling system pump has been carried out efficiently.
Thus, you have gained experience in replacing the water pump of your own car 2115 and saved about one thousand rubles, which would have been required when replacing it at a service station.
There is a special offer on our website. You can get a free consultation with our corporate lawyer by simply submitting your question in the form below.
Preparing the tools
Regardless of what specific problem arose on your car, the only solution to fix it is to replace the pump. This work on a VAZ 2114, VAZ 2115 can be done independently, since the convenient design of the machine makes it possible to carry out all stages of work without special skills.
First you will need to prepare a simple tool:
- wrenches 10, 17 and 19;
- socket head 10;
- flat screwdriver with a thin blade.
Without this tubular socket wrench it will be impossible to unscrew the hard-to-reach bolts on the pump mount
Dismantling
Before starting work, you need to understand where the part is located. The water pump is located on the left side of the engine compartment, under the camshaft pulley, so when it jams, the timing belt flies off.
The removal process is simple; the engine must cool down before doing this.
In a vehicle with an 8-valve engine, the following actions are required:
- Disconnect the terminal from the battery.
Disconnecting the terminal from the battery
- Remove the timing case (held on by 3 bolts).
Removing the timing case
- Place a mark on the camshaft so that it aligns with the mark on the engine. You need to jack up the car and slowly turn the right front wheel, having previously installed 4th gear.
- Move the timing belt. The product needs to be loosened; the tension roller will need to be removed.
- Unscrew the ignition module mounting bolts without disconnecting the contacts. This is necessary to get to the antifreeze or antifreeze drain plug.
- Prepare a container where the liquid will flow and a hose.
- Unscrew the plug with a key set to “13”. Place the hose, which should be directed into the container.
- When the pressure becomes weak, the lid can be screwed back on. There is no point in draining all the liquid; to make the process easier, you can leave a little.
- Then remove the container.
- Remove the thin pipe. The part is connected to the throttle valve heating unit.
- Remove all heating pipes.
- Wedge the camshaft gear teeth with a screwdriver and unscrew the fastening bolt.
- Remove the pulley.
Pulley removal
- Remove the metal casing (secured with 5 bolts).
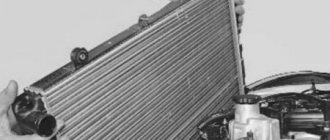
- Unscrew the pump. Using a wooden block, tap the device body and dismantle it.
- Clean the sealant from the seating area.
Before installing a new pump, you need to check the old one for play. Check the tightness of the oil seal. If there is no play or leaks, the old pump can be reinstalled.
How to change the pump
The procedure for working on a VAZ 2114, 2115 with an 8-valve engine is determined as follows:
- Remove the protective cover from the timing belt.
- Slightly loosen the tensioner roller.
- Slightly reduce the tension on the alternator belt, and then remove the alternator belt and timing belt.
- Disconnect all hoses from the pump (antifreeze may leak out, so it is recommended to place a container under the pump in advance or cover the area with a rag).
- Drain the antifreeze from the system (just unscrew the cap from the radiator so that the liquid flows out in 10 minutes).
- Disconnect the pump protective cover and pull out the pump.
- After dismantling, be sure to clean the flange surfaces from smudges and dirt, and also remove the remnants of the old rubber gasket.
- Next, you will need to perform all work on installing the new pump in reverse order.
Video: DIY water pump replacement procedure
It is necessary to change the rubber gasket even if it shows no signs of wear or damage. To ensure reliable sealing, it is recommended to coat both the pump mounting location and its junction with the cylinder block with a heat-resistant sealant.
It is recommended to ensure that the new and old pumps are completely identical.
Replacement
In principle, the work of repairing a pump is not difficult. To do this you will need a minimum number of tools:
- Keyset(10,17,19);
- Head for 10;
- Slotted screwdriver.
It is most convenient to carry out all manipulations in the inspection hole; you should also not carry out work on a hot engine.
The replacement process itself occurs as follows:
- Remove the crankcase protection. Otherwise, it will interfere with our further actions;
- Drain the antifreeze. To do this, open the valve on the radiator. Find the drain bolt on the engine and unscrew it. Sometimes it's easier. Simply unscrew the pipe clamp and drain the liquid through it;
- When using the “10” key, unscrew 3 bolts securing the timing case;
- We set the tags;
- When using the “17” key, the camshaft pulley mounting screw breaks off. To do this, jam the pulley with a screwdriver. Be careful not to lose the key;
- Unscrew the belt tensioner and remove it;
- The belt is removed from the upper pulley and from the pump;
- Remove the camshaft pulley. Usually it can be removed without problems; in extreme cases, you can lightly tap it on the back side with a hammer;
- Unscrew the protective cover and then remove it;
- The rear casing nuts also secure the pump. Therefore, to remove it, it is now enough to simply pry off the edge with a slotted screwdriver. Next, the pump is carefully removed;
- We clean what is left of the gasket from the cylinder block. The better you clean the pump landing area, the better. The slightest piece of the old gasket will lead to uneven installation of the new unit and fluid leakage;
- The new gasket is lubricated with sealant; this must be done on both sides. Carefully install it in place;
- Reinstall the pump. Pay attention to the inscription. It should be at the top;
- We install the removed parts.
After assembly, wait a couple of hours for the sealant to cure. Then start the car and drive on a flat road. Correct assembly will be indicated by the absence of extraneous sounds and the smell of antifreeze.
Conclusion
. The cooling system is extremely important for the proper operation of the engine. Therefore, in case of any malfunctions, the problem should be resolved as quickly as possible. Replacing the pump on VAZ 2114 and 2115 is the most frequently required work. In principle, this process should not cause any difficulties. Most importantly, do not forget to align the timing belt to the marks before replacing it. This will make assembly easier.
How to change pipes on a pump
Replacing the pipe on the water pump is advisable in cases where the hose is swollen or has small cracks through which antifreeze leaks out. A significant disadvantage of changing the pipes is that they are located below the pump - that is, you will have to jack up the body and crawl underneath.
The old pipes are removed after the antifreeze has been drained and the pump itself has been dismantled. It is important to clean the landing site from dust, dirt and coolant leaks. Then connect new pipes to the new pump, installing a new gasket at the junction. It is recommended to use heat-resistant sealant to ensure reliable connections.
Before installing new pipes, it is necessary to drain the antifreeze from the cooling system.
Work stages and materials
In general, the entire repair can be divided into the following stages:
- Preparatory part. This can include preparing tools and places for repairs.
- Draining the coolant system.
- Dismantling an old device that has become unusable.
- Purchase and installation of a new coolant pump
To replace the pump on a VAZ-2115 with your own hands, you will need the following tools and materials:
- Socket and open-end wrenches.
- Sockets and ratchet.
- Jack, supports, wheel chocks.
- Cone-shaped pliers.
- Screwdriver.
- Capacity of at least 10 liters.
- Clean rags.
You will also need a sealant. But it must be used carefully, in small quantities.
How to install an additional pump on a VAZ 2114, 2115
Experienced VAZ owners know that the “fourteenth” and “fifteenth” are ideal for conducting a variety of experiments on installing this or that equipment. For example, if the standard heating on a VAZ 2114 through the stove is not enough for the owner, then you can install a second (additional pump). The essence of this procedure is that the pump will pump antifreeze in a small circle, thus providing better engine cooling and maintaining the temperature in the cabin in winter.
A second water pump keeps the cooling system running at peak efficiency.
Installing an additional pump takes a maximum of 10 minutes, but the procedure will increase slightly in time due to the fact that you will have to drain the antifreeze from the system.
You will need to purchase the following spare parts in advance:
- water pump (for models 2114 and 2115, the ideal solution is a pump manufactured by Bosch 0 392 020 034);
- elements of electrical equipment;
- several hoses of different lengths (depending on the diameter of the small circle) with clamps;
- fastening for the pump.
Assembling the structure
In this case, you will already need some experience in independently servicing a VAZ. So, to install an additional pump, you need to:
- Assemble this unit itself from three parts - a pump and two pipes (the shortest hose works for the outlet, the longer one for the suction of antifreeze).
- Next, drain the coolant from the system.
- Near the bottom of the car, feel for two hoses coming from the stove, remove the one that works for the outlet.
- Instead, connect the assembled unit.
- After this, attach the pump itself to the crankcase of the manual gearbox. It is better to use brackets and screws for this.
The final stage is pouring new antifreeze.
To mount the pump, you can use any type of fastener, the main thing is to ensure the reliability of the connection
How to check the pump without removing it from the engine
Timing belt Daewoo Nexia: do-it-yourself replacement
Even a completely inexperienced driver can carry out such diagnostics of the pump. This will make his task easier if the engine suddenly heats up. And it makes no sense to delay diagnostics, so that such overheating does not lead to breakdown of the power plant. The convenience of this diagnosis is that it can be carried out at any time: on the road or in a deserted area, and then make a decision about further movement.
Signs of a pump malfunction directly depend on different elements of the cooling system. A number of manufacturers recommend replacing the water pump after 60-80 thousand kilometers, sometimes together with the timing belt. And this recommendation should be followed
In addition, always pay attention to the quality of the composition of the liquid used for cooling
Diagnostics are carried out in the following order:
- start the engine and warm it up to operating temperature;
- pinch the pipe going from the radiator to the pump with your hand; if the pump is working, then you will feel the pressure it creates (in the form of strong shocks);
- if the shocks are weak (or absent at all), then after turning off the engine, you need (but not on all models) to dismantle the timing drive casing and identify leaks: through the pulley seals or near the pump mounting point. If these signs are present, then the pump should be removed and its defects determined.
In case of some malfunctions, the pump begins to howl and knock, which is accompanied by overheating of the motor.
Problems with the pump are possible for various reasons:
- depressurization - the coolant leaves through the gasket or shaft seal, then the pressure at the pump is lost and the antifreeze quickly leaves the system;
- bearing wear - the shaft bearing on which the impeller is located wears out: it jams or even fails. And this problem manifests itself in different ways: the bearing begins to howl due to oil production and wear of the race. If the bearing jams, then the pump cannot be turned at all;
- destruction of the impeller - most often due to a poorly manufactured part. Immediately after starting the engine, there is a strong roar and the car quickly overheats.
The cooling system must operate without interruption, with maximum efficiency, so you need to know how to check it without removing it from the engine.
Source
Replacing the pump on a VAZ 2114, VAZ 2115 (16 valves)
The procedure for replacing the water pump on 8 and 16 valve engines will be slightly different. The fact is that on a VAZ 2114 with 8 valves there is only one crankshaft pulley, and on cars with a 16-valve engine there are two. That is, the designs of cars with different types of engines are somewhat different from each other.
In this regard, you need to be extremely careful: pumps for VAZ with 8 or 16 valves cannot be considered interchangeable. That is, when purchasing a new water pump, you should make sure that it is suitable specifically for your type of VAZ engine.
Replacing the water pump on VAZ 2108 and 2109
Pump for a VAZ 2114 Even an inexperienced car enthusiast can repair and replace the pump for a VAZ 2108/09. You will need a standard set of tools - open-end and socket wrenches (10 and 17), screwdrivers, etc. If you plan to replace the pump, you should purchase a kit consisting of the pump assembly itself and a sealing gasket, and silicone sealant. In addition, for work you will need rags, acetone solvent and a canister of fresh antifreeze.
The repair kit for the water pump must contain a new gasket
As already noted, the pump is built into the bore of the engine cylinder block. The pump drive pulley is rotated by the timing belt. Therefore, to dismantle the pump, you must first remove the belt protective cover and the belt itself. But before this you need to perform a number of preparatory operations.
- The negative terminal of the battery is disconnected.
- The coolant is completely drained into a pre-prepared ten-liter container. In working condition, about 8 liters of antifreeze circulates in the cooling system of the VAZ 2108/09. If the fluid has been changed recently, it can be reused. It is prohibited to drain coolant onto the ground, as it is poisonous to plants and animals.
- The generator belt is removed. To do this, the fixing nut on the tension bar is loosened, and the generator is moved towards the engine. The belt sags and is easily removed.
- To ensure that the settings are not lost after removing the timing belt, the drive pulleys should be aligned to the marks. It is not difficult. The right front wheel is lifted with a jack. Then fifth gear is engaged. By slowly rotating the wheel, the mark on the camshaft pulley is aligned with the stationary mark on the engine.
- The timing belt tension roller becomes loose. To do this, the fastening screw is unscrewed and the roller is moved away from the belt gear.
After removing the belt, you can proceed directly to dismantling the pump. Using a 10mm wrench, unscrew the three mounting bolts and remove the pump. This is not always easy to do. The pump may “stick” to the landing site. In this case, you will need a chisel and a hammer, with the help of which the layer of old sealant in the socket is carefully torn off. After this, the pump can be easily removed.
The pump is secured with three bolts to the cylinder block body
It is impossible to completely remove the pump in the normal position of the car - the body gets in the way. You need to raise the motor slightly. To do this, the right side of the car is lifted on a jack - the engine is tilted.
If you have an assistant, you can do without hanging the body. One person forcefully pulls the motor in the direction opposite to the direction the pump exits the socket. Another person pulls out the pump at this time.
After removing the water pump, the impeller blades are inspected. They may break off or crack. This happens if the engine has been severely overheated, or the impeller is made of poor quality material. Small blade fragments usually fall out of the drain valve.
Chips on the impeller sharply reduce pump performance
To be completely sure that the cooling system is clean, it is recommended to flush it using the following algorithm.
- Remains of sealant, dust and debris are removed from the engine surface with a rag and solvent.
- The mounting bolts are cleaned of grease, rust and debris. Before installing the new pump, apply a thin layer of sealant to the threads.
- The gasket is lubricated with waterproof sealant and the new pump is carefully installed in place. Sometimes it may be necessary to press the pump using a wooden spacer.
- The bolts are tightened first by hand, then using wrenches. In this case, it is strictly forbidden to overtighten the threads - the pump housing may crack.
- Assembly is carried out in reverse order.
- Fresh (or previously drained) coolant is added.
- Air pockets are removed from the system.
- The engine starts and the cooling system is checked for leaks.
Professionals recommend replacing the tension roller along with the water pump. To check the serviceability of the roller, rotate it by hand. If the roller rotates with difficulty or a crunching sound is heard, it needs to be replaced.
It is generally accepted that the water pump should be changed every 90 thousand km of the car. However, this figure is conditional, depending on the operating conditions of the vehicle. Obviously, in the city cycle with constant traffic jams and limited speed, the cooling system will wear out faster than on the highway. Therefore, the need to replace the pump should be assessed based on its actual condition.
Installation of the Grants thermostat on VAZ 2110, 2112
| It is no secret that the production of VAZ cars of the tenth family in Russia has already been completed. However, nothing prevents owners from improving their cars by replacing outdated parts with more modern ones, from foreign cars or VAZs of the latest years of production. An example of this would be replacing a VAZ 2110 thermostat with a Lada Granta thermostat. |
Will need to buy
- Thermostat Lada Granta (catalog number: 21900-1306010-00), price 640 rub.
- Gasket for the thermostat (same as standard), price 8 rubles.
- Lower radiator pipe for Lada Granta (1 self-tightening clamp included), price 440 rub.
- M8 studs, approximately 85mm long, price 20r.
- Washer for temperature sensor.
- ABRO sealant, clamps.
- Antifreeze.
Replacing the thermostat
- Remove the hoses by unscrewing the clamps (don’t forget about the throttle assembly).
- Unscrew the thermostat mounting bolts (see replacing the thermostat).
- Remove the studs and lower pipe.
- Install a new pipe and tighten the clamp.
- Plug the hose coming from the throttle valve using an M10 bolt and tighten it with a clamp.
- Screw in new thermostat studs.
- Secure the Granta thermostat.
- Connect the hoses. Cut the hose from the stove in place (by about 5 cm). Reinstall the temperature sensor.
Conclusion
- faster engine warm-up, especially while driving.
- the cabin became noticeably warmer
- more stable temperature conditions in different operating modes (during traffic jams, using the stove, in winter on the highway and in the city).
xn--2111-43da1a8c.xn--p1ai