Disassembly and assembly of the Chevrolet Niva front axle gearbox
Tools:
- Straight box spanner 10 mm
- Straight box spanner 17 mm
- Kern
- Small hammer
- Beard
- Driver for socket attachment
- Extension for socket wrench
- Knob attachment 10 mm
- Knob attachment 17 mm
- Knob attachment 19 mm
- Bearing puller
- Soft metal drift
- Device made from an old drive gear
- Level
- Flat feeler gauge
- Torque wrench
- Mounting blade
- Dynamometer
- Pliers
- Calipers
- Vise
Parts and consumables:
- Strong thread
- Differential bearings
- Axle gears
- driven gear
- Pinion shaft
- Tapered pinion shaft bearing
- Spacer
- Cuff
- Flange nut
- Kerosene
- Rags
- Adjustment ring
- Gasket for the front cover to the gearbox housing.
- Gasket for the lower cover of the front axle gearbox.
Note:
Before disassembling, clean the gearbox from dirt, preventing it from getting inside the gearbox.
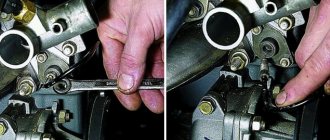
1. Using a 10mm spanner, unscrew the eight nuts securing the front cover to the gearbox housing.
2. Remove the cover.
3. We remove the gasket.
4. Using a 10mm socket, unscrew the bolt securing the locking plate of the left differential box bearing cover and remove the plate.
5. Similarly, remove the locking plate of the right cover.
6. Using a 19mm socket, unscrew the four nuts securing the bearing caps of the differential box.
7. Remove the washers from the studs.
8. Prying it with a screwdriver.
9. Remove the left differential box bearing cover.
10. By pulling the bolt, remove the cover.
11. We take out the adjusting nuts.
12. Remove the differential box assembly with the driven gear of the main gear.
13. Removing the driven gear and disassembling the front axle gear differential are similar to the corresponding work described here. We remove the main gear drive gear oil seal from the gearbox housing socket, as described here.
14. Remove the oil deflector from the drive gear shank.
15. We take out the inner ring of the rear bearing of the drive gear with the separator and rollers.
16. We take out the drive gear with the inner ring, cage, spacer sleeve and front bearing rollers.
17. We take out the ring.
18. Similarly, remove the outer ring of the rear bearing. When oil leaks from under the lower cover of the front axle gearbox housing.
19. Using a 13mm wrench, unscrew the eight bolts securing it.
20. Remove the cover.
21. The connection is sealed with sealant. To check the technical condition of the parts, see the section “Disassembly and assembly of the rear axle gearbox”. In addition, we check the condition of the ball bearings of the internal drive joint housings. Bearings must not have damage to the raceways of the rings, cages and balls, as well as cracks and chips on the rings. The radial clearance of the bearings should not exceed 0.05 mm. There should be no cracks or signs of wear on the gearbox housing seats. We replace worn and damaged parts with new ones.
22. We press in new outer rings of the drive gear bearings with a piece of pipe or a tool head of a suitable size.
23. Assembly and adjustment of the front axle gearbox are similar to the operations described here. When installing a new pair of final drive gears, you must make sure that their gear ratio (marking on the gears is 2106) is equal to the gear ratio of the main pair of the rear axle gearbox.
Notes:
To set the preload of the differential box bearings, we consistently and evenly tighten both bearing adjusting nuts so that the distance between the covers increases by 0.08-0.11 mm. We clean the mating surfaces of the covers and gearbox housing from residual sealant and oil. We replace the sealing gasket of the front cover of the gearbox housing with a new one. We install the lower cover of the gearbox housing with sealant.
The article is missing:
- Photo of the instrument
- Photos of parts and consumables
- High-quality photos of repairs
Chevrolet Niva. Removing and installing the front axle
Removal
. Place the car over the inspection ditch (on a lift), brake with the parking brake and disconnect the negative terminal from the battery.
Loosen the front wheel nuts, remove the front wheel hub caps and loosen the hub adjusting nuts.
Place the gearbox and transfer case levers in neutral.
Raise the car and remove the front wheels.
Remove the crankcase protection and engine mudguards.
Drain the oil from the front axle gear housing.
Unscrew the nuts of the bolts securing the flanges of the propeller shaft and the front axle gearbox. While rotating the front driveshaft, disconnect it from the gearbox.
Bend the edges of the locking plates and unscrew the nuts securing the exhaust pipe to the exhaust manifold. Then unscrew the bolts securing the muffler exhaust pipe clamp to the gearbox and the bolts securing the pipe to the additional muffler and move the muffler exhaust pipe to the engine.
Disconnect the right shock absorber rod from the mounting bracket, unscrew the nut of the bolt securing the shock absorber to the lower arm, remove the bolt and remove the shock absorber.
Unscrew the right hub nut and remove the cone bushing.
Place a stand under the right lower arm and, lowering the car, compress the front suspension spring until the rebound buffer of the upper arm begins to unload. Then install the brackets on the spring and fix the spring in the compressed position.
Unscrew the three nuts from the lower ball joint bolts to the lower arm and remove the bolts.
Raise the car, disconnect the ball joint from the lever, move the hub to the side and remove the tip of the outer drive joint from the hub.
Unscrew and remove the bolt securing the bearing cap of the inner joint 22 (see Fig. 3-78) of the right (and then left) drive to the cross member of the front suspension.
Unscrew the four nuts securing the lower cover 2 of the front axle gearbox to the stabilizer bar.
Unscrew the three nuts securing the bearing cap of the right-hand drive inner joint to the gearbox.
Turn the wheels all the way to the right, holding the gearbox, remove the drive from the gearbox housing until the pins are released, unfold the hinge bearing cover and remove the right drive assembly.
Temporarily secure the left drive inner joint bearing cover with a bolt to the front suspension cross member and the lower gearbox cover with nuts to the stabilizer bar.
Remove the left shock absorber, cone bushing and remove the outer drive joint tip from the left hub, following the steps above for the right side.
Unscrew the bolt and nuts installed temporarily and remove the front axle gearbox with left-hand drive assembly.
Unscrew the three nuts securing the left drive inner joint bearing cover to the front axle gearbox and disconnect the left drive from the gearbox.
Installation
carried out in the reverse order of removal.
Fill the front axle housing with transmission oil through the oil filler hole; the oil level should reach the bottom edge of the hole.
Replacing and disabling the front gearbox on a Niva Chevrolet
The Chevrolet Niva has a front axle, which includes a differential and main gear, which are installed in one crankcase, which has a cast housing that is closed with a lid and sealed with a gasket, which is exactly the same as the rear axle. According to the regulations, the oil in the gearbox must be changed every forty-five thousand kilometers.
From time to time you have to remove the front axle gearbox; the Chevrolet Niva requires timely maintenance.
To make a replacement or repair, the gearbox must be removed, and in order to do this you need to have the necessary skills and tools, so if you do this in the garage, then most likely you will not achieve the desired result. Therefore, if it comes to replacement or repair, then the best option would be if you contact a specialist. If you still decide to make the replacement yourself, then you will need a certain set of tools:
- Twelve hexagon
- Keys for 17, 27, and 13
- Hammer with chisel
- Any syringe to make it convenient to fill in transmission oil, it is also advisable to prepare any container to drain the used oil into.
When you have all the tools at hand, you can start removing:
- First of all, we remove the front wheels of a car 2121 or another
- Berm a container and drain the used oil from the front axle of the gearbox there
- Then we disconnect the front driveshaft from the front axle of the gearbox
- Unscrew the nut and remove the mounting bolts
- Remove the drive from the front wheel
- At the front suspension, unscrew several nuts that secure the cover of the internal hinges of the left drive
- We turn the steering knuckle so that it pulls the drive behind it
- Disconnect the wires from the gearbox
- Let's take it off
- Then we change the oil
- When the replacement procedure is completed, install everything in reverse order.
To save fuel, on hard and dry roads, on a Chevrolet Niva, you can disable the front axle. But in order to achieve the greatest savings, the manufacturer recommends moving with a permanent drive, but at a moderate speed. But if you still decide to turn it off, then move away from dirt, snow, sand, and try to tow a trailer or tow on steel hitches. By disabling the front axle, you will ensure a reduction in mechanical losses in the transmission, thereby wearing out the tires and gearbox.
Rear axle gearbox repair
When the rear axle overheats or noise comes from it, the gearbox needs to be repaired. It is not recommended to remove the Chevrolet gearbox yourself in the garage, because it is very difficult to determine the gap between the gears.
Removing the rear unit
If it is not possible to repair the gearbox in a workshop, then it is better to replace this entire part:
- Install the NIVU on a pit or overpass;
- Oil is drained from the rear axle;
- Disconnect the driveshaft from the drive gear flange;
- Dismantle axle shafts on a Chevrolet;
- Unscrew the bolts of the rear axle gearbox at the beam;
- Remove the rear axle gearbox.
Rear Assembly Installation
In early models of NIVA cars, the joints between the flanges and the rear axle were sealed with a gasket. Later, oil-resistant sealant was used for this. When reinstalling the gearbox, any type of seal must be restored. Follow the sequence below:
- Clean the surfaces connecting the rear axle to the assembly from residual sealant; Degrease the bolt threads, mounting holes in the beam and connectors with a special agent, solvent or gasoline;
- Treat surfaces with oil-resistant sealant;
- The threads of the gearbox bolts must be lubricated with a fixing compound;
- Install the gearbox into the Chevrolet rear axle beam and tighten evenly with the mounting bolts;
- Install the remaining dismantled parts in exactly the reverse order;
- Fill the rear axle with oil.
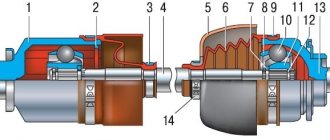
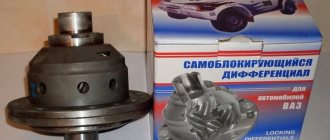
Device
The unit parts are housed in a durable metal case that protects the mechanism from damage. Gear oil is used to lubricate rotating parts.
The force of the propeller shaft, screwed to the flange on the shank of the unit, is transmitted to the drive gear. Next, through the satellites, the torque is distributed between the axle gears (left and right).
The gearbox mechanism also includes bearings, nuts, gaskets, and adjusting rings. Plugs are provided for filling oil and removing waste into the housing. The drive gear, like the axle shafts, is equipped with oil seals that prevent transmission leakage while the vehicle is moving. The figure shows the gearbox design in detail:
Symptoms of a problem
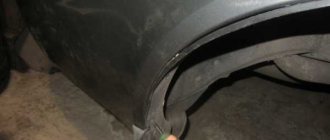
Mechanism breakdowns most often manifest themselves in the form of extraneous noise or oil leakage. Let's look at the most common problems that arise with the front axle gearbox and how to fix them.
Increased noise while driving occurs in the following cases:
- The inner joint or differential bearings are worn.
- Gears are damaged.
- There is not enough transmission oil in the crankcase.
- The differential gears or bearings are not adjusted correctly.
To eliminate the malfunction, you need to check the transmission level and, if necessary, top it up.
Replacing the shank oil seal Niva Chevrolet front axle
The oil seal must be replaced with a new one if an oil leak is detected; to replace it you will need a 13, 24 wrench, a screwdriver, a torque wrench and a hammer. Before replacing the front gearbox shank seal on a Niva, turn off the gear and turn off the engine, drain the oil from the front axle crankcase and disconnect the Chevy front propeller shaft from the drive gear flange of the front axle gearbox. Remove the housings of the internal hinges of the front wheel drives from engagement with the gears of the front axle reducer axle shafts. Determine the moment of resistance to rotation of the drive gear flange nut and replace the oil seal. Install the removed components and parts in the reverse order of removal and fill the gearbox with oil.
How to change?
If the mechanism is seriously damaged, it makes sense to replace it with a new one. To do this you will need a new gearbox and a small set of tools:
- wheel wrench;
- jack (if the work is done in an inspection hole);
- chisel:
- hammer;
- hex wrench 12;
- ring or open-end wrenches for 13, 17 and 27;
- syringe for filling transmission oil;
- container for processing.
Important: replacement or repair of the gearbox cannot be performed without a lift, inspection ditch or overpass.
Operating procedure
- Place a waste container under the gearbox.
- Unscrew the drain plug, then the filler plug.
- Wait until the entire transmission flows out of the gearbox.
- Unscrew and remove the front wheels.
- Unscrew the cardan shaft from the flange on the shank.
- Undocking and hanging the cardan.
- Unscrew the fastening of the right cover from the suspension cross member.
- Unscrew the fastening nuts and disconnect the shock absorbers from the front control arms.
- Unscrew the threaded connections holding the wheel drive bearing caps.
- Unscrew the nuts securing the brackets holding the gearbox.
- Unscrew the nut securing the left gearbox cover to the cross member.
- Remove the hub cap and unscrew the right wheel hub nut.
- Remove the centering sleeve.
- Compress the suspension spring and unscrew the ball joints.
- Move the steering knuckle to the side.
- Disconnect the exhaust pipe from the exhaust manifold.
- Pull the gearbox back.
- Remove the right wheel drive.
- Remove the gearbox from the machine
To install the new unit in place, you must perform the operations in reverse order.
Important: after installing the gearbox, do not forget to fill it with transmission oil. Otherwise, you will soon have to change it again with another one
Repair
It is not necessary to buy a new unit. You can replace the oil seals or gears yourself, and then adjust the mechanism. It makes sense to repair the mechanism if most of the parts are not worn out. Otherwise, it’s worth overpaying and installing a unit that is known to work, so as not to return to repairs.
To repair and adjust the front axle gearbox you will need:
- mark;
- hammer;
- spanners for 10 and 17;
- knob with extension;
- end attachments at 10, 17,19;
- punch;
- bearing puller;
- mounting blade;
- caliper;
- pliers;
- dynamometer;
- flat probe;
- level;
- vice.
You will also need new gaskets for the covers.
Adjusting the front axle gearbox Niva Chevrolet video
During the repair of the gearbox, the aluminum housing had to be replaced. Next, when adjusting the clearance of the planetary gear. Replacing the bearing and oil seal of the housing of the internal hinge of the front axle drive of the Chevy Niva Before starting work, prepare a hammer, a bit, a circlip remover and sealant.
To replace the bearing and housing seal, adjustment of the front axle Chevrolet Niva hinge, you will need to remove the front wheel drive, then remove the bearing retaining ring, using a hammer and a wooden spacer, knock down and remove the housing and bearing from the shaft Read: Oil B Steering Gearbox VAZ Front wheel drives Renault Logan A - right, B-left, 1 - external hinge body; 3. The bearings should not have damage to the raceways of the rings, separators and balls, as well as chips on the rings.
Adjustment
It will not be possible to adjust the drive gear without a torque wrench and mandrel A.70184 . You will also need:
- level;
- calipers;
- flat feelers for measuring gaps;
- adjusting rings with a pitch of 0.05 mm;
- perfectly straight metal rod.
The drive gear is adjusted as follows:
- Align the crankcase mating plane horizontally (you will need a level);
- Install a metal rod onto the bearing bed.
- Place the adjusting rings and measure the distance from the rod to the mandrel.
- Install the adjusting ring. Its thickness is calculated as the difference between the actual clearance and the deflection value indicated on the new gear.
- Install the shaft and related parts in place, secure the drive gear flange.
- Using a torque wrench, tighten the nut with a force of 12 kgf.
- Using a dynamometer, check the moment at which the drive gear shaft begins to rotate. If this value does not correspond to 7.6 to 9.5 kgf, the nut needs to be tightened.
Communities › Chevrolet Niva › Blog › Chevy Niva front gearbox – assembly and adjustment
...So, we assemble the front gearbox. We pressed the outer rings of the bearings into the crankcase - now we measure the base of the crankcase. We install the VPZ bearings with metal cages.
We selected an adjusting ring of the required thickness, pressed the bearing onto the drive gear, put the spacer sleeve into the crankcase, the front bearing onto the shank, the oil slinger, pressed the oil seal in.
the oil seal is in place, now the flange, washer, and tighten the flange nut, set the preload of the drive gear bearings, check...
ready. Our main pair 2101.10/43, 4.3 was found from a thrifty grandfather (May the Kingdom of Heaven be upon him) - in Soviet times, people stocked up on spare parts for future use.
We assembled the differential - all the satellites, axle gears, the satellite axle - everything is new, new bearings too
press on the differential bearings
If there is no mandrel, you can use an old spacer sleeve.
All that remains is to install the differential and adjust the gearbox. From my subjective experience I have developed the following algorithm of actions. First, I take the yoke nuts and tighten them without caps until the end of the thread on the seats of the crankcase bearings
Then I unscrew it evenly until the differential can be inserted.
I install the differential and tighten the nuts by hand - I loosen one, tighten the other - to set approximately the required gap in the engagement of the drive and driven gears. After this, I put on the diff bearing caps and tighten them only slightly. I take a special wrench and check how the adjusting nuts rotate, whether they are normal rotate along the thread
Now we move on to adjusting the gearbox - we set the gap in the engagement of the main pair and the preload of the differential bearings. Unlike the rear gearbox, on the front gearbox the divergence of the covers should be within 0.08-0.11 mm.
Well, everything is ready, the gearbox is assembled and adjusted. The rear one, of course, is easier to assemble...