Characteristics of door limit switches Grants
Apart from the driver's side, there are no door limit switches on the Lada Granta in other opening structures. There aren't even any buttons or standard wiring. The operation of these mechanisms determines the activation of the door open lamp, which lights up on the dashboard. Moreover, the interior light and car alarm react to the actions of the driver or passenger. The average cost of limit switches starts from 150 to 200 rubles. Article 1118-3710199 is the original number and its price is lower than its analogues. The Lada Granta has this device, but it all depends on the modification:
- The “Norma” package implies the installation of this device in all door structures.
- The “Standard” package does not imply the presence of limit switches on the seats. There they are replaced with plugs.
- The “Lux” package will delight the buyer with a full set of sensors, even a rear one.
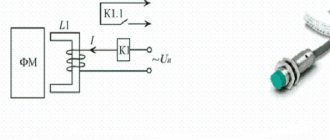
The activation sensor transmits information using light indicators.
Problems with door switches
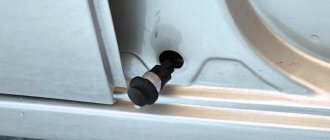
In winter, limit switches installed on car thresholds often stop responding to door openings, since their rubber boots lose their elasticity at sub-zero temperatures, which ultimately leads to the contacts opening.
In addition, there may be other problems associated with the correct functioning of the limit switches. Thus, many car owners complain about the unstable operation of the alarm system, the light that does not come on when the car door is opened, etc.
Some car owners have also noted cases of limit switches triggering independently when turning the car sharply, when the doors may move slightly away from the body. The cause of all the listed problems lies directly in the limit switches.
Many car owners decide to replace the limit switches located in the threshold with switches located in the door locks. This manipulation can eliminate the problems listed above; moreover, it can be easily carried out independently if you have additional plugs and wiring. Below we will talk about other ways to troubleshoot these problems.
Installation of limit switches on Lada Granta
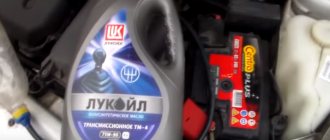
An activation sensor in all doors will provide additional comfort. To carry out the installation procedure, you will need special equipment and available materials: lubricant, rubber tips, screwdriver, rag.
Step-by-step algorithm of actions:
- Remove the rubber tip.
- Open the housing and remove the limit switch.
- Remove the block with wires and disconnect.
- Install a new sensor.
- Reassemble.
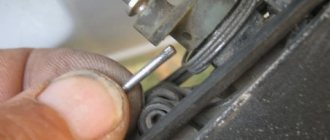
After the basic steps, you need to check the functionality of the device. To connect the limit switch to the power circuit, you will need to connect two terminals: first “+” and then “-”.
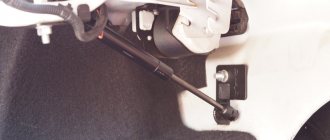
If you need to replace the trunk limit switch, then the instructions are identical, you just need to open the trunk lid.
All about the door switches on the Lada Kalina car
Content
- Purpose in different cars
- What's behind this name?
- Plus and minus - what is their difference?
- Why connecting an alarm system to limit switches is an important process
- How to find limit switches quickly and without any problems
- Troubleshooting door switches
- How to check limit switches
- Backlight
- Alarm connection
The Lada Kalina car consists of hundreds of parts, assemblies and mechanisms. These are, for example, wheels, steering wheel, doors, trunk, engine, etc. But at the same time, the car has a number of parts, the existence of which only people involved in the repair and operation of cars have any idea about. This includes the door switch Kalina, what kind of unit it is and what its functional purpose we will consider further.
Finalization of the scheme
The installation or modification scheme will require special equipment to test the electrical circuit. The first place on the list of accessories is a tester and a soldering iron. You will also need a screwdriver, additional wires, electrical tape and a new sensor. When connected, the driver can use the button in the threshold or the door lock contacts.
To do this, you first need to open the sensor housing with a screwdriver and remove the element, remove the block with wires using a screwdriver. Then replace the wire and solder. Insulate the ends and assemble the structure in reverse order. The process is carried out in parallel so that the process involves elements that go to the working positions of the door.
To measure the circuit resistance with a tester, you need to alternately press and release the spherical protrusion.
see also
Comments 28
In those years, the limit switches were powered strangely. those. works on one driver's side, and the other 3. Since 2015, the front ones are separate, the rear ones are combined. Most likely the wiring has a short somewhere.
This is even more interesting. The lampshade is still lit from the hood switch)))) The problem was in this limit switch))) It is necessary to soak the rubber bands of the limit switches in kerosene or something. To be soft.
With the ignition on, try pressing the limit switches one by one. It seems to be connected through the ignition.
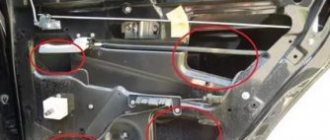
If the interior light does not go out, it means that the contacts of one of the door limit switches are not opening. They are connected to all doors in parallel. Maybe somewhere along the route of laying the wire it was pinched onto the housing. This is very easy to check. You start with the driver's side, unscrew it, pull out the limit switch itself, check it with the device and pull the wires themselves for clamping. As a rule, the connection goes to the driver's door, after which the wire goes to the left rear, and if the wire does not go from the rear left to the rear right (under the rear seat), then perhaps it will go from the front right to the rear right. Or simply cut off the wire suitable for the driver's limit switch and check whether the light turns off or not, and then solder the wire back into place.
I replaced the hood switch, and everything))) everything worked.
There, in the ceiling itself, everything is done in such an antediluvian way. Maybe the slider just doesn't touch. Take it apart and clean the contacts
then the alarm would not scream when setting the alarm from the remote control)
There is also a limit switch under the hood - it often fails
I haven’t looked at it! I'll replace it tomorrow and see if it squeals or not)) maybe the problem is trivial))
If he didn’t look, he was a hundred pounds. It is almost always damp and this heel under the end switch bends down over time and does not work
Yes, this bastard is dead. And the lampshade also depends on it)))
Are there light bulbs or LEDs in the lampshade?
bulb. Everything is standard except the tow bar.
To begin, disconnect the chip from the lampshade, that is, unscrew it from the ceiling, etc. And try without the lamp to see how the signaling will react. Well, check the limit switches, do you have limit switches installed in each door?
Yes, I disconnected it, in my opinion it was still on fire. I could be wrong really.
bulb. Everything is standard except the tow bar.
There is only one conclusion: something is shorting somewhere
Try pressing the door switch with your finger harder, as if the door is closed, will the light turn off? Don't forget to switch the ceiling light to limit switch mode. Have you tried that?
source
Design solution to the problem
When replacing or connecting, you only need to restore the originally designed circuit. If no modifications are carried out, then the need to disassemble the locking mechanism and use insulating materials is immediately eliminated. Step-by-step instruction:
- Open the hood.
- Loosen the bolt connections and disassemble the device.
- Unscrew the terminals.
- Connect the wires from the battery.
- Pull the limit switch out of the hole.
- Pull out the switch.
- Stretch the wires and connect them.
- Bring the ends out through the hole.
It is important that the wires are no shorter than ten centimeters.
- Strip the wires.
- Stretch the wires to the threshold to the installation site.
Lada Granta "SONN" › Logbook › Connecting standard door switches
Good day to all!
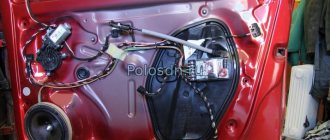
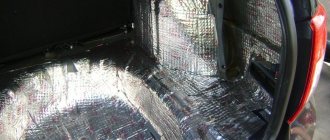
Like many non-luxury grant drivers, after the purchase I learned with horror that the car only has one door switch, on the driver’s side. Of course, when installing the signaling, 3 more missing limit switches were installed. But who knew that they were already installed in the locks. Even the alarm installer was not in the know. AVTOVAZ simply regretted running the wires into the doors to connect them. At first I thought that the limit switches were even better in rapids, but winter put everything in place. In winter, the rubber band on it becomes stiff and the end switch “sticks” when pressed. But that's not all. I noticed that when the car is loaded (5 people in the cabin), when making sharp turns, sometimes the light in the cabin comes on, so the body plays and the door moves back a little, releasing the limit switch. As a result, almost immediately I wanted to convert everything to limit switches in the locks. But it took me a long time to get ready, the car is almost two years old and I just got around to it. But the work took less than two hours, I did it alone. For now I limited myself to the rear doors. The front ones are completely noisy, I don’t want to open them. YES and they work better.
Troubleshooting
Drivers may encounter various types of malfunctions. Even though the sensor is protected, it is not as reliable as the manufacturers claim. In addition to silicone lubricant, other measures can be used:
- Install the spring under the rubber cover. If this element is elastic, it will protect the mechanism even at very low temperatures.
- Remove the protective caps for the winter, but there is a danger that the element will quickly become clogged with dust and dirt.
- Treat with protective liquid.
Often drivers replace their original limit switch with a part from another manufacturer or install a boot. In this case, the body of the new element is inserted into the standard connector and secured with a self-tapping screw.
Lada Granta automatic transmission Coriander › Logbook › Installation of limit switches in Granta
I bought Jp Group
(art. 1196500300) 3 pcs.
The surprise was that they came without connectors
(without “males”).
But with rubber caps. ) I started looking for a suitable connector. It turned out that such a connector is sold separately, and it costs a hefty 100 rubles per piece! Moreover, a domestic trailer for it costs 50(!) rubles. True, without a rubber cap. It seemed to me that the amount was too high (a question of principle, not a monetary one), and I decided to join the collective farm. I picked it up in stores, to no avail. I went online. I came across on the Renoshek website that they select a connector from the crankshaft sensor from TAZs and it costs about 50 rubles. I found it, bought it... as always, the stingy one pays twice, in one store there were only 2 of them, in another it already cost 70. It’s not enough to buy them; you also need to secure them properly on the end switch itself. He hangs out in it a little more. And to do this, I cut around the plastic with wire cutters, fitted the connector, caulked it with the remaining rubber from the connector (I stuck pieces of elastic between mom and dad) and securely wrapped the joint with electrical tape so that it wouldn’t come off. In general, I made a connector. Now I’m writing the text and thinking - why didn’t I immediately buy 100 ruble connectors?
)) Although, in fact, if I had immediately bought these connectors from the crankshaft, without picking them up in stores, without traveling to other stores, then it wouldn’t be a big deal, and the profit would be more obvious.
Next, it was necessary to install them in their standard places (remove the rubber plugs in the sills) and connect in parallel to the driver’s. The limit switch is “normally closed”, i.e. when the door is open there is a circuit, when it is closed the circuit opens. Therefore, the connection is parallel (before this I figured it out myself, checked it with a tester, because I couldn’t find any information on how to connect). The most difficult thing in this process, as always, is working with the casing, more precisely with the plastic of the central tunnel, which is difficult to remove and even more difficult to install. I suffered especially for a long time trying to tighten the last screw - it didn’t fit into the hole and that’s it, I fiddled for about 30 minutes. And the hole there is stupid in the iron, made with a self-tapping screw.
I connected one limit switch trially and checked the operating procedure on the interior lamp. Turned on the DOOR lighting mode and let's open and close the doors with the limit switch connected. Everything works correctly. Well, in this way I installed and stretched the wires from the other end switches. I ran the wires under the upholstery near the back sofa, near the vertical wall, where no pressure would be exerted on the wire.
Connected. I checked. Everything is working. Now at least I’ll know if which door is not completely closed... when driving, I’ll see it on the panel, and when arming, the alarm will give a signal) Well, the perimeter is now protected))
I also timed the installation of thresholds purchased for another 2 months to coincide with this event. back, because I knew that I would install limit switches so as not to climb twice).
PS: from the photo you can see that I have belts with pretensioners - great! (I didn’t think about this when purchasing, I only knew that there were 2 pillows).
source
How to extend service life
Craftsmen are constantly coming up with new ways to extend the service life of factory elements. Some people put coins under the rubber band, fasten the parts with tape, or insert washers. To prevent the switch from freezing or becoming deformed, there are several effective techniques to consider:
- Spring insert.
- Replacing standard caps with elements from foreign manufacturers.
- Silicone Grease.
You should not assume that these actions will grant immortality to the limit switch, but these measures will significantly increase its service life.
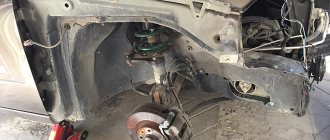
Lada Granta Belka › Logbook › The polite backlight does not work. Fixed it. Hood end cap)))
Hi all. Who has encountered such a problem? The lamp is always on unless you turn it to the non-working position. There is no reaction to the endings of any door. In addition to the driver's side, there is an indication on the dashboard. The car is 13 years old. The TsBKE is revocable, but the tow bar is still in place. Plus, if you set the alarm using the remote control, the standard alarm goes off. Where to look for the reason? Winter is just around the corner, the problem needs to be solved sooner))
Troubleshooting door switches
The Lada Kalina limit switch is not located in the door leaf, as in other VAZ models, but in the closing lock itself.
One of the reasons for incorrect operation is the grinding of the mechanism, or rather its moving part made of plastic, as a result of which it does not make contact.
The procedure required to restore the part's functionality:
- Remove the door trim.
- Disconnect the lock terminal.
- Remove the lock.
- Carefully remove the limit switch cover using a knife or screwdriver.
- Wrap tape around the lock pusher. This will increase its size a little, allowing it to push the limit switch into position.
- Fill the pusher with the wound tape with high-quality glue.
- Replace the cover, having previously spread glue around the perimeter.
- Reinstall the door in reverse order.
Central locking control on Lada Kalina
Every car owner is concerned about the safety and security of their car. This is especially true for those who are forced to leave their “iron horse” for a long time in public places, as well as in the courtyards of residential buildings. The desire to protect your property is understandable, given the fairly high crime rate. Modern cars are produced with a security system straight from the assembly line. Most often we are talking about the central locking.
It is very convenient and practical, so it remains unrivaled when choosing a security system for little money. Using this device, you can close and open all doors, including the trunk lid, automatically. All this is done both directly by turning the key in the lock, and from the remote control.
Features of standard central locking
AvtoVAZ even installs a central locking system with a remote control from the factory even on the most budget versions of Kalina. However, such a system is clearly not enough to effectively protect a car from theft. The Lada Kalina central locking system is also controlled from the interior. On the driver's door next to the power window control unit there is a central locking button. The ignition key simultaneously functions as a remote control. On its plastic part there are three buttons, the purpose of which is as follows:
- Unlocking. One press – the actuator should click and the driver’s door will open, two presses – the rest.
- Closing. To close all doors at the same time, just press the button once.
- Opening the trunk. Not available on all trim levels, as a trunk lock actuator is required. You can also install the electric drive yourself.
Kalina also provides another important function - rear door locking, as it is also called - child protection. To activate it, you need to use the key to turn the red chip to the right near the lock from the outside. After this, opening the rear doors from the passenger compartment is not possible, so that children cannot accidentally fall out while driving.
The central locking system does not have anti-theft functions; there are no shock sensors. All that the central lock can do is signal an unauthorized opening.
Basic central locking malfunctions and methods for eliminating them
There are times when, after pressing the door unlock button, you may encounter a lack of response to the command. The lock cannot be removed and the central lock does not respond to button presses on the remote control. Conclusion - Kalina's central locking does not work.
You can gain access to the interior using a key, but in this case the sound alarm is not deactivated, and everyone will know the car is opened If the system does not respond to commands from the remote control, there may not be many problems: either the batteries in the remote control are low and need to be replaced, or synchronization is lost. In this case, it is not repair that is required, but restoration of the system's functionality.
Restoring synchronization
Synchronization may be lost if there is a short-term (from 6 seconds) lack of power to the microcircuit in the key fob. In this case, desynchronization may actually occur, i.e. the connection between the remote control and the control unit of the central locking Lada Kalina is lost. According to the operating manual, if such situations arise, it is necessary to register the key fob again, entering data about it into the memory of the central locking system. You should immediately take into account that the procedure is far from the simplest and most understandable, and you also need a special training key. You can try to restore synchronization as follows:
- Turn the ignition switch with the key that requires synchronization.
- Wait 6 seconds.
- After the immobilizer lamp stops flashing, the ignition can be turned off.
After 10 seconds, the same key is used to start the car again. If the immobilizer warning light does not blink, it means that synchronization has been restored.
At first glance, nothing complicated, but this method does not help in all cases. If there is a training key, but there is no previously registered key, then the ignition is first turned on, then turned off. After the immobilizer warning lamp stops flashing, within six seconds the key is moved to the second position of the ignition switch (starter).
Conversion into a single door unlocking impulse
The controller of the central locking control unit opens the doors in two stages: one press of the button unlocks the driver’s door, two presses – all others. But you can make it so that everything unlocks after one press. This is very easy to do:
- Turn on the ignition.
- Press the unlock and close buttons at the same time and hold for at least five seconds.
- After the beep, the key can be released.
When the buzzer sounds once, the system notifies you of the transition to a new mode. Returning everything to the way it was before is just as easy. To do this, repeat the above procedure and wait for the double buzzer to confirm the transition to the default settings.