Tuning and repair of VAZ 2110
I think everyone understands that with roads like ours, the chassis often requires repairs. Quite often after winter, when the snow has melted and the holes are not yet visible due to puddles, shock absorbers and support bearings often get damaged. Because of such situations, it is necessary to repair this component of the VAZ 2110 chassis. It is better to carry out repairs in a timely manner, since in the first stages it will result in you spending less money than if you cause a breakdown and it will lead to a more disastrous result.
This article will provide information so that you can replace the VAZ 2110 support bearings with your own hands. Moreover, we will do this in such a way that we do not have to adjust the wheel alignment. That is, we will not touch the camber bolts.
What tool will you need to replace the support bearing of the front strut of a VAZ 2110?
- Steering wheel and ball joint remover.
- Ties for shock absorber springs.
- Tool for loosening strut nuts.
- Spanners.
- Jack.
- If it is possible to have an assistant, this will be a big plus.
Tools.
So, to replace the tens support bearing you will need:
- of course, the new support bearing itself;
- installation;
- universal set of keys;
- hammer;
- a spring tie and a special device for unscrewing the rack nuts;
- jack;
- steering wheel end remover.
It also wouldn’t hurt to have another person next to you—an assistant. When you have all of the above, you can start working.
Replacing the front support bearing of a VAZ 2110
1. First of all, remove the cap on the hub, and then loosen the nut.
2. Now, put the assistant behind the wheel, let him keep his foot on the brake pedal. At this moment you must unscrew the nut, or rather tear it off. 3. Jack up the car and remove the wheel. 4. Remove the cotter pin from the steering tip, unscrew the nut and use a puller to press out the pin.
5. Press out the ball joint pin.
6. At this stage you need to release the brake hose; it is held on the strut clamp.
7. Next you need to remove the caliper from the brake disc. When it is unscrewed, hang it to the side so that it does not interfere with you, but at the same time does not strain the brake hose.
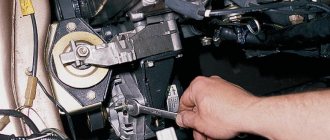
8. Now unscrew the 3 nuts holding the strut under the hood. Before doing this, I advise you to loosen the strut nut a little. This will make it easier for you to work with the stand further.
9. Unscrew the CV joint nut and remove the strut so that the CV joint comes out of the splines.
10. Now that the strut is removed, you will need a spring remover, called a spring puller. Having installed them on different sides of the spring, we begin to tighten the nuts on the pullers one by one. This will compress the spring. After the operation, unscrew the support bearing of the VAZ 2110.
11. We put a new one in place of the old support.
Everything is assembled back to the parsing algorithm.
As you can see, replacing the support bearing of a VAZ 2110 is not an entirely simple matter. But if you decide not to spend money on a service station and do this repair yourself, then following these instructions you should not have any difficulties.
For greater clarity, I suggest watching a video in which the support bearing of the front strut of a VAZ 2110 is replaced:
Lada 2110 Snow Queen › Logbook › Replacing the support bearing without wheel alignment
A method for replacing a support bearing without unscrewing the camber bolts and without adjusting the wheel alignment.
You will need special tools. — A device for unscrewing the nuts of the struts — Ties for springs. — Steering end puller (I didn’t need it)
1. Remove the hub cap and unlock the CV joint nut. (My nut was so tight that neither a screwdriver nor any pick could be reached, so I decided to use a drill and a suitable drill bit)
2. Use the head to push the CV joint nut through the wrench until it rotates easily. The assistant presses the brake at this time.
3. Raise the car on a jack and remove the wheel.
4. Unscrew the steering tip nut and unscrew it. Using a hammer and a pry bar, press out the finger.
5. Unscrew the 2 ball mounting bolts and disconnect the ball.
6.Release the brake hose from the strut.
7. Unscrew the 2 caliper bolts, first bending the washer petals. and move the caliper to the side (do not leave it hanging on the brake hose).
8. In order to make it easier to work with it “on your knees” after removing the stand, remove the nut from the stand, but do not unscrew it. Next, unscrew the 3 support nuts.
9. Unscrew the CV joint nut. We take out the rack while simultaneously pulling the CV joint from the splines.
10.Tighten the spring and then unscrew the support bearing.
11. Install a new support. We assemble everything in reverse order.
Don't forget that you need to install a new nut. Tighten and lock with a large torque.
What is not clear, ask!
Mileage: 70,750 km
Replacing the support bearing on VAZ-2110, 2111, 2112
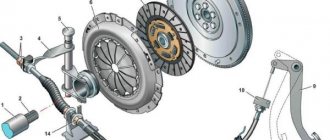
Support bearings are designed to reduce body loads transmitted from the vehicle wheels through the shock absorber struts.
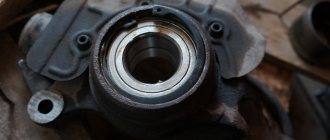
They are components of the upper supports of the front shock absorbers. The support bearings are located in the upper inner surface of the “cups” located in the engine compartment above each of the wheels.
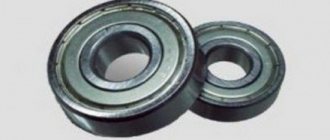
The design of the standard support bearing of the VAZ 2110 consists of the bearing itself (a thick rubber separator with steel balls built into it) and two protective rubber gaskets.
Basic faults
When a support bearing fails, a knock resembling dull blows appears in the front part of the car in the area of the pillars. Most often, such symptoms are observed when driving over uneven surfaces.
A knock indicates that the bearing has ceased to cope with its duties due to a violation of its integrity. This is caused by the destruction of its structure due to:
- exceeding the recommended resource;
- excessive dynamic loads;
- dirt and moisture getting inside the bearing.
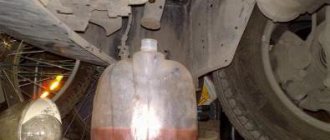
However, knocking in the area of the racks may have other causes. To check the bearings and make sure that they are the ones knocking, lift the hood of the car, remove the cover of the supposed “glass”, and place your palm on the upper shock absorber support.
Rock the car up and down. If at the same time you hear the same knock and feel the corresponding vibration with your hand, immediately replace the bearing.
When to change
The service life of standard bearings for the VAZ 2110 is 100 thousand km, but given the state of our roads, it is better not to take risks and change the bearings after no more than 50 thousand km or 2-3 years of operation, especially if they are no longer factory.
Also, support bearings must be immediately replaced when their malfunction is diagnosed. Otherwise, in addition to the body, the supports themselves and the shock absorber struts will suffer.
It is recommended to replace two support bearings at once.
The cheapest support for the “ten” costs about 300 rubles . A good alternative to the original bearing models are products from other manufacturers, such as SS-20, ASOMI, TRACK or FENOX ( up to 800 rubles per piece ). They may have a modified design designed to meet certain consumer requirements.
You can also buy the entire upper support assembly. This will cost approximately 1200-3000 rubles per unit .
The cost of replacing one prop at a service station is about 500 rubles.
Types of support bearings
The bearing must perform angular contact functions, and the more accurately it does this, the longer the car will retain its handling characteristics. Therefore, many different designs have been developed; there is no single one yet.
Bearings according to their structural organization can be divided into:
- by the nature of the rolling body - ball and roller;
- bearings with removable outer or inner races;
- integrated angular contact bearings of non-separable type;
- bearings without cages, which are a powerful cage with built-in rolling elements; the support flanges act as tracks.
During assembly, a supply of lubricant is placed in the bearing, but its operating conditions are such that it is not enough for a long time.
Replacement
It is not necessary to overpay for the work of replacing support bearings. Having the necessary tools at hand, you can do this yourself.
It will be useful: Wipers on the VAZ-2109 work slowly: operating features, causes and common faults, diagnostic methods and do-it-yourself repair methods
Tools and tools:
- wheel wrench;
- car jack;
- a special puller for steering tips (as a last resort, a hammer and a small pry bar);
- wrenches 9, 13, 19;
- pliers;
- two spring ties.
Work order
- Park the machine on level ground. Jack up the body on the desired side. Remove the corresponding wheel.
- Unscrew the nut securing the steering tip (pliers) and unscrew it (19mm wrench).
- Using a special tip puller, press out the pin. If you don’t have such a tool, knock out the finger by carefully tapping it with a hammer from below and prying it up with a small pry bar from above. Be careful not to damage the threads on the finger.
- Unscrew the two nuts securing the lower part of the strut in the steering knuckle (19mm wrench). If you cannot unscrew them, treat the connections with anti-rust liquid.
- Under the hood there are three nuts securing the upper support to the body. Unscrew them (key 13).
- Remove the entire shock absorber.
- Using two spring ties, tighten the spring enough to relieve the load on the support.
- Unscrew the nut of the central fastening of the support to the rack (wrenches 9 and 22). Remove the support and disassemble it.
- Replace the support bearing in it with a new one.
- Carry out work on assembling the rack and installing it to the body and suspension in the reverse order. Replacing the second bearing is carried out in the same way.
Suspension cracks
On VAZ cars, both the front and rear suspension may fail over time. You can determine the malfunction by examining the suspension arms near the ball joints, silent blocks, and under the spring stops.
The levers, as well as the transverse link of the front suspension, need to be replaced as soon as possible if cracks are observed on them, even the most minor ones. It is not recommended to fix this problem by welding; it is better to purchase a new part.
Cracks also appear over time on metal wheel rims, forming near bolt holes or ventilation windows. If these shortcomings are present, the disk should be replaced. If this is not possible, you need to carefully inspect the wheel after each strong impact.
Front shock absorber struts can last quite well for more than 100,000 km, but not every owner can boast of such a result. For many VAZ 2109-2108, the front suspension modules have to be changed almost twice as often, that is, every 50 thousand km. Using my own example, I can say that I drove about 80,000 km on factory struts, and only after that one of them leaked.
Below I will describe the procedure for replacing all module parts, from support bearings to springs and supports. To perform this repair you will need the following tools and accessories:
- Socket head for 19 and 13
- Extension
- Ratchet handle
- Vorotok
- Special key for holding the strut rod from turning
- joint puller
- spring ties
- open-end wrench or socket wrench 19
- breakdown if necessary
- hammer
So, first you need to open the hood of the VAZ 2109-2108 car, and after removing the protective cap from the top of the support, slightly loosen the central nut of the front drain. To do this, you need a special key, which can be purchased at any auto store. Or you can use improvised means.
The fact is that the central rod must be kept from turning while loosening the nut. Since in my case there was a 6mm hex hole at the end of the rod, I solved this problem without a key. To do this, I used a spark plug head, which can also be turned with a regular open-end wrench. In short, see the visual example in the picture:
Next, unscrew the front wheel mounting bolts and jack up the car. After this, it is necessary to disconnect the steering tip from the steering knuckle of the strut. Read more about this in the article on Replacing tie rod ends. As a result, we get the following picture:
After this, unscrew the two nuts securing the front strut, as shown in the photo below:
Then you can knock out the bolts to free the lower part of the rack. It is possible that they will be removed without much effort, but nevertheless, just in case, it is worth keeping in mind:
Now you can move the lever to the side, thereby releasing the rack from below:
Now you can start working on the top part of the mount. From under the hood, you need to unscrew the three nuts securing the support to the body glass. This action is clearly shown in the photo below:
When you unscrew the last nut, hold the stand from below so that it does not fall. And now you can easily remove the front strut assembly with the spring, support and bearing outward:
Next, we will need special spring ties to remove the support with the bearing and the front drain spring of the VAZ 2109-2108. We put them on the coils of the spring on both sides and try to evenly tighten them to the required level.
When the upper nut of the support fastening begins to rotate without force, that is, the pressure on it from the spring disappears, then you can finish with the tie and unscrew the nut, again, holding the central rod from turning:
Now you can remove the top cup from the support:
Then remove the support itself:
Well, all that remains is to remove the lower cup:
We take out the front strut spring up and now the entire front suspension module is disassembled into parts:
Next, you can begin assembling a new module if you decide to carry out a complete revision of the suspension. By the way, the old protective cover can be removed from the rack if it is normal and not torn, so that you can install it again later:
If you decide to replace the supports, it is better to immediately change them along with the bearings. Installing the new parts is done in reverse order, and again, use zip ties to install the springs and supports. As for the price, I can say for the complete set: I recently had to install new assembled modules on the front drive. All together it cost 13,000 rubles (SS20). Also, do not forget that after replacement it is necessary to go to a service station and get a wheel alignment done.
Replacing the support bearing of a VAZ 2110 on your own
Support struts with bearings VAZ 2110
As you know, replacing the support bearing of a VAZ 2110, as well as support struts, is an important and common situation. The fact is that it is these elements of the car’s structure that are constantly subject to loads, sometimes incredible ones. In fact, replacing a support bearing on a VAZ 2110 is a job that every self-respecting motorist must learn, because this component of the car can fail at the most inopportune moment.
How to quickly change the support bearings of struts on a Lada Granta
To replace the standard worn support bearings on the Lada Kalina 2 and Grant, according to theory, it is necessary to completely remove the front strut. This is due to a loss of time, a bunch of special tools, and not everyone has experience in this regard. The strut support can be replaced without removing the shock absorber from the car, quickly and with your own hands.
What is needed to replace supports. Tools and accessories
To work, we will need a standard set of heads and plumbing tools. However, here is the complete list:
- Tie for springs of any design.
- Two jacks or a jack and a stand.
- Hexagon to keep the shock absorber rod from turning.
- New strut mounts complete with bearings.
- Magic penetrating lubricant WD-40 or something similar.
- Litol-24 or other grease.
Cause and symptom of support bearing failure
It goes without saying that timely replacement, repair and, in general, any modernization of a car brings greater effect and success. In particular, if you are late in replacing the bearing, you can damage other important parts and components of the machine. The entire chassis can even fly off if you are not careful about your car. And then just a replacement won’t do, and you’ll have to do a major overhaul. The main cause of failure of this bearing is dirt. We conclude that if we drive often off-road, we will have to replace this component more often. The support bearing itself is practically not protected by anything. A symptom that the bearing has failed is a knocking sound. But to finally be sure that the reason lies in the support bearing, diagnostics by turning the steering wheel to the right and left will help.
Typical breakdowns
A disciplined motorist performs periodic inspections and diagnostics of the vehicle, extending the life of the vehicle, and preventing traffic accidents due to technical factors.
Signs of possible malfunctions of car suspensions:
- uncertain behavior of the car on the road while driving - deviation from a straight path, increased braking distance, skidding when turning;
- characteristic knocks;
- annoying noise from suspension components;
- oil drips – shock absorber defects;
- uneven, premature tire wear.
Knocks and noises can be caused by damage to:
- racks;
- springs (deformation, failure);
- swivel joints;
- compression buffer;
- poor quality, loose fastening of parts;
- wear, destruction of rubber structural elements;
- wheel imbalance.
Accelerated wear of rubber and instability on the track are caused by incorrect wheel angle settings, imbalance, wear of joints, and increased spring stiffness.
Preparing the tools
In this article, we will look at how the support bearings of a VAZ 2110 are replaced without a mandatory wheel alignment, a process that requires special equipment and a stand.
Replacing support bearings on a VAZ 2110
First of all, before making a replacement, you need to arm yourself with the following tools:
- A special device that helps tighten the springs and unscrew the strut nuts;
- A special puller designed for removing the steering tip;
- A set of standard wrenches - wrenches or caps;
- Mount;
- Hammer;
- By lift.
Note. Needless to say, you also need to stock up on a new support bearing. In addition, the help of an assistant in this work will not hurt.
How much does it cost to replace a wheel bearing on a VAZ 2110?
At a service station, services for replacing a wheel bearing will cost from 1000 to 1500 rubles. On average, such work will be completed by engineers in 40-50 minutes. If you need to replace the hub, the service will charge about 3,500 rubles for it.
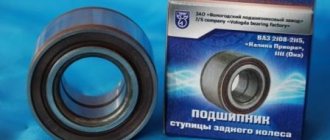
Price of hub and bearing for VAZ 2110
A factory hub produced by AvtoVAZ (21100-3104014-00) costs from 1300 to 1600 rubles. This is the most reliable option. Analogues:
- Riginal (RG21083103012) — 950 rub.
- VolgaAvtoProm (21080-310301200) — 650 rub.
A proven version of the front wheel bearing is the original AvtoVAZ element (21083103020). Its cost is about 470 rubles.
There are several options for bearing analogues:
- FAG (713691010) - 1330-1500 rub.
- SKF (VKBA 1306) - 1640-2000 rub.
- HOLA (NB721) - 545-680 rub.
- HOFER (HF301046) — 380 rub.
- KRAFT (KT100505) — 590 rub.
- FEBEST (DAC34640037) — 680 rub.
The German company “FAG” and the Swedish “SKF” offer the most reliable front hub bearings for the VAZ 2110. These bearings differ from others in high quality and extend the life of the hub itself. But the worst option, according to car owners, is HOFER.
The replacement process itself
Replacing the support bearing of a VAZ 2110 is easy and simple
We begin the process by removing the car's hub cap. Be sure to place the car on a flat, hard surface. Let's continue:
- after removing the hub cap, unlock the CV joint nut (see VAZ 2110: replacing the CV joint - do it right);
- We ask the assistant to press the brake pedal, and we unscrew the nut ourselves, using either a socket or a wrench;
- jack up the car;
- dismantle the wheel;
- Now you need to unscrew the steering tip nut.
Note. To unscrew the steering tip nut, you should unscrew it, and to do this use a hammer, a pry bar and a special puller.
- press out the finger;
How to replace the support bearing on a VAZ 2110
- Now you should disconnect the ball, which is secured with two bolts;
- they will need to be unscrewed;
- after this, the brake hose is removed, which is removed from the strut clamp;
- Now it's time to unscrew the caliper bolts (there are two of them).
Replacing the support bearing of a VAZ 2110 strut - bearing without a race
Note. To be able to unscrew the caliper bolts, you must first unlock the washer petals. After the bolts are unscrewed, the caliper should be moved to the side and hung on a wire so that it does not interfere with further work. Under no circumstances is it recommended to hang it on the brake hose.
- We tear off the strut nut to make it easier to continue working.
Replacing the strut support bearing on a VAZ 2110
Note. We remember that you do not need to remove this nut completely, but halfway.
- Now unscrew the nuts that secure the strut support (there are three of them);
- then unscrew the CV joint nut and leave the strut;
- We pull out the CV joint from the splines;
It will be useful: Outdoor air temperature sensor VAZ-2114: description, characteristics, why it shows incorrectly
CV joint or grenade pulls out from the splines
- Now you should bring the spring together.
Note. To properly compress the spring, you need to install it on the coils and begin to tighten each of them evenly, using a wrench. Once the spring has compressed, the support bearing can be removed.
- install a new one in place of the old bearing;
- all the parts will need to be reassembled, doing this as opposed to dismantling.
Often, along with the bearing, the gasket and ring are also replaced. But we’ll talk about this in the next article. Needless to say, replacing a bearing is the easiest job, but using videos and photos in your work, you can easily do everything yourself. The main thing is to strive to do everything as required by the instructions. As for the help of specialists, as you know, today the price for their services is quite high. In addition, as mentioned above, the support bearing can fail at the most inopportune moment, for example, on the road, where there is no car service nearby.
Replacement of the upper support and support bearing of the front strut of VAZ 2108, 2109, 21099 cars
To replace the upper supports of the front struts on VAZ 2108, 2109, 21099 vehicles, it is necessary to remove the front strut (preferably together with the steering knuckle, so as not to disturb the wheel camber) and partially disassemble it.
— Socket wrench or socket “13” — Open-end wrench, socket wrench or socket “17”
— Tie rod end remover
— Using a special wrench, loosen the tightening of the shock absorber rod nuts on both struts
— Unscrew the jammed shoulder of the front wheel hub nut and use a curved spanner or a socket with a “30” knob to loosen it.
- Loosen the front wheel bolts
— Jack up the car on both sides, hang it up and remove the front wheels
On VAZ 2108, 2109, 21099 cars, if both front wheels are suspended, then the anti-roll bar does not tighten the elements of the car’s front suspension. This makes it much easier to remove the front strut.
— We clean the front struts, steering knuckles, ball joints, and tie rod ends from dirt
The procedure for replacing the upper supports and support bearings of the front struts of VAZ 2108, 2109, 21099 cars
— Remove the front struts from the car (using the example of the right strut of the front suspension)
We disconnect and remove the caliper (by unscrewing the two fastening bolts with a key “17”). We hang it on a wire so that the brake hose is not stretched.
Disconnect the tie rod end from the strut swing arm. Unscrew the pin nut and use a 17 key to unscrew it. Using a puller or using a mounting tool, press the pin out of the steering knuckle boss. Read more: “Replacing tie rod ends for VAZ 2108, 2109, 21099 cars.”
Unscrew the front wheel hub nut. We use a key or socket set to “30”. Remove the nut and the washer installed under it.
Disconnect the ball joint from the steering knuckle. Using a socket wrench or a “17” socket, unscrew the two ball mounting bolts.
We unscrew the three nuts securing the upper support of the front strut to the car body (“cup”). We use a socket or socket wrench or a 13mm socket.
Remove the front strut along with the steering knuckle. We move it towards ourselves, while simultaneously removing the shank of the outer CV joint from the steering knuckle. We try not to move the outer CV joint too much along the axis, so as not to pull the inner one out of the box. We clean the removed rack from contamination.
— Partially disassemble the front pillar
Compress the suspension spring. To do this, we install two ties on it, one opposite the other. We hook the hooks of the ties to 4-5 turns of the spring. By rotating the tie screws evenly and alternately, we compress the spring.
Remove the front strut upper support. To do this, use a special wrench to unscrew the rod securing nut, remove it, the upper support travel limiter and the support itself with the support bearing. The remaining parts of the rack do not need to be removed.
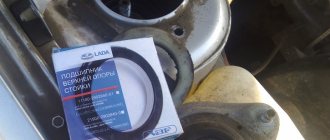
— Replace the old upper support of the front strut assembly with support bearing with a new one
— Assembling the front pillar
— Install the front strut on the car
We insert the upper part of the rack into the “cup” of the body, the shank of the outer CV joint into the hole in the steering knuckle. We combine the lower part of the steering knuckle with the ball joint housing. Attach the tie rod end. We fix the parts of the front pillar.
Similarly, we replace the upper support with the support bearing on the second front strut.
Notes and additions
— The upper support of the strut, due to its elasticity, allows the strut to swing during suspension movements. Due to this, high-frequency vibrations are dampened when driving over uneven surfaces. The support bearing allows the strut to turn when the steering wheel rotates along with the front wheels.
— The upper supports of the front struts with the support bearings pressed into them must be replaced if a fractional knock occurs from the suspension when driving over uneven surfaces (“ridges”), creaks or other extraneous sounds appear, or difficulty turning the steering wheel.
— A frequent knocking sound when driving over uneven surfaces can be caused by a malfunction of the tie rod ends or steering rack; extraneous sounds when the steering wheel rotates appear when the suspension ball joint fails. Therefore, before starting to replace the upper strut supports on a VAZ 2108, 2109, 21099 car, you should diagnose the front suspension and identify the malfunction of the supports.
— It is possible to remove the front strut of VAZ 2108, 2109, 21099 cars to replace the upper supports without a steering knuckle. To do this, you will have to unscrew the bolts securing the strut to the steering knuckle. One of them is also the front wheel camber adjusting bolt. Therefore, in this case, after replacing the support and installing the rack back, it is necessary to adjust the camber of the front wheels.
More articles on the front suspension of VAZ 2108, 2109, 21099 cars
How to find out that the support bearing is broken
In the vast majority of cases, the support bearing fails due to severe contamination. Therefore, if you often drive in bad weather or travel on almost complete off-road conditions, this part will break down much more often than when using the car in the city.
What symptoms indicate bearing failure? There are several of them:
- knocking of the front suspension when driving even on small uneven sections of the road;
- an unpleasant grinding or crunching sound when turning the steering wheel in any direction;
- clicks that can occur even while driving on a flat road.
Replacement of the VAZ-2110 support bearing should be carried out immediately after detecting any of these symptoms. Otherwise, the safety of car operation is significantly reduced, the risk of rapid tire wear increases, the support struts fail, the restoration of which will cost much more.
The procedure for replacing a bearing on a VAZ-2110
In order to cope with the replacement of a part relatively quickly, you will need to prepare in advance all the necessary tools - a standard set of keys, a spring tie, a mechanical steering wheel end puller and a jack. In addition, it is important to choose the right support bearing itself, which must meet the specifications of your car.
The replacement procedure does not take as much time as it might seem at first glance, and includes several main steps:
- We install the car on a perfectly flat, hard surface and dismantle the hub cap;
- Unscrew the CV joint nut using a wrench or a special socket. At this point, you will need help to press the brake pedal at the same time;
- lift the car using a jack and remove the wheel;
- remove the cotter pin of the steering tip nut using a special puller, then completely unscrew it;
- remove the finger, which will have to be pressed out with very noticeable force;
- unscrew the bolts holding the ball joint and dismantle it;
- remove the brake hose, after which you need to unscrew the bolts holding the caliper and move it slightly to the side. This will allow you to reach the bearing without interference;
- pull out the CV joint, compress the spring using the tie mentioned above and remove the support bearing;
- Carefully install a new support to replace the worn one, after which we reassemble in the reverse order.
If you do not have any practical experience in car repairs, then the entire procedure described here may seem quite complicated. However, in fact, if you have a special tool, it is possible to replace the support bearing in the shortest possible time and with virtually no effort.
Of course, you can use the help of specialist auto mechanics who will complete this procedure even faster. However, the price for professional services is constantly increasing, which will lead to considerable costs, especially if you constantly drive off-road, and the failure of the support bearing has long become an unpleasant tradition. Using our video instructions, you can easily learn how to make a replacement no worse than experienced craftsmen and save money.
How to replace the front support bearing and strut on a VAZ 2110
The support bearing of the VAZ 2110 is one of the important parts of the chassis. Thanks to it, the shock absorber can easily rotate around its own axis without pushing through the upper part of the mount. This ensures the durability of the suspension itself and also guarantees comfortable driving.
With proper operation, the part should fail only after 70-100 thousand km. However, situations arise when repairs will be required sooner. You can learn how to recognize a malfunction in time, diagnose a breakdown, or professionally replace a VAZ 2110 support bearing with your own hands from this article.
Causes of failure and how to check the support bearing of a VAZ 2110
The original supporter is capable of traveling 70-100 thousand km. But if used incorrectly, failure will occur earlier. For example, a breakdown can occur due to:
- dynamic driving style;
- ignoring the features of the roadway;
- liquid getting inside the part, which will wash out all the lubricant from the bearing.
It will be useful: Diagnosis of the VAZ-2110 with your own hands: step-by-step instructions
The main symptoms of a malfunction will be:
- knocking noise when driving on rough roads;
- vibrations on the steering wheel when it rotates while driving;
- slow reaction to driver actions.
How to check the support:
Below is a video with verification recommendations:
Creak when turning the steering wheel in the area of the front wheel of a VAZ 2111:
How to check the support bearing of a VAZ 2110 strut:
vazoved
I drive a LADA VESTA CROSS, Moscow
Then there will simply be no one to pay the fines! This is a Korean 7 in 1 car tablet video recorder for Android..
I forgot about fines and Yandex Navigator.
There is FULL HD shooting, radar detector and GPS with 32 satellites. I got it at a reasonable price for just a few thousand HERE
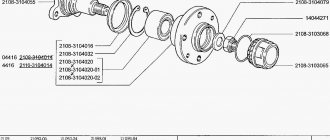
Diagram and design of the unit
This photo shows a diagram of the front suspension of the car with a list of main elements:
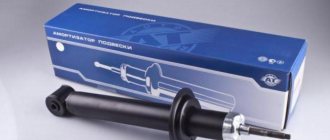
Which racks are better to put on a VAZ 2110
ShtokautoAdvantages: The case is of standard length - you don’t have to redo the fasteners to install them; Reducing the working length of the rod made it possible to lower the car by 50 mm; The classic cup allows you to install wheels of 15-18 inches; Reduced sway when turning; Improved handling. Flaws: Buyers note that the cost could be a little lower. | DemfiAdvantages: One year warranty from the manufacturer; Minimum number of rolls; Instant response to turning the steering wheel; Excellent directional stability; Collapsible design. Flaws: The model is intended for use in combination with barrel springs; Slightly increased rigidity. | PlazaAdvantages: Soft ride at high speeds; Improves the car's cornering; Allows you to comfortably accelerate to 160 km/h and above; Due to the rigidity of the struts, the car rises slightly; Can walk for a long time without extraneous sounds and replacing liners. Flaws: The oil is susceptible to sub-zero temperatures. |
ElastoMagAdvantages: The rod does not knock; Improved driving quality; Balanced softness when driving at different speeds; Raises the car by 2 cm; Reasonable price - 3800 rubles. for a couple. Flaws: They do not always withstand strong blows, however, like any other stands. | BelMagAdvantages: Durability when driving off-road; Durability with a significant margin; Soft running when driving on uneven surfaces; Affordable price - about 2000 rubles. per element; Shock-absorbing fluid with unchanged kinematic properties when changing temperature. Flaws: Not very confident behavior at high speed. | SS 20Advantages: Light loads on the valve system and a long service life; Pistons with good sealing and stable damping characteristics; Successful design of the lower silent block; Reliable and better in terms of damping capabilities; Reduces vehicle sagging under load; Operating temperatures are in the range -42˚ to +50˚ C; One year warranty, regardless of mileage; Silent operation throughout the entire period of use. Flaws: The price could be lower. |
KYB (Kayaba)Advantages: 3-stage valve system; Durable multi-lip stem seal; Wear-resistant Teflon coating of piston valve; Robust, seamless tube design in the working cylinder and mounting area; Reliable galvanic material covering the shock absorber rod. Flaws: A little vibration is transmitted to the car when driving over bumps. | ||
Step-by-step instructions for removing the assembly
Before the procedure, you should stock up on the necessary tools.
To work you will need:
- jack, trestle or lifting mechanism;
- a set of standard wrenches with socket heads from 12 to 28;
- several screwdrivers, including Phillips and flathead;
- two ties for removing the spring;
- engine oil.
Having the tool available, you can get to work. Removal instructions are provided below:
- We drive the car onto a lift or overpass. You can also lift the wheel we need using a jack, which should be placed under specially reinforced areas of the body. You must first loosen the wheel mounts;
- Open the hood, where we loosen the three upper support fastenings;
- Now you need to loosen the central nut of the strut. It is not necessary to unscrew it completely so that the spring does not straighten;
- Remove the wheel rim;
- Now you need to unscrew the CV joint nut. To do this, you will need to lock the brake disc or your partner must press the pedal;
- Remove the brake hose fixation;
- Using a 17mm wrench, remove the two brake caliper bolts;
- Separate the brake pads and remove the caliper;
- Unscrew and unscrew the steering tip nut with a 19 mm wrench;
- Using a 17 wrench, unscrew the ball fastenings;
- Remove the steering knuckle;
Rack disassembly process
Next, you need to disassemble the unit in order to remove the support bearing of the front strut of the VAZ 2110:
- We tighten the shock absorber spring with two ties until its upper coil stops pressing on the upper element;
- Unscrew the central nut and remove the “chandelier”;
- We remove the support along with the accompanying elements;
- Replace the support, and then inspect the condition of the remaining parts;
- Next we proceed to the installation;
Check adjacent rack parts and replace if necessary
After disassembly, you should definitely check the condition of all other parts of the assembly. There should be no cracks or holes on all rubber parts, insulators and boots. The spring must be free of cracks and creases. Eliminates oil leaks on the shock absorber. Otherwise, along with replacing the bearing, all faulty elements should be replaced.
Only fully serviceable parts can guarantee the correct functioning of the chassis.
DIY repair instructions
Before replacing the support, you should check it. Sometimes you don’t have to install a new part, but rather repair the old one. Repair is possible when not the ball bearings themselves are worn out, but the damper rubber of the support is pressed through.
- Let's disassemble the part;
- We select a metal plate of suitable diameter and thickness (from 3 to 5 mm);
- We install it on the upper part;
- During assembly, you should unlock the petals of the washer, and also additionally seat the parts for welding;
Below is a detailed video on the repair.
Repair process on video:
Support support repair – option 2:
Installation of a new support
In fact, the simplest work is assembling the unit, because all actions are carried out in the reverse order.
- Install the spring on the strut. Then we install the insulators and place the support on top;
- Tighten the central fastening;
- Now you need to install the node itself. We place the upper edge under the hood, where we attach the three upper fasteners
- Attach the ball joint mount;
- We fasten the steering tip;
- Install the brake caliper and hose;
- Tighten the CV joint nut;
- Reinstall the wheel rim;
- We tighten the fastenings under the hood.
DIY front strut diagnostics
Checking a suspicious node is quite simple. When the car is stationary, one hand is placed on the shock absorber rod with a nut protruding from the suspension glass, and the other hand is used to intensively rock the body. It is better to carry out even such an operation together, since the efforts are quite significant.
Your hand on the top cup of the rod will easily feel extraneous sounds and vibrations that should not be present in serviceable parts.
If an assistant turns the steering wheel from side to side, and your hands, while on the strut cup or spring coil, feel a knocking, grinding (crunching) sound, then things are bad with the bearings.
If the shock absorber rod of a particular car is not connected to the inner race, then it will be difficult to check the part in this way.
You will only have to focus on the sounds when driving and the results of partial disassembly of the suspension.
About replacing an assembled part
If there are leaks on the shock absorber, the entire strut needs to be replaced. To do this, you need to carry out the disassembly process:
- Hang up and dismantle the wheel;
- Loosen the top fastenings;
- Remove the brake caliper with hose;
- Disconnect the steering tip and CV joint;
- Disconnect the steering knuckle;
- Dismantle the unit;
- Replace the brake disc, spring and other elements on the new strut, and then reassemble.
It is important to remember that after such a procedure it is necessary to adjust the wheel alignment, because when dismantling the shock absorber, the camber bolts are disconnected.
Buyer's choice: cost of support bearing VAZ 2110, its manufacturers and articles
There are many different options on the market. It is advisable to take original parts - article number: RS-67499 or 2110-2902820-RU. The width of the part is 144 mm, length – 148 mm, and height – 62 mm with a weight of 1260 grams.
However, there are plenty of other options with good reviews. Among the well-proven products are parts from the Balakovo plant, as well as products from the Asomi company. The price fluctuates between 750 – 1800 rubles. When choosing a spare part, you should pay attention to the quality of the processing of the edges of the part, as well as the packaging. In addition, the part must have certificates of conformity and quality certificates.