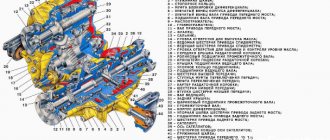
Lada 4×4 3D 1996, engine Gasoline 1.7 liter., 70 hp, AWD drive, Manual — vehicle breakdown
Only registered users can participate in discussions.
All Comments
Reasons for oil leakage from the pan:
The VAZ 2121 is regularly used off-road, and it is possible that the bottom of the engine touches the ground. This is an extreme situation that can lead to a hole. Also, when the pallet hits the ground, the landing plane may be deformed. Due to such damage, the gasket that ensures the seal often breaks. Crankcase deformation due to overheating. If the size of the damage exceeds the thickness of the gasket, oil begins to leak out of the engine. Excessive tightening of the fastening bolts leads to destruction of the gasket . The other side of the coin is insufficient tightening torque. If a leak is detected, tighten the mounting bolts. Banal destruction from old age or low quality of a factory part. If broaching does not help, a simple replacement process awaits.
How to change the pan gasket yourself
The only condition is the presence of a hole in the garage, or an overpass. Despite the high ground clearance, replacement at ground level is not possible. Drain the used oil. To do this, the machine warms up, then you need to wait up to 10 minutes until the liquid collects at the bottom of the pan.
Important! Take precautions against hot liquids coming into contact with your body. After unscrewing the drain plug, a strong stream sprays oil in all directions. To change the gasket, you will have to raise the power unit by 15-30 centimeters. Loosen the fastenings of both rubber engine mounts and unscrew the gearbox from the fastenings of the front axle and engine.
We install a jack under the engine and raise it to the height of the travel of the support pad bolts.
We install restrictive spacers into the resulting gap - wooden blocks will do.
This is done for safety - the jack may suddenly collapse, and then replacing the gasket will result in injury. Unscrew the bolts securing the pallet. Not sequentially in a circle, but crosswise, to evenly relieve stress from the body.
The tray on the NIVA 21214 is quite heavy; before unscrewing the last pair of bolts, hold the body, or ask an assistant about it.
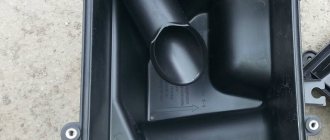
Using a gentle downward and forward motion, remove the part from under the engine compartment. There may be oil at the bottom, do not spill it on your clothes. Attention! An oil receiver with a filter mesh descends from the crankcase cavity. Do not damage this unit during dismantling. Taking this opportunity, we inspect and troubleshoot the internal cavity of the crankcase. Clean visible parts with a lint-free cloth moistened with oil . Scrape off any old gasket residue from the crankcase mating surface. Rinse the pan with kerosene and check the geometry from the fasteners. To do this, lay the case upside down on a flat surface - for example, glass. If there is deformation, the spare part will have to be replaced. Small chips and damage are sanded. Install a new gasket after wetting the surface with engine oil. The use of sealants is undesirable; rags will eventually end up in the crankcase cavity. Carefully place the pan (without damaging the oil receiver) under the crankcase and secure it with four bolts crosswise. Tighten all bolts, observing the tightening torque specified in the vehicle instructions.
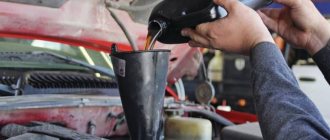
Raise the engine again, remove the spacers, and lower them onto the mounts. Tighten the support bolts. Secure the gearbox. This completes the gasket replacement procedure. All that remains is to tighten the drain plug and add fresh oil. Perform a test drive and check for leaks from the crankcase.
Features of self-removal of the defect that has arisen
When replacing the hydraulic chain tensioner and installing a mechanical tensioner on a Chevrolet, the valve cover must be removed.
Next, after pulling out the pin, you need to use a ratchet wrench to make one full revolution of the crankshaft. It is important to pay attention to whether the sagging chain on the Niva has come out of the grooves of the shoe
. If this point is ignored and the defect is not eliminated, then the consequences can be sad (but this only applies to a single-row chain).
Also interesting: No charging for VAZ 21213 reasons
Also, as a result of the first revolution, the primary slack of the chain on the Niva is selected and, as a rule, the rod immediately comes out one or two more clicks, relative to the first shooting. After self-replacement, subsequently no extraneous sounds will be observed during startup on the Chevrolet Niva. The engine will always run smoothly.
When the hydraulic tensioner is replaced, nothing will rattle when you start the engine. Since it is always only the faulty element that rattles. The instructions for replacing this unit yourself prove that the procedure is not at all complicated, and in addition, the price of the issue is no more than 2,000 rubles. But there is one “but” - if the Niva Chevrolet car is relatively new and was under warranty, it will automatically be canceled.
Read news about the new Niva
- Lada 4×4 Bronto - sales stopped, new details » Lada.Online - all the most interesting and useful about LADA cars
- Description of the instrument panel Lada 4×4 (VAZ 2121, 2131) » Lada.Online - all the most interesting and useful about LADA cars
- LADA Niva – Operating manual – Official LADA website
- Chevrolet Niva gasoline consumption per 100 km
- Buy LADA (VAZ) 2131 (4×4) 2021 in Rostov-on-Don, low price for Lada 2131 (4×4) 2021 on the Avto.ru website
- Fuses Niva 21214 injector «
- The new large Lada 4×4 Niva “Bigster” 2021-2022 based on the Dacia Bigster was shown for the first time. The SUV has changed beyond recognition
- New Niva Chevrolet Lux 2021 - review of GLC equipment
What will you need during the work process?
To remove the pallet yourself, you need to prepare the following tools:
- set of keys and socket heads;
- flat screwdriver;
- 4 liter capacity for oil;
- end-type driver;
- extension for wrench or lever;
- jack.
Along with the above list, when replacing the oil pan gasket, you should purchase:
- a couple of bars 40-50 mm thick;
- gaskets for the oil pump and pan;
- rags for removing oil stains.
Chevrolet Niva | Removing and installing the pallet | Chevrolet Niva
Chevrolet Niva - Removing the cylinder head
To do this, lay the case upside down on a flat surface - for example, glass. Next, to free up space around the crankcase to remove the pan, you will need to unscrew the nut securing the engine mount.
Manuals → Chevrolet → Niva (Chevrolet Niva). Removing and installing the pallet. When installing, use a new...
Unscrewing the sump cover to drain the oil is done with a head. In the second case, you will need to use stands under the front axle so that the car is level.
Unscrew the 19 crankcase mounting bolts and remove the washers.
Rinse the pan with kerosene and check the geometry from the fasteners. To do this, lay the case upside down on a flat surface - for example, glass.
If there is deformation, the spare part will have to be replaced.
Small chips and damage are sanded. Install a new gasket after wetting the surface with engine oil. The use of sealants is undesirable; rags will eventually end up in the crankcase cavity.
Carefully insert the pan without damaging the oil receiver under the crankcase, secure it with four bolts crosswise. Tighten all bolts, observing the tightening torque specified in the vehicle instructions.
Raise the engine again, remove the spacers, and lower them onto the mounts. If the gasket remains on the cylinder block, separate it from the mating plane of the block with a sharp tool, such as a screwdriver, and clean the plane from gasket residues.
Install the new gasket and all previously removed parts in reverse order. Tighten the crankcase mounting bolts crosswise, without applying excessive force, so as not to deform the crankcase flange and damage the gasket.
How to remove the pallet on Niva 21213
Lada 4x4 (VAZ-21214): Replacing the oil pan gasket
We replace the gasket when an oil leak is detected at the junction of the crankcase pan and the cylinder block, when tightening the pan mounting bolts cannot eliminate the leak.
We carry out the work on an inspection ditch or overpass.
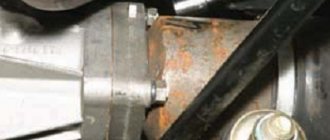
We remove the mudguards of the engine compartment (see “Removing the mudguards of the engine compartment,” p. 282). Drain the oil from the engine (see “Changing the engine oil and oil filter”, page 18). We unscrew the nuts securing the cushions of the left and right power unit supports to the front suspension cross member brackets (see “Replacing the power unit supports,” p. 97). We unscrew the nuts and bolt securing the front axle gearbox to the suspension brackets of the power unit and the engine cylinder block (see “Removing the front axle gearbox,” p. 191).
Place the adjustable stop under the clutch housing.
. raise the power unit. For fixing the power unit.
. We insert wooden blocks between the support pads and suspension brackets.
. and lower the adjustable stop.
After cleaning the mating surfaces of the cylinder block and oil pan, install a new gasket. We carry out assembly in reverse order.
Removing the engine sump gasket on a VAZ 2121 and Niva 2131 is done to replace it in case of damage, which is accompanied by the presence of oil smudges at the junction of the sump and the engine block. The cause of a leak can be not only its damage, but also deformation of the pan itself, which often occurs as a result of engine overheating. In this article, we will consider the process of replacing the gasket. First of all, you need to try to tighten all the bolts securing the pallet, while observing the cross-to-cross sequence; if this step does not help, then proceed to the repair. First of all, prepare a standard set of tools; the car must be driven into an inspection hole or overpass. Then do the following sequence of actions:
At this point, the repair work to replace the oil pan gasket on the VAZ 2121 and Niva 2131 has been completed. We install the new one in the reverse order.
Remove the pan in the field without removing the engine
Lighting
Light bulbs, Headlight lamp, Halogen lamps, Xenon lamps, LED lamps, PTF lamp, Rear PTF lamp, Tail lamp lamp, Brake lamp, License plate lamp, Brake lamp, Reversing lamp, Parking lamp, Turn signal lamp, Instrument panel lamp, Trunk lamp, Engine compartment lamp, Interior lamp, Heater backlight lamp, Headlight, Left headlight, Right headlight, Xenon headlight, Headlight washer, Headlight washer pump, Headlight washer nozzle, Headlight range control, Additional headlight, Finder headlight, Headlight ignition unit, Sensor ground clearance, Headlight mount, Headlight cover, Headlight reflector, LED headlight, Headlight glass, Fog light (PTF), Fog light, PTF mount, Fog light, PTF frame, Tail light, Reversing light, Brake light, Running lights, Side lights , Reflector (reflector), Side marker, Parking lights, Turn signal, Side turn signal, Rear turn signal, Front turn signal, Repeater, Lamps, License plate light, Trunk light, Door light, Engine light, Dashboard light, Interior light, Rotating light
Cooling
Water Pump (Pump), Water Pump (Pump) Pulley, Water Pump (Pump) Gasket, Intercooler, Intercooler Hose, Thermostat, Thermostat Housing, Thermostat Gasket, Radiator Fan, Fan Assembly, Inverter Fan, Diffuser, Fan Motor, Fan Relay, Viscous coupling, Impeller, Air conditioning, Air conditioning compressor, Compressor bearing, Compressor pulley, Pneumatic switch, Air conditioning dryer, Air conditioning pipe, Air conditioning control unit, Interior temperature sensor, Air conditioning evaporator, Thermostatic valve, Air conditioning mount, Air conditioning resistor, Air conditioning relay, Air conditioning hose, Radiator, Cooling radiator, Radiator mounting, Radiator hose, Coolant sensor, Air conditioner radiator, Inverter radiator, Radiator pipe, Adapter flange, Expansion tank, Expansion tank cap
Answers from experts
Dmitry Levin:
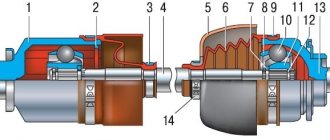
To change the piston rings on a Niva, you need to remove the cylinder head and pan. There are no problems with the cylinder head. But there is a lot of fuss with the pallet. It is difficult to remove because the front gearbox gets in the way. The complexity of such work increases. You need to release the gearbox (let the cardan rest on the rod, that’s enough). Unscrew the pan in a circle - it will not come off, the oil pump also gets in the way. Stick your hand with a 13 key into the sump, unscrew 2 bolts - the pump will fall into the sump. Only after this can you remove the pan and open access to the connecting rods and piston group.
Sanya Sanya:
This operation will be difficult to do on the car itself; it is best to remove the internal combustion engine.
Alexey 69 rus:
you remove the pan - the head - unscrew the connecting rods, pull them out through the top with the pistons, change the rings and that's it!
Alexey Russkikh:
if you only change the rings and nothing else, then you can do without removing the engine head, remove the pan, remove the bottom of the piston, carefully knock it out, change the rings, put them back together))) but why do you need to change them if the oil is consumed after replacing the caps, then you need to change it, but if the compression is all eat, don't do anything
Sergei Lapotko:
you need to remove the engine and crankshaft. pull out the pistons and put the rings on them. If the car is old, then there is already an ellipse on the cylinder block and the cylinder block needs to be bored and the crankshaft must also be ground. change the liners on the shaft.
kain gerd:
Marina is for you.. Nothing simpler: remove the engine head, remove the pan, pull out the piston, change the rings, and everything in reverse order. good luck to you in this difficult task, it’s easier for you to cook borscht than to change rings. trust the professionals...
Alien Ka:
REPLACING rings if the engine mileage is more than 80 thousand km is wasted work, changing is not difficult; you lower the gearbox, remove the pan, and the head and change without removing the engine, pulled out the piston with the connecting rod, changed the rings and then put it back again... We did this procedure on the road. there is nothing complicated. the whole point is that it’s useless, the cylinder wears out with the rings the same way, so it’s just boring other pistons and rings.
Yuri Bulany:
you need to throw your head down, the piston in the middle and he measures the production of liners with a bore gauge = if it is more than 0.09-0.15 mm = then bore to the repair size = otherwise it will consume 40 thousand oil = oil in buckets
Student:
Similar to any Classic from VAZ... You don’t have to remove the engine... There are a bunch of video clips on this topic on YOU-TUBE. Watch and enjoy...
Sergey Polden:
Don’t you guys think enough to change the rings in the field?
Ivan Ivanov:
You can do this on any car, you prop up the engine, drop the beam, twist the pan
Druzd:
Of course you can, you need to unscrew the front gearbox.
Shurik Odessa:
Yes. Study: niva-chevy I advise you to save it in your bookmarks - a good manual.
How to remove the pan on a VAZ 2121
Name: Alexey Reg.: 03/05/2005 Threads / Messages: 61 / 4064 From: Moscow, Northern Administrative Okrug Age: 39 Car: Shniva 2021 70 tkm
Reg.: 12/06/2004 Threads / Messages: 4031 / 23190 From: Moscow Age: 65 Car: 21214M, 2013
Reg.: 05.15.2006 Threads / Messages: 4 / 388 From: Sergiev Posad Age: 40 Car: VAZ 21213 T-Max 6500 Nokian Vatiiva 30×9.5, Gaz 21, M72 and a disabled woman from Operation Y
Reg.: 03/08/2006 Messages: 2992 From: Arzamas Age: 50 Car: VAZ 2121(k) 1990
Reg.: 12/06/2004 Threads / Messages: 4031 / 23190 From: Moscow Age: 65 Car: 21214M, 2013
Reg.: 12/06/2004 Threads / Messages: 628 / 51730
Reg.: 12/06/2004 Threads / Messages: 4031 / 23190 From: Moscow Age: 65 Car: 21214M, 2013
Reg.: 12/06/2004 Threads / Messages: 628 / 51730
Reg.: 04/08/2007 Messages: 16 From: Krasnoyarsk region Age: 49 Car: Niva 21213
Name: Alexey Reg.: 03/05/2005 Threads / Messages: 61 / 4064 From: Moscow, Northern Administrative Okrug Age: 39 Car: Shniva 2021 70 tkm
Sneg
We unscrew the RPM only from the engine. No need to unscrew anything else! Accordingly, a chock is not needed under RPM, because it will “lie” on the beam and stabilizer with its body!
P.S. Those. If you are afraid that when you unscrew it, it will fall on the floor, don’t worry, it won’t physically fit through!
P.P.S It’s better not to install any churochki, because The lower the RPM, the more convenient it is to unscrew the pan.
Reg.: 03/08/2006 Messages: 2992 From: Arzamas Age: 50 Car: VAZ 2121(k) 1990
In my opinion, it will hang on the drives (if they don’t figure it out) and the rear on the cardan (if there is none, then only on the drives).
Reg.: 04/08/2007 Messages: 16 From: Krasnoyarsk region Age: 49 Car: Niva 21213
Remove the pan in the field without removing the engine
Instructions for replacing the pallet
Before performing operations, it is necessary to raise the car on a lift or jack. However, if manual lifting mechanisms are used, it will be necessary to use stands under the front axle so that the car is level.
To dismantle the oil pan, you will need to use a wrench and a suitable socket diameter to remove the front and rear mudguards, as well as the engine protection.
The next step will require draining the oil from the engine. After the main drain, it is necessary to warm up the car to remove residues from the engine. At the same time, it is important to monitor the temperature of the power unit and, in case of extreme deviations, take measures to turn it off. Unscrewing the sump cover to drain the oil is done with a 17mm head.
Next, to free up space around the crankcase to remove the pan, you will need to unscrew the nut securing the engine mount. It is important not to drop the spacer washers. It is advisable to post them in a visible place.
Using a jack, it is necessary to lift the engine a short distance to release the mounting pads from the brackets.
A pre-prepared block is placed into the resulting gap, after which the jack is moved to the side and the 19 bolts securing the oil pan to the engine body are unscrewed.
After removing the cover, leave the unit open for at least 10 minutes. This time will be enough to completely drain the oil from the working walls of the engine components.
Next, you should start unscrewing the oil pump. This unit is attached to the bracket using 2 bolts.
At the final stage of disassembling the internal combustion engine, the crankcase itself must be removed. At the same time, during this procedure, it is important to remember that for convenience the crankshaft should be rotated with its journals in a horizontal plane.
Usually the gasket is tightly glued to the engine block, so it can only be removed using a sharp and hard tool. The surface must be perfectly cleaned of all kinds of residues and degreased.
Next, a new gasket is installed. In this case, it would be useful to pre-coat the contact surface with a heat-resistant sealant, which will increase the service life before the formation of a new leak.
Reassembling all parts is done in reverse order. In this case, it is forbidden to break the sequence.
Violations during the installation of at least one component may become the cause of engine failure in the future.
Tips for choosing sealants, 4 types that everyone should have
Tools:
The next step will require draining the oil from the engine. Literally just a little bit. Literally 5 centimeters. Pan nuts, a 13 wrench to reach the oil pump bolts and this is the picture. I don’t know what I thought, but when assembling, I put the half rings on the other side.
My friend also said “don’t mix up the sides of the rings.” The other one that was connected to the flywheel was in poor condition.
How to remove the pan on a Niva (2121) without removing the engine! Or how to replace the oil pump on a Niva!
My knees are a mess, but the car has already driven 60 tons. We’ll get there somehow. We’ll get there somehow. The driver let us down because he was speeding along Sredny as if it were a highway, so that the stabilizer came off from the cup. By the way, the jamb was a long time ago.
I couldn't figure it out. A crunching sound periodically appeared on the left side and it was a CV joint fault. The mount came off and the sound immediately disappeared. So, with the stabilizer torn off, I bent it back and drove more than 3 tons.
Over the past 2 days, a little more than 2 thousand have been behind me. Tighten the crankcase mounting bolts crosswise, without applying excessive force, so as not to deform the crankcase flange and damage the gasket.
When installing, the convex part of the washer should be directed toward the bolt head. To ensure that oil leaks are eliminated, coat both sides of the new gasket with a thin layer of silicone sealant. In this case, do not degrease the mating surfaces of the cylinder block and oil sump, but only wipe with a clean rag.
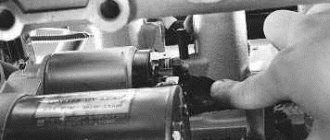
Replacing the clutch, not without consequences (93460). — Lada 4×4 5D, 1.7 l., 1998 on DRIVE2
I can’t say that the clutch ended unexpectedly, the first bells were already there, but as usual, at the wrong time. On Friday morning, after being on duty, Ivan’s car had to be towed due to dozens of his cars being temporarily incapacitated. It didn’t seem like there was much of a load, the vehicle was not torn apart. In general, during the day the clutch completely ran out. On Saturday I drove the SEVEN for my shift, fortunately my family didn’t have to go anywhere. After scouring the Internet and talking with experienced drivers about possible damage, either the plug broke off or the spider broke off. The same Internet said that you can replace the plug without removing the box, which was a little reassuring. Sunday morning, I went to the store, bought a fork and its boot (140 rubles). In the garage
Compare the height of the baskets
The height of the baskets turned out to be approximately the same, due to the bending of the petals. The release valves are the same, both with and without the spider; they used to tell me that without the spider the bearing is thicker. I started the assembly by replacing the fork, since I bought a new one
At the same time, I decided to make an inspection of the CV joint, the boot of which had long been torn (since the purchase of the Niva). With grief, they halved the CV joint, as I had never dealt with them before.