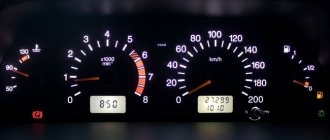
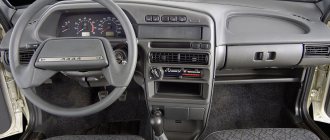
On the VAZ 10th family, which includes the VAZ 2110-2112 models, the designers used an electronically controlled interior heating system, thanks to which the temperature set by the driver is maintained automatically.
On the VAZ-2110, instead of a manual heater control mechanism with a cable drive of the main elements - the coolant shut-off valve and dampers, an automatic heater control system (AHC) controller with a temperature sensor and a gearmotor that regulates the position of the dampers are used.
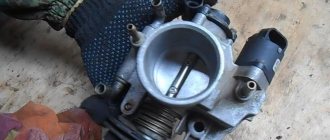
In such a stove, the valve for shutting off the antifreeze supply is no longer used, and the adjustment of the heater operating mode - “heating” or “ventilation” - is carried out by a central damper, which directs the air flow through the radiator or bypassing it.
How malfunctions manifest themselves
The automatic temperature maintenance system used on the VAZ-2110 is more convenient in terms of control, since the automatic control system does everything independently, but is less reliable than a mechanical cable drive. Moreover, problems are caused by the electronic and electrical components of the stove - the controller, temperature sensor and micromotor gearbox, the central damper, which regulates the air supply to the cabin from the outside.
Problems with the operation of the VAZ-2110 heater related to the damper:
- lack of temperature control (only hot or cold air comes from the stove) regardless of the position of the handle on the controller;
- insufficient air heating (even when setting the handle to the maximum temperature);
- squeaks, knocks and extraneous noises after setting the temperature.
The cause of such problems is the central damper of the VAZ-2110 stove, which is adjusted by the controller through a gearbox. The design of the stove includes another damper - air distribution into zones. It is controlled using a handle mounted on the central air supply deflector into the cabin, so malfunctions with this part are rare.
Ventilation and heating systems of the VAZ 2110 car
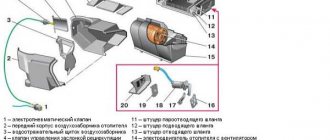
To find out whether the VAZ 2110 heater generally needs to be replaced, you should first consider the system as a whole. The ventilation and heating system of the VAZ 2110 car model consists of:
- The controller's automatic control system is an automatic system that controls the heater;
- a special sensor that regulates the interior air temperature;
- micromotor gearbox.
To increase the accuracy of maintaining normal temperature in the cabin, it is possible to adjust it to the sensor. The device is called a potentiometer and is located under a slot on the side of the controller itself. Simply remove the controller from the socket and adjust the setting using a trim potentiometer based on the following calculation:
- 0.2 gr . Celsius - if the potentiometer rotates clockwise, this leads to a decrease in temperature (referring to the controller per revolution 2110-8128020-01 ;
- 0.3 gr . Celsius – if rotating the potentiometer leads to an increase in temperature ( 2110-1303.3854 ).
Potentiometer regulating interior temperature
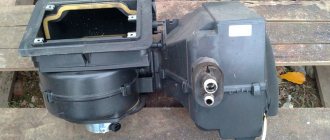
Stove design
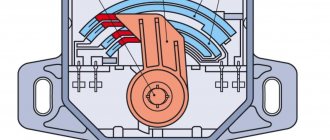
A special sensor sends a corresponding signal about the temperature in the cabin to the heater system unit, which instantly responds and compares it with the temperature set by the driver. If the difference exceeds two degrees, the ACS controller transmits a control signal to the micromotor gearbox, which, in fact, controls the heater damper. In other words, this same micro-gearbox closes or opens the access of hot air to the cabin.
micromotor gear unit of the heating system VAZ 2110
The drive of the heater damper of the VAZ 2110 must be carried out in such a way that the damper in the extreme temperature positions on the ACS unit moves independently of the readings given by a special sensor. In this diagram everything looks in more detail.
diagram of the operation of the stove on a VAZ 2110 car
Features of the design of the VAZ - 2110 stove damper
Note that VAZ-2110 of different years of manufacture uses heaters that differ in design:
1. Old-style stove damper
Old heaters use two central dampers, one of which blocks the flow of air into the cabin from the outside, and the second one redirects the air flow to the heater radiator or bypasses it. They are interconnected by drives and opened by a micromotor gearbox.
2. New sample
In the new type of stove there is only one central damper and it is connected by a drive to the gear motor directly, and not through a lever.
3. Under the “Euro” panel
Structurally, such a stove does not differ from the new type of heater, but in it the damper for distributing the air flow into zones is controlled by another micromotor gearbox.
It is easy to visually distinguish the stoves by the location of the heater fan. In the old-style interior heater, the fan is located horizontally, while in the new model, it is positioned vertically. Their gearmotors are also different.
Adjusting the heater dampers
By adjusting the dampers with your own hands, you eliminate the supply of part of the air “to the glass” when the lever that controls the air flow is installed in the heater in the “chest” or “legs” position. The photo shows the damper adjustment control units.
Adjustment unit with control lever positioned vertically
2 – adjustable rod for installing the damper “in the chest” – “in the legs” 3 – fastening the rod “in the chest” – “on the glass”. To do this, you need to shorten the adjustable rod by three divisions, and use side cutters to bite off the protruding tip on it. After performing such operations, the heater damper will be in the desired position, and the heat from the stove will flow better in the given direction.
Causes of malfunctions
Depending on the design of the stove, the damper may cause a disruption in the efficient operation of the heater for the following reasons:
- deformation;
- wear of seals;
- deterioration or damage to control levers and rods;
- skew.
Deformation is a problem with old-style heaters. The first dampers of the VAZ-2110 stove were equipped with plastic elements that bent under the influence of temperature. Because of this, even when completely closed, cold air from outside leaks in and mixes with the heated air, and the efficiency of the stove decreases. Subsequently, the designers replaced the plastic flaps with aluminum ones and the problem with deformation disappeared.
To ensure tightness, the dampers have seals that reduce air leakage. Initially, foam rubber seals were used, which quickly wore out and became damaged. Later, foam rubber was replaced with rubber, but this only extended the service life of the seal; over time, the rubber ages, cracks and collapses.
On old-style stoves, rods and levers may break. On new heaters, there is another problem - wear on the edges of the square end of the gearbox, with which it is inserted into the groove made in the damper axis. As a result, the limit switch bypasses the groove, and the heater damper jams, although the gearmotor operates. The misalignment occurs due to the displacement of the damper axis in the mounting holes of the housing. Because of this, the damper warps and jams when opening.
Causes of failure
If the gearmotor is out of order, then you will not be able to regulate the temperature inside your car by controlling the heating system.
To check the operation of the element, you can supply electricity from the battery directly to the gear motor in the middle position. The functionality of the controller is checked in a similar way. If it breaks, then it also becomes impossible to regulate the temperature.
Failure of a gearmotor (MR) may be due to the following reasons:
- The integrity of the electrical circuit has been compromised. This means that there is no voltage supplied to the motor, and therefore the gearmotor is not able to work properly;
- A defect has occurred in the autonomous control unit of the stove. Because of this, the gearbox does not provide air at the temperature required by the driver.
Old sample
Diagnosis of the problem
If the reason why the VAZ-2110 stove does not work is the damper, it is not difficult to identify it. To do this, disassemble the central deflector, turn on the ignition and rotate the temperature setting knob to its extreme positions. In a working stove, the central damper will not knock and will completely open and close the air supply channel.
If the heater damper does not move or stops in a position that does not completely block the air passage, it may be stuck. You can verify this by pushing the valve with your hand or a long rod. If after this the damper returns to its normal position, then this is the reason why it is jammed. Through the mounting hole of the deflector, you can assess the condition of the damper and its seals. If the damper is deformed, its bend is clearly visible.
Repair and restoration of the stove damper
The deformed heater damper of the VAZ-2110 cannot be repaired; it only needs to be replaced. In this case, it is better to purchase a replacement metal part that is not so susceptible to temperature effects.
Whatever heater is installed on the VAZ-2110, to carry out repair work, the heater must be completely disassembled. In this case, the process of dismantling and disassembling depends on the design of the stove.
A positive aspect of the heater design on the VAZ - 2101 is its location - to get to it and the dampers you can from the engine compartment and you don’t have to remove the front panel.
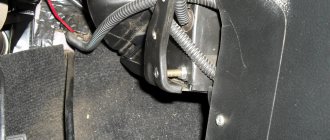
Removing the gear motor of the VAZ-2110 heater
To access the micromotor gearbox of the VAZ-2110 heater, regardless of the year of manufacture of the car, you will need to perform several simple operations.
- We remove the wipers. They are fastened with two nuts. Raise the protective caps and unscrew the fastening nuts with a 14 mm wrench.
- We dismantle the upper protection of the engine compartment - frill. To do this, unscrew the screws with a Phillips screwdriver, some of which are hidden under round plastic plugs.
- We remove the sound insulation of the engine shield. It is secured with screws. To dismantle it, you will need to disconnect the coolant supply pipes.
- We disconnect the trapezium of the wipers, which is attached to the body with two nuts.
The vacuum brake booster can be removed, but this operation is not necessary. But then, when unscrewing the screws of the gearmotor, you will need a short screwdriver or a ratchet with a screwdriver attachment.
Popular problems
Diagram
The reasons for valve failure are different
| Causes of failure | Characteristic |
| Micromotor gearbox jammed | This element is responsible for controlling the damper drive |
| Problem in the control unit | It should be checked in order to understand whether the micromotor gearbox, the damper, or the control unit is at fault |
| The plastic dampers have moved from their seat and are jammed, making it impossible to control the stove. | This is typical for the old-style VAZ 2110 heater damper, when plastic was still used for this component. |
When the gearbox is functioning, but the damper still does not turn, you can hear characteristic sounds - clicks . This indicates that a square shaft rotates inside the socket.
There is only one way to cure such a malfunction - remove the old damper made of plastic with foam insulation, and replace it with a new, modern one. The new type of damper is made of metal, and the seal for it is made of rubber.
Functionality check
If you do not want to spend a lot of money on repairing and replacing the device, you need to first check whether such manipulations are required. To do this, you can try to return the displaced damper to its rightful place.
- Turn on the ignition;
- Switch the regulator to different positions;
- Manually move the flap;
- This way it can be returned to its original position.
Of course, you first have to dismantle the deflector to gain access to the damper. If this method works, the damper will be able to work again as before, which means it will respond to the regulator.
But this cannot be considered a full-fledged measure for restoring the functionality of the damper, since if the socket is already loosened, the unit will no longer be able to work normally. At first, you will apply the half-measures described above over and over again, but over time you will still have to replace the heater damper on the VAZ 2110.
If any of these components stops working normally or is completely out of order, then the heater damper will not work on the VAZ 2110. Only its replacement is required. Ignoring the problem will result in even greater repair costs in the future.
Replacement of micromotor gearbox
To replace an element, you will need to perform several not particularly complex activities. Therefore, it is not at all necessary to go to a service station and pay a lot of money for their services.
- First of all, remove the frill.
- Next, the vacuum brake booster is dismantled.
- After this, you still need to remove the pedal assembly.
- Now we begin to dismantle the old micro-gearbox along with the plastic component.
- A new micromotor gearbox should be installed in place of the damper sector. There you will see a similar square.
Location of the device
Practice shows that replacing a micro-gearbox does not require special skills, a lot of time or excessive effort. However, never forget to be careful.
But in order to install the damper of your micro-geared motor, you will need to invite an assistant.
- First, the contacts are connected to the new micro-gearbox, that is, the motor.
- By turning the damper counterclockwise, you turn on the cold air supply.
- Turn on the ignition and turn the heater control system (SAUO) sensor to the position directly opposite the blue dot of the regulator.
- Or you can do the opposite, that is, check the micro-gear motor by installing the sensor opposite the red dot, and turn the damper all the way clockwise.
- The micro-gearbox rotates slightly more than required, so for proper installation it is recommended to use a special lubricant for the square.
- Install the motor so that the holes for the screws match.
- Now you need the help of your friend, since his task will be to turn the temperature regulator and at the same time press the motor inward.
- If the squares match, the replacement of the micromotor reducer can be considered successful. Now the air should flow to the desired temperature inside the cabin.
- Don't worry if the square doesn't go the full length of the flap you're using. This is normal when the gear motor goes about a third of the way. This installation will not affect the performance of the system in any way.
- Now all that remains is to return the screws to their place and twist the micro-gearbox several times - from the blue mark to the red one, and in the reverse order.
- These manipulations will allow the stove to remember what operating range the new gearbox has. Therefore, there will be no problems with its performance in the future.
If everything is done carefully and in accordance with the instructions, when you turn the damper, the micromotor reducer of your stove will not move to the required position. By turning on the device in mode with the “A” icon, control and adjustment will be carried out automatically - with an error of no more than 2 degrees.
Installation
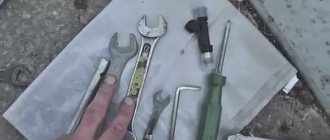
To install the gearmotor, you will need a certain set of tools, which include:
- Open-end wrench 10 millimeters;
- Crosshead screwdriver;
- Spanners.
Don't worry if you're new to doing car repairs yourself. There is nothing complicated about replacing a gearmotor.
- Remove the windshield wipers from the fuse to gain access to the device. To do this, you need to dismantle the contact nut and then release the frill.
- You will have access to the screws.
- Two nuts are unscrewed on the sides of the frill, and then the rubber seal is removed from the electric motor compartment of the gearbox.
- Disconnect the damper jabot pipeline by disconnecting it.
- Remove the screws that hold the gearbox thermal radiators.
- The motor is located on the left in the damper gear box, right next to the brake booster.
- Next, you need to unscrew the lower mounting screw and remove the electric motor.
- The damper assembly should be carried out strictly in the reverse order. Moreover, do this only after the gearmotor has been installed.
Functionality check
Checking the element consists of the following activities:
- First, set the left knob to the blue dot position;
- Wait about 15 seconds;
- Start the engine;
- Disconnect the controller from connector X1 and measure the resistance on two contacts - X1.4 and X1.1.
Depending on the type of controller, the indicators must be appropriate.
| Test point | Controllers | Resistance indicators |
| Position on the blue dot | 1303.3854, 1313.3854, 1333.3854 | 800-1200 Ohm |
| 1323.3854 | 3600-500 Ohm | |
| Position on the red dot | 1303.3854, 1313.3854, 1333.3854 | 3200-5000 Ohm |
| 1323.3854 | 1200-1600 Ohm |
If checking the micromotor gearbox shows no resistance or it does not change during testing, the shaft position sensor has most likely failed. Alas, you won’t be able to purchase it separately, so you will need to completely change the gearbox. And this is a significant expense.
Loading …
Dismantling
The stove is being disassembled
To replace the device, you will have to perform a series of sequential steps. The work is not particularly simple, but doing it yourself is more than possible:
- Drain all coolant from the heating system;
- Disconnect the battery. To do this, simply remove the negative terminal;
- Remove the trim, windshield trim and sound insulation;
- Remove the fan from the stove;
- Disconnect the vacuum pipe clamps from the heater housing;
- Remove the front heater air intake housing. There's definitely no need to rush here. To facilitate dismantling, we recommend removing the dashboard. Inside the cabin, the fasteners that hold the heater are unscrewed, and then raised;
- Remove the spring clips, mounting nuts, and front housing;
- Disconnect all hoses from the radiator;
- Disconnect the rear casing from the heater;
- Remove the radiator from the stove.
Assembly
Damper location
After this, reverse the assembly procedure according to the dismantling steps. Refill the system with coolant and check that the new damper is in place. It is important to ensure that there are no leaks and that the hose connections are not tight.
Turn on the stove and check how the heater behaves. If everything is normal, you have carried out competent and successful work, for which we congratulate you.
Installation of a new damper and reassembly of the stove
When replacing the valve, you need to be very careful. You need to make sure that the fork should fit into the lever. After this, the damper should be raised. If the assembled damper is not in the raised position, it means something was done incorrectly. If the fork does not engage with the lever, it will simply be impossible to control the stove normally.
After replacing the damper, you need to begin the process of assembling the stove. To do this, you need to follow exactly the same points as during the disassembly process, simply placing them in the reverse order. After assembling the stove, you need to check the functionality of the damper by filling in the coolant. You need to inspect everything, checking for leaks and whether all hoses are tightly connected.
Now you can turn on the stove. If the heater works normally and responds to the settings, everything was done correctly.
Drive problem
When changing the damper, do not forget to check the functionality of the actuator.
Drive unit
If the micromotor gearbox does not work, it will have to be repaired or simply replaced with a new one.
- Having removed the trim and trim from the windshield, directly behind the vacuum booster of your “ten” you will find a micromotor gearbox. Disconnect two connectors from the amplifier - the micromotor and the micromotor-reducer. Now unscrew the screws and
- remove the micromotor gearbox. You have to remove the motor from it.
- Connect it to the automatic control system to check its functionality.
If the device does not work, you can try to repair it. For this:
- Bend the pressed side slightly and remove the lid;
- Check the condition of the commutator, brushes and bearings;
- Replace the specified components or correct them;
- If the gear teeth are worn out on the gearbox, it will have to be replaced;
- Be sure to lubricate the bearings. Ideally, a silicone-based lubricant should be used;
- If the above measures do not help, simply install a new unit.
Assembly of the unit
Interchangeability of gearmotors
When the work to restore the functionality of the MMR is completed, install it in place. For this:
- Insert the pin of the micromotor-reducer lever into the slot of the lever. It is located on the damper drive;
- If the lever is not turned properly, apply 12V voltage to the motor connector pins using two wires. We are talking about yellow wires here. This way you can return the lever to the correct position;
- Having installed the micromotor-reducer, check it for operability, plus watch how the damper drive of your heater moves, whether the heater control lever “plows” properly to regulate the temperature.
We will repair or replace the damper and heater drive, you will be able to return the heater to its previous functionality and independently determine what temperature regime will be set inside the cabin of your VAZ 2110.
Vehicles of the VAZ concern have one global disadvantage - the car's stove. Despite the fact that VAZ-2110 cars have already taken into account some shortcomings in the heating system, the situation with air distribution remains at an insufficient level.
Often, with the onset of cold weather, drivers are faced with the problem of poor-quality operation of the car’s heating system or its complete failure. An unforeseen situation must be resolved urgently, since improper functioning of the heater causes significant discomfort for the driver and passengers and reduces safe driving.
The temperature in the vehicle interior is adjusted by using the VAZ-2110 heater damper, which often fails. Let's take a closer look at how to repair and replace the VAZ-2110 heater damper with your own hands.
Diagnostics of the heater damper operation
In most cases, stove problems appear with the arrival of cold weather, when it is one of the main attributes that ensure comfort in the vehicle interior. A common problem in dozens of stoves is the incorrect distribution of warm air flows that enters the car interior. Often a situation arises when the stove does not respond to switching temperature modes and supplies only cold or only hot air. Both the first and second options bring significant inconvenience for the driver.
Most often, under such circumstances, the culprit of what is happening is the heater damper of the VAZ-2110. Dozens that were produced before September 2003 are equipped with old-style stoves. They are equipped with plastic flaps, which tend to deform from high temperatures. And also very often the valve seat is destroyed, which makes controlling it almost impossible. When the valve is jammed in one position, only hot or cold air is supplied to the cabin. If, for example, warm air flows towards the windshield, but hot air flows towards the feet of the driver and passengers, therefore, the damper does not open completely. In a situation where the valves do not move at all, it is necessary to check the micro-gearbox - the drive mechanism of the part.
If the problem is with the heater damper itself, then when switching modes, peculiar clicks will be heard, which indicate that its shaft is turning. In this case, repairing the damper is practically impossible; it must be replaced with a new product. For these purposes, it is better to purchase, instead of a standard plastic valve with a foam seal, a similar product of a new type. The modernized dampers are made of metal and have a rubber seal. The new damper is highly resistant to high temperatures and fits more tightly to the heater body thanks to an improved rubber seal.
The next element that can influence the operation of the valve is the micro-gearbox that controls its rods. If you cannot hear the traditional sound of the damper stroke when switching temperature modes using the regulator, then the cause may be the micro-gearbox of the drive. If it breaks down, it must be replaced, because restoring its functionality will not give long-term results.
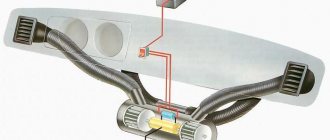
Principles of interior ventilation
Before you understand the causes of the malfunction, you should know the principle of the device and the rules by which ventilation is carried out. So:
- Air is supplied to the passenger compartment through the holes in the trim on the windshield : when the car is moving voluntarily, or forcibly with the help of a heater fan.
- Air escapes through the gaps between the inner door panels and between the upholstery, then through the holes located at the ends of the doors. The thermal insulation of the interior is improved by valves built into the openings, which allow air to pass out and prevent it from entering the inside of the car.
- The main part of the air is directed to the windshield; flows are directed to the central part and side windows through deflectors blocked by flaps.
- Air is supplied to the driver’s feet and the passenger sitting next to him through two pairs of deflectors: one pair is located near the floor, the other at knee level.
- Through a lining located on the floor tunnel and two air ducts built under the front seats, air is supplied to the feet of passengers in the rear.
- To prevent the entry of outside air, especially if the road section is polluted, smoky or very dusty, there is an air recirculation system. When the recirculation button is recessed on the instrument panel, the electro-pneumatic valve opens. In this case, under the influence of the vacuum that occurs in the intake pipe, the access of outside air is blocked by the recirculation system flap into the vehicle interior.
- The air temperature is regulated by the controller handle from 16°C to 30°C.
- Information about the temperature is read from its sensor by a unit with a microfan located on the ceiling. The unit turns on the micromotor when a temperature difference occurs, which controls the heater dampers. When the damper reaches the desired position, a signal is sent from the sensor to the control unit, which turns off the micromotor.
Repair of the VAZ-2110 heater damper
Repair of the damper is carried out only in a situation where it is skewed or jammed in a certain position. It is very difficult to call this a repair; it is most often a forced measure to extend its operation for a short period of time. If there are problems with the valve or its drive, then soon you will still have to disassemble the stove and replace the failed parts.
The repair consists of installing the valve in its standard seat. To do this, you do not need to completely disassemble the heater. With the ignition on, it is enough to try using manual adjustment to try to seat the valve in its seat. You can also remove the deflector and try to activate the damper by hand. If it starts to move, then you have a temporary fix. However, as previously stated, this is a conditional fix for the problem. If a part jams, it will soon have to be replaced, since the stove will not function correctly.
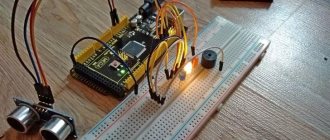
Installing an electric heater damper drive in a VAZ 2110 - watch video
To do this, the electric drive for the heater damper must be taken into account as follows:
- Which SAUO unit is installed (the connection diagram depends on this)
- What kind of MMR (micromotor gearbox) is installed on the heater (if the MMR is old 2003 (before the sample.v.) then it needs to be modified)
damper You can convert stoves to automatic adjustment in different ways:
- Use a standard gear motor from VAZ Use
- 2110 stepper electric damper drive from VAZ Priora (2170)
The difference between these two methods is that in the first case you will have to hold down the button until the damper reaches the desired position and then release the button. Download Embed Embed this video on your site
Embed Download
Embed this video on your second A site the most correct method is to automatically set the damper to the desired position depending on the set “position” knob of the ACS. Download Embed Embed video this on your site
Let's consider both methods in detail:
Remaking the heater damper using a VAZ gearmotor 2110
The damper and gear motor are located inside the panel. Control the gear motor on a separate button. You can use an old watch for the fastening button. And move the self-propelled gun from the center to the sides.
make it clear where the damper is located using LEDs. Set up a sector divided into 5 zones for each. A wire is soldered to the contacts, and on the lever the gearbox slides along these five contacts. It turned out.
contact indication of five damper positions:
- extreme two - in the legs and on the face
- One average is two
- glass intermediate between them
We disassemble using the ACS circuit and connect the contacts:
- step 1 to the drive motor-geared flow control
- step 1 to the flow drive control gearmotor
- – damper drive micro-reducer contact – on heater 8 (brown wire) of the old block
- – not needed (connected for air conditioning)
- - No
- +12V power supply cannot be switched off (did not connect)
- + DTVS – on pin 5 (green-red wire) of the old block
- + heater shaft damper position sensor – on pin 4 (blue-red old) Terminal wire
- backlight - on pin 11 (white old) wire block
- ground - you don’t have to connect it (it’s already in the BC block), but I connected the heater speed wire with pin 3 (black block)
- step 2 to the flow drive control gearmotor
- step 2 to the control flow drive gearmotor
- heater damper gearmotor - on 2 pink (contact wire) old block
- + fan contact – on 13 ДТВС (gray wire) of the old block
- not needed (connected for air conditioning)
- - No
- minus contact - on 3 DTVS (green-black wire) old minus
- damper shaft position sensor block contact - on 1 heater (green wire) of the old block
- – not diagnostic (connected)
- – I didn’t connect the BC already in the block (+ ignition after)
Further, the standard rod was of good quality , and a bolt (with a sphere in a ground head) was used to dismantle it.
In the place where the damper adjustment lever was installed, you can install an emergency button from Kalina . The plastic was cut by hand.
Given: The withdrawal method is more expensive, but also the most correct. Now the control of the heater damper in the 2110 VAZ is automatic, as in the Priora or Refinement