Everyone knows how important the presence of a gearbox in a car is. But over time, the parts from which it consists begin to wear out, partially or completely disabling the entire mechanism. The box has a solid structure, so if problems arise, it is necessary to completely remove the Niva Chevrolet gearbox to replace one or more components.
You can also remove the gearbox at a specialized service center. It will be faster, better quality and will not require specially equipped premises and tools. But in some cases, car owners are forced to do this procedure themselves in order to save money. Also, no one guarantees high-quality service work, so many people prefer to carry out repairs at home. In fact, this operation is accessible to most car enthusiasts, since it requires basic tool skills; you just need to know the basic rules for removing the transmission on a Chevrolet Niva.
In what cases is this procedure necessary?
With proper operation, the gearbox can last quite a long time, since it is a self-sufficient design element that does not require frequent maintenance. On the Chevrolet Niva, the gearbox is designed in such a way as to satisfy the off-road ambitions of the crossover, because initially this car was equipped with all-wheel drive in order to overcome various obstacles. This means that the car’s transmission is designed for increased loads. But it is necessary to take into account such processes as metal fatigue and the production of parts. Over time, under increased loads, the gearbox begins to operate for a long time, experiencing overheating, which leads to expansion of parts and increased wear.
There may be several main reasons when it is necessary to remove the gearbox:
- Dismantling to completely replace the entire mechanism. It is usually rarely used in practice, since in most cases it is possible to repair an old gearbox except in cases where the housing is damaged.
- To carry out maintenance. Components can be cleaned or consumables can be replaced: oil seals, slides or gaskets, depending on the specific case.
- When carrying out other repair work, when the gearbox will prevent access to the desired unit.
Before removing the gearbox, you must carefully study the feasibility of these actions. For processes such as changing the oil, installing a rocker seal or clutch cylinder, removing the box is not required.
How to choose a new backstage?
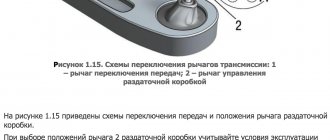
What kind of rocker should I put on a Niva Chevrolet?
This question came to the mind of every Niva car owner who had to deal with a malfunction of this element. In fact, there is nothing difficult in choosing a component. In practice, many car owners of the above car models install mechanisms from classic Fiat cars on their vehicles. According to reviews on the Internet, these devices are completely suitable for installation in a Chevrolet Niva. However, there is also a negative side. In practice, Niva cars equipped with a mechanism from Fiat cars require more careful adjustment of the element. In addition, despite Italian quality, these components of the transmission system are more susceptible to wear and tear.
Therefore, when choosing a mechanism, you should not “be fooled” by the stories of handicraft “garage” craftsmen and come up with a new headache for yourself. For installation in a Chevrolet Niva, it is better to purchase a standard rocker, which is equipped with basic models of Niva cars.
New rocker for Niva Chevrolet
Replacing an element
As a rule, the need to repair this component arises after installing or repairing the gear shift drive. If you have replaced the drive, but when driving you feel how the vibration of the gearbox lever remains, then, most likely, there is increased play in the lever hinge mechanism. This means that the hinges should be repaired, and accordingly, it may be necessary to replace the rocker.
If you decide to replace a component at home yourself, then prepare in advance everything that you may need during the work process. In particular, we are talking about:
- wrenches on "12";
- wrench set to “14”;
- socket wrench at “10”;
- clamp for securing the gearshift lever cover;
- stationery knife;
- Phillips screwdriver.
Read also: Opel Vectra bumper covers
Of course, you will also need a new mechanism if you decide to replace it.
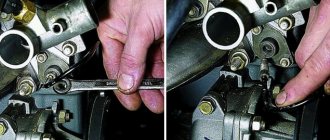
First of all, open the hood of your Chevrolet Niva and find the connection between the tip of the gearshift lever and the gear shift rod. Once you see this connection, take the appropriate wrench and loosen the nut of the mounting screw. After this, remove the turnbuckle and its protective cover. Now get into the car and remove the front part of the floor covering. Next, remove the gearshift lever cover frame
Be careful, you will need to remove it carefully to avoid damaging the clips. Next, you will need to turn the shift lever boot inside out. Having done this, you will see the cover fastening clamp
Take pliers or a regular stationery knife and cut through this clamp. After this, the cover can be removed from the lever. Please note: the gearbox lever mounting clamp is disposable. That is, if you bite it with pliers or cut it with a knife, you won’t be able to reinstall the part in its original place. Therefore, when assembling the parts, you will need to install a new clamp. Next, you will need to remove the front portion of the floor tunnel lining. Depending on the year of manufacture of your Chevrolet Niva, the instructions for dismantling the floor tunnel lining may differ. Therefore, we recommend that you use the instruction manual specific to your car. Now look at the gearshift lever. You will see that the axle lock is attached to it: this element must be disconnected from the lever. Having done this, the lever axis can be dismantled, simultaneously removing this axis from the holes of the gear shift lever and the rocker. When the axle is removed, you need to remove the gearshift lever. To do this, you will need to pull the lever itself up. Then take a screwdriver and push the plastic bushing inside the gear lever housing. You need to move this element along the shaft. Now, using a wrench, you need to unscrew several screws securing the gearshift lever housing to the car body. By unscrewing and dismantling the bolts, you can remove the housing and remove the gearbox shaft from it. Next, remove the guide rod from the shaft. Now you will see your backstage. If you see a large play in the hinges of the element that cannot be adjusted, or the hole for the lever axis is too worn, then you need to remove the mechanism and replace it with a new one. Since the process of replacing this element is not so easy, we recommend that you visually inspect all dismantled parts. If you have any doubts about their performance or reliability, it is better to replace them immediately. After replacing the backstage, all parts must be assembled in the reverse order. Don't forget to install a new shift lever clamp.
Read also: Funny words in Ukrainian
After installing the rocker, you will need to adjust the gearbox shift drive.
A necessary tool.
During the process of dismantling the box you will need
- set of wrenches for bolts 10, 12, 13 and 17.
- Set of hexagons from 12 and above
- Container for collecting used oil
- Pliers, Phillips and slotted screwdrivers
- A special stand, suspension or assistant to support the gearbox.
After you have collected all the necessary tools, you can proceed to the actual work.
Procedure for removing the gearbox on a Niva
Work to remove the gearbox must take place on a special lift or in an inspection pit. Before proceeding with dismantling, it is necessary to disconnect the battery to avoid accidental short circuit. After this, the car is set to the parking brake. If work is carried out in an inspection pit, the wheels are additionally blocked with shoes.
After the car is secured, it is necessary to drain the oil in the box. Usually its level is 1.7-2 liters. You need to have a container with a wide neck that is suitable in volume. To drain the oil, there is a special plug on the housing that can be unscrewed using a hexagon. Gearbox oil has a high viscosity, so it will take at least 10 minutes to remove it. At this time, no additional work can be carried out. To achieve maximum oil drainage, it is necessary to warm up the engine for 5 minutes before operation. This will ensure the necessary movement of oil through the channels.
- After draining the oil, the plug is cleaned of dust and lubricant residues, after which it is better to immediately replace the sealing ring on it and install it in place, screwing it in until it stops.
- After this, the cardan and intermediate shaft are removed.
- The wire supplying the signal to the reversing lights is disconnected, and the gearbox control cover is disconnected from the passenger compartment. To do this, use a flat-head screwdriver to pry it up and lift it up to the handle. Then the handle is unscrewed along with the cover.
- From the side of the inspection hole, unscrew the nut on the speed shift support plate, then the clamp screw that holds the rod of the device.
- Then the three screws that secure the base plate bracket are removed. After they are removed, the drive for shifting gears is disconnected.
- The crankcase shield can be unscrewed using a 13mm wrench, after which you need to start unscrewing the bolts on the clutch slave cylinder. It needs to be disconnected, but it remains hanging on the hose.
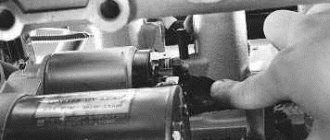
- The starter is disconnected. To do this, you need to unscrew the 3 mounting bolts.
- The anti-roll bar is removed, then the receiving tube is disconnected
After carrying out this work, it is necessary to have an assistant or a special lift. The bolts securing the gearbox to the engine are unscrewed. The rear of the engine must be supported during this time. After this, you can remove the box along with the clutch housing.
When carrying out work, do not rest the end of the input shaft on the clutch petals. This may deform the pressure plate, which will require replacement.
Reasons for withdrawal
Everyone knows that the gearbox on cars is the most unpretentious product, but only if you handle it correctly. Let's start from the beginning: the Chevrolet Niva is an all-wheel drive SUV, which, from the very design, was prepared for a track with various types of obstacles. Overcoming obstacles means loading the car, and loads and overloads of the vehicle cause many problems, in particular, parts of the engine, gearbox, clutch, etc. fail.
Thus, the reasons for dismantling the gearbox may be as follows:
- Removal for subsequent replacement of the entire mechanism. But it’s immediately worth noting that a new box is installed only if the old one is completely unusable. But this doesn’t happen often, only on cars with high mileage.
- For carrying out repair and cleaning work. This work may include: replacement of failed components, gaskets, scenes and other products. It all depends on what was disabled.
- When carrying out repair work on other vehicle components, if the gearbox interferes with these activities.
We won’t take a long look at what you already know, but let’s get straight to the process of dismantling the gearbox on a Chevrolet Niva.
Before you begin the process of dismantling the gearbox, you will need to make sure that this activity is necessary. For example, to change the oil in the box or replace the clutch slave cylinder, you do not need to remove it.
To carry out work on removing the gearbox, in addition to free time, you will also need the necessary tools.
Tool for the job
In order to remove the gearbox from a Niva Chevrolet, you must use the following tool:
- A set of wrenches, in particular, a wrench for “10”, “12”, “13”, “17”.
- A set of hexagons, in particular with a diameter of 12 mm.
- A container for draining used oil from the box.
- Pliers and a set of screwdrivers.
- For ease of implementation, we recommend that removal be carried out by two people, since the gearbox unit is quite heavy.
After making sure that these tools are available, you can install the Niva Chevrolet SUV on the inspection hole and proceed directly to the process of removing the gearbox.
Removing the gearbox: everything in order
Before starting the procedure for removing the transmission from a Niva Chevrolet SUV, be sure to set the car to the handbrake and place shoes under the wheels. Also open the hood and remove the negative terminal from the battery. This is necessary to avoid unintentional short circuiting.
So, let's start removing:
- Having descended into the inspection hole, find the plug on the gearbox for draining the used oil. Before unscrewing it, prepare a special container. The container must have a capacity of at least 1.7 liters.
- Using a hexagon, the plug is unscrewed and the oil is drained. The drain takes about 10 minutes. While the oil is draining, it is not allowed to carry out any work on the box.
Before unscrewing the oil drain plug, you must start the engine and warm it up for five minutes. This is necessary in order to flush all the channels in the device and drain the maximum amount of oil.