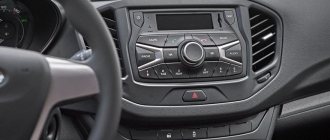
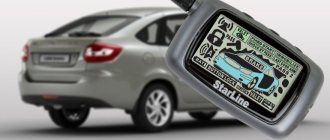
If your car alarm remote control breaks down, you don’t have to immediately purchase a new one. You can repair the Sherkhan keychain yourself. Take it step by step.
- Initially, find out where the failure occurred (check the condition of the battery, disassemble the key fob, carefully inspect each part, ring the contacts and circuit boards).
- Decide what to do next: do the repairs yourself or turn to specialists.
- You can perform the following operations on your own: replace some parts (display, case, button); soldering contacts; reprogramming the system control key fob.
- Elimination of identified faults, checking the functionality of the remote control.
Find out how to set the clock on your Sherkhan key fob.
Advantages and disadvantages
Advantages of the Scher-Khan 5 car alarm:
- Guarantee of no malfunctions;
- Signal reception range width;
- A small amount of involuntary activation;
- Engine start is automatic;
- Long service life.
Flaws:
- Interruptions in operation at low temperatures;
- Widespread distribution of cheap copies;
- Rare cases of false positives.
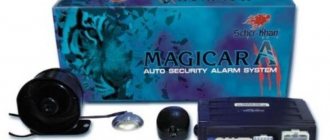
Specifications
Technical parameters of the Scher-Khan Magicar 5 alarm:
- frequency range - 433.92 MHz;
- transmitter power - no more than 10 mW;
- communicator communication range - up to 1500 m;
- current consumption - up to 35 mA;
- weight of the central block - 270 g;
- supply voltage - 9-18 V;
- product protection class - IP40 (except siren).
Functions
Alarm system with auto start Scher-Khan 5 has the following functions:
- the ability to support the performance of supercharged engines;
- the ability to disable the security mode using a password;
- 2-stage removal of protection;
- Alarm signals are provided by LED lamps and a siren;
- The engine can be started either remotely or automatically;
- The relationship with the central locking units is carried out jointly;
- A special channel has been created to control the luggage compartment lock;
- Security is turned on automatically;
- Ability to set a timer to turn off the interior light;
- The car is protected even with the engine running.
Symbols on the display
Before you start using the alarm, you need to take out the safety insert that is glued to the contacts of the communicator. When correct installation is confirmed, a signal should sound indicating that the device is ready for use.
The display of the Shere Khan 5 alarm communicator has the following symbols for display on its screen:
- symbol responsible for power status;
- a symbol defining the operating mode of this device;
- clock display symbol;
- a symbol displaying the status indicators of the security complex;
- siren and shock sensor icons;
- symbol responsible for the inscriptions when starting the engine with a timer or running a turbo timer;
- symbol for opening panels in the body;
- symbol responsible for turning on the “Hands-Free” mode;
- icon of a call coming from the machine;
- a symbol indicating the operation of lighting equipment or a power unit;
- Valet mode activation symbol.
Enabling and disabling Turbo mode on Magikar 5
When operating a car that has a turbocharged engine, special maintenance methods are used:
- To prevent destruction of the injection mechanism, the car should not be turned off immediately after stopping.
- To eliminate the waiting time for the turbine to cool down, they resort to using a turbo timer.
- The Magikar 5 alarm makes it possible to cool the turbine without being in the car. The engine runs for about 2 minutes after the ride is completed.
To enable or disable this mode, you must press keys III and IV for a short time. The status of the function will determine which signals or icons are displayed on the key fob.
Purpose of the buttons
The buttons on the communicator support 4 types of operation:
- short exposure;
- long (more than 2 seconds) press;
- quick complex impact on 2 keys;
- long-term joint holding of 2 buttons.
The driver is given the opportunity to turn on or off the security mode, activate remote start, as well as other functions. More detailed purpose of the buttons is indicated in the attached instructions.
Setting the time
In order to program the clock, you need to press keys 2 and 3 together, and then you need to make the settings by pressing key 1.
In order to adjust the clock value, use keys 2 and 3; to write to memory, you must hold down keys 2 and 3.
Installation instructions
The algorithm for setting up the alarm system is explained in the instructions below:
- It is necessary to place the antenna unit on the corner of the windshield; it should also be taken into account that if the unit is installed covertly, the range of the remote control will be reduced;
- The location of the call sensor should be on the surface of the windshield, and the installation point should be degreased before the procedure;
- Next, you should install the siren under the hood of the car. The unit must be placed remotely from sources of heat and moisture;
- Additional limit switches must be placed in areas that are not exposed to moisture;
- Next, the processor module is mounted inside the instrument panel. Fastening is permitted with screws or plastic clamps. Also, do not forget about programming the remote control codes;
- The final stage is to mount the shock sensor inside the car.
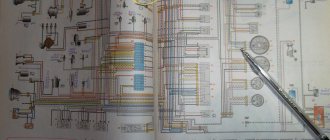
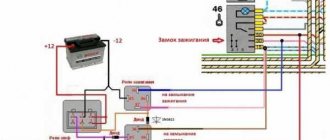
Connection diagram
Once you have completed the installation, you need to connect the Sherkhan 5 alarm system to the network and connect the electronic units to each other. Special cables are supplied, equipped with insulation of different colors, which should be used in the connectors. The edges of the connection must be protected with a special tape, and do not forget about the protective fuses. See the diagram below for more details.
Activating/deactivating the hands-free function
In order to enable/disable the “hands-free” mode of the Sherkhan 5 alarm system, you must press and hold button I of the key fob for a long time (at least two seconds).
“Hands Free” can function in two modes:
- icon on the LCD display in a non-blinking state
(at the same time, the minimum operating distance is 15 meters);
- icon on the LCD display blinking
(at the same time, the maximum operating distance is 35 meters);
Changing operating modes or turning off is also done by pressing and holding button I of the key fob (for 2 seconds).
It should be remembered that the activation/deactivation distance of the “hands-free” function depends on a number of third-party factors: the presence of metal objects in close proximity to the receiving antenna, the presence of active radio equipment that can affect radio interference on the air, external environmental conditions, etc. d.
If the hands-free function is constantly active, this can significantly reduce the battery life of the key fob. Therefore, you should not continuously maintain the “Hands Free” function of the Sherkhan 6 alarm in an active state.
How to use the alarm
The answer to this question can be found in the attached manual, which contains a number of sections devoted to working with the communicator, the functioning of the security system, and others.
The driver is recommended to study this material and write down certain algorithms in the memo.
Remote start from key fob
Starting can be done by pressing button 2 for a long time. As soon as the locks are locked, the motor is activated, and the remaining operating time can be seen on the communicator display. The driver has the opportunity to disable the security; first, he must place the key in the lock, turn on the ignition and start driving.
Note: 20 seconds are allotted for execution, otherwise the engine is turned off.
Silence siren signals
By simultaneously pressing keys 1 and 2, you can turn the siren on or off. This function is pre-configured during programming. When silent mode is activated, the buzzer remains on. At the moment the signal is cancelled, the display shows an image of a playing trumpet.
Opening the trunk
The Scher-Khan Magicar 5 car alarm involves controlling the trunk lock; in order to unlock it, you need to long press button 3. The alarm takes into account the possibility of programming a mode in which the side doors will be locked. In this case, after locking the lock, the alarm will automatically turn on.
How to enable autorun
In order to activate autorun, you should hold down buttons 2 and 4, the display should display timer, indicating that the actions were performed correctly. The Sherkhan Magic alarm does not have the ability to simultaneously activate two modes.
Video help for activating remote controls
Author of the material: Dumchenkov Mikhail
- Audi
- Brilliance
- Faw
- Ford
- Chevrolet
- Citroen
- Geely
- Haval
- Changan
- Chery
- Datsun
- Great Wall
- Hyundai
- Kia
- Lada
- Volkswagen
- Renault
- Nissan
- Toyota
- Honda
- Mitsubishi
- Opel
- Lifan
- Mazda
- Skoda
- Rest
Did you like the material? Share with your friends:
Programming instructions
Please note that before you set up, you must turn off the alarm. Then, by long pressing buttons 1 and 2 to enter table 1 and buttons 1 and 4, respectively, to enter table 2. Then button 4 selects a section.
Each key press is accompanied by a corresponding sound. And after each input to the section, an additional signal is given.
The programming chart below gives you a more detailed look at how to properly configure the parameters.
Note: to configure each function, the algorithm must be repeated
Malfunctions and their elimination
If there is no connection between the control panel and the head unit, the process of transmitting commands is disrupted. The algorithm of actions in this case depends on your settings. Switch the ignition three times, then turn the key to the “off” position.
Then press key 1, then write down the remaining devices.
Note: Each step takes 4 seconds.
If the password filling algorithm has gone wrong, then after triple switching you should enter the first register of the code. The number of turns depends on the previously configured code. Next, another register is configured by analogy.
Next, you need to confirm the setting, in which case all codes will be entered into memory.
The main cause of malfunctions may be a breakdown of the control panel, due to wear or moisture.
In this case, it is necessary to disassemble the device, remove oxidation and replace the necessary parts. In case of complete failure, replace the communicator.
If the alarm refuses to activate the security mode, it is recommended to perform a full check of the settings. Do not forget that when activating the Valet mode, the security is completely disabled.
The cause of a probable malfunction may be a breakdown of sensors, or switches, or damage to connecting harnesses.
The check can be done with a test device.
If this does not help, contact the service center.
Source
OPERATING INSTRUCTIONS FOR CAR ALARM MAGICAR M902F
When you insert the battery into the keychain pager, the LCD will show all the icons one by one, accompanied by music.
IMPORTANT INFORMATION
1. To autostart a manual vehicle, you must set the Magicar to standby mode before leaving it.
The reserve mode is designed to allow you to leave the car while the gearshift lever remains in the “neutral” position.
Do not set the Standby Mode if anyone is inside. It is very dangerous to use the system if one of the door buttons does not work well.
Your vehicle should only start in Park or Neutral. For automatic transmission. If starting in a different position, using the automatic mode may be dangerous.
2. This product can only be used as a car alarm, use for other purposes is not allowed.
We do not accept any liability for injury or damage resulting from failure to comply with the above requirements.
.
LCD indication
Magicar Car Alarm Pager Remote Control is a unique device with a color LCD that visually shows the owner about the car's security status at all times. Different icons appearing on the LCD indicate what is currently happening with the car.
LCD icons
Icon
| Explanations |
| Shows if the voice module is in use, whether it is enabled or disabled. |
| Shows whether the Automatic door closing/opening mode is turned on or off. (Icon flashes at long range) |
| Shows whether Timer mode is on or off. |
| Shows whether Turbo mode is on or off |
| Indicates whether the Passive security mode is on or off. |
| Shows the activation of the seismic sensor |
| Shows whether the seismic sensor is on or off |
| Indicates that Valet mode is enabled |
| Indicates that the side lights are flashing. |
| Shows whether the siren is on or off when closing and opening the car doors. |
| Shows whether the RPS (remote pager system) mode is on or off |
| Shows that someone is calling the owner of the car |
| Indicates that the pager is transmitting a signal to the main unit |
| Shows whether the sound on the pager is on or off (sound+vibrator, vibrator) |
| Shows door closed/open position |
| Shows battery capacity |
| 1. Time 2. Temperature inside the car (FC) 3. Reminder of remaining warm-up time 4. Battery voltage reminder |
| Shows whether auto-closing doors from the ignition is enabled or disabled |
| Appears when the door is open |
| Appears if autostart is performed or the ignition is turned on |
| Appears when the trunk is open |
..
Description of pager button functions
| Buttons | Time pressing | Functions | |
| 1 | I | ½ sec | Security mode – on/off, traffic police – on/off, siren off, starter blocking (Anti-theft mode) – on/off |
| 2 | I - ① | 2 sec | On Auto-arming (Auto-on) |
| 3 | I - ② | 2 sec | On Long range auto-arming (Auto – flashing) |
| 4 | I - ③ | 2 sec | Disabling Auto Arming |
| 5 | (III+IV) — | ½ sec | Recording and playback (If voice module is installed) |
| 6 | II | ½ sec | AUXILIARY CHANNEL 1 |
| 7 | III | ½ sec | AUXILIARY CHANNEL 2 |
| 8 | IV | ½ sec | Polling function |
| 9 | II - | 2 sec | Autostart function – on/off |
| 10 | III— | 2 sec | Opening the trunk |
| 11 | IV - | 2 sec | Panic mode, Press button I to turn on the siren |
| 12 | (I+II) | ½ sec | Siren chirping when closing/opening doors - on/off |
| 13 | (I+III) | ½ sec | Valet mode – on/off |
| 14 | (I+IV) | ½ sec | Closing doors from ignition - on/off |
| 15 | (II+III) | ½ sec | Passive security – on/off |
| 16 | (II+IV) | ½ sec | Timer start mode – on/off |
| 17 | (III+IV) | ½ sec | Turbo mode on/off |
| 18 | (I+III) — | 2 sec | Seismic sensor – on/off |
| 19 | (I+II) — | 2 sec | Programming Menu #1 - Installers Only |
| 20 | (I+IV) — | 2 sec | Programming Menu No. 2 – for installers only |
Note: Pressing the I button in succession switches ① - ② - ③ - ①... then repeats. On ② the Auto icon will flash.
Note: “-” means pressing the button for 2 seconds.
( ) means pressing the buttons simultaneously
( ) – means pressing the buttons simultaneously for 2 seconds.
…
Additional button functions
| Buttons | Press time | Functions | |
| STEP 1 | (II+III)- | 2 sec | Beep signal to confirm |
| STEP 2 | (I) | ½ sec | Time setting mode is enabled. Multiple flashes and beeps |
| STEP 3 | (I) | ½ sec | Set the clock |
| (II) | ½ sec | Set minutes | |
| STEP 4 | (II+III)- | 2 sec | Turn off installation mode. Beep signal. You can continue to control the car |
1. Setting the time
2.
DPS and Vibrator on/off selection of temperature readings between C and F /
| Buttons | Press time | Functions | |
| STEP 1 | (II+III) — | 2 sec | Beep signal to confirm |
| STEP 2 | (III) | ½ sec | ON OFF DPS on/off, beep signal to confirm |
| (IV) | ½ sec | Sound on/off, (vibrator + sound, vibrator) beep signal to confirm | |
| (I+IV) | ½ sec | Choosing between F and C |
(I)
….
Closing doors
If the doors are slammed but not closed, then to arm and close the doors, press the button (I) for ½ second. The siren will chirp and the parking lights will flash once, confirming that the security system is armed.
(I)
Opening doors
If the doors are slammed and closed, press the button (I) for ½ second to disarm and open the doors. The siren will chirp and the parking lights will flash twice, confirming the doors are opened and disarmed.
If you hear 4 chirps and the side lights flash 4 times, this means that one of the security zones is activated during security.
( I -) Automatic arming
You can turn this function on/off by pressing the button (I) for 2 seconds. When auto-arming is enabled, your alarm will arm automatically after closing the last door, when you move 15-30 meters away from the car, and 15 seconds after disarming. Your alarm will automatically turn off the security when you approach a distance of 15-30 meters from the car.
· Enabling the auto-arming function.
The operating range will depend significantly on the level of surrounding radio interference.
By pressing the I button for 2 seconds:
1) First time: Auto icon will be lit
2) Second time: The Auto icon will flash - indicating that the longer range is enabled
3) Third time: Auto icon goes out
( II -) Automatic engine start
Press button (II) for 2 seconds to automatically start the engine from the automatic transmission. After receiving a signal from the remote control, the system will issue a confirmation chirp. To drive a car, you need to disarm the car with the button (I), insert the key into the ignition and turn it to the ON position within 20 seconds after opening the door. The engine will turn off after 20 seconds if you do not have time to insert the key into the ignition and turn it to the ON position. Do not attempt to turn on the starter while the engine is warming up.
The engine will warm up for 15/25/45/5 minutes, depending on the programmed time, and then turn off. If your pager transmitter fails to start the engine, Magicar will make 2 more attempts. If after the third attempt the engine does not start, then you need to contact an auto electrician.
While the engine is warming up, the pager indicator will indicate the remaining warm-up time.
( III -) Opening the trunk
Press button (III) for 2 seconds to open the trunk. Setting this mode is only possible if your car is equipped with an electric trunk activator. Note that opening the trunk will open not only the trunk, but also the doors. If a trunk limit switch is installed, the Standby mode will be disabled after opening the trunk in manual transmission mode.
( IV ) Status poll
The status polling function allows the owner to monitor the vehicle’s condition based on the indication on the LCD pager remote control. Press the button ( IV) for ½ second to enable Status Polling. You will receive one of the following responses if you are in the operating range of the pager system:
| Pager | Siren | |
| Security is on, engine is not running | Beep, beep, beep, | Tweet |
| Security is disabled, moving does not work | Beep, beep, | Tweet, Tweet |
| Security is on, engine is running | Beep/Beep, Beep/Beep, Beep/Beep, | Tweet, Tweet, Tweet |
| Security is disabled, engine is running | Beep/Beep, Beep/Beep, | Tweet, Tweet, Tweet, Tweet |
· After the survey, you will know the temperature inside the car in degrees Celsius or Fahrenheit.
· During the survey, you can also find out the voltage on the battery. Press the IV button on the remote control to turn on the polling function, and then again within 6 seconds and you will see the battery voltage.
For example, if the battery voltage is 12.6 V, then you will see 12_6
…..
( IV -) Panic
Press the (IV) button for 2 seconds to enter panic mode. In this mode, security will be turned on; if security was not turned on, the siren will turn on and the side lights will flash for 90 seconds. Panic mode will turn off engine warm-up if it was turned on. To turn off Panic mode, press the button (I) for ½ second. Then press the button (I) again for ½ second to disarm and open the doors.
( I + II ) Silence siren
When this function is enabled, the speaker indicator will disappear from the LCD and the siren will not sound. The siren will not sound when arming/disarming, the seismic sensor is triggered, or the panic mode is activated.
( I + III ) Valet mode
In this mode, only the function of opening and closing doors will work. This mode is very useful when your car is being washed or at a service station.
( I + III -) Disabling the seismic sensor
Press buttons (I+III) for 2 seconds to enable or disable the two-level seismic sensor. The two-level seismic sensor will be active 30 seconds after the Magicar goes into security mode. After turning on the two-level seismic sensor, the pager will respond as follows:
· If there is a light impact on the car, the first level of the seismic sensor will turn on and the car siren will chirp 4 times and the side lights will flash 4 times. The pager will emit a warning signal Beep and the hammer icon will appear on the pager display twice.
· If there is a strong impact on the car, the second level of the seismic sensor will turn on and the car siren will sound for 30 to 60 seconds, and the side lights will flash for 30 to 60 seconds. The pager will warn with sounds and the hammer icon will flash on the display.
Press button I for ½ second to reset the signal, the siren will turn off and the parking lights will stop flashing.
( I + IV ) Closing doors from ignition
This feature allows the doors to automatically close 30 seconds after the vehicle is started using the key if all doors are closed. After turning off the ignition, the doors will open automatically. This function does not work when starting the engine remotely, but does work when starting with the ignition key.
( II + III ) Passive guard/Active guard
1. You can turn this function on or off by pressing buttons (II+III) for ½ second. The passive security indicator will be highlighted on the LCD. When passive security is installed, the alarm will automatically turn on the security mode 30 seconds after the last door is closed. Passive closing means that the doors will be closed and the system will be in passive security mode. By default, the system is set to active security mode, which means that the system will only lock doors and arm when the pager is used.
2. If you select both modes: Auto-arming and Passive arming, then Auto-arming has priority over passive arming.
3. In manual mode, Passive security will close the doors in Reserve mode. In Turbo mode, Passive security will close the doors after closing the doors and turning off the ignition.
( II + IV ) Standby mode (24-hour timer)
Procedure
1. Turn off the Timer icon.
2. Set the start time. When doing this, first make sure that the time is entered correctly.
3. Turn on the Timer icon.
| Buttons | Press time | Functions | |
| STEP 1 | (II+III)- | 2 sec | Beep signal to confirm |
| STEP 2 | (II) | ½ sec | Time setting mode is enabled. Multiple flashes and beeps |
| STEP 3 | (I) | ½ sec | Set the clock |
| (II) | ½ sec | Set minutes | |
| STEP 4 | (II+III)- | 2 sec | Turn off installation mode. Beep signal. You can continue to control the car |
.
Timed triggering is only possible when security is on.
( III + IV ) Turbo mode
You can turn this mode on or off by pressing the buttons (III+IV) for ½ second, the Turbo indicator will appear on the screen. In this mode, the engine will continue to run for 2 minutes after the ignition is turned on. This mode is useful for Turbo cars that need to cool down after a trip.
( III + IV -) Recording and playback via Voice Module (if installed)
The icon is located to the left of the Auto icon and is turned on by simultaneously pressing the III + IV buttons for 2 seconds, while turning on the Voice Modulator Recording and Playback mode. Recording and playback can be activated by pressing buttons II and III for 0.5 seconds. But if no button is pressed within 60 seconds, the Recording and Playback mode will be automatically turned off.
( II ) Auxiliary channel 1
Auxiliary channel No. 1 will turn on if button II is pressed for ½ second. Four different connection types can be used (consult your installer), to close the sunroof, control the mirror or other accessories.
( III ) Auxiliary channel 2
Auxiliary channel No. 2 is turned on if you press button III for ½ second.
Note:
1. The duration of the Auxiliary Channel output signal may vary depending on the type of equipment used at the output.
2. The output of this channel is 250mA. Therefore, make sure that the output is a relay or other device that uses more than 250mA. Otherwise, you may damage this device.
3. Connecting this auxiliary channel will require additional payment. Therefore, consult your installer.
Real-time remote pager function
Types: RPS (Remote Pager System), opening or triggering of the seismic sensor, will turn on the pager beeper and the LCD indicator blinking mode. An owner warning signal will be sent to the pager until it is turned off.
Opening - one beep every 2 seconds
Seismic sensor triggered - one beep every 4 seconds
DPS – one beep every 6 seconds
These functions are only available when the vehicle is armed.
Remote Pager System (driver call)
Traffic police is a function that allows you to individually call the owner of the car by simply tapping the traffic police sensor located on the windshield of the car. This tapping will be detected by the system and your pager will ring four times, and the handset indicator will appear on the LCD, indicating that someone is calling you.
Disabling security using a traffic police sensor
Thanks to the new, patented traffic police system, you can open doors without a key and remote control.
Programming 4-digit password (1111-9999)
Step 1: Turn on the ignition
· Step 2: Open the door
· Step 3: Knock 10 times. Each time the green LED will flash once. In this case, there should be no more than 1.5 seconds between blows.
· Step 4: The red LED will start flashing quickly. If this does not happen, repeat from step 1.
· Step 5: Enter your 4-digit password by tapping from 1 to 9.
To enter the first digit of the code, make the appropriate number of strikes. In this case, there should be no more than 1.5 seconds between blows. Then wait for confirmation by counting the number of flashes of the red LED. If the number of flashes does not correspond to the beats, then repeat from step 1. If the number of flashes corresponds to beats, then you can continue entering the remaining digits of the code.
Step 6: The parking lights will flash once to confirm programming.
Keyless entry using traffic sensor.
· Step 1: Knock 10 times. Each time the green LED will flash once. In this case, there should be no more than 1.5 seconds between strikes.
· Step 2: The red LED will start flashing quickly.
· Step 3: Enter your password. To enter the first digit of the code, make the appropriate number of strikes. In this case, there should be no more than 1.5 seconds between strikes. Then wait for confirmation by counting the number of flashes of the red LED. If the number of flashes corresponds to beats, then you can continue entering the remaining digits of the code. If the number of flashes does not correspond to the number of strikes, then the traffic police will send a signal to the pager. So you need to go back to step one.
· Step 4: The doors will open and the pager display will show this function, accompanied by two beeps.
Note: You can make up to five attempts within 30 minutes. This keyless entry feature will then be disabled for 24 hours, or until the doors are opened using the key fob.
When the seismic sensor is activated by an impact on the car, the beeper on the pager turns on and the LCD indicator with a hammer appears for 7 seconds. Press the button (I) for ½ second to turn on the siren and flash the parking lights from the seismic sensor.
…….
Remote tamper indication
When the alarm mode is turned on, after unauthorized opening of the door, the siren on the car will turn on and the sound signal on the pager will turn on, and the door open indicator will appear on the LCD. The siren will turn on even when silently armed. Press the button (I) for ½ second to turn off the siren and flash the parking lights. Press the button (I) again for ½ second to disarm the security.
Linking a new key fob to the Scher Khan Magicar 5 alarm system
The user manual supplied with the equipment contains a section devoted to working with the communicator. There is a separate chapter describing the functioning of the security complex. The driver of the car is recommended to study the manual and then write out individual sections (for example, a description of the emergency shutdown algorithm) in the form of a memo, which is stored along with the documents for the car.
Symbols on the display
Before you start using the alarm, you need to remove the safety insert glued to the contacts of the communicator. When the battery is installed correctly, a melodic signal is given, indicating that the device is ready for use.
On the LCD screen of the Scher-Khan 5 alarm communicator there are symbols to display:
- battery condition;
- device operating mode;
- fields for displaying hours;
- security mode status indicators;
- siren and shock sensor operating mode icons;
- explanatory notes when the engine is actively started using a timer or the turbo timer is running;
- indicators of open body panels;
- turning on the “Hands-free” mode;
- icon for receiving a call from the car;
- indication of the operation of lighting equipment or power unit;
- Valet service mode activation signal.
Purpose of the buttons
The buttons located on the communicator support 4 operating modes:
- short exposure;
- long (more than 2 seconds) press;
- quick complex impact on 2 keys;
- long-term joint holding of 2 buttons.
The driver, by pressing the buttons on the communicator or auxiliary remote control, turns the security mode on or off, activates remote start and other functions. The keys are used to configure the remote control with a display and are used during programming of the central unit. The purpose of the buttons is indicated in the relevant sections of the operating and configuration instructions.
Setting the time
To program the clock, press buttons II and III together for a long time, and then the driver goes to the settings menu (by briefly pressing button I). To adjust the values of hours and minutes, keys I and II are used; to record the result in memory, a long-term impact is made on II and III (before the buzzer gives a signal).
To turn on the alarm, you need to press the I key. The siren will sound, the external lighting will work, and then the engine starting circuits will be blocked and the locks will be locked. Explanatory pictograms appear on the communicator display.
The control diode turns off, and icons in the form of car headlights and a lock with an open shackle flash 5 times on the display.
Starting is carried out by long-pressing button II. After locking the locks, the engine starts, and the communicator display shows the remaining operating time (pre-programmed). The driver can disable the security, place the key in the lock, and then activate the ignition and start driving. 20 seconds are allotted to perform actions, otherwise the engine is turned off.
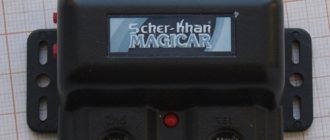
Scher Khan Magicar 5 keychain diagram
To repair the display you will need:
- soldering iron;
- flux;
- rosin;
- thin screwdriver.
Replacing the Magikar car alarm screen begins with disassembling the remote control.
- Remove the battery.
- Unscrew the screw located under the rubber plug.
- Using a knife, divide the body into two parts.
- Remove the internal components.
The screen contacts are soldered to the board on top. Unsolder them using a soldering iron (temperature 320 degrees).
- Clean the contacts on the board and irradiate them.
- Remove the protective film from the new display.
- Place the screen and quickly solder it with a soldering iron.
- Reassemble the key fob in reverse order and check its functionality.
Find out how to disassemble the Sherkhan keychain.
Firmware and reprogramming Sherkhan 5
You can reflash the Magikar key fob version 5 using the PIN code. Record the remote control codes by following the instructions below.
- In four seconds, turn the ignition key three times from the “Off” to “On” position. Turn off the ignition.
- Turn the ignition back on within four seconds. The number of activations must match the first value of the secret code. The light optics will light up once, confirming that the second value can be entered.
- Turn on the ignition. The number of activations must correspond to the second digit of the code. The emergency light will blink once, confirming correct action.
- Enter the remaining secret number values in the same way.
- After entering all the numbers, press button 1 of the switch. The lights will light up once to confirm the pager entry. After four seconds, the system will exit programming mode.
The alarm remote control is something that is constantly lost, forgotten, broken, or falls into the water. It is not possible to connect a second key fob due to its absence. Replacing with the original remote control is also unrealistic. You have to look for a communicator from a family that is more or less compatible with yours. The pager may be completely, partially, or not suitable at all. We reviewed the compatibility of key fobs for the Sherkhan Magikar 5 anti-theft system earlier.
Brief instructions for programming the key fob
If you do not register the device, the user will not be able to configure the basic functions of the anti-theft system.
Alarms Sherkhan Magikar and Logikar allow you to link up to three communicators to the memory of the control unit.
For model 4
To program the Sherkhan 4 key fob, perform the following steps:
- When the protection mode is disabled, the ignition system is activated. The “Valet” button located on the body of the diode element is pressed for two seconds. The vehicle's parking lights will blink once.
- Over the next five seconds, the “Jack” key is pressed once. The vehicle lights will flash twice. After 5 s, the diode light will light up and stop blinking. This indicates successful entry into the communicator settings menu.
- Within 5 seconds, the user must press the fourth key on the remote control twice. If the device code is received successfully, the warning light will blink. Then the remaining communicators are linked.
For model 5
The programming procedure for model 5 is as follows:
- Within four seconds, you need to turn the ignition system on and off three times, after which it remains inactive. The machine's lights will blink three times, indicating that you have entered the binding menu.
- Within 4 seconds, but no longer, after the last flashing of the hazard warning light, the first button on the key fob is pressed. The lights should blink once, this indicates that the system has accepted the remote control code. The rest of the communicators are programmed in the same way.
- To leave the binding menu, you must take no action for four seconds.
Video about self-programming the Sherkhan Magikar 5 alarm key fob
Filmed by MasikBonLive channel.
For model 6
Programming of Sherkhan Magikar 6 remotes is performed using a personal password:
- Within four seconds, the user turns the ignition system on and off three times. As a result, it should remain in an inactive state. The car's turning lights will flash three times.
- The ignition must be activated several times within 4 seconds. The number of activations must correspond to the first digit of the individual password (initially the system is assigned code 11). The car's lights blink.
- Over the next four seconds, the next digit of the password is entered in the same way. The car's turning lights will flash.
- Then the first key of the communicator is pressed, which needs to be linked to the control unit. This must be done within four seconds after the last flash of the light alarm.
- Linking the remaining key fobs is done in the same way, by pressing the first button. But the time interval between programming devices should be no more than four seconds. If one communicator is registered, then the first button on the remote control is “clicked” three times.
Video about the programming features of the communicator from the sixth version of Sherkhan Magikar
Filmed by the STAN SLAV channel.
For model 7 and 9
The key fob binding process for versions 7 and 9 looks like this:
- When the security mode is disabled, the ignition system is activated. The button located on the transceiver body is pressed for two seconds. This will cause the car lights to blink.
- Over the next five seconds, the car owner’s call key “clicks” briefly.
- If a personal password has been programmed in advance to control the alarm, then it must be entered. This will cause the vehicle lights to blink.
- After five seconds, the alarm status LED will light up continuously in blue. This indicates that the control unit is ready to bind communicators.
- Over the next 5 seconds, press the first button on the remote control. Then the remaining devices are registered in the same way.
For model 13 and 14
Programming communicators for models 13 and 14 is done as follows:
- When the protection mode is disabled and the ignition is on, the key located on the transceiver body is pressed for two seconds. The car's lights will blink once.
- Within 5 s the button is pressed again. The LED will start flashing quickly.
- Over the next four seconds, the key on the transceiver is pressed several times to enter the password. The number of “clicks” must correspond to the first digit of the code. 4 seconds after the last press, the car's lights will blink once.
- The previous step is repeated to enter the remaining characters of the password. 5 s after the last sign is indicated, the diode will begin to light without interruption.
- Within five seconds the fourth key of the communicator is pressed. The lights will flash once. Similar actions are performed to program the remaining remote controls. To leave the binding menu, you must take no action for 4 seconds.
Photo gallery of remote controls from popular models Sherkhan Magikar
Devices from version 6
Photo of the Magicar 4 communicator
Photo of keychain from Magikar 7
Remote controls for models 13 and 14
Equipment
The Sherhan Magic Car 5 car alarm set includes the following components:
- head unit with processor and relay units;
- communicator with 2-way communication channel;
- auxiliary console;
- shock sensor;
- driver call shock sensor;
- antenna unit with connecting harness;
- temperature sensor;
- separate relay with mounting block;
- siren and additional limit switch;
- a set of power cables with connectors;
- installation and configuration instructions;
- set of stickers.
Functions
Alarm system with auto start Scher-Khan 5 has the following functions:
- support for supercharged engines;
- disabling password protection;
- 2-stage removal of protection;
- giving alarm signals with lamps and sirens;
- automatic and remote engine start;
- joint work with standard central locking units;
- additional channel for controlling the luggage compartment lock;
- automatic activation of security;
- interior light turn-off delay mode;
- support for car security with the engine running.
To enable the function, press the IV button for a long time (the type of activated mode is indicated when programming the processor unit). If the alarm was turned off, then when a signal is received, the doors and start circuits are blocked. A sound and light alarm is activated and lasts 90 seconds.
The design of Magic 5 provides the ability to automatically disable and enable security. In the active mode, the alarm reacts to the radiation of the transmitter, which is detected at a distance of 15 m. When the owner moves away from the car, automatic arming occurs, and when he returns, the protection is turned off.
To activate the “Hands Free” mode, you need to long press the I button. After the icon with the text Auto appears and the melody is broadcast, you need to briefly press the IV key. An icon with the text “Holy Hands” turns on on the display. The mode is deactivated by long pressing the I key.
Valet mode
When transferring the vehicle to a service station, it is possible to use a mode to temporarily disable the security functionality. To turn on, use a complex press on keys I and III, which are held for 2 seconds. When the function is activated, the ability to control the door locks is retained; an icon in the form of 4 letters Z is turned on on the communicator display. Repeated long-term pressure on the buttons allows you to disable the mode.
User manual
The instructions supplied with the equipment in Russian contain recommendations for management:
- To arm the security, use the I button installed on the communicator. Holding keys I and II allows you to activate the security mode without giving signals from the siren.
- Disabling the security is performed by briefly pressing the I key. The driver can lock and open the locks while driving.
- To remotely start the power unit, you need to press button II for 3 seconds. To ensure engine starting on vehicles with a manual transmission, a procedure for programming the neutral position of the selector is first carried out. A prerequisite for starting is to set the parking brake handle to the working position. The Sherkhan user adjusts the motor operating time by programming the central unit.
- To unlock the trunk lid, use a long press on button III (with the channel activated).
- In the center of the call sensor there is a control diode that lights up in red when the security mode is active. To call the driver, you need to knock on the glass; you need to pause for 1.5-2 seconds between knocks. The diode changes color to green, a call is received on the communicator, a buzzer sounds and an icon is displayed on the display. To turn off the call tones, briefly press the IV button.
- When an alarm is triggered, a signal is sent to the communicator, a buzzer sounds, and the display shows the zone that detected an attempt to break into the car.
- Briefly pressing the IV key allows you to poll the system. The status of the complex is displayed by sound signals from a buzzer and siren, and the display shows the temperature inside the car. Pressing the button again displays the voltage value in the vehicle's on-board network.
How to set up the remote control
The manual contains a section describing how to configure the communicator. To activate the menu, press keys II and III, the text PRO9 appears on the display and a buzzer sounds. A short press on the I button activates the clock setting mode. To change the hours and minutes, short actions are applied to keys I and II, respectively. Pressing II and III again stores the value in memory.
While in setup mode, the driver controls the operation of the call sensor (using button III). The communicator displays the temperature in degrees Celsius or Fahrenheit. The change is made using a combination of buttons I and IV.
- Alarm Sherkhan Magikar 3
- Sherkhan 6 autostart how to turn on
- Starline A39 with auto start instructions
- KGB TFX 5 manual
Installation instructions
The DIY alarm installation algorithm for dummies is given in the factory documentation:
- Place the antenna unit in the corner of the windshield; installation of the unit under the interior trim is allowed. If the owner installs the unit secretly, then the range of the remote control may be reduced (due to shielding of the antenna).
- Place the call sensor on the surface of the windshield; the installation point is pre-degreased.
- Mount the siren under the hood of the car. The unit is located away from sources of heat and moisture.
- Place additional limit switches in areas not exposed to moisture.
- Secure the processor module inside the instrument panel. Screws or plastic clamps are used for fastening. Equipment supplied from the factory does not have key fobs stored in its memory. Before use, you need to program the remote control codes.
- Glue the shock sensor inside the car (on a metal base). Provide in advance unobstructed access to the rotary potentiometer for sensitivity adjustment.
Connection diagram
After installation is complete, you should connect the Sherkhan 5 alarm system to the on-board network and connect the electronic units together. The instructions include a connection diagram; before starting the switching, you should study the documentation. The connectors use cables equipped with insulation of different colors, which allows you to determine the purpose of the cord.
Starting the engine is a very convenient function of the security system. After carefully studying the instruction manual, every car enthusiast can start the car using the key fob. Before programming, disarm the car, turn off the ignition, turn off the hands-free mode, and open one door just in case.
Time setting.
- To enter programming, simultaneously hold down keys 1 and 2.
- Enter the timed autorun settings by pressing button 4 thirteen times. After each press, the system should emit a single beep.
- Select the desired autostart time: button 2–8 hours, 3–4 hours, 4–2 hours.
- Then turn on the timer by clicking keys 2 and 4 simultaneously. The “timer” symbol will appear on the display.
Automatic engine start based on temperature.
- Enter programming mode: buttons 1 and 2.
- Press key 4 twenty-one times.
- Select the required temperature: key 2 – (-15), 3 – (-25), 4 – (60).
- Turn on the timer by pressing 2 and 4 simultaneously. The display will show “timer”.
Autorun setup instructions
Starting the engine is a very convenient function of the security system. After carefully studying the instruction manual, every car enthusiast can start the car using the key fob. Before programming, disarm the car, turn off the ignition, turn off the hands-free mode, and open one door just in case.
Time setting.
- To enter programming, simultaneously hold down keys 1 and 2.
- Enter the timed autorun settings by pressing button 4 thirteen times. After each press, the system should emit a single beep.
- Select the desired autostart time: button 2–8 hours, 3–4 hours, 4–2 hours.
- Then turn on the timer by clicking keys 2 and 4 simultaneously. The “timer” symbol will appear on the display.
Automatic engine start based on temperature.
- Enter programming mode: buttons 1 and 2.
- Press key 4 twenty-one times.
- Select the required temperature: key 2 – (-15), 3 – (-25), 4 – (+60).
- Turn on the timer by pressing 2 and 4 simultaneously. The display will show “timer”.
Advantages and disadvantages
Advantages of the Scher-Khan 5 car alarm:
- no malfunctions;
- low number of false positives;
- signal reception range;
- automatic engine start;
- long service life of the batteries in the communicator.
Equipment shortcomings noted in owner reviews:
- interruptions in operation at air temperatures below -35°C;
- there is no cellular communication unit;
- a simple encoding algorithm that can be broken by signal scanners;
- There have been cases of involuntary activation of the owner's call sensor;
- The standard siren has a low volume;
- Chinese copies are common on the market, imitating the original packaging and products.
How to remove Valet mode without a key fob
On the Sherkhan alarm system, it is quite easy to turn on the “Valet” mode by accidentally pressing it. Very often this is mistaken for a system failure: the alarm does not respond to blows, autostart fails, key fobs are not programmed, the LED is constantly on. Only the central locking and trunk opening work.
To disable Valet without a key fob, use the multifunction button located in a visible place.
- Turn on the ignition, do not start the engine.
- Press and hold the multifunction key for two seconds. "Jack" is disabled.
Source
How to set the time on the Magikar 5 model?
The Magicar 5 key fob can start the engine using an internal timer. The “Timer” icon will be displayed on the LCD screen. In order for the function to work correctly the first time you use it or after you have to remove the batteries, you need to set the clock.
According to the manual, setup is carried out as follows:
- Press buttons II and III in combination. The car will beep.
- Press I for less than a second. The time on the screen should blink.
- Using keys I and II we set the exact value of hours and minutes.
- To fix the set value, leave the programming mode by simultaneously pressing buttons I and II. A signal should sound.
Incorrect time setting leads to desynchronization of the readings on the key fob and the real watch. Because of this, it is not possible to correctly set auto-start by timer on the alarm. The engine and interior will not warm up on time.
You need to set the time in accordance with the real clock for more accurate synchronization.
Setting the time on the Magicar 5 key fob is shown in the video by Marat.