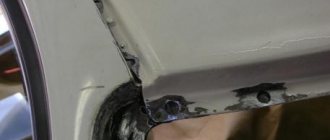
Ceiling 2106 at the location where the front handle and front safety lining are attached
The ceiling of the VAZ 2106 is one of the important elements of the car body, which determines the interior of the car and performs, in addition to protective ones, some technological functions. During a visual inspection of the car’s interior, inspection of the ceiling shows the degree of maintenance of the interior, and dark smudges and stains indicate the need to replace it. Technologically, the ceiling is made of an all-metal sheet of special automotive steel, and is a rigid mount to which the body pillars of the car body are welded.
Ceiling installation VAZ 2106
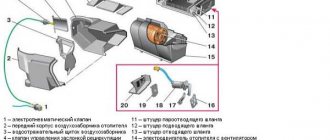
The ceiling of the VAZ 2106 is supported by 6-7 metal arches, which are attached to the base of the car's roof by welding. It is a plastic rubberized fabric with a thin layer of glued insulation, which is evenly stretched and attached to the metal roof arches. An air space is created between the arches and the ceiling, which plays the role of an air insulating layer. On the ceiling, using special fasteners, auxiliary devices necessary for the comfort and control of the car are held. These include handles for maintaining balance while the vehicle is moving, lights for interior lighting, a rear-view mirror and a safety pad. Additionally, rear and side curtains for windows are mounted on the ceiling.
Assembling the ceiling handle after replacing the fabric layer
Replacing the ceiling trim of a VAZ 2106
Work such as replacing the ceiling trim of a VAZ 2106 is carried out in the following cases:
- If this part of the ceiling is accidentally rendered unusable when working with tools in the cabin
- When the appearance of the ceiling becomes unsatisfactory due to long-term use of this part
- When tuning the car interior
For a VAZ 2106 car, the ceiling lining is a part fixed in the car at the factory, so its dismantling requires compliance with certain rules when removing this part, so as not to damage the remaining elements of the VAZ 2106 ceiling. So, how to change the ceiling lining on a VAZ 2106 with your own hands, do not resorting to the help of specialists from an automotive technical service center? On our website, car enthusiasts can watch a video on this topic, and the messages of our correspondents are equipped with relevant photo materials. In addition, on our portal you can find the appropriate instructions for carrying out this work.
Removing the ceiling trim of a VAZ 2106
Old or damaged VAZ 2106 ceiling trim that needs to be replaced is removed as follows:
- We begin removing the trim from the aft part of the ceiling mount
- For this purpose, we unclench the “crocodiles” under the rubber seal of the rear window, take out the material from under the seal, unbend the petal - the fastening of the first arc, and then one by one remove all the remaining arches along with the old ceiling material
- We concentrate the removed “crocodiles” in one place and save them for the reverse operation; remove the insulating layer glued to the old trim and clean the car interior with a vacuum cleaner.
Removing the ceiling trim of a VAZ 2106
Installation of a new ceiling VAZ 2106
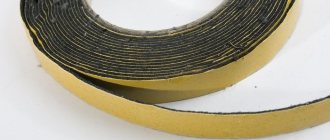
As an analogue of the ceiling, you can use a special leather substitute for this purpose, which is used by many Russian car enthusiasts for these purposes. To improve the absorption of noise effects, it is necessary to glue a layer of special fabric with BF-88 glue, or, as a last resort, with “Moment”. After this, you need to decide how the car owner plans to install the ceiling. The first option is the simplest and least expensive. We cut out the leatherette according to the configuration of the ceiling and glue it along the perimeter and area of the ceiling of the car. After that we install it in its old place. The second option is the most beautiful and most expensive. To do this, it is necessary to stitch the entire area of the new substitute leather, that is, create a copy of the new skin, but the stitching should be carried out in such a way that the seams are hidden and are least noticeable on the front surface of the ceiling. Next, we apply the cut or glue-dried ceiling to the installation site, making the surface smooth by smoothing and stretching. After installing the ceiling with the metal arches installed and the new ceiling, we place the edges of the ceiling under the rubber seal of the windshield, install the safety panel, sun visors and rearview mirror. After this, it is important, with the help of another person, to stretch the ceiling well so that there is no sagging and gathering of the fabric; we hook the outermost metal arc to the petal, after which it is good to bend it. After longitudinal tension, we carry out lateral tension and install the “crocodiles”, checking the fastening by tapping with a hammer. The last step is to place the edge of the ceiling under the rubber seal of the stern glass. With proper tension, the car owner should have a flat ceiling. Thus, the ceiling lining of the VAZ 2106 is installed.
Replacing an outdated ceiling
Re-upholstery of a new VAZ 2106 ceiling
We purchase a new VAZ 2106 ceiling at an auto parts store, but you should know that the ceiling, which is sold in a roll, is usually factory-made, and the one folded like a piece of fabric is produced by other enterprises. The price for the ceiling of the VAZ 2106 varies, but it will not force car enthusiasts to spend money, and costs about 2000 rubles.
Dismantling and installation of factory-made VAZ 2106 ceiling
During the dismantling and installation of a factory-made VAZ 2106 ceiling, the following activities are carried out:
- remove the fastening screws and linings of the wind deflector struts and central posts
- The “wind deflectors” and the rear glass with rubber glass seals are removed.
- the screws are released and the sun visors with holders, the rear view mirror, the handles and the anti-emergency lining above the windshield, the upper seals of all side doors and the brackets of the roof trim holders along its perimeter are dismantled.
- When bending the antennae, the upholstery of the “sidewalls” of the roof and ceiling is removed and the metal arches with anti-creaking bushings are removed.
- Metal arches are inserted into the updated roof lining, but it should be taken into account that the 1st and 2nd arches are the same size. Having installed the anti-creaking bushings, the sixth, fifth and then the ceiling mounting arcs are mounted at the installation site. As for the 2nd arc, when tension is applied, it is grabbed along the edges, the upholstery is tightened and secured with hooks to the edge of the “windbreaker”.
- The edges of the upholstery are lubricated with BF-88 adhesive and secured with bracket holders to the flanges of door and window openings. Excess upholstery along the edges of the ceiling is cut off. Then “wind deflectors” and aft glass, linings of the front and central pillars, rubber seals for all doors, a safety lining, handle holders, a stern viewing mirror and visors against solar radiation are installed.
Replacing the ceiling trim of a VAZ classic
I was replacing the ceiling trim on a VAZ classic (tensioned), I decided to share tips and photos of the process.
Replacing the ceiling trim of a VAZ
Replacing the ceiling must begin with dismantling the front and rear windows, removing the handles and injury protection with visors. The sheathing itself is attached to the ceiling using metal arches and small metal latches under the door and glass seals.
After removing the glass, you can then remove all the metal latches around the perimeter of the casing. We save them, as practice shows, in order to stretch a new ceiling well, you need a larger number of latches than in the factory cladding version. The thing is that at the factory, in addition to the fact that the ceiling is fastened with latches, it is also glued along the bend. To compensate for the lack of glue, it is necessary to use more fasteners.
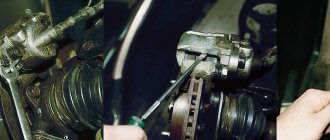
After all the fasteners have been removed, you can remove the arches, this must be done very carefully, as you can break the fasteners. It is necessary to remove the arches from the passenger side, not the driver.
Next, we spread the new ceiling upholstery, and one by one we move the arches from the old ceiling to the new one. The new casing has stampings (not always visible) along which it is necessary to cut off the loop in which the arc is attached.
New ceiling laid out
The arcs were rearranged into new casing
The ceiling is installed on one side only; the arcs are located more often on the back of the casing.
It is necessary to put white (yellow) fasteners on the arches. You need to start stretching the ceiling from the rear window. The arcs are installed first with one end in the black cap, and the other with a plastic tube in the hole in the body.
Black cap
White tube fastener
We first install the arcs themselves, with the ceiling not stretched, and after fastening, we pull the arc towards ourselves, thereby stretching the ceiling. Be careful here; under no circumstances should you tear the ceiling.
When installing arches, try to stretch the ceiling as much as possible, since it will be difficult to do this later.
You should get something like this
Next, we take the ceiling in front and pull it slightly forward to tighten the front part of the trim and secure it with fasteners on the windshield frame. Next, the last arc near the rear window also needs to be secured by the tongue.
We fix the ceiling in front
Last arc fastening tongue
The last rod is tightened by the tongue and fixed
Then we stretch the ceiling little by little using metal latches; I do not recommend putting them on all the way right away, since in practice you usually have to remove them and tighten the ceiling 2-3 times.
We fix the ceiling as follows
Gradually stretch the sheathing, trying to smooth out all the folds; wrinkles from storing the sheathing will go away over time.
In the process of stretching the ceiling
Process
I’ll post a photo of the final version a little later, and after finishing the process of stretching the ceiling, we cut off the excess material along the edges and return the glass to its place.