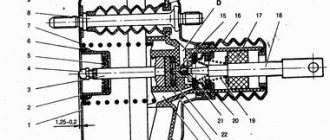
Removing and disassembling the fuel module
We are carrying out work to replace the fuel level indicator sensor, fuel pressure regulator, strainer and fuel pump.
Relieve the pressure in the power system (see “Replacing the fuel filter”). Disconnect the wire terminal from the negative terminal of the battery. Inside the car, lift the rear seat cushion (see “Removing the rear seat”) and bend the sound insulation valve that closes the hatch cover in the floor of the body under the rear seat. Use a Phillips screwdriver to unscrew the two screws securing the hatch cover...
...and remove the cover. Lifting the wire harness block clamp...
...disconnect the block from the fuel module cover connector.
By pressing the spring clamp, disconnect the tip 1 of the tee from the fitting of the fuel module cover. By squeezing the clamps (in the direction of the arrows) of tip 2 of the fuel supply tube, disconnect the tip from the fitting of the fuel module cover.
Using a 10mm socket with an extension, unscrew the 8 nuts securing the pressure plate of the fuel module. Remove the spring washers and the ground wire from the tank neck studs.
Remove the pressure plate.
Carefully, trying not to damage the fuel level indicator sensor float, remove the fuel module from the tank. We drain the remaining fuel in the module into a previously prepared container.
If replacement is necessary, remove the ring plastic spacer.
Please note: when installing the spacer subsequently, its cut must coincide with the protrusion on the fuel module cover.
Remove the rubber sealing gasket. We close the hole in the fuel tank to prevent foreign objects from getting into it. We disassemble the fuel module on a workbench. If it is necessary to replace the o-rings of the fuel pressure regulator or the regulator itself...
...disconnect the tip of the ground wire from the terminal on the regulator body.
Using a screwdriver, remove the fuel pressure regulator mounting bracket.
Using pliers, remove the regulator from the module cover socket.
Remove the two rubber sealing rings of the regulator. Install the fuel pressure regulator in reverse order. We replace the regulator O-rings with new ones. Before installing the regulator O-rings, apply a thin layer of engine oil to the O-rings. To replace the fuel gauge sensor or fuel pump, the fuel pressure regulator does not need to be removed. From the inside of the module cover...
...use a screwdriver to press out the fixing plate of the common wire block...
...and disconnect the wire block from the cover connector. By pressing the latch...
...disconnect the wire block from the fuel pump. To remove the fuel level sensor...
...we release the two sensor latches...
...and move the sensor along the grooves of the housing towards the cover.
Remove the fuel level indicator sensor with wire blocks. Install the fuel level indicator sensor in the reverse order. When replacing the fuel pump, it is better to remove the fuel level sensor to avoid damaging it.
Use a screwdriver to pry up the drain tube... ...and disconnect it from the module body.
There is a retaining ring located in the groove of one of the guide posts of the module cover. We remove it by prying it with the blade of a slotted screwdriver.
By pressing the four latches of the pump holder...
...remove the fuel module cover assembly with the holder and the fuel pump.
Remove the spring from the guide post of the cover.
...remove the strainer.
Remove the lock washer from the slot in the strainer housing.
Using a screwdriver, press out the plastic latch of the holder...
...and use your finger to push the fuel pump out of the holder. We heat the plastic corrugated tube on the pump nozzle over a container of boiling water...
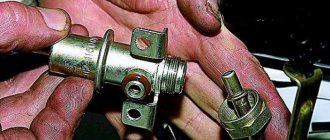
...and remove the tube from the pump connection. The car is equipped with a BOSCH fuel pump 0580454035.
A valve is installed in the fuel module housing to prevent fuel from leaking out of the housing. We assemble and install the fuel module in the reverse order. When installing the strainer, pay attention to the condition of the lock washer; if it is dented, it must be straightened or replaced. When installing the fuel module into the tank...
...arrow 1 on the fuel module cover should be directed backwards (towards the trunk). Arrows 2 on the fittings of the fuel module cover indicate the direction of fuel movement. We put the tips of the tee and the fuel pipe onto the fittings of the module cover until the latches click. Before closing the hatch cover in the floor of the body under the rear seat, it is necessary to check the tightness of the fuel module connections. To do this, connect the wire terminal to the “negative” terminal of the battery and turn on the ignition.
All about pressure in the fuel system of a car
Fuel pressure in the car system is one of the important parameters that is used in engine diagnostics. The behavior of the car in various operating modes depends on the pressure. We answer the questions: how to measure the pressure in the fuel rail and how to use it to determine a car malfunction. To provide information more conveniently, we will divide the article into two large parts:
How to measure the pressure in the fuel system with your own hands
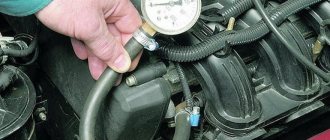
There are many ways to find out the pressure in the fuel rail. For example, buy a device to check fuel pressure. A kit with a fuel pressure gauge, adapter and drain will cost you 1200-1300 rubles. Pay RUB 300 to the service station and take measurements there. You can also measure the pressure in the fuel system with an air pressure gauge, which is used to measure tire pressure. This is where I will dwell in more detail. Since the site is dedicated to cars of the tenth family, then further figures and some nuances will relate specifically to the VAZ 2110. Otherwise, the procedure is similar to any other car. I’ll make a small digression right away. The peculiarity of pressure gauges is that their initial scale values have relative inaccuracy. What does it mean ? If the air pressure gauge has a scale of up to 16-20 atm (when the measurement limit for fuel is 5-7 atm), then pressure measurements will not be accurate due to this error, which will fall within the initial values of the instrument scale. Therefore, it is correct to check the fuel pressure with a fuel pressure gauge with a limit of 6-7 atm. We take a pressure gauge (in the photo a device for measuring tire pressure). We wind the foam (plumbing flax) under the pipe and put on an oxygen hose with an internal diameter of 9 mm. Secure with clamps. Place a rag on the generator (so as not to start a fire under the hood). Unscrew the plastic cap on the fuel rail. Under the cap there is a hole with a nipple. Unscrew it from the wheel cap. Due to the residual pressure in the rail after removing the nipple, gasoline will splash out. If desired, you can relieve the pressure in the vehicle's fuel system. To do this, you need to remove the fuel pump fuse (under the right trim of the center console near the ECU, where there are 3 relays and 3 fuses. Usually the fuel pump fuse is on the far left) and wait until the car is running and does not stall. We put the second end of the hose on the ramp hole and secure it with a clamp. We remove the rag from the generator and start the engine. Don’t forget to cover the generator with a rag again before removing the hose from the ramp. That's it, now you know how to check the pressure in the fuel system in the field. By the way, instead of clamps, you can use the bushing of the classic adjusting bolt (item 27 in the figure). It screws perfectly onto the tens ramp fitting. To seal, we put a suitable rubber ring on the fitting. On the other side of the bushing we solder a fitting onto which we put a hose with a pressure gauge. What pressure in the VAZ 2110 fuel system should be? 2.8–3.2 bar (2.8–3.2 atm) How to measure the fuel pressure in the system, where is there no return? On a VAZ 2110 with 1.6 liter engines, the pressure in the ramp is constant and amounts to 3.6-4.0 atm. Otherwise, the measurement technique is similar. Alternative ways:
- It is measured at the outlet fitting of the fuel pump module - this is the one with one tube. You will need a flexible gas-resistant hose with an internal diameter of about 8 mm and a pressure gauge (you need to remove the tube and put on a hose with a pressure gauge instead). The pressure should be 5-7 atm.
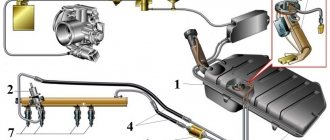
- Close the return line, as is done on an internal combustion engine with a drain ramp, but you must turn it off again at the fuel pump itself. We pull off the second hose (double) and insert a plug into the removed hose, made, for example, from an old fuel filter (saw off the nipple from it and plug it). A single hose must be put on the pump fitting, and now the measurement must be made at the fuel rail. According to the power system diagram, everything will be clear.
1 – fitting for checking the pressure in the power system;
2 – fuel rail; 3 – nozzles; 4 – fuel line; 5 – fuel tank; 6 – fuel pump module (in the fuel tank); 7 – fuel filter; 8 – tee. Video showing the process of checking the pressure in the fuel system of a car: xn--2111-43da1a8c.xn--p1ai
Signs of a malfunctioning fuel pressure regulator
The fuel system of a modern car is a complex mechanism consisting of many parts and is one of the main systems. The fuel system contains many moving parts, one of which is the fuel pressure regulator. The flow of gasoline into the combustion chamber requires constant maintenance of a certain pressure, so this operation requires a special unit that is connected to both the combustion chamber (injectors) and the fuel system (via a valve).
However, over time, with constant and long-term operation of this unit, certain problems arise in the form of malfunctions, which can lead to certain problems in operation.
Components
This part consists of several main elements:
- Diaphragm valve is the main part of the regulator and is connected to the fuel supply system and combustion chamber (injector rail). In most domestic models (such as VAZ 2115, 2110, 2114 and Lada Priora) this unit is presented in a similar configuration, since the fuel supply systems of front-wheel drive vehicles of this family have a similar design. Therefore, the quality of breakdowns for these machines is similar;
- Pipes connected to the valves and combustion chamber on one side and, through other valves, to the fuel line on the other. The device in the VAZ 2107 models is somewhat different due to an older and unreliable design. When using equipment for rear-wheel drive, old components of an outdated design are used (the valve may work unstable when operating in a carburetor engine and the wrong choice of fuel mixture enrichment) so its design is somewhat different, although problems arise.
Failure
The design of this unit is quite simple to operate, but the valve can also fail.
This will entail certain negative consequences and the main signs will be:
- Increased fuel consumption due to partial failure of the element . When the valve unstably performs its functionality, the pressure in the rail and the fuel system drops, there is an excess supply of gasoline to the combustion chambers, which causes significant fuel consumption. This also entails, in addition to increased gasoline consumption, increased wear of the element, which will ultimately lead to complete failure of the part;
- Unstable engine operation at idle speed . If the fuel supply is poor, the engine cannot reach its optimal level of operation, so the idle air regulator operates unstably. If there is insufficient pressure and the fuel pressure regulator fails, its supply either stops or fuel flows freely through the system. This can also cause the engine to start poorly, which requires increasing the load on the starter, also causing wear. This effect manifests itself during mechanical wear of the valve, when the failure of one part of it ensures poor pressure balancing between the fuel and air;
- The crankshaft cannot maintain a constant speed level. This effect is dangerous because this malfunction can involve many elements of the system, and the malfunction of this regulator is an indirect cause of such a breakdown. Unstable operation of the crankshaft not only disorganizes the driver, but also reduces engine life (albeit slightly);
- Deterioration of engine power qualities . If the fuel supply is poor, the engine cannot fully realize its potential when moving, so its performance decreases. This causes a deterioration in the dynamic qualities of the motor and affects its service life;
The video shows signs of a malfunctioning fuel pressure regulator:
Removal and installation of pressure regulator VAZ 2170 Priora
- Repair manuals
- Repair manual for VAZ 2170 (Priora) 2004+.
- Removing and installing the pressure regulator
One of the reasons for the car skidding or pulling to the side when braking may be a malfunction of the pressure regulator.
It is recommended to replace a faulty pressure regulator as an assembly.
You will need: a flat-blade screwdriver, a 8- or 13-size wrench, a 13-size socket wrench (head), a special 10-size wrench for loosening the brake pipe nuts.
| 1. Using a screwdriver, remove the lock washer of the elastic arm of the regulator drive and the flat washer installed under it. | 2. Disconnect the elastic lever with the shackle from the rear suspension beam. |
| 3. To avoid having to adjust the pressure regulator drive during installation, mark the position of the drive lever relative to the bracket. | 4. Place a container under the junction of the pipes with the regulator, since liquid will flow out from there, and use a special “10” wrench to unscrew the four nuts securing the brake pipes. |
| 5. Disconnect the tubes from the regulator. Plug the pipe openings, for example, with protective caps for the wheel cylinder bleeder valves. Label the tubes so as not to mix them up when installing the regulator later. | 6. Using a 13mm wrench, remove the front bolt securing the regulator to the bracket. |
| 7. Using a 13mm wrench, unscrew the rear regulator mounting bolt... | 8. ...and remove the regulator with the drive from the car. |
| Note This is what the pressure regulator looks like when removed from the car... ...and its drive. |
| 9. If it is necessary to replace drive parts, use a screwdriver to pry the earring bracket away from the elastic lever. | 10. Remove the bracket along with the earring from the lever. |
| 11. Using a 8mm wrench, remove the bolt securing the lever lock. | 12. Remove the lever retainer and disconnect the drive lever from the elastic lever. |
13. When connecting the drive lever to the elastic lever, the clamp fork should fit into the groove on the elastic lever.
14. Install the regulator in the reverse order of removal. Please note that the front mounting bolt is longer than the rear.
15. After installing the regulator, crimp the earring bracket with pliers. Then bleed the brake system and, if necessary, adjust the pressure regulator drive (see “Adjusting the pressure regulator drive” ).
↓ Comments ↓
1. Car structure
1.0 Car structure 1.1 General information about the car 1.2 Passport data 1.3 Car keys 1.4. Controls 1.5. Heating and ventilation of the cabin 1.6 Ensuring a comfortable air temperature in the cabin 1.7. Doors 1.8. Passive safety equipment on the car 1.9. Seats
2. Recommendations for use
2.0 Recommendations for use 2.1. Safety rules and recommendations 2.2 Running in the car 2.3 Operating the car during the warranty period 2.4. Preparing the car for departure
3. Problems along the way
3.0 Malfunctions along the way 3.1. The engine does not start 3.2 Malfunctions of the fuel injection system 3.3 Idle speed has disappeared 3.4. Interruptions in the operation of the 3.5 engine. The car moves jerkily 3.6 The car accelerates poorly 3.7 The engine stalled while driving 3.8. Oil pressure dropped to 3.9. Engine overheating 3.10. The battery does not recharge 3.13. Knocks in the engine 3.16. Wheel puncture
4. Maintenance
4.0 Maintenance 4.1. General provisions 4.2. Inspection work 4.3. Lubrication and filling works 4.4. Diagnostic work 4.5. Repair and adjustment work
5. Engine
5.0 Engine 5.1 Design features 5.2 Possible engine malfunctions, their causes and solutions 5.3 Useful tips 5.4 Checking compression in the cylinders 5.5 Removing and installing the decorative engine casing 5.6 Removing and installing the engine splash guard 5.7 Installing the piston of the first cylinder to the TDC position of the compression stroke 5.8 Replacing the drive belt gas distribution mechanism and tension roller 5.9 Replacing the power unit supports 5.11. Replacing engine seals 5.13. Engine cylinder head 5.15. Engine repair 5.16. Lubrication system 5.17. Cooling system 5.18. Power supply system 5.19. Design Features
6. Transmission
6.0 Transmission 6.1. Clutch 6.2. Gearbox 6.3. Front wheel drives
7. Chassis
7.0 Chassis 7.1. Front suspension 7.2. Rear suspension
8. Steering
8.0 Steering 8.1 Design features 8.2 Possible steering malfunctions, their causes and solutions 8.3. Steering column 8.4. Steering linkage 8.5. Steering gear
9. Brake system
9.0 Brake system 9.1 Design features 9.2 Possible malfunctions of the brake system, their causes and solutions 9.3 Bleeding the brake system hydraulic drive 9.4 Removing and installing the vacuum brake booster 9.5 Replacing the brake pedal axle bushings 9.6. Main brake cylinder 9.7. Front wheel brakes 9.8. Braking mechanisms of the rear wheels 9.9. Pressure regulator 9.10. Brake hoses and tubes 9.11. Parking brake
10. Electrical equipment
10.0 Electrical equipment 10.1 Design features 10.2. Battery 10.3. Mounting block (relays and fuses) 10.4. Generator 10.5. Starter 10.6. Ignition switch (lock) 10.7. Electronic engine control system (ECM) 10.8. Ignition system 10.9. Lighting, light and sound signaling 10.10. Windshield cleaner 10.11. Washer reservoir 10.12. Electric fan of the engine cooling system 10.13. Electric motor of the heating and ventilation system fan 10.15. Cigarette lighter 10.16. Instrument cluster 10.18. Electronic anti-theft remote control system 10.19. Immobilizer 10.21. Replacing sensors and switches
11. Body
11.0 Body 11.1 Design features 11.2 Possible body malfunctions, their causes and solutions 11.3 Removing and installing windshield frame lining 11.4 Removing and installing soundproofing upholstery in the engine compartment 11.5. Removing and installing bumpers 11.6 Removing and installing the fender liner and protective wing cover 11.7 Removing and installing the front fender 11.8 Removing and installing decorative sill trims 11.9. Hood 11.10. Trunk lid 11.11. Doors 11.12. Seats 11.13. Seat belts 11.14. Rear view mirrors 11.15. Interior fittings 11.16. Instrument panel 11.17. Heater 11.20. Body care
12. Applications
12.0 Appendix 12.1 Appendix 1. Tightening torques of threaded connections, Nm 12.2 Appendix 2. Fuels, lubricants and operating fluids 12.3 Appendix 3. Nominal filling volumes 12.4 Appendix 4. Basic data for adjustments and monitoring 12.5 Appendix 5. Spark plugs used on vehicles 12.6 Appendix 6. Lamps used on a car 12.7 Appendix 7. What you need to have in a car 12.8 Appendix 8. Tools used when repairing a car
13. Electrical diagrams
13.0 Electrical Diagrams 13.1 Diagram 1. Instrument Panel Harness Connections 13.2 Diagram 2. Vehicle Front Wire Harness Connections 13.3 Diagram 3. Engine Electronic Control System (ECM) Harness Connections 13.4 Diagram 4. Vehicle Rear Wire Harness Connections 13.5 Diagram 5. Light Harness Connections license plate light 13.6 Diagram 6. Left front door wiring harness connections 13.7 Diagram 7. Right front door wiring harness connections 13.8 Diagram 8. Rear door wiring harness connections
Fuel pressure regulator: diagnostics, repair, replacement
Modern cars are equipped with electronic fuel pumps; mechanical ones are found only in cars manufactured before 2000. The task of this component is to ensure an uninterrupted supply of fuel. Everything functions well at high engine speeds, but problems arise when moving to low and idle speeds. Increased pressure damages fuel supply hoses and other system components. The fuel pressure regulator protects against such consequences. If there are malfunctions in it, this can be determined by several signs.
Design and operating principle
The regulator (RTD) consists of a housing, a valve, a diaphragm and a spring, which are located on the fuel rail, in the fuel return hose of the power supply system, or directly in the tank (if the car does not have a recirculation system). The purpose of the product is to send excess fuel back to the tank. When the engine speed increases, the resulting vacuum opens the valve slightly, and the excess returns to the tank.
Location of the fuel pressure regulator in the fuel supply system
Video about RTD
I’m driving quietly, enjoying myself, my favorite music is playing, suddenly I feel the car twitching, then everything is fine, it drives, the check engine light doesn’t come on, I thought it was a glitch and the road is not smooth) I drive into the yard, it stalls, I start it, it works, then it stalls again. I thought the pump had failed, checked it, it was working, but when I turned it on I could hear gasoline flowing into the tank through the return line, everything was clear) it was the fuel pressure regulator. Some people have it under the hood on the fuel rail and look like this
Signs and Symptoms of a Malfunctioning Fuel Pressure Regulator
- the engine stalls at idle;
- engine power is greatly reduced;
- when accelerating, it is not possible to achieve normal dynamics;
- the car reacts poorly to pressing the gas pedal;
- fuel consumption suddenly increases greatly;
- the amount of carbon dioxide emissions increases;
- the crankshaft rotation speed changes.
All these problems arise due to the fact that the regulator becomes clogged or completely clogged over time. Another common cause of failure is weakening of the spring, leading to a strong decrease in pressure. In the absence of normal pressure, fuel supply decreases, power decreases and controllability deteriorates. Such problems are especially common on Ladas - Kalina and Priora, as well as on cars of the 2110, 2112, 2114, 2115 series.
To check the part, you need to carefully inspect it itself, the vacuum hose and all connections. Any leaks found must be corrected. It is also recommended to check the membrane. Disconnect the tube that goes from the RTD to the receiver and shake it. If no gasoline comes out from inside and there is no strong odor, then the membrane is in order.
RTD in diesel engines
Diesel vehicles running on the Common Rail system are also equipped with a pressure regulator. It fits into the fuel rail or is located on the high pressure fuel pump housing. The principle of operation is approximately the same. A special valve diverts unused fuel into the return line, preventing excessive loading.
Measuring the fuel pressure of the Lada Priora engine
An indicator of the health of the engine power system is the fuel pressure in the fuel rail.
If the fuel pressure is insufficient, the following may occur:
– unstable engine operation;
– stopping the engine at idle speed;
– reduced crankshaft rotation speed at idle;
– insufficient acceleration of the car (the engine does not develop full power);
– failures in engine operation when the vehicle is moving.
To begin with, we recommend checking the reliability of the electrical contacts in the ECM wiring harness blocks responsible for the fuel supply (fuel pump module, injectors, fuel relay and corresponding fuses).
The fuel pressure in the power system is checked using a professional pressure gauge and a hose with an original fitting for connection to the valve located on the fuel rail.
Turn on the ignition and listen: within a few seconds you should hear the sound of the electric fuel pump. If you can't hear it, check the electric fuel pump power supply circuit.
If you turn on the ignition three times without attempting to start the engine, the electric fuel pump will not turn on again, which is not a sign of a malfunction. It will turn on simultaneously with the starter starting the engine.
Reduce the pressure in the supply system.
If it is not possible to use a professional pressure gauge, use a regular pressure gauge with a hose and clamp. The pressure gauge must have a measurement scale of no more than 1000 kPa (10 kgf/cm2) and a division value of no more than 20 kPa (0.2 kgf/cm2).
Pay attention to the reliable connection (rolling) of the pressure gauge and hose.
Unscrew the protective cap of the fitting for monitoring the fuel pressure at the end of the fuel rail.
Please note that the cap has an O-ring.
If the ring is torn or has lost elasticity, replace it or the entire cap.
Using a metal tire valve protective cap, remove the valve spool (the same as in the tire)
When turning the spool valve out, a small amount of fuel may leak out, so first place a rag under the fitting.
And remove the spool from the fitting
Connect a hose with a pressure gauge to the fitting.
Secure the hose to the fitting with a clamp and check the reliability of its fastening
Start the engine and check the pressure using the pressure gauge. It should be 380–400 kPa (3.8–4.0 kgf/cm2).
The following reasons for decreased pressure are possible:
– the fuel pressure regulator is faulty;
– the fine fuel filter or fuel inlet filter is clogged;
– the electric fuel pump is faulty.
Stop the engine and reduce the pressure in the power system.
Disconnect the pressure gauge from the pressure control fitting, screw the spool valve into the fitting and install the protective cap on the fitting.
How to check on VAZ and foreign cars
To determine a breakdown, the following procedures are performed:
- The fitting plug is unscrewed - the element that controls the fuel pressure.
- The O-ring is inspected - if it is damaged, this component must be replaced.
- The spool is removed from the fitting.
- The engine starts, the pressure in the regulator is measured with a pressure gauge.
- The information received is compared with that specified by the manufacturer.
You can check the performance of the RTD yourself, even without tools. To do this, just pinch or disconnect the valve and study the intensity of the stream. A pressure gauge will give a more accurate result. It should be connected between the fitting and the fuel hose, having first disconnected the vacuum hose. The measurement is taken at idle speed. The information obtained depends on the car model - for example, in a VAZ 2110, the pressure indicator should start at 0.3 and gradually increase to 0.7 Bar.
Fuel pressure regulator with connected pressure gauge
Has your blood pressure changed? You may have connected the pressure gauge incorrectly. Check the connection. If everything is correct, it means the regulator has become unusable.
Where is the fuel pressure regulator located and how does it work (video)
Checking the RTD
In the old days, when driving exclusively in VAZs and GAZs, folk craftsmen came up with a universal “kneeling” method for self-checking that did not require any equipment.
Elementary actions:
the bypass valve was turned off/clamped and the outgoing stream was visually observed.
With the spread of injectors and carburetors becoming a thing of the past, the method became ineffective. (see “Differences between an injector and a carburetor”) Nowadays you will need a pressure gauge to check. However, a tire one, which almost every car owner has, is quite suitable.
The vacuum hose is removed, a pressure gauge is connected between the fuel hose and the fitting, the engine starts and idles. During the measurement, the pressure in the fuel system should rise from 0.3 bar to 0.7.
If this does not happen, the vacuum hose is changed and the measurements are repeated. This “knight’s move” did not help either - the problem is definitely in the fuel pressure regulator. It cannot be repaired, so we go to the spare parts store for a new one.
What are the consequences of malfunctions in the operation of RDTs?
Over time, the engine starts more and more poorly. Fuel begins to come out of the cracks, which leads to a strong increase in its consumption. When the pressure changes unevenly, the dynamics of movement are disrupted, surges occur, and the car jerks during acceleration.
Is it possible to repair a failed part? In most cases, no, you have to completely change it. Repair units are almost always non-separable. Some experts suggest repairing the component, but this is dangerous. It is better to buy a new regulator - fortunately, it is inexpensive.
Determining violations in the operation of RTDs is not a very difficult task, which can be handled independently. Remember that this part of the machine needs to be checked periodically. By detecting the problem in time, you will protect important car components from rapid wear.
Signs of a malfunctioning fuel pressure regulator
Every engine fuel system contains a fuel pump. Electric fuel pumps have recently been installed in gasoline engines; mechanical models are already outdated and are no longer used on modern vehicles. Mechanical fuel pumps live out their days on cars produced in the last century.
The performance of the electric fuel pump must be such as to ensure uninterrupted fuel supply at any engine speed and under any load. But what to do when the engine is running at idle or low speed, and a small portion of fuel is required? After all, the pressure that is created in the engine power system for heavy loads will be excessive at idle speed. And excess pressure can lead to disastrous results - breakage of fuel hoses or other damage. For normal operation of the fuel system, there is a fuel pressure regulator.
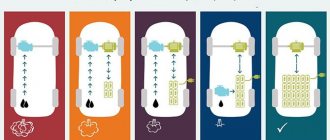
Controller operation in different modes
Operating principle of RTD
If we take a simplified look at the operating principle, it is quite simple. The pump pumps fuel into the ramp, from which it also enters the fuel chamber of the regulator. As soon as the pressure force exceeds the spring stiffness, the membrane begins to move towards the vacuum cavity, dragging the valve with it. As a result, the drain channel opens and part of the gasoline flows into the tank, while the pressure in the ramp drops. Because of this, the spring returns the valve with the membrane to its place, and the return channel closes.
But as already mentioned, the RTD adapts to the operating mode of the motor. And it does this due to the vacuum in the intake manifold. The greater this vacuum, the stronger its effect on the membrane. Essentially, the vacuum created creates an opposing force against the spring.
In reality, everything looks like this: to operate the engine at idle speed, an increase in the amount of fuel is not necessary, and therefore no increased pressure is required.
In this operating mode, the throttle valve is closed, so there is not enough air in the intake manifold and a vacuum is created. And since the vacuum chamber is connected to the manifold by a pipe, a vacuum is created in it. Under the influence of vacuum, the membrane presses on the spring, so less gasoline pressure is needed to open the valve.
Under load, when the throttle valve is open, there is practically no vacuum, which is why the membrane does not participate in creating force on the spring, so more pressure is required. Thus, this element functions in the power system depending on the operating mode of the motor.
What is a fuel pressure regulator?
The fuel pressure regulator (FPR) is a vacuum valve that transfers excess fuel through a return hose into the fuel tank. The RTD is a housing that contains a valve, a membrane and a spring. There are also three terminals in the housing: two terminals for the passage of fuel through the regulator, the third is connected to the intake manifold. As engine speed increases, the vacuum created in the manifold (at the third terminal) overcomes the force of the spring and moves the membrane, thereby opening the valve slightly. Excess fuel gets access to the second outlet and goes back to the gas tank. An RTD is often also called a check valve.
As a rule, the check valve is located on the fuel rail; it can also be embedded in the fuel return hose of the power supply system.
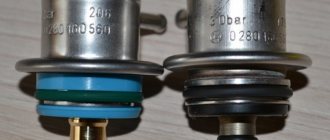
The best fuel pressure regulator VAZ 2110-12
Incorrect operation of a car engine may be due to problems with the fuel system. One of its components is the fuel pressure regulator (FPR). On the market you can buy RTD marked SPORT. What does this mean and which RTD is better to choose? The fuel pressure regulator is a diaphragm safety valve. On the one hand, the regulator diaphragm is affected by fuel pressure, and on the other, by the pressure of the regulator spring and the vacuum in the intake manifold. Depending on the engine, the RTD is installed:
- For 1.5l - placed on the ramp (3 atm)
- For 1.6l - placed in the fuel pump block (4 atm)
These RTDs are not interchangeable and also differ depending on the number of valves in the internal combustion engine. Why is an RTD needed? Its function is to maintain a constant pressure drop across the injectors. The RTD compensates for changes in engine load by increasing fuel pressure as the pressure in the intake manifold increases (as the throttle opening increases). When the pressure in the intake manifold decreases (the throttle opening decreases), the regulator reduces the fuel pressure. At the same time, the regulator valve opens and excess fuel is drained through the drain line back into the fuel tank. If the RTD is faulty, then the reduced fuel pressure leads to problems (impaired engine operation). How to diagnose the fuel system and determine the malfunction has already been described (instructions). Instead of the standard RDT-300, they propose installing an RDT-380 or even 400 kPa. Such sports RTDs increase the performance of injectors in all engine operating modes and are necessary when increasing the volume and power of the internal combustion engine. That is, the advantage of the Sport RTD is that it is able to increase the performance of injectors that “do not pump out” at normal pressure. Allows you to leave less productive injectors where their performance is no longer sufficient with a standard regulator (cleaning injectors yourself). The price of a standard RTD is about 500 rubles, and a tuning one will cost 2-3 times more. You can replace the RTD with a VAZ 2110 according to these instructions. The engine power supply diagram may be useful. So, let’s vote and leave reviews about the VAZ 2110 RTD:
- What regulator did you install?
- How long did the old pressure regulator last?
- Other impressions and comments..
ps All off-topic comments will be deleted.
xn--2111-43da1a8c.xn--p1ai
Causes of fuel pressure regulator malfunctions
RDT may fail for several reasons. For example, defective parts are found on Russian-made cars. There are significantly fewer defects on foreign models, but you can purchase a defective RTD by purchasing a non-original spare part.
Mostly the check valve breaks down due to natural aging. Let's say this can happen after a hundred thousand mileage or more. It should be noted that check valve failures are not common. Most often, in an RTD, the membrane dries out over time, less often the valve jams, and even less often the spring breaks or weakens.
Sensor failure may occur due to low-quality gasoline. For example, in winter, fuel was filled with water, and water got into the regulator. If the fuel filter is not replaced on time, dirt gets into the parts of the power system, including the regulator. In this case, the RTD valve most often jams. It’s hard to imagine what could happen to the spring, but apparently, it still breaks sometimes.
Characteristic symptoms of fuel pressure regulator malfunctions
By what signs can you determine that an RDT is not working:
- the engine is very difficult to start, you need to turn the starter for a long time and at the same time keep the gas pedal pressed in order for the engine to start;
- The engine idles unsteadily or the speed is very low, the engine often stalls. At the same time, it does not gain power at all; when trying to accelerate, it results in a deep failure;
- The spam engine changes speed sharply, this is especially noticeable at idle:
- Fuel is leaking from the fuel hoses. Attempts to tighten and replace clamps and replace hoses do not help.
How to check the fuel pressure regulator for serviceability
The fuel pressure regulator is not an electrical sensor and cannot be checked using instruments. It should also be taken into account that the RDT cannot be disassembled or repaired. Someone writes that the fuel check valve can be repaired. I would like to see what it looks like and where you can buy a repair kit. Typically, RTDs are inexpensive, and even for that reason they would not be worth repairing if they were repairable.
Signs of RTD malfunction
There are a number of signs of vehicle engine operation that can be used to determine that the RTD is out of order. The most common among them are:
- unstable operation of the power unit (it stalls), in which the fuel fluid pressure level is stable and the other systems are working normally;
- there is a decrease in motor sensitivity;
- there are jerks and failures in the operation of the power unit, which is especially noticeable in motion;
- the level of harmfulness (presence of CH and CO) of exhaust gases increases;
- fuel consumption increases;
- There are difficulties starting the engine.
Also, if malfunctions occur in the RTD, there may be an increase in fuel consumption and leaks of working fluid on the system hoses, which cannot be solved by installing new clamps and replacing tubes. If the symptoms of malfunction described above appear, it is useful for each driver to be able to check the fuel pressure regulator.
This is interesting: Petro-Canada oil: 3 categories and their operational features
Diagnostics of the presented equipment is carried out as follows.
Step 1. Unscrew the plug of the fitting that supplies fuel fluid to the first chamber and inspect the o-ring. In the event that it has lost its integrity or obvious defects are observed, it is necessary to replace it.
Step 2. Remove the spool from the fitting, which is done in the same way as with a similar device in the tire. After this, you need to fix the tire pressure gauge using a special clamp on the latter and measure the pressure while the power unit is operating. After checking the parameters with those specified by the manufacturer, we can draw conclusions about the malfunction of the device. It is worth considering that when you disconnect the vacuum hose, the pressure level should increase slightly. When this does not happen, a complete replacement of the device is inevitable.
Signs of a malfunctioning fuel pressure regulator
The fuel system of a modern car is a complex mechanism consisting of many parts and is one of the main systems. The fuel system contains many moving parts, one of which is the fuel pressure regulator. The flow of gasoline into the combustion chamber requires constant maintenance of a certain pressure, so this operation requires a special unit that is connected to both the combustion chamber (injectors) and the fuel system (via a valve).
However, over time, with constant and long-term operation of this unit, certain problems arise in the form of malfunctions, which can lead to certain problems in operation.
Components
This part consists of several main elements:
- The diaphragm valve is the main part of the regulator and is connected to the fuel supply system and the combustion chamber (injector rail). In most domestic models (such as VAZ 2115, 2110, 2114 and Lada Priora) this unit is presented in a similar configuration, since the fuel supply systems of front-wheel drive vehicles of this family have a similar design. Therefore, the quality of breakdowns for these machines is similar;
- Pipes connected to the valves and combustion chamber on one side and, through other valves, to the fuel line on the other. The device in the VAZ 2107 models is somewhat different due to an older and unreliable design. When using equipment for rear-wheel drive, old components of an outdated design are used (the valve may work unstable when operating in a carburetor engine and the wrong choice of fuel mixture enrichment) so its design is somewhat different, although problems arise.
Failure
The design of this unit is quite simple to operate, but the valve can also fail.
This will entail certain negative consequences and the main signs will be:
- Increased fuel consumption due to partial failure of the element . When the valve unstably performs its functionality, the pressure in the rail and the fuel system drops, there is an excess supply of gasoline to the combustion chambers, which causes significant fuel consumption. This also entails, in addition to increased gasoline consumption, increased wear of the element, which will ultimately lead to complete failure of the part;
- Unstable engine operation at idle speed . If the fuel supply is poor, the engine cannot reach its optimal level of operation, so the idle air regulator operates unstably. If there is insufficient pressure and the fuel pressure regulator fails, its supply either stops or fuel flows freely through the system. This can also cause the engine to start poorly, which requires increasing the load on the starter, also causing wear. This effect manifests itself during mechanical wear of the valve, when the failure of one part of it ensures poor pressure balancing between the fuel and air;
- The crankshaft cannot maintain a constant speed level. This effect is dangerous because this malfunction can involve many elements of the system, and the malfunction of this regulator is an indirect cause of such a breakdown. Unstable operation of the crankshaft not only disorganizes the driver, but also reduces engine life (albeit slightly);
- Deterioration of engine power qualities . If the fuel supply is poor, the engine cannot fully realize its potential when moving, so its performance decreases. This causes a deterioration in the dynamic qualities of the motor and affects its service life;
The video shows signs of a malfunctioning fuel pressure regulator:
Changing the RTD
- Those who are unsure of themselves can drive up to a service station with a new part, but believe me, nothing complicated will be required of you. Take a 24mm wrench and a five-point hexagon and begin the repair work;
- The fitting plug at the end is unscrewed. There is an o-ring there. If it is torn, cracked or stretched, replace the seal or the entire plug;
- The spool is unscrewed from the fitting. It is similar to the tire one, so you will recognize it;
- The vacuum pump is removed from the regulator;
- The nut is twisted - fastening the fuel drain pipe;
- The bolts are removed - 2 pieces - with which the RTD is fixed to the fuel rail;
- The regulator fitting is pulled out of the ramp hole, and the regulator itself is removed from the drain tube. It happens that the sealing ring gets stuck in the ramp. You need to carefully get it out of there; if intact, put it on a new RTD; if torn or cracked, replace it with a new one.
Installation of the purchased spare part is carried out in the reverse order. After finishing the installation, you should start it and listen to the engine to make sure that all problems are solved.
Finally, we note:
You shouldn’t raise the alarm and look for signs of a malfunction in the fuel pressure regulator as soon as the engine sneezes. RTD is a fairly reliable thing and does not “fly” very often. And if this happens, you will quickly understand what’s going on.