Removing a standard window regulator
If you plan to install rear electric windows on the car, you will have to disassemble all the doors. Therefore, at the first stage, remove the trim from all the doors, and then begin disassembling the mechanisms. Having opened access to the cable mechanism and glass fasteners, you can begin dismantling. First, push the glass all the way up and secure it with tape.
After this, unscrew all the fastening bolts that are on the glass carriages. Moreover, you need to unscrew them both on the mechanism and on the glass. After this, you can pull the entire mechanism out of the door and begin installing the electrical one.
Lada 2114 SnowMan › Logbook › Window lifters without ignition
You stop, turn off the engine, take the key out of the ignition, press the power window button to close the window, BUT IT WAS NOT THERE
. When the ignition is turned off, the window switches do not work. Now, in order to close the window, you have to reinsert the key into the ignition...
I think you are all familiar with this situation.
I overcame this “illness” in the first days of using the car, long before I registered to drive. Due to the fact that during the drive I was asked more than once how I did it, I decided to post a detailed report.
And then I started by studying the materiel.
Electrical wiring diagram for VAZ 2114 electric windows
A little theory:
From the diagram it can be seen that the positive power window power wire passes through the K5 window relay and is open (pins 30 and 87). When you turn the ignition key, a plus is applied to the 85th contact of the K5 relay, the relay electromagnet turns on and closes the 30th and 87th contacts, after which a plus appears on the power window buttons.
Conclusion:
In order for the power windows to work without an ignition key, you need to bridge contacts 30 and 87 of relay K5 as in the figure below.
The red line indicates the jumper.
Let's move on to practice:
I will not impose on you any specific method of making a jumper; I will describe only the most common ones; you can choose any of these methods that seems most simple and convenient to you.
Method No. 2
Here I will describe another method of making a jumper. We will need: - 6.4mm MALE detachable terminal - 2 pcs - 5cm of wire We strip 5-7mm of insulation from each edge of the wire. Using a crimper, we crimp the connector terminals at the ends of the wire.
This is what should happen
We insert the resulting jumper instead of the K5 power window relay in the mounting block (the jumper is inserted between contacts 30 and 87).
Method No. 3
In this version, the role of the jumper will be performed by the K5 window relay itself with minor modifications. We take out the K5 relay from the mounting block, turning the relay over we will see the markings of its contacts. We take a piece of wire without insulation and wind it around relay contacts 30 and 87 (see figure below). We return relay K5 to its place in the mounting block.
Wire marked in red
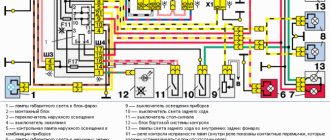
Electric windows of the front doors of VAZ 2115, VAZ 2114 (connection diagram): 1 – mounting block; 2 – power window switch for the right front door; 3 – gear motor for the electric window of the right front door; 4 – motor reducer for the electric window lifter of the left front door; 5 – power window switch for the left front door; 6 – ignition switch; K5 – relay for turning on electric windows; A - to power supplies; B - to the external lighting switch
Many cars produced recently are equipped with electric windows. Often, power windows are installed only on the front doors. But previously, VAZ 2114 and VAZ 2115 cars were not equipped with electric windows at all. Such cars were equipped with conventional mechanical
lifts for both front and rear windows.
In the window lift mechanism, instead of a gear reducer used in mechanical window lifters, there is only a drum into the hole of which the output shaft of the gear motor is inserted. The gear motor consists of a worm gearbox and a DC electric motor with excitation from permanent magnets. Its design is similar to that of the windshield wiper gearmotor. The gearmotor is reversible, the direction of rotation of the output shaft depends on the direction of the current in the armature winding. To protect against overloads, it has a built-in thermobimetallic fuse.
Above is a diagram for switching on electric windows on VAZ 2114 and VAZ 2115 cars. Gearmotors 3 and 4 are switched on by switches 2 and 5 located on the armrest handles. The supply voltage is supplied to the switches when the ignition is turned on through fuse F6 and the power window relay K5, located in mounting block 1. If the power windows do not work, then it is necessary to remove the door trim and check whether voltage is supplied to the gearmotors, check the fuse and the power window relay, and restore broken connections in the wires, replace the faulty gearmotor with a new one.
Add a comment to the article
Excellent service
The price of services also depends on the type of power window. Their range is quite wide, but if you find it difficult to choose, count on the support of specialists. Do you want the installation of electric windows not to result in a number of unpleasant consequences? Entrust the work to us! We know all the technological nuances of the process, so errors are practically eliminated.
We also service power windows in operation. We promptly repair electrical and mechanical components, circuits and other elements. Call us, describe the problem, and we will fix it.
The cost of the service starts from 3000 rubles.
Our auto industry rarely installs electric windows on cars such as, for example, the VAZ 2109. However, during the serial production of the Nine, electric windows were not used at all on domestic cars. Nowadays, the opposite is true, the mechanical handle is becoming a thing of history, because now it has even become possible to install electric lifts with your own hands. For this, many thanks to the domestic industry, which produces electric lifts for cars that were not originally equipped with them. Further discussion will focus on the installation of window regulators of this type.
Electric lifts come in several types:
- cable - the weakest, slowest and cheapest. If the motor burns out on them, you can easily replace it;
- rack and pinion – rather weak and requiring regular lubrication during operation;
- articulated-lever - fast, quiet and quite powerful (for example, frozen glass is not a problem for them).
Power window
The vehicle configuration with electric windows contains additional bundles of wires that make up the VAZ-2114 window lift circuit. In addition, there is a control button on the front passenger door trim. On the driver's door there is a block of buttons that control all windows that have an electrical connection for the VAZ-2114 power windows.
The scheme has the following elements:
- Mounting block.
- Front passenger door ESP button.
- Front passenger door lift motor.
- Driver's door ESP electric motor.
- Driver's door switch button.
- Egnition lock.
The letter “A” in the diagram indicates the wires going to the power supply of the circuit, and the letter “B” indicates the wires going to the side lights.
Electric drive installation
Each set of electric windows comes with instructions that indicate the installation diagram of all drive elements, as well as a circuit diagram. It allows you to see how to connect electric windows to the vehicle's on-board network. The same instructions, which describe installing the drive on the “seven”, indicate how the holes in which the rack is attached are located relative to each other. Measure the distance using a ruler and caliper, mark the location of the holes using a marker.
Make a hole with a 5.5 mm drill inserted into a screwdriver or drill. The power window mechanism is installed through the right hole in the door. Next, align the holes in the rail with those you made in the door. All that remains is to secure the rail with 10mm bolts, which should be included in the installation kit.
Electric drives
Drives with electric motors are much more advanced. But they were installed on “classic” VAZ cars exclusively by car owners - this option was not provided at the factory. The main thing (according to those who have been producing these cars for almost 30 years) is wheels on an iron body and some kind of motor, as long as it drives this entire structure.
If you take a closer look, you will see that the designers did not bother themselves with comfort; they only thought about how to save on production. And in the car circuit there was no provision for connecting power windows. Therefore, you have to install all the wiring yourself.
But many car owners took on the responsibility of the factory and began installing power windows themselves. Most often, the choice falls on hinged lever mechanisms, which have several advantages:
- Quite low cost of the kit.
- Electric windows are easy to install.
- There is no need to look for components - everything needed for installation is already available, including wires and buttons.
- The devices are highly reliable, work quickly and do not make noise (the latter advantage is more relevant for modern Vesta than for the “seven”).
Electrical work
Remember that using a power window fuse can protect all important components from short circuits.
The electrical setup procedure looks something like this:
- The electric motor must be supplied with voltage directly from the battery. In this case, the rotor should rotate and the entire mechanism should rise up. And you need to wait for the moment when the holes in the fasteners of the mechanism are aligned with those located on the glass carriages. Only after this can the glass be fixed.
- If there is no wiring (the installation of ESP is not provided for by the manufacturer), then it must be laid through the technological holes that are located in the door and body. You need to run wires to the instrument panel.
- You can place the control buttons in any convenient place, but it is best to place them in the door handle. But on domestic cars they are more often installed in the cigarette lighter area or near the handbrake.
- All moving parts of the electric drive must be lubricated - a CV joint type compound is suitable.
- Apply voltage to the entire system through the power window fuse and check operation.
- If there are no faults, you can install the casing and recheck.
The article shows a wiring diagram for the power window button. It is recommended to switch all power circuits using relays to maintain the integrity of the buttons.
Featured Posts
To remove the old window mechanism, you must first remove the windows. It is necessary to disassemble the window regulator, remove the button and clean the contacts if they are oxidized. Pin 3 is the ground on the driver's side and the positive wire on the passenger's side. In addition, the power windows must operate when the ignition switch is on.
First, the old windows need to be removed. After this, the casing is completely removed.
First, remove the handle from the standard window regulator; you need to remove the lock washer from under it.
Use only a small amount of lubricant at a time, working in a window between applications to ensure good penetration. If the wiring is not provided for the installation of ESP by the manufacturer, then it must be laid through the technological holes that are located in the door and body.
Therefore, at the first stage, remove the trim from all the doors, and then begin disassembling the mechanisms. In this case, disassemble the window regulator, remove the button and clean the contacts if they are oxidized.
See you on the pages of the site. Pay attention to the wiring diagram for the power window button; check it several times to avoid mistakes.
American statistics record literally dozens of accidents related to a simple situation: a baby left in a stationary car stuck its head out the window, and with some paw - front or back - accidentally pressed the window-raising button located on the armrest. Do-it-yourself Electric Window Lifter (ESP), diagram and what you need
Power rack-and-pinion windows
Rack and pinion window lifters are considered one of the most “long-lasting” compared to others. Rack-type ESPs operate on the principle of transmitting rotational motion from an electric motor to gears, with its subsequent transformation into linear movement of racks that perform lifting. In addition to reliability, window lifts of this type lift windows much faster and quieter than cable counterparts.
But, like everything in this world, rack and pinion windows are not perfect and have their drawbacks. The main disadvantage is that the gears need lubrication; without it, they very soon begin to wear out, and the power windows themselves cease to function normally. The second drawback especially concerns those devices whose manufacturers decided to “save” on metal parts and gave preference to plastic. The fact is that this material is fragile and is noticeably inferior in strength to aluminum, as a result of which the service life of such ESPs is reduced. Among other things, the rack and pinion mechanism is more bulky, so they are installed mainly in “large” car doors.
Cable-type electric windows
The main advantage of cable window lifters is their high maintainability. In the event of a malfunction, you can easily repair the mechanism, and spare parts can be found in almost any auto store
This advantage, at first glance, is insignificant, but as practice shows, most motorists choose this type of ESP without paying attention to the disadvantages of the cable mechanism. The fact is that the cable wears out or stretches over time; in addition, due to the low strength of the plastic guides, they often fail, and the electric motor is very prone to overheating
Lever type electric windows
Lever-type ESP successfully combines compact dimensions and a high degree of reliability. In such power windows, the motor turns a gear, which transmits rotation to one or more levers. In turn, the levers move the plate on which the glass is mounted. The main disadvantage of this mechanism is the uneven speed of glass movement; the higher it is, the slower the lifting will occur.
As for glass, regardless of the type of mechanism, it moves along guide channels or special rails.
Impulse and non-impulse windows?
In addition to the type of lifting mechanism, ESPs are divided into pulsed and non-pulse. The former are capable of operating in pulsed as well as normal mode. By “normal” we mean that the power window operates only when you directly press and hold your finger on the control key. The term “pulse” means a short touch, after which the glass itself will completely lower or rise.
Pulse power windows are most often equipped with five-position control keys; the lever is set in neutral mode, from which there are two speeds of lifting up and down. By moving the slider up one position, the window lifter will operate in “normal” mode, and the glass will rise exactly as long as you hold your hand on the key. The second position will allow you to fully raise or completely lower the window.
Apr 14, 2015
Removing a standard window regulator
If you plan to install rear electric windows on the car, you will have to disassemble all the doors. Therefore, at the first stage, remove the trim from all the doors, and then begin disassembling the mechanisms. Having opened access to the cable mechanism and glass fasteners, you can begin dismantling. First, push the glass all the way up and secure it with tape.
After this, unscrew all the fastening bolts that are on the glass carriages. Moreover, you need to unscrew them both on the mechanism and on the glass. After this, you can pull the entire mechanism out of the door and begin installing the electrical one.
Types of window lifters
Additionally, you need to take two more wires with which to connect the button to the power window motor. Duplicate buttons must also be supplemented with two 5-pin relays; they are not on the diagram.
Black from gray - to hole number 6. Since everyone’s door closers may be different, the connection diagram may differ accordingly. There may be situations where everything is fine electrically, but the power window switch still does not work.
You will need one pair for one door. The backlight is powered by one of the standard buttons. Electrical work Remember that using a power window fuse can protect all important components from short circuits.
The next reason is wear of the plastic teeth of the mechanism drive. Once you have made the repair, test the window again to see if you have resolved the problem. They can handle them easily, while cable lifts experience significant stress on both the mechanism and the electrics.
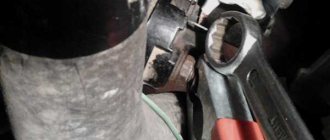
Removing a standard power window If you plan to install rear power windows on your car, you will have to disassemble all the doors. Save to Album There is only one output wire from the closer to the engine - this is GREEN - and you cannot install a relay here since you need to determine the engine noise. In any case, you should not take a wire cross-section less than 1.5; more is better. If the engine is faulty and you cannot service it successfully, replacement is the only answer.
In addition, if you plan to replace it with an electric lift, then you need to dismantle the opening limiter, since a bundle of wires will need to be inserted into the door. There are 8 clips installed around the entire perimeter of the door. Next, check the output side of the relay - current means the relay is bad and needs to be replaced, otherwise the problem is with the control switches, wiring, or the motor itself. All that remains is to install the glass, as well as the button for the window lifting mechanism, securing them with sealant in a specially made connector in the door trim.
Set of socket wrenches or sockets. Addition from It is possible to connect any number of duplicate buttons.
I also stuffed it into the same box as the parking brake. Front passenger door lift motor. Automotive relay. How does it work? What is it for? How to connect?
Standard windows
On domestic cars of the “classic” family, only manual power windows were installed. For example, the first “sevens” had rack and pinion ones, and the “nines” and “kopecks” had cable ones. Why were such mechanisms installed? It’s just that domestic designers tried to reduce the cost of the car, so for the sake of economy, devices with plastic gears were installed. And they fail quite quickly.
In the early 90s, the designers who developed the “sevens” realized their mistake and began installing cable-operated windows on the cars, but the drive was still manual. The peculiarity of such structures is that they are repairable. If in rack-and-pinion gears when a plastic gear breaks, the entire mechanism needs to be replaced (and it is very difficult to find it on sale), then if the cable system malfunctions, it is more than possible to carry out repairs.
The principle of operation of all mechanisms (both cable and rack and pinion) is the same - the system on which the glass is attached rotates with a handle. Depending on the type of window lifter, either the gear moves along a toothed vertical rack, or the cable is tensioned.
Installation of glass closers
Technological progress has allowed people to minimize their labor through the use of all kinds of equipment capable of performing the same type of operations. So why not automate the process of opening and closing the windows in your car?
If decades ago ordinary electric windows were the ultimate dream for many, today without closers they are no longer fully perceived. A person getting out of a car in a hurry may forget to roll up the windows. The closers are guaranteed to do it for him. All you have to do is remember to arm the car...
| type of instalation | Price, rub.) |
| installation of universal window lifters | from 2500 |
| installation of power windows | from 2500 |
| installation of glass closer 2 tbsp. | 1500 |
| installation of glass closer 4 tbsp. | 2500 |
| installation of glass closer 2 tbsp. with a gun | 2500 |
Our specialists professionally install glass closers and guarantee an impeccable result of their work. Depending on your own needs, you can order installation of this equipment on two or four doors.
Contact us and get high-quality services for installing window lifters and automatic glass finishing systems for minimal money!
Adviсe
Let's give some advice.
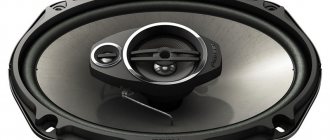
In addition to calculating the load on the equipment in a specific connection, it is important to correctly select the wires that match the resistance in the circuit. Preference can be given to acoustic wires, which give the purest sound at the output, or to ordinary wires with R not lower than 4 ohms. To avoid damage and short circuit, the polarity of the contacts + to - should be strictly observed. When you turn on the radio for the first time to check, the volume should be minimal
If the sound is distorted, the equipment should be turned off immediately. This effect occurs when the polarity of the connections is not observed, which will have to be corrected.
Video of replacing the vacuum brake booster of a VAZ 2110
Backup video on how to replace the vacuum brake booster of a VAZ 2110:
Welcome! Vacuum brake booster - designed to make the brake pedal much easier to press, it only works when the engine is running, but when the engine is turned off, the vacuum booster will not work, all this is due to the fact that when the engine starts, the air filter housing begins to suck in air from the environment and it enters the intake manifold, air is taken from the manifold a little and goes into the vacuum chamber and therefore it starts to work only when the engine starts.
Note! To replace the brake booster, you will need: A set of all kinds of wrenches, as well as a couple of screwdrivers, and also for this task, a socket head and a wrench will be very convenient!
Where is the vacuum brake booster located? It is screwed to the car body with four nuts, or rather not the itself, but its bracket, the vacuum booster itself is secured to this bracket with two nuts, but they are easiest to remove as an assembly, i.e. unscrew the four nuts that secure the bracket to the body and then remove them, and when the vacuum booster with the bracket is in your hands, you will need to unscrew the two nuts and separate them from each other, but we will talk about this later in this article, a little lower .
When do you need to change the vacuum brake booster? If the brake booster fails, a hiss may appear when you press the brake pedal, and the speed may also go up and then down, in addition, the brake pedal will become difficult to press (This is equivalent to the fact that the car is turned off) basically this is there are all the symptoms that indicate that the vacuum booster has failed, it does not always happen that they all appear together in the car, but a couple of them will still appear when the vacuum booster becomes unusable (the main ones most likely, namely, tight brake pedal and floating speed).
Note! By the way, the vacuum booster can be checked for serviceability as follows: With the engine off, press the brake pedal 5 times and when the last press is made, hold the pedal to the floor, immediately after which start the car, if the pedal falls a little, this will indicate that that the vacuum booster is fully operational!
Installation of electric windows on a VAZ 2106
The main goal pursued when installing electric windows is comfortable control of the door windows. In addition, you do not need to be distracted from the road by turning the handles. Electric windows, which are currently produced for classic Zhiguli cars, are characterized by fairly high reliability, the possibility of self-installation and ease of control from a button. In addition, the mechanism can work in conjunction with the security system, allowing you to automatically close the windows when the car is armed.
Which ones to choose
Power windows can be installed in several ways:
- With the installation of an electric motor without any major modifications. This method is simpler and less expensive. However, there is a possibility of motor failure due to overheating.
- With installation of a separate kit. Despite the higher cost of such equipment, it is still justified by the reliability of the system during operation.
The most popular electric window lifters for the VAZ 2106 and other “classics” are rack-and-pinion mechanisms such as “FORWARD”. One of the main elements of the unit is the rack along which the gearmotor with gear moves. The latter are mounted on a metal carriage, to which the glass is fixed, and as a result of the rotation of the electric motor, the entire mechanism is set in motion. The set of the device in question consists of the following list:
- installation instructions;
- two electric windows;
- wiring harness;
- two switches;
- decorative plugs for holes.
Electric window kit contains everything needed for installation
How to install
To install the mechanism in question, in addition to the set of equipment itself, you will need:
- a set of keys;
- flat and Phillips screwdrivers;
- wires;
- circuit breakers;
- fastening elements.
Many car owners power their window lift motors from the cigarette lighter, which is simply convenient. If for some reason this option does not suit you, the wire will have to be routed under the hood to the battery. The device control buttons are also installed at the discretion of the owner: installation is possible either on the door, for example, in the armrest, or in the area of the gear shift knob or other convenient place.
We install electric windows on the “six” as follows:
- Remove the negative terminal from the battery.
- We lift the glass and secure it with tape, which will prevent it from falling when removing the old mechanism.
- We dismantle the mechanical device.
- We attach the adapter plate to the power window at a downward angle so that the glass lowers completely.
- According to the instructions, we mark and drill holes on the door for mounting the gearmotor.
- We fix the mechanism to the door.
- We lower the glass and attach it to the plate through the corresponding holes.
- We temporarily connect power to the electric motor and try to raise/lower the window. If everything works, install the buttons in the selected places, lay and connect the wires to them, as well as to the cigarette lighter.
- We install the trim, and then the plug, closing the hole under the handle of the mechanical window lifter.
Video: installation of electric windows on the “six”
Initially, mechanical windows were installed on the VAZ “Six”. Today, many owners of these cars replace them with electrical devices, which not only increases the level of comfort, but also avoids periodic repairs or replacement of the manual mechanism. Malfunctions that arise with mechanical window lifters can be eliminated by almost every Zhiguli owner, as well as installing a structure with a gearmotor. To do this, a standard garage set of tools and familiarization with the step-by-step instructions will be enough.
Installation of electric windows on a VAZ
The procedure is performed in the following sequence:
- temporarily remove the glass seal located on the inside of the door;
- remove the glass, and then dismantle the window regulator fastening mechanism;
- we install devices that will operate from an electric drive;
- connect the negative terminal to the battery and check the operation of the new window regulator;
- We install the glass in place and trim the door.
Unlike conventional mechanical devices, power windows are not equipped with traditional gear reducers, but with a special drum. The shaft of a DC electric motor is inserted into its hole located in the center. In this case, the motor is only a component of the gearmotor, on which, as we found out earlier, the speed and quality of raising and lowering the windows depends.
Installation of the lifting device is quite simple. It starts with disconnecting the battery. After this, use a curved screwdriver to unscrew 3 screws, unfasten the door trim latches and remove the door pocket. Using a thin screwdriver, pry off the handle (latch) of the window lifter - the tip of the tool is inserted into the recess between the latch and the socket.
The handle itself is removed. At the next stage, the car door opening handle is dismantled. To do this, use a screwdriver to pry the handle cover and remove it. Now use a screwdriver to remove the 2 fastening screws that were hidden by the cover plate. After this, the handle can be removed without much difficulty. Using a screwdriver, you can also remove the power window button, which serves to lock the door.
After removing 6 pistons, the trim covering the car mirror adjustment mechanism is also removed. As a result, it remains easy to dismantle the door trim. Armed with a 10mm wrench, unscrew the 2 bolts that hold the auto glass clips. Next, 2 nuts securing the lifting mechanism, nuts of the upper and lower fastenings, and 3 nuts securing the lifting mechanism are unscrewed in sequence.
Upon completion of the described stage, it is time to remove the lower guide pin of the lifting device from the door panel. To facilitate and simplify such an operation, the upper pin of the guide must be bent using a screwdriver. Now the entire lifting mechanism can be safely removed through the resulting opening in the door frame.
When you need to install ESP (electric windows) yourself, then, as always, on the Internet it is difficult to find correct and understandable diagrams for everyone. Having experience in radio electronics, I am laying out for everyone the correct and understandable diagrams for connecting an ESP, an intelligent glass closer Pandora DWM-210 (but it is better to install a Sheriff PWM-200), as well as simple closers only for raising the glass, installed in the wire gap on the positive side of the motor.
The process of installing the ESP is described in detail by me here: www.drive2.ru/l/4651635/
We take ESP power buttons (NOT low-current trigger (multiplex) from Itelm), namely power ones: a block from Granta, and a new model button from Kalina (it’s the power one), since they are the cutest in appearance.
These are, of course, not dual-mode imported buttons, but they will work just as well with an intelligent door closer. We also install the Sheriff PWM-200 type door closer itself. Power buttons are easy to identify by their contacts - they have thick and flat blades, while trigger buttons have thin pins like needles!
We use thick power wires (shown in bold in the diagrams) >= 1 mm2, while control wires can be used thin = 0.5 mm2. Exception! If the buttons are not on the door, but on the center console and thick wires >= 1.5 mm2 are stretched from them to each door, then you can do without a relay, since there is no duplicate button here, and each one has its own door and the drawdowns are minimal. Then you don't have to read further.
Plus +12V must be taken from the fuse block, and not from the ignition, otherwise the automatic window closer will not work when arming. It is better to take the weight from the bolt behind the mounting block, and not in the door, since the contact in the door may not be very good. Although the door contact is also good if the car is not old. Take tinned terminals.
Connection diagram for power window lifter button "AVAR"
Diagrams for connecting the backup button on the driver's door to the main button on the passenger door
When installing two buttons on one window regulator, they are usually installed in series (or in parallel, but then they must be decoupled via a relay).
The main button is the button that controls the power window of the door on which it is installed. The duplicate button is the driver's button, which additionally controls another window regulator from the driver's seat.
Daisy chain connection (for low current trigger buttons)
We connect the output of additional button 1 in the driver's door to input 6, and output 7 to input 3 of the main button on the passenger door.
We cut the wires in the block connecting contacts 5-6 and 6-3. The minus of contact 5 now goes only to the backlight, and contacts 6 and 3 now take output from additional buttons 1 and 7 of the driver's door. Attention!
Installation in parallel will cause short circuit when raising and lowering. Power wires are highlighted in bold.
Parallel connection (for our power buttons)
Since with a serial connection you still can’t do without a relay, it is better to make a button duplication circuit in parallel, decoupling the main button from the backup button through two 5-pin relays: the wires from the main button next to the driver’s ESP motor go directly to the 88th contact of the relay and from pin 30 directly to the engine, and long wires from the backup button go to pin 85 of the relay winding, and the relay feeds a powerful plus to the passenger’s ESP engine.
A parallel connection for power buttons is preferable, since there is no need for a relay on the main (passenger) button (the wires here are short), and we thereby eliminate unnecessary clicking of the relay when the main button on the passenger door operates. For non-power low-current (trigger) buttons, in this case you will definitely have to use 2 more extra relays to relieve the load on the passenger button (therefore, a serial connection is always used for trigger buttons). Further, everywhere in my circuits a parallel connection is used, since all the buttons are power
.
Programming and adjustment: features
After the unit is installed, you need to program the power windows. The unit registered in the ECU memory will work more efficiently. Training window regulators depends on the vehicle they are installed on, so there is no universal instruction for this process.
Let's look at an example of how to register an electronic signature using the example of a Ford Focus car:
- First, you need to press the ES control button and wait until the glass in the door rises all the way.
- Next, press the same button again and hold it in this position for several seconds.
- Now you need to lower the window; to do this, press the corresponding button until the electric valve lowers all the way. When the glass is in its lowest position, release the button.
- Then you will need to raise the glass again until it is in its highest position.
- After that, simply lower the window and try to raise it in automatic mode by pressing the button once rather than holding it down. If these steps do not help you, then repeat the entire process again. It should be noted that if this procedure is carried out on Focus 2 cars assembled in Russia, then such an operation will make it possible to train the electronic control system if the car is equipped with all four power windows. If your car only has 2 ES, then this algorithm will not work.
Connecting power windows VAZ-2109
Owners of a VAZ 2109 car can replace power windows with electric windows. On 2109 cars, electric windows can be connected via standard wiring, which already has everything provided for connecting an ESP.
This circuit is used to connect ESP on more “rich” configurations of the nine and it is advisable to use it when connecting independently. Below are diagrams for connecting an ESP with fuse blocks of new and old models.
Wiring diagram for power windows on a VAZ 2109 with an old-style mounting block (17.3722):
- 1 - Mounting block
- 2 - Ignition relay
- 3 — Ignition switch
- 4 — Right door electric window motor
- 5 — Left door electric window motor
- 6 - Right door power window switch
- 7 - Left door power window switch
- K7 - Power window power relay
- A - To terminal “30” of the generator
- B - To the wiring harness block connected to the heater lever illumination display
- B - to the heater lever illumination display
- G - conventional numbering of plugs in the gear motor block
How to connect power windows via a relay
When you need to install ESP (electric windows) yourself, then, as always, on the Internet it is difficult to find correct and understandable diagrams for everyone. Having experience in radio electronics, I am laying out for everyone the correct and understandable diagrams for connecting an ESP, an intelligent glass closer Pandora DWM-210 (but it is better to install a Sheriff PWM-200), as well as simple closers only for raising the glass, installed in the wire gap on the positive side of the motor.
The process of installing the ESP is described in detail by me here: www.drive2.ru/l/4651635/
We take ESP power buttons (NOT low-current trigger (multiplex) from Itelm), namely power ones: a block from Granta, and a new model button from Kalina (it’s the power one), since they are the cutest in appearance.
These are, of course, not dual-mode imported buttons, but they will work just as well with an intelligent door closer. We also install the Sheriff PWM-200 type door closer itself. Power buttons are easy to identify by their contacts - they have thick and flat blades, while trigger buttons have thin pins like needles!
We use thick power wires (shown in bold in the diagrams) >= 1 mm2, while control wires can be used thin = 0.5 mm2. Exception! If the buttons are not on the door, but on the center console and thick wires >= 1.5 mm2 are stretched from them to each door, then you can do without a relay, since there is no duplicate button here, and each one has its own door and the drawdowns are minimal. Then you don't have to read further.
Plus +12V must be taken from the fuse block, and not from the ignition, otherwise the automatic window closer will not work when arming. It is better to take the weight from the bolt behind the mounting block, and not in the door, since the contact in the door may not be very good. Although the door contact is also good if the car is not old. Take tinned terminals.
Connection diagram for power window lifter button "AVAR"
Diagrams for connecting the backup button on the driver's door to the main button on the passenger door
When installing two buttons on one window regulator, they are usually installed in series (or in parallel, but then they must be decoupled via a relay).
The main button is the button that controls the power window of the door on which it is installed. The duplicate button is the driver's button, which additionally controls another window regulator from the driver's seat.
Daisy chain connection (for low current trigger buttons)
We connect the output of additional button 1 in the driver's door to input 6, and output 7 to input 3 of the main button on the passenger door.
We cut the wires in the block connecting contacts 5-6 and 6-3. The minus of contact 5 now goes only to the backlight, and contacts 6 and 3 now take output from additional buttons 1 and 7 of the driver's door. Attention!
Installation in parallel will cause short circuit when raising and lowering. Power wires are highlighted in bold.
Parallel connection (for our power buttons)
Since with a serial connection you still can’t do without a relay, it is better to make a button duplication circuit in parallel, decoupling the main button from the backup button through two 5-pin relays: the wires from the main button next to the driver’s ESP motor go directly to the 88th contact of the relay and from pin 30 directly to the engine, and long wires from the backup button go to pin 85 of the relay winding, and the relay feeds a powerful plus to the passenger’s ESP engine.
A parallel connection for power buttons is preferable, since there is no need for a relay on the main (passenger) button (the wires here are short), and we thereby eliminate unnecessary clicking of the relay when the main button on the passenger door operates. For non-power low-current (trigger) buttons, in this case you will definitely have to use 2 more extra relays to relieve the load on the passenger button (therefore, a serial connection is always used for trigger buttons). Further, everywhere in my circuits a parallel connection is used, since all the buttons are power
.
Connection diagram for multiplex (low-current) ESP button
ESP connection diagram when the multiplex button closes the contacts to ground
Dimensions of the installation location for the ESP “AVAR” buttons
Glass closer Pandora DWM-210
What it gives: - full glass travel in one short press (“one touch”) - BUT DOES NOT WORK ON 2 GLASSES AT THE SAME TIME (since the module has only one sensor for electromagnetic noise of the motor, current and time); — stopping the glass in any position by pressing again in any direction; — automatic stop of the glass when it encounters an obstacle in the window opening; — automatic shutdown of ESP motors when current is exceeded; — automatic closing of windows when arming the car; — automatic opening of the windows when disarming to the previous position before arming, if the parking lasted no more than 20 minutes. (The rev counter works rather conditionally and may leave the windows closed or not closed enough). The closer is installed in the driver's door.
ATTENTION! When you hold the button, the closer does not use its relays
, which take the plus (through a 20A fuse) and minus from the closer, but sends all the current directly from the button to the motor, so you need to install a relay after leaving the button with long wires!
Apparently this was done so that if the door closer fails, you can always close the window by simply holding the button. When you briefly press
the button, the door closer with its relays is activated and closes the glass.
Place the relay only at the input to the closer from the output after the duplicate button!
If this is not done, then due to subsidence along the long wires of the sequential connection of the buttons, the passenger window will barely move.
The output of the closer must be connected directly to the motor without a relay, otherwise the detection of electromagnetic noise from the motor will not work and the closer will not work!
At the output of the driver's power button, relays are not needed, since all the power wires there are short.
It is ideal to install 2 door closers on each door, as is standard on foreign cars - then the AUTO mode will be on 2 doors at once in parallel, and not alternately. In addition, you will not need to pull 2 extra thick wires to the motor from the driver's door to the passenger's door. If I had known right away that the Pandora DWM-210 is such a Ketai crap without its own relays in the power part of the closer, I would have purchased and installed a Sheriff PWM-200
, in which the power part is clearly separated from the control part and, moreover, you can close two windows at the same time in one touch! So it's definitely better!
Installation and connection diagram for VAZ 2109 window regulators: step-by-step instructions with photos
- Before starting work, you must turn off the power supply to the vehicle's on-board network from the battery. Or we separately turn off the power circuits for the cigarette lighter and the backlight of the instrument panel and buttons, because The power supply wiring for the power windows will be connected to these circuits in the future.
- Remove the door trim. It can be removed quite easily, but it is better to stock up on mounting pins.
- First of all, we dismantle the mechanism of the standard manual window lifter, fixing the glass (for example, using office tape) in a position that provides access to the place where it is attached to the lifting mechanism.
- Unscrew the bolts securing the door glass to the standard window lifter mechanism.
- We dismantle the guide of the standard window lifter mechanism (trapezium). Unscrew the bottom nut:
- Two nuts in the middle:
- Top nut:
- The guide is free, now all that remains is to unscrew the three nuts securing our window lifter in the area of the rotation handle.
- We take out the entire door window lifter mechanism. To do this, we bring the lower pin of the guide into the hole in the door (see photo).
- By pressing with a screwdriver, we remove the upper fastening of the guide.
- Done, the window lift mechanism is disconnected. We take it out of the door cavity.
- That's it, the standard mechanism has been dismantled, let's start installing a new one. The new mechanism is attached using standard fasteners; you don’t have to drill anything new. We place the window lifter mechanism into the inner cavity of the door through the largest technological hole in an “assembled” form (otherwise it won’t fit), as if in the “open” position of the glass.
- We fasten the mechanism inside the door using two studs, which we insert into two holes that previously held the middle part of the guide of the standard VAZ 2109 window lifter. We combine them and screw on the nuts.
- The next task is to combine the mounts on the window lift linkage system with the mount on the glass. This can be done by supplying power to the power window motor contacts from an external power source, for example, any working car battery.
- When the lift mechanism is combined with the strip on the glass, we connect them using the bolts from the kit.
- It is advisable to lubricate the rubbing parts thoroughly.
- The mechanical part is complete, let's move on to the electrical part.
- We estimate the route for wiring from the door from the electric motor of the window lift drive to the installation location of the buttons - activators. The standard place for buttons in the high panel of the VAZ 2109 is two plugs to the right of the cigarette lighter, and we install them there. The hardest part is running the wiring from the door into the rack and then out of the rack under the dash. For this purpose, there are technological holes in the rack. You may need to use a special probe. The wiring is done with a wire with a cross-section of at least 1 mm. sq. We lay the wires in such a way that they do not touch any moving parts of the door or the ESP mechanism itself. We will take power for the electric windows from the cigarette lighter. We make electrical connections according to the following diagram: When the circuit is assembled, it is necessary to connect the battery power and check the correct operation of our system. We turn on the side lights and check the correct operation of the backlight of the ESP activator keys. If the backlight does not work, swap the sockets on the contacts of the keys, indicated in the diagram as 3 and 6. You can install the power windows in the standard way, here are two diagrams: Connection diagram for power windows on a VAZ 2109 with mounting block 17.3722 (until 1998) Connection diagram for power windows on VAZ 2109 with mounting block 2114-3722010-60, 2114-3722010-10 and 2114-3722010-18 (new model)
You can read more about the types of mounting blocks for front-wheel drive VAZs here.
We check the functionality of the window regulators. The glass should move smoothly, without jamming or jerking, and should not come out of the guides. To facilitate the movement of glass in the seal, it can be treated with silicone grease. All that remains is to reinstall the door trim. That's it, the installation of the window lifters is complete, let's enjoy the completed modification!
Useful tips
So, after removing the rubber plugs in the holes for the cable outlets, you may need to install a broach (inserted into the rack channel). Next, you need to secure the adjustment plate, which is pre-inserted into the inclined groove. For this task, M6 bolts are used. The plate is attached to the glass bracket, which requires caution when performing work.
Now the window lifter mechanism (folded) is inserted into the upper hole. It is usually secured with M6 nuts and lock washers. A screw is placed in the hole in the middle. When tightening, all nuts must be completely tightened, as the fastenings may become loose when the vehicle moves.
We also recommend reading the article on how to install a start-stop button in a car. From this article you will learn about the features of selecting and installing an engine start button, as well as what you need to consider when choosing and connecting a “start-stop” button for a car engine to implement starting the engine from a keyless button.
Then you need to pull the cable through the hole in the door and pillar. It is important to pull the cable so that the wires in the door do not come into contact with the moving parts of the window regulator. To do this, securely fasten it using electrical tape, adhesive tape, zip ties, etc.
After connecting the contacts to the switch, to check, you should supply power from the battery and turn on the side lights. If everything is normal, the power window switch light will be on. If this is not the case, then the sockets on the contacts and switches are swapped.
If the operation of the window regulator causes complaints, you can correct the situation by adjusting the window regulator. For example, when the glass comes out of the guide grooves, it is necessary to loosen the nuts securing the adjusting plate (the short guide is fixed in the upper hole). If the glass moves with force, loosen the nut and fix the short guide in the lower hole.