In this article, auto electrician Alexey Molotov answers the question “How to connect a sheriff alarm?”
Most car alarm systems offered on the modern market are accompanied by fairly detailed instructions, meanwhile, in each specific case, when dealing with the problem of how to connect a sheriff alarm, you have to take into account many quite important nuances.
It is best to avoid attempting to install this unit in the engine compartment. Not only is there an increased risk of moisture and other aggressive liquids getting in there, but there are many components in the engine compartment that can interfere with the radio signal, and this, in turn, leads to a decrease in the range of the system and creates conditions for false alarms.
The block is secured in the selected location with the supplied screws or using special braces. As for the engine compartment, it is much more appropriate to install a siren in it, and such a place should not be too accessible from the outside, remote from moving elements and protected from moisture.
It is best to mount the shock sensor on the hard surface of the jumper between the engine compartment and the passenger compartment (on the passenger compartment side).
The LED is placed so that it best suits its main purpose, that is, it warns a potential attacker as early as possible about the presence and enabled state of the security system.
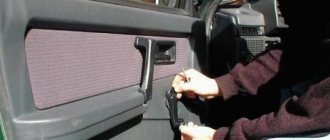
The Valet button requires a particularly reverent attitude, which, after installation, must be both hidden from view and, at the same time, as accessible as possible to the driver
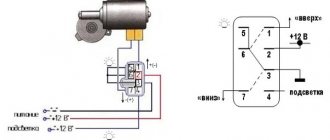
When installing such a system, you may have to cut the standard register for controlling the electric drives for controlling the door locks. As a rule, these wires are laid from the main locking (unlocking) switch to additional switches and then to the electric lock drives. For the normal functioning of the security system, the wire going to the main switch is connected to the green wire of the system, and the wire going to the electric drives is connected to the yellow one.
The car alarm connection diagram included in the kit provides complete information about the color masking of the wires and their connection locations. The only thing you should pay attention to is protecting the wires using special corrugated tubes and insulating tape, as well as securely fixing them with cable ties.
Page 50
To install the Valet switch, select a location where the vehicle driver can easily use it. It is recommended to use certain camouflage methods, which will increase the level of system security and make it more difficult for hijackers. The Valet push-button switch can be mounted on the lower driver's side of the vehicle's dashboard.
To install the impact sensor, select a flat, hard surface on the partition separating the engine compartment and the vehicle interior, on the passenger side. Attach the shock sensor to the selected location using two self-tapping screws. The sensor can also be mounted on the pillars to which the car’s dashboard is attached using cable ties. Regardless of which method of mounting the shock sensor is used, it is necessary to ensure free access to the potentiometer for adjusting the sensitivity of the sensor, which may be required for subsequent system setup.
Connecting system wires
When connecting additional relays to the security system outputs, make sure that there is a damping diode on the relay control contacts. Connect the security system output to the additional relay only from the anode side of the snubber diode. Make all connections to the security system wires only with the security system power circuit fuses removed. If there is no damping diode in the additional relay, the polarity of its connection is arbitrary.
Direct connection of low-current channel outputs to the high-current executive input of the car trunk lock opening circuit, as well as to the input of some remote vehicle engine start devices, will damage the main unit of the security system. Therefore, use an additional switching relay.
Description of the functions of the wires of the 18-pin connector of the N1 system
In VAZ-2107 cars, connecting a door sensor couldn’t be easier: there is one wire that is shorted to ground when any door is open. The cord from the handbrake sensor is routed to the “tidy”, and in the adjacent connector there is a tachometer contact. In general, the owner can install a “regular” alarm system that does not have auto start without any help. A more complex option, when connected to the ignition switch, is also discussed in our text. In the first case, by the way, you can use the turbo timer. Let's start considering this option right now.
Features of standard electrical wiring
First you need to clarify what exactly needs to be connected if the installation is performed without autorun:
- Ignition control;
- Power supply for the alarm itself;
- Door switches;
- Handbrake switch;
- Signal lamps (2 wires).
As you can see, the number of elements here is kept to a minimum. But even using this, that is, a minimum set of points, will allow you to quickly connect a turbo timer. Simply, in cars of the 2107 family, the ignition support relay is installed as standard. And you need to use this.
Look at the diagram and you will understand what we are talking about:
In general, the figure shows all the important elements:
- Ignition support relay.
- Outputs for light signaling (blue and black-blue). The 8-pin connector is located in the steering column.
- Door control wire. It is located in the side tunnel near the clutch pedal.
Make T-branches and connect any signaling. By the way, the power supply to the lamps (second photo) is connected through fuses. Which is true for any car, not just the VAZ-2107.
How to use the ignition switch
Any alarm equipped with auto-start is usually equipped with 5 power terminals:
Cord 3 here is the control one; it is connected to the starter terminal. And on the blue wire, that is, on terminal 15/2, the voltage may disappear when the starter is running, or it may remain on it all the time. When setting up, select one option.
VAZ 2101-2107 cars have their own characteristics. The coil of the additional relay shown in the diagram cannot be connected to the ignition cord going to the standard relay. The line is simply not designed for additional load!
Let's see what the ignition switch looks like in reality:
If you really need autostart, the starter cord (red) will have to be cut. Let's list what the correspondence between the lock and alarm cords looks like. The alarm cable will be indicated on the left:
- Green – free;
- Blue – free;
- Red – pink;
- Black-yellow thick – red (tap to starter);
- Black-yellow thin – red (bend to the lock);
- Yellow - blue thick.
In theory, everything turns out simple.
Of course, you can install the autostart system yourself. But it is better to entrust this task to a professional electrician. The three cords leading to the alarm must carry significant current. In new VAZ models the number of these cords will be no less.
Design and principle of operation
The alarm device includes a head unit, an antenna complex, control key fobs and some other elements, for example, an engine blocker. All Sheriff anti-theft systems have the following functions:
- Vehicle condition monitoring. The system notifies the user using the key fob. The function works like this: if there is an attempt to steal or damage the car, the sensor transmits information to the head unit. The latter sends data to the key fob, on whose screen a message appears.
- Remote control of the car. Depending on the alarm model, the system provides various options for remote engine starting. The user can send a command from the key fob, set the motor activation time, or set frequency indicators.
- Security coding. The Sheriff car alarm operates using a separate channel. It is impossible to crack the security code using standard means.
- Power window control. The function is implemented only in the presence of automatic closers.
- Remote door opening. When the protective mode is turned off, the head unit sends a command to unlock the door locks and trunk.
- Silent mode. When the anti-theft system is turned off and on, the system will not sound an alarm. By making the appropriate settings, the user can achieve automatic activation of the security mode when closing the doors.
- Activation of alarm mode. At the same time, sound and light indications are triggered. The mode is designed to deter criminals.
Pros and cons of the manufacturer
According to user reviews, Sheriff anti-theft systems with feedback and remote start have the following positive qualities:
- Easy to install and use. Anti-theft systems can be installed by yourself. It is enough for a car owner to have minimal knowledge about the structure of the on-board network.
- Affordable price. Sheriff alarms are the most popular among buyers, due to their low cost and advanced functionality.
- A large number of useful functions. The system will not only protect the car from theft, but will also allow you to control adjustable elements of the interior and body.
Reviews about the operation of the Sheriff APS-35 pro alarm system
Driver reviews of the aps 35 pro car alarm are mostly positive. Many note stable operation, ease of setup and affordable price.
There are also negative opinions among users, mostly based on the lack of modern functions and the weak signal of the remote control. The impressions of some motorists can be found below.
| Possibility of connecting additional elements: window closers, door locks and trunk. | Some kits do not have an alarm siren. The manufacturer supplies sheriff aps 35pro alarm systems in two versions - with and without a bell. Before purchasing, you need to clarify which option is offered to you. |
| Keychain with battery charging indicator. The driver always knows when it’s time to change the battery, and in the event of a breakdown, he knows for sure that the problem is not in the power source. |
| Positive reviews | Negative reviews |
| Misha (avtozvuk.ua) |
I would like to leave a positive review about the aps 35pro sheriff car alarm. I bought it six months ago from a trusted store. The guys recommended this particular kit because it works well and is inexpensive. And indeed, after installation and configuration, the alarm works like clockwork!
I took this sheriff aps 35pro silver alarm system simply because I liked the design of the key fob. After a week of use I was very disappointed in this equipment. Not only was the strap on it not made of leather and wore out in a couple of days, but it also doesn’t work correctly. You can turn it on and off only from close range, and only if you approach from the front. That is, to open the car you need to run around the car with the remote control. In short, it’s not an alarm, but a complete inconvenience.
I am quite happy with the Sheriff 35 PRO alarm system. She does everything she needs for her money. It sets and disarms without problems, does not glitch, and does not go off for no reason. I am completely satisfied and am not going to spend extra money on fancy bells and whistles.
I've been using this alarm for about a year now. It's on a Peugeot Boxer. The shock sensor is very sensitive. How many times have you had to jump up in the middle of the night from a loud sound? In addition, the signal between the key fob and the receiver is very poor. It doesn't always work the first time. I would rather buy something more expensive and better than this Chinese junk.
I have a sheriff aps 35pro silver car alarm installed in Cherry. When I was choosing, I was attracted by the stylish design of the keychain, and it has all the necessary functions. I generally don’t leave my car anywhere for a long time, but sometimes I need security. I like that you can easily find a car in a parking lot by its sound and open the trunk when your hands are full.
I have it on Bekha, the previous owner installed it. The keychain is beautiful and convenient, but there are not enough functions. Suitable only for old cars that no one is going to steal anyway. Without feedback, such signals are of little use, they will only scare youngsters in the yard. I’ll soon change it to something more serious, otherwise I’m afraid for my BMW.
One-way models
Simple models that do not have feedback have a minimal set of functions. 2 communicators are used for control.
Sheriff APS-2625 and 2400
Sheriff APS-2400 has the following features:
- dynamic coding (the system has minimal resistance to hacking);
- the presence of two-level sensors in the kit that quickly respond to an attempt to open or damage the vehicle;
- the presence of a service button (this element is used to deactivate the alarm if the key fob breaks down);
- the need to link each remote control to the head unit;
- low price (a system with a basic set of functions costs no more than 3,000 rubles).
The Sheriff APS-2625 alarm system is equipped with the following options:
- manual activation of protective mode;
- manual disabling of security functions;
- two-stage deactivation of protective mode.
If the key fob malfunctions or is lost, the system will have to be controlled manually. If necessary, the user can link up to 4 communicators to the main unit. The emergency mode is activated by pressing the emergency button. Impact controllers have 2 sensitivity zones.
Sheriff APS-2500 and 35 Pro
Sheriff APS-2500 is distinguished by the following features:
- remote control of the alarm function regardless of the system operating mode;
- accompaniment of pressing the service button with a sound notification;
- protection of all parts of the car equipped with controllers (if the sensor does not work, the alarm system bypasses it).
The APS-35 Pro model is equipped with 2 auxiliary channels, which are used to connect adjustable interior and body parts. One connector is a power connector, which is rare among budget anti-theft systems. The set includes 2 keychains with shock-resistant housings. The functionality includes the following options and modes:
- quiet and passive security modes;
- Anti-robbery function;
- two-level disabling of the security mode;
- remote control of the “Alarm” option;
- turbo timer;
- separate opening of the driver's and passenger doors.
Overview of models and operating and installation manuals
Sheriff APS-2500
An extremely primitive system without feedback, which is controlled by two key fobs with minimal functionality: one button controls arming/disarming, the second activates an additional channel, and in combination with the first, it implements arming with disabling sensors or silent mode.
This “Sheriff” alarm system can actually be considered a radio-controlled central locking module with a tiny share of security functions. With a standard installation, it is not at all difficult to disable it if the machine is hacked. Just look in the instructions to see how to disable the system without using a key fob:
- Open the door with the key.
- Turn on the ignition.
- Press the Valet button within an interval of no more than 10 seconds.
Therefore, for the owner, setting a secret code is a mandatory measure to ensure at least some security. Here its length is fixed, two numbers from 1 to 9, which theoretically gives 81 different combinations. However, the instructions prohibit choosing the number 3 as the first digit of the code, which reduces the number of combinations to 72.
To set a secret code, you need to disarm the car:
- Turn on-off-on the ignition.
- Dial the first digit using the Valet button.
- Turn off, then turn on the ignition again.
- Dial the second digit.
- Turn off and turn on the ignition.
- After waiting for a short signal from the siren, turn off the ignition again.
But in order for the alarm to start working with a secret code, you need to activate the corresponding function:
- After disarming the car, turn on the ignition.
- No later than 3 seconds later, press Valet three times (this is why you cannot use 3 in the first digit of the secret code).
- Turn off and turn on the ignition.
- Press Valet 9 times, going to the F9 function.
- Press the main key fob button - the system will give two siren signals, indicating that the F9 function has been switched to value 2 (secret code).
Two-way models
The processor device of such anti-theft systems communicates with the key fob using a secure channel. The owner regularly receives messages about the condition of the vehicle. The data is reflected on the display of the control panel.
Sheriff ZX-945 and ZX-1090
The ZX-945 feedback alarm has the following features:
- interactive signal coding, providing reliable protection against hacking;
- high range of the key fob (signals are received at a distance of up to 2 km);
- processor unit equipped with 4 communication channels;
- the presence of a liquid crystal screen in the main communicator;
- 2 security modes: active and passive;
- possibility of connecting 2 engine blockers (devices prevent criminals from starting the engine).
Commands from the ZX-1090 alarm key fob can be issued from a distance of 1000 m. The range of the communicator in receiving mode is 2200 m. The spare pager operates at a distance of up to 50 m. Dynamic dialogue coding prevents intruders from intercepting the signal.
Sheriff ZX-1070 and ZX-940
Sheriff ZX-1070 is equipped with a feedback function and an engine auto-start module. The system reliably protects the vehicle from theft, damage and evacuation attempts. An auto-start alarm can be configured so that it starts the engine on a timer or at certain intervals. Other useful functions of the anti-theft system include:
- dynamic signal coding;
- active and passive security modes;
- separate control of activation and deactivation of protective functions;
- passive engine blocking;
- using a displacement sensor.
The Sheriff ZX-940 anti-theft system is equipped with 4 service channels. There is a two-way communication function. The user sees messages about the vehicle's status on the key fob screen. The driver can remotely adjust the seat position, engine start and security system lights.
Complete sherriff alarm circuit diagram
At the final stage of installing the system, the antenna wire is stretched to its maximum length, which is secured with fastening ties in a place where it is difficult to accidentally damage it. Please note that in order to avoid spurious interference, it is strictly forbidden to wrap current-carrying harnesses and individual wires with the antenna cable. Our manual is suitable for the following models:
- Sheriff ZX-1095
- Sheriff ZX-945
- Sheriff ZX-935
- Sheriff ZX-755
- Sheriff APS 2400
- Sheriff APS-35PRO Platinum2
- Sheriff ZX-750
- Sheriff ZX-1070
- Sheriff ZX-1055
- Sheriff ZX-1060
- Sheriff APS-35PRO Platinum1
- Sheriff ZX-940
- Sheriff ZX-1090
- Sheriff ZX-725 ver.2
- Sheriff ZX-925 ver.2
- Sheriff ZX-910 ver.2
- Sheriff Lady ZX-800
- Sheriff ZX-710 ver.2
- Sheriff ZX-1050
- Sheriff ZX-600 ver.2
- Sheriff ZX-625
- Sheriff APS-35PRO
- Sheriff APS-25PRO
- Sheriff APS-2600
- Sheriff APS-2625
- Sheriff APS-2500
- Sheriff ZX-950
- Sheriff ZX-930
- Sheriff ZX-900v2
- Sheriff ZX-700
- Sheriff ZX-730
- Sheriff PRO-9250
- Sheriff APS-35PRO Silver
- Sheriff APS-2600 Ver.2
- Sheriff APS-2500 Ver.2
- ff APS-35PRO Ruby
Of the series of one-way alarms from the Sheriff APS brand, the 35 pro security system is rightfully considered the most successful. It compares favorably with other budget car alarms with its stylish design of control panels, high-quality work and a fairly large set of functions.
The Pro prefix means that the model is made for professional installation and has the widest possible functionality within the limits of its model capabilities.
How to find out the alarm model
Having learned the model of the security system, the user will be able to purchase a suitable spare part or replace the communicator. You can identify the alarm using the key fob by opening this device. It is necessary to pry the latches and remove the top cover. The alarm model is recognized by markings on the board. The detected combination of characters is entered into the search bar of the browser and the types of security systems are determined. To find out the alarm model, you need to find the markings in the area of the antenna unit.
How to connect
According to the installation instructions, to connect the components of the anti-theft system, you need to perform the following steps:
- mount all the elements (the head unit and service button are installed in a hidden place, the antenna complex is placed on the rear window, the siren must be connected under the hood);
- stretch the wire going from the ignition switch to the head unit (a cable is used that receives voltage when the engine starts);
- extend the wires of the limit switches and siren to the processor unit;
- connect the ground cable (according to the car alarm connection diagram, a standard nut located on the body is used for this);
- cut the standard cables used to control the door locks (such wires are laid from the unlocking switch to the locks);
- connect the main switch wire to the green cable;
- protect the wiring with electrical tape and corrugated tubes;
- connect the antenna unit (the cable of this element cannot be inserted into the wiring harnesses that provide power supply).
User manual
The operating instructions for the alarm contain recommendations that allow you to use the system correctly.
Activation and disarming of security
The security mode is activated by briefly pressing button 1 of the key fob. The protective function is disabled using the same key. To activate the option while the engine is running, you need to start the engine and hold down 1 button on the key fob. To disable the function, press the key briefly.
Programming a new key fob
The control panel programming process includes the following steps:
- Removing the security mode and starting the engine.
- Press the emergency button three times. The system will confirm action 1 with a beep.
- Hold down button 1 of the first key fob. The key is released after a long beep appears.
- Long press button 1 of the auxiliary communicator. Completion of key fob programming is accompanied by a sound notification.
Changing your personal code
Before programming, the anti-theft mode is deactivated using the service button. After this, perform the following actions:
- turn the engine on and off;
- enter the first digit of the password by the required number of presses of the service button;
- turn on the ignition;
- using the emergency button, enter the second digit of the code;
- turn off the ignition (the correct password entry is confirmed by a sound notification);
- Press the service button 3 times;
- press 1 key on the key fob (the system will notify you that a new code has been recorded with a sound signal);
- turn on the power to the transponder (after the sound signal appears, the device is deactivated).
The programming menu is exited after 10 seconds of inactivity.
Emergency disabling of security
According to the instructions for use, to emergency disable the protective mode, you need to open the driver's door with the key. After the siren sounds, you must start the engine. 10 seconds after turning on the ignition, press the service button.
How to enable autorun
To enable the alarm to automatically start at a certain frequency, you need to perform the following steps:
- press F twice;
- switch to cursor control mode;
- Press the F button again to confirm the selection of the desired indicator;
- use the door lock button to set the required interval.
The algorithm for enabling automatic start based on temperature differs by choosing a different indicator. The state of the security system does not matter.
Programming engine idle speed
Select the desired parameter as follows:
- The handbrake is moved to the “On” position;
- the ignition is turned on and the engine starts;
- within 20 seconds, press the service button 5 times (4th and 5th presses are accompanied by sound signals);
- the brake pedal is pressed and held (recording the value becomes possible after the parking lights flash);
- after a minute the brake pedal is released.
Engine lock
Remote engine blocking is carried out using the “Stop” button. Deactivation of the motor is accompanied by the disappearance of an indicator that looks like smoke. The function is configured in the cursor control menu.
Antihijack mode
The mode is activated when the engine is running, all types of cars are compatible with it. To begin, press buttons 1 and 2 of the key fob. They are held until 3 light signals appear. Over the next 20 seconds, the alarm will sound short beeps and periodically activate the interlock circuits. After 40 seconds, the alarm mode will turn on. If the engine is started unauthorized, the vehicle will not be able to continue moving and the doors will be locked.
Features of the Sheriff APS-35 pro alarm system
The security system has all the necessary functions to ensure reliable protection of the car. The sheriff aps 35 pro car alarm is controlled using remote controls that change the signal encoding, preventing the possibility of its interception using a device called “code-grabber”. A special feature of this model is the presence of an LED battery charge indicator, which is rarely included in inexpensive alarm systems.
Standard functions of the aps 35 car alarm include:
- Engine blocking using a built-in relay.
- Possibility of connecting door, hood and trunk locks
- Relay for turning on dimensions
- Arming with the ignition on
- Silent security and alarm removal
- “Search” (panic) mode, which allows you to find a car in the parking lot
- Anti-robbery function. The program turns on the alarm when the ignition is on
- Control with secret Valet button and much more
In addition to the main functions, the system has a number of programmable capabilities:
- Personal code available only to the alarm owner
- Alarm setting delay 5 seconds or 1 minute
- Automatic closing/opening of door locks when the engine is running
- Reinstalling protection
- Removing the alarm in two stages
- False alarm avoidance function
- Possibility of returning to factory settings
A significant advantage is also that when the power is turned off, for example, if the battery runs out, the owner’s individual settings are saved in the device’s memory.
Possible problems and their solutions
If Sheriff alarms do not respond to commands sent from the key fob, you need to make sure that the antenna is installed correctly. It must be mounted at a sufficient distance from metal parts. An equally common problem is the false alarm of the siren. In this case, the sensitivity of the sensors is adjusted in accordance with the parameters specified in the instructions. If the doors do not lock when the security mode is turned on, check the condition of the wiring. Damaged cables are replaced.
Video - Sheriff APS-35 Pro installed on Volvo s70
Friends, good afternoon! I want to say thank you to everyone who subscribes, comments and motivates me to create quality content =)
Today I want to highlight the installation of the SHERIFF ZX-1070 alarm system.
Car alarm Sheriff ZX-1070 is a fairly popular budget model with two-way communication. This alarm system has an auto-start function, but I won’t connect it today.
The kit includes the main unit, connection wires, locking relay, shock sensor, 2 key fobs, battery, installation instructions. The alarm kit does not include a siren, so it had to be purchased separately. I removed the autostart and additional channels wires, since they are not involved in this installation.
Alarm connection wires. On the large block there are 2 “pluses” and an ignition wire.
Next are 6 wires to the central locking. The client’s car does not have an electric door drive, so I will connect these wires according to the power circuit indicated in the instructions.
Next there are 2 white wires - turns. White with a black stripe - exit to the siren. The orange wire is a normally closed interlock. Black wire is ground. Red-white - “+”, power supply for the alarm itself. Dark green - hood end. Dark green and black - trunk end. The brown wire is the door switch. Gray - hand brake. Brown-black - input from brake lights.
Also coming from the alarm system is the Valet button and wires to the shock sensor. There is also a connector for connecting the transceiver antenna, which I have already installed in the car.
As usual, I divide all the wires into groups and wrap them into braids that will go to different ends of the car.
Under the hood it is necessary to place a hood switch and a bell (siren). The limit switch will fit into the connector that was already there, and I secured the siren under the power steering expansion tank. The bell was placed on a standard bolt and additionally tightened. We stretch the wiring to the limit switch and the bell, and make the appropriate connections. In this case, I use twists, which I insulate with 3M electrical tape.