How to open and repair a jammed door of a VAZ 2109?
The question of how to open a jammed door of a VAZ-2109 arises among motorists quite rarely. Many of them do not encounter such a problem during the entire life of the car. The reason is that the locking mechanisms on the doors of the VAZ of the “ninth” family are quite reliable and rarely fail. But sometimes they also malfunction, causing the door to jam and making it difficult to open. There are several ways to do this without resorting to extreme measures in the form of an angle grinder, so that you can then fix the problem without consequences.
Door opening method
If the VAZ-2109 door does not open from any side, then the cause of the breakdown is difficult to determine, since there is absolutely no access to the lock mechanism.
A somewhat simplified version of the breakdown occurs when the door does not slam shut completely and gets stuck in that position. Then it is possible to reach the latch from the outside with a sharp object.
To open a jammed door, you must first perform the following steps:
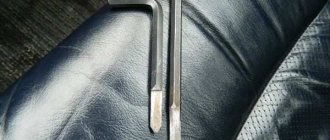
- When the sash is not completely slammed, try to get to the locking device using a steel flat ruler. It may be possible to open it in a similar way to conventional door locks with a latch.
- If the door is completely closed, try to move it to the slightly open position to gain access to the lock. To do this, try pressing the inside and outside handles together or alternately, while simultaneously pushing the door from the inside.
- Try opening the back door with a helper, who will press and release it to get it into position while you try to open the lock.
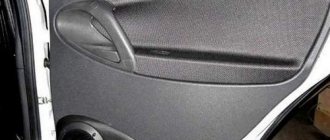
When simple means do not produce results, the door will have to be opened from inside the cabin, which will require removing its trim.
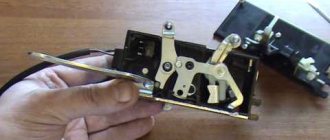
Door lock VAZ 2109
In practice, this is not easy to do, because the casing is pressed by the sash and it is difficult to pull it out without damage. But there is still no other way out: it is better to damage the inner panel than to mutilate the door itself.
To dismantle the decorative panel, you need to unscrew the armrest handle with a screwdriver, and then the storage shelf located at the bottom of the door card. Then the button that secures the lock from above is unscrewed and removed. Lastly, the window lifter handle and the opening handle frame are removed. Now you need to carefully separate the lining from the body using a pair of flathead screwdrivers and another suitable tool. You may be able to remove the trim without visible damage.
When the decorative panel is removed, access to the lock mechanism from the inside opens, although getting to it is inconvenient. Immediately check whether the rod running from the handle to the lock has fallen off. This is a fairly common malfunction that can be fixed with little effort. Put the rod in place and open the door.
If there are no visible reasons for the breakdown, simply try to open the door from the inside by working on the mechanism with various tools. If necessary, enlist the services of an assistant who will press or pull the door from the outside. Experience shows that such procedures for opening jammed doors can take a lot of time, so you will have to be patient.
Causes of malfunctions
There are several types of malfunctions that prevent the doors of a VAZ-2109 from opening from the outside or from both sides:
- The outer key, made of silumin, broke off. This happens when you try to open the door in severe frost, applying a lot of force. Breakage is not considered a big problem, because the sash can be opened with a handle from the inside.
- The silumin pusher, which is activated by the opening key, has broken. The reasons are the same: low temperature outside and strong pressure. In this situation, the door can also be unlocked from inside the car.
- The rod that connects the handles with the locking mechanism has disappeared. The door does not unlock from either side.
- Wear of parts of the locking device.
- The screws securing the lock have come loose and it is hanging freely inside the door card. It is impossible to open the door using the handles.
Troubleshooting
If a key or silumin rod breaks, you should not immediately buy a new block with a handle. On sale you can find special repair kits for VAZ 2108-099 door handles, which contain these parts in 2 copies.
This way you will save money and easily change the key yourself by removing the handle using the following sequence of actions:
- Remove the decorative panel.
- Disconnect the rod connecting it to the locking device from the handle mechanism.
- With the glass fully up, unscrew the 2 fastenings of the handle to the door card.
- Remove the handle, replace the parts and put it back.
If the rod is disconnected, then you need to remove the inner lining and put it in place, as described above. Using the moment when the facing panel is removed, check what caused the disconnection of this rod so that history does not repeat itself when the door is slammed.
Malfunctions of the locking mechanism can only be eliminated by removing it. In a situation where the device has a lot of wear, as happens on the driver and front passenger doors, it is recommended to replace the lock with a new one.
If you find an error, please select a piece of text and press Ctrl+Enter.
Source
Connecting autorun
The VAZ-2114 models use an ignition switch with three terminals - 15 (blue wire), 30 (lilac) and 50 (red). Terminal 30 is connected to the battery. When you turn the key, blue wire 15 is connected to this terminal. The third terminal is responsible for the starter.
As it is written in the instructions, it is quite possible to power the alarm from contact 30, from which the lead is made. And the cable from connector X1, yellow, is connected to connector 15.
After all the actions taken, the connection of the tachometer remains. In this case, a loop antenna and a reading device are combined. Connector X3 has a gray-black outgoing wire. It is connected to the tachometer as shown in the VAZ dashboard diagram:
This will allow the alarm to control the speed. And at the very end we connect the ground from the main unit. This is a black cord from connector X3.
How does it work?
The design and operating principle of the central locking system in most cars is almost the same. Only the locations of the actuators and the connection diagram differ. However, the principle of operation is completely identical.
When a signal is received from the key fob to the control unit, it issues a command - the corresponding relays are closed and the activator motors are activated. As a result, the door lock cylinders turn. They open up. On some cars it is possible to open the trunk using the key fob. But there is a separate button for this.
There are several simple reasons why the central locking does not close the doors. There aren't many of them. These breakdowns are easy to fix with your own hands.
Central locking of VAZ 2115 does not work
Content
Central locking, or "CH" as it is briefly called, is a suitable and necessary item for any car, allowing the owner to open and close any door in the car with just the movement of a hand. But it happens that this system stops working one hundred percent or some of its parts do not work properly.
There are prerequisites that one or another part of the central lock can refuse, and we will talk about each of them in detail below.
Central locking does not work: signs of failure and causes
It happens that no action is taken for the other door when the central locking located on the driver's door is closed. But enough to move it, since the door here was closed. It is immediately clear that there are defects in the central locking, which are facilitated by certain prerequisites.
Among all possible circumstances, defects are the most important.
No contact with disk
With this fault, the contacts inside the drive do not make the correct contacts. There are several reasons for this:
- The traction control that connects the lock button and the drive is done incorrectly. This reason contributes to improper engagement and lack of contact with the drive.
- The button touches part of the skin and does not allow it to be lowered to the required depth to ensure traction contact with the drive. Although the driver's door is locked, there are no signals for the other door.
READ Where is the wiper gas relay 3110 located?
Check the condition of the steel bar.
If such problems occur when working with the central locking, you must first ensure that the button is pushed all the way down. If for any reason this does not happen, first check the skin to assess and then look for traction towards a uniform and clear position.
There was a fuse
If manipulating the central traction lock does not lead to any results and they do not respond in any way to either opening or blocking, then you first need to check the electronic circuit and the fuse. directly. Because in the central lock it can fail not only due to a short circuit in the circuit, but also due to the appearance of the smallest overloads.
The central locking is marked with a marker.
In most cases, overload occurs due to the lack of position of the connecting rods, as well as due to their lubrication during winter operation of the car.
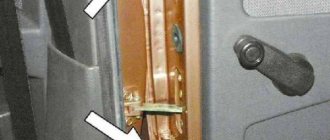
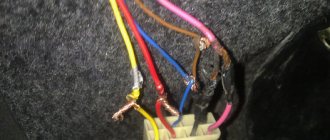
The central locking wires are broken
Broken wire. not the main reason, but one of the reasons for the failure of the central locking system. The main reason for this is the destruction of wires in areas of high load. Such a place, of course, is a corrugated passage from the side of the pillar and the driver's door. And since in most cases the driver's door opens in any car, it takes a huge part of the load.
- Determining such a malfunction is quite simple, you just need to release one of the ends of the corrugation in which the wires pass through the door and pull out one of the 5 central locking wires. They usually come together in one belt or go together.
- After such manipulations, the wire that breaks or breaks is simply relegated to the middle of the usual pile.
- If you are sure that the circuit is faulty, it will not be easy to replace it by inserting the appropriate wire and future insulation with electrical tape.
- When wires are broken or broken, you can only find the fault by calling the circuit with a multimeter.
READ Speed Sensor VAZ 2110 What It Affects
Bloated block
Another condition for failure of the central locking system is burnout of the central locking unit. And to diagnose it, you need to use the multimeter mentioned above and find the voltage at the contacts of the block.
This is what the immobilizer and central locking unit look like on the device panel.
Please note that during diagnostics it is necessary to operate the driver's door lock so that the impulses from it reach the main unit.
The central locking drive is faulty
And the last condition that will allow the central locking to work. This is a drive failure on the center drive. It can work both for mechanical reasons and due to wear of rubbing parts, as well as due to external causes of water and corrosion.
If the drive itself fails, replace the drive with a new one and replace it. Please note that the drive must have 5 wires of different colors.
The principle of operation of the central lock on the VAZ-2115
The central lock operating on the driver's door of the VAZ-2115 works as follows:
- The electric drive installed in the door is designed not only to control the lock, but also to send signals to the central locking. It in turn sends commands to the other door to open and close the door.
- In order for the driver's door actuator to be so functional, it has up to 5 wires, in contrast to the standard actuators of 2. Additional channels are designed to communicate with the central locking control unit.
READ BMW X5 E53 Central Locking Doesn't Work
Reason for drivers and passengers.
When the lock is locked, the rod on the driver's door moves down, covering some of the contacts on the actuator. From these actions, the central lock receives signals and sends commands to the actuators of all other door locks . That's exactly how they were discovered.
Source
Circuit breakers
In this case, the lock will not only not close, but will also stop opening the doors. It's worth taking a look at what's going on in the fuse box. The fact is that the central locking system itself is quite dynamic. Various short circuits in its wiring are by no means uncommon.
If this is a standard lock, then you should look for its fuse in the factory block. If an alarm system is installed (and often it is this that controls the operation of the central locking), then you should look for the fuse on the positive power wire of the unit.
The malfunction of at least one of these objects explains the problem with the central locking. The way out of the situation is simple. You need to replace the blown fuse with a new one. Sometimes you have to struggle with removal - the element sits tightly in the connector.
Tapping into wires
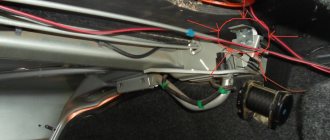
Next to the driver's door, there are two wire harnesses running right along the floor. One of them has a cable coming from the parking brake and two wires to the turn signals. The second harness contains the door switch cable. This is where you need to start connecting. To do this, remove the sill trim along with the side panel. They are attached using self-tapping screws that must be unscrewed. Having done this, you can see the wiring harness shown in the photo:
This harness goes to the dashboard. We are interested in the door switch cable. If a 1N5401 diode is inserted into the wire break, the current should flow towards the limit switches. And the second diode 1N4001 is connected as shown in the figure.
The following figure shows the second harness:
At the same time, taps are made from the blue cables and the cords are pulled to the place where the alarm will be installed. And the handbrake wire is cut, and a 1N4001 diode is soldered into the cut with the cathode towards the switch.
Dead battery
This reason refers to the situation when the central locking does not lock the doors or open them. Everyone has encountered a situation where, in the morning, when you press a button on a key fob, nothing happens.
Sometimes drivers forget to turn off electrical appliances in the car, which leads to deep battery discharge. It’s easy to verify this; just open the car with the key and turn the ignition key. It will not turn on at all, or it will be impossible to start the engine. To solve this, you just need to charge the battery. The system will work again.
Common node faults
Installing an alarm system on Lada Priora
Often, the VAZ-2114 central locking control is carried out incorrectly due to the fact that the contact pairs are closed with a delay. A common reason for this is a violation of the adjustment of the thrust located between the gearmotor and the lock button, or its jamming. Simply put, when the button is pressed, the position of the rod does not allow the contact pairs of the drive to be completely closed.
The door on the driver's side may be locked, while the others will remain open due to the fact that the contacts of the control unit are not fully closed. This malfunction is purely mechanical in nature, and to eliminate it, it is enough to adjust the rod or the free play of the button in case it gets stuck.
In addition, such a problem can be caused by a malfunction of the VAZ-2114 central locking relay. In this case, you will have to replace the failed element.
In the case when the VAZ-2114 central locking completely stops responding to commands given by the driver, it is worth moving on to checking the electrical part of this unit. It is possible that this behavior of the system is caused by a blown fuse. Note that it can fail not only in the event of a short circuit, but also from constant overloads caused by the heavy movement of the core, or a violation of the adjustment of the rods.
Quite often, the reason why the VAZ-2114 central lock does not work is a violation of the integrity of the electrical wiring supplying power to it. The wires in the driver's door of a vehicle almost always break because it opens and closes more often than others. You can determine the damaged section of the wire using a multimeter. Less often than not, the control unit fails. In this case, the entire system either completely stops working or performs its functions incorrectly.
To prevent module malfunctions, it is necessary to pay attention to the condition of the activator, since its contacts can oxidize or burn, causing malfunctions. Periodic cleaning will significantly extend the life of the module.
VAZ 2113, 2114, 2115 cars considered
Attention! The location of fuses and relays in the blocks may differ depending on the year of manufacture and vehicle equipment. You can see earlier modifications of fuse blocks on this page
Fuses for the VAZ 2114 injector and VAZ 2115 injector are also described on this page.
Where are the fuses and relays located?
The main part of the fuses and relays is located in the mounting block of the engine compartment.
To get to the block you need to press two latches and remove the cover
Using pliers installed in the block, remove the fuses
On the inside of the cover there is a diagram of the location of fuses and relays.
Click on the image to enlarge.
Fuse mounting block 2114-3722010-60
A fuse in an electrical circuit is a small-sized protective device that is designed to protect the main working parts from extreme overloads in the form of a sharp increase in current through a break in the circuit due to the melting of a special insert. The first fuses of this type appeared at the end of the 19th century and today they are widely used in electrical circuits of modern cars, including the VAZ 2114.
Wiring
As practice shows, due to the lack of contact, you can often observe a situation where the central lock does not close the doors using the key fob. The system seems to be working, but when I press the button nothing happens.
It's all because of the wiring. It is necessary to carefully check all connections that are related to the alarm system, as well as to the central locking. Even if the contact moves away just a little, this can already cause malfunctions. Do not forget that one of the connections is inside the door - you will have to remove the trim. You should first check the condition of the wire that goes to the motor - it can “stick” to ground.
There are a lot of questions and discussions related to the operation of the central lock on numerous forums. Sometimes the central locking only closes the driver's door - this is a typical malfunction, the cause of which lies in the wiring and contacts. The fact is that a special activator is installed in the driver's door. It has not two, but five contacts. The activator controls the operation of all locks in the remaining doors. The microswitch inside the activator may also fail.
Installation instructions for central locking
Before installing the central locking system, you should study the connection diagram
Photo gallery “Central locking diagrams”
1. Central locking diagram for VAZ 2114
2. Central locking diagram
3. Connection diagram of the central locking system to the alarm system
The central locking control module is located on the left side under the panel. There are 6 wires coming from it. To install the central locking system, you need to disconnect the brown and blue wires.
Before connecting, you need to check that activators with 5 outputs are installed in the doors. If they are missing, they should be installed.
In a car, the one responsible for opening the doors is usually white and connected to terminal 7. If there is no connection to terminals 7 - 5, then the 8th terminal is connected to the brown wire. This wire is responsible for opening the doors. Terminals 5 and 6 are for closing doors.
To install the central locking system, you must purchase additional items:
- 2-3 diodes 1N4001 at 1A;
- one diode 1N5401 3 A;
- 2 diodes of 4 or 5 A, if there are no separate outputs for turn signals.
The central locking VAZ 2114 (hereinafter referred to as CZ) is a mechanism that ensures the simultaneous closing or opening of all four doors in the car. This option is very convenient; it eliminates the need to reach out and lock the doors manually every time. Such centralized control comes in handy when installing car alarm systems, which significantly expands the possibilities and variations of the use of the locking mechanism.
The operation of the lock itself does not depend on whether the car engine is running or the fact that the ignition is turned on. Power is supplied directly from the battery. It is quite common for the system to malfunction. For example, when the locks of some doors close, but the rest do not. Or the closing process occurs with great difficulty, jamming, or partial failure of the latches. A situation familiar to many car enthusiasts, isn’t it? There are several reasons for the node to not work correctly; we will look at them in more detail.
Electronics failures
If the central lock does not close one door, then simple reasons may not be immediately considered. The electronic unit is to blame here. It is better to start diagnostics with the key fob. The first step is to make sure that the battery is in good condition and the buttons do not stick.
Then they check the alarm and central locking control unit. Typically, in the instructions for the alarm, the manufacturer indicates what needs to be pressed to enter the diagnostic mode. The last thing to diagnose is the board located on the lock motor. Here you can also check the drive itself.
Defective parts must be replaced. The whole difficulty lies in the control unit - it is quite difficult to repair it. All that remains is to replace it. Often key fobs can lose connection with the unit - then reprogramming will help.
Connection diagram
After carefully studying the alarm installation instructions, you can find the following connection diagram:
In this diagram, the designation X2 indicates a six-pin connector. It must be connected according to the diagram above. If you need to install an additional actuator, then it is better to use the diagram given in the instructions.
Now let's figure out how to connect the door sensors. For this purpose, there is a special wire in the connector marked X3.
Mechanics
In addition to reasons related to electronics, the central lock does not close one door due to mechanical faults. If the lock is standard, then it is more difficult to diagnose. But if simple activators are installed, everything is much simpler. In cases where only one door does not close, it is worth checking the drive rod.
Standard locks, especially on foreign cars, are a single unit with mechanical and electrical parts. Often on old machines, plastic drive elements - gears and shafts - wear out over time. As a result, the motor rotates, but the central lock does not close one door. The force required to open a door is always less than to close it.
The lock rod is fixed to the cylinder lever - it can fall out of its place. Then the lock will not work. The driver will hear the motor running, but the desired action will not occur.
In the case of Chinese activators, the mount may slip along the rod, which controls the opening or closing of the lock. When the latter closes, the activator pulls the lever down, but slips. As a result, the door does not close. You need to disassemble the casing and tighten the fastening bolts.
How to connect
Installation of the VAZ-2114 alarm system begins with disconnecting the battery and determining the location of the elements. The control unit is placed under the instrument panel or behind the glove box, the siren is placed in the engine compartment. Guided by the instructions and diagram, all elements are connected.
The control unit is connected through connectors to system elements, components and vehicle parts. Installation and installation begin from the farthest point of installation of the security system element, using 9 connectors (X) for connection.
Sensors (limit switches) are installed in the engine compartment, under the hood and in the trunk, which react to opening. The door trims are dismantled to install activators. The Valet service button is installed in a place hidden from prying eyes, but easily accessible to the car owner.
A transmit-receive antenna is installed on the windshield in the upper corner. It is recommended to install the shock sensor inside the passenger compartment, securing it to a metal surface. The emergency siren is installed in the engine compartment with the bell facing down.
When all the elements are located in their places, you can begin to connect them into a single system.
Scheme
The characteristics of the Starline A 91 car alarm and the connection diagram of the main elements are given in the manufacturer's instructions. When connecting a 6-pin connector X 2, you may need an additional door opener activator.
When connecting door opening sensors, use the blue/red wire of connector X 3. All alarm connection points, i.e. connectors (X) look like this:
- X 9 - connect a two-level shock sensor installed on a metal surface.
- X 8 and X 7 - connectors are not used.
- X 6 - Valet service button, installed in a hidden and easily accessible place.
- X 5 - LED indicator, installed on the instrument panel.
- X 4 - transmitting sensor receiving module; it is recommended to install it in one of the upper corners of the windshield.
- X 3 - connector with many wires.
They are connected to the systems with wires of the following colors:
- Red - with the “plus” of the ignition switch.
- Green/yellow and green/black - sidelights and side turns.
- Black—vehicle mass.
- Yellow - ignition switch (connection to blue/black).
- Gray is the “plus” of the emergency siren.
- Blue/red - “plus” of the door entrance.
- Black/red - additional blocking relay.
- Orange/gray - hood lift sensor.
- Orange/white - trunk opening sensor.
- Orange/purple - to the brakes (according to the diagram in the instructions).
- X 2 - connect door opening activators;
- X 1 - ignition switch (closed with red wire).
Connecting the central lock
In basic configurations, the control unit (CU) of the central locking (CL) performs the function of locking the door lock. The electrical circuit connection diagram is the same for all central locks, the only difference may be in the control unit, activators and the number of pins for connecting an additional device.
The main elements of the central lock include the control unit, door sensor switches (limit switches) and microswitches that fix the position of the key. All these elements are connected to the alarm and interior lighting of the car.
To connect to the central locking, it is necessary to connect the central locking control unit (CU) to the car alarm using the door opening and closing relay, to the car ignition switch and to the door opening sensors. When installing the central locking, you will need additional parts, such as:
- diode 1A - 3 pcs.;
- 3A diode - 1 pc.;
- diode 5A - 2 pcs.
Tapping into wires
In order to insert into the wires, you first need to free them from under the threshold trim. To do this, unscrew the fastening screws and remove the upholstery. Underneath there are 2 wire harnesses running to the instrument panel. One of the harnesses contains the parking brake wire. 2 wires are connected to the sidelights and side indicators.
When inserting into the parking brake wire, 1 diode is installed, and 2 diodes are installed in the wire that powers the side headlights and side turn indicators. The terminals of the insertion wires are connected to connector X 3 of the alarm control unit.
Autostart
One of the functions of the Starlin car alarm system is auto engine start. In order to install with autostart yourself, you need to use the ignition switch wires. The lilac wire is connected to the battery. Blue (ignition switch) is connected to the alarm control unit via connector X 1.
To connect the tachometer sensor, it is connected to a gray/black wire coming from connector X 3. Connect ground from the main unit using the black wire of connector X 3.
Pneumatic central locking
Along with electric locks, there are also their pneumatic counterparts. Here the malfunctions and their causes are almost the same. If the doors do not close at all, then the compressor or control board is to blame.
If a separate door does not work, then check the circuit board directly on the door lock. Often there is a lack of tightness in the vacuum line, broken contacts in the wiring, and also a breakdown of the control unit.