A properly functioning car brake system is the key to safe movement in this car. Good and serviceable brakes are ways to stop your car in time and avoid an accident, which can lead to dire consequences. Therefore, it is necessary to pay special attention to the braking system of the car and not treat it carelessly.
The VAZ 2114 is equipped with front disc brakes, which allow you to effectively stop the car in almost any weather conditions. It should also be remembered that the braking distance greatly depends on the quality of the car tires.
In this article we will talk about the brake pads of the VAZ 2114 car, namely, methods for replacing them, timing and reasons for rapid wear. By also studying the article you will learn about the best brake pads for the VAZ 2114.
When to change pads
VAZ 2114 brake pads must be changed as they wear out. Most often, good brake pads can last about 30-40 thousand kilometers, but “Chinese” fakes may not even last 10 thousand kilometers.
You should also pay attention to the condition of the pads themselves; the wear of the rubbing part of the pad should not be less than 2mm. Some pads are equipped with a special indicator strip, which can be used to easily determine pad wear.
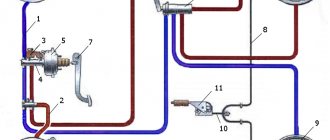
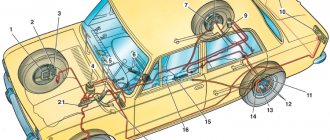
BRAKE SYSTEM DEVICE
Like any other mechanism in your car, the brake system consists of several elements that work together. The VAZ brake system is no exception. It is much simpler both in structure and functionality than in popular foreign cars, but it also deserves attention.
Its main elements are:
- Front wheel brake structures;
- Pipelines (both sides);
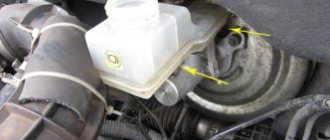
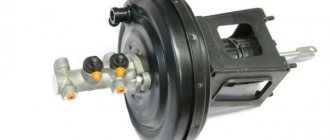
- Hydraulic drive main cylinder;
- Tank;
- An amplifier that has a vacuum structure;
- Braking mechanisms located on the rear wheels;
- Two pressure control levers;
- The hydraulic system also has a regulator that controls the pressure;
- Pedal;
- Hoses made of flexible material.
The system is designed so that if one of the circuits fails, the second will provide safe braking. This is done in order to make driving as safe as possible. The brake system of the VAZ 2115 works on the same principle.
The hand brake consists of:
- Lever with locking button;
- Cable in a protective sheath;
- Adjustment nuts;
- Equalizer;
- Locknuts;
- Protective cover.
The weak point of the handbrake is the cable . It requires constant attention. Its stretching or rupture can lead to disastrous consequences. It is also worth remembering that the pads are constantly worn out (especially with active use). It is important to pay attention to the brake force regulator of the VAZ 2113.
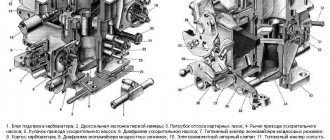
Diagram of the brake system of a front-wheel drive VAZ car (device)
These are the elements that make up the brake system of the VAZ 2114. Everything is quite simple, both in repair and in preventive maintenance. Any adjustments are also made without much effort. For example, you can adjust the handbrake in half an hour yourself, and adjusting the brake pressure regulator of the VAZ 2114 will not cause stupor even for a beginner. These are the key features of the domestic automobile industry - everything is easy and simple.
Why do pads wear out quickly?
There may be several reasons why brake pads wear out quickly, but all of them, as a rule, can be quickly resolved with the exception of a few.
Reasons for rapid pad wear:
- Poor workmanship of the part;
- Caliper jamming;
- Intense riding;
- Overheated (crooked) brake disc;
All these reasons greatly affect the condition of the brake pads.
Low-quality pads have cheap materials, which leads to rapid wear, and using cheap pads can damage the brake disc.
A jammed caliper leads to constant friction of the pad against the brake disc and, as a result, to rapid wear and damage to the brake disc.
Intense and fast driving of a car leads to frequent braking and strong friction of the pads on the disc.
Overheating of the disc deforms it and then the brake pad may wear unevenly, which will lead to bending of the caliper guides and to its failure.
Rear pads, signs of wear, when replacement is needed
Replacement of rear brake pads is necessary in the following cases:
- When pressing the brake pedal, a grinding noise from the rear brake pads appeared.
- The rear brakes are not as effective and actually “don’t grab.”
- The parking brake cannot be adjusted; the vehicle cannot be held on an incline, although the handbrake lever inside the car is raised to the maximum.
It is quite possible that when replacing the rear brake pads, additional faults in the brake system will be discovered, so before starting work, diagnostics should be carried out, at least an external visual inspection.
It is better to drive the car onto a lift, but it can also be inspected in a pit. Things to check:
- Are the cylinders (rear) leaking?
- Condition of parking brake cables.
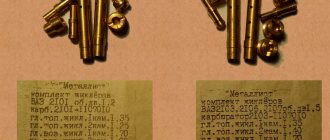
The best brake pads for VAZ 2114 Price
The best brake pads for the VAZ 2114, according to most car enthusiasts and owners of the 14th Lada model, are HQ pads. This nonsense produces very high-quality brake pads that can last many thousands of kilometers. Their cost depends on the region, but on average the price for a set of HQ front pads varies within 1000 rubles.
Tools, accessories, consumables
To replace you will need the following tools:
- Screwdrivers.
- A wooden beam or a drift made of soft metals (brass, copper, bronze).
- Sledgehammer or hammer.
- Pliers.
- Balloon wrench.
- A set of car keys (most likely, you will only need a “12” key).
- Liquid WD-40.
Replacement
Replacing brake pads on a VAZ 2114 is quite simple; using the instructions below, this work can be carried out by anyone, even those far from cars.
First you need to prepare the tools that you will need to carry out the work.
Required tool:
- Jack;
- 13mm key;
- Powerful flat counter;
Instructions for replacing pads
- We remove the front wheel from the side on which the replacement will be made;
- Press in the caliper piston using a screwdriver;
- Unscrew the bolt securing the guide pin;
- Raise the caliper bracket up and remove the old pads;
- We install new pads and reassemble in the reverse order;
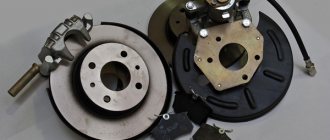
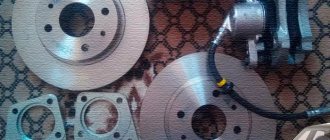
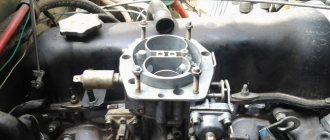
Front brake device for VAZ 2114
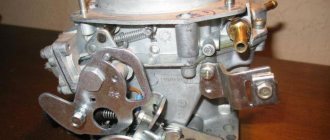
The front brakes of the “four” consist of the following parts and mechanisms:
- Brake disk. It is connected to the wheel hub and rotates with the car wheel.
- The pad guide is a holder for the pads and a base for the guide pins.
- Caliper. Responsible for uniform transmission of force from the pads to the disc.
- Brake pads. When you press the pedal, the disc is compressed on both sides. This results in slower movement.
- Cylinder. A sealed cavity in which the piston moves.
- Piston. Hydraulic fluid pressure presses the pads against the disc during braking.
- Seal ring. Serves to seal the system.
- Cover to protect the guide pin from dirt.
- Guide finger. Ensures uniform movement and adhesion of the pads to the disc with the entire plane.
- Protective cover. Protects the disc from contamination.
The front brakes of the VAZ 2114 are disc. They provide automatic adjustment of the gap between the pads and the disc.
Pro tips: how to remove the rear brake drum, in what cases does it need to be replaced
To move the rear brake drum, instead of guides, you can use other bolts of longer length, but with identical threads. When tightening the bolts, do not use too much force, otherwise the bolt may break off. You only need to tap the drum through a drift or wooden beam. In addition, this must be done over the entire surface, and not just on one side.
The drum must be replaced if its internal diameter is more than 200.5 millimeters. The distance is measured using a caliper. If the wheel does not spin after replacing, check that it is assembled correctly. Also make sure the parking brake lever is fully released.
Rear pads, replacement (step by step instructions)
- To replace the pads, put the vehicle on a jack and remove the rear wheel (if the replacement is not carried out on a lift). If there is no lift, it is advisable to replace the sides one by one - first we do one side completely, then the other.
- We unscrew the 2 “12” bolts that hold the drum and guide the wheel.
- Next, you should remove the rear drum, which is not always easy to remove. Here you may need a sledgehammer or a hammer, a brass drift or a wooden block.
- Remove the springs that tighten the pads. You should start with the side springs, then remove the upper and lower ones. This is where pliers and a screwdriver come in handy. The springs are not so easy to dismantle (especially the upper one); most likely, you will have to tinker with them quite a bit. It is especially difficult to carry out work without skills.
- After removing the springs, the pads can be easily removed. The parking brake cable is the last thing to be released.
- The bracket for the parking brake cable on the new elements is not included in the kit, so it must be replaced with the old ones. The bracket is easily rearranged, you just need to remove the cotter pin and disconnect the bracket, after which we install it on the new block and install the cotter pin.
- Now let's put everything back together. We start the assembly from the top - put on the upper spring, place the pads in the grooves of the brake cylinder and install the spacer on top. It is also necessary that everything from below falls into the grooves. Next, install the side springs, and lastly install the top spring.
- Then we install the drum and wheel, after which we carry out exactly the same work on the other side.