Overview of General Concepts
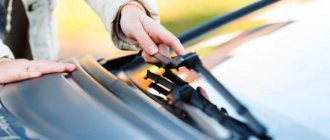
Installing rear power windows on a Priora is clearly not within the capabilities of every driver who decides to install it themselves or replace a failed device with their own hands. Before installing these devices in a car, you need to have at least approximate knowledge of the operating procedure and the principle of operation of the device itself. Without this, proper repair of the window regulator is impossible. The electric window mechanism is installed inside the doors. Priora's window regulators consist of an electric motor, a drive and an electronic control unit.
In some configurations of the Lada Priora, factory rear ESPs are installed, which does not eliminate the need for knowledge about their design. Replacing a window regulator is a problem that comes up unexpectedly, so it's best to be prepared for it in advance.
As some car owners have found out, in order to install power windows, you need to be able to understand electrical wiring and have a lot of patience. In particular, in the 2008 Priora, it was discovered that the rear door wiring was not completely routed, which seriously complicates the work. In addition, the operation of standard ESPs with the ignition off is impossible, even if you insert a jumper into the desired relay.
There are many sets of rear lifts on sale that are compatible with the VAZ-2110, Granta and Priora. The cost of the kit can reach 3,500 rubles, depending on the type of design and manufacturer. Installation of equipment at the service will cost approximately the same amount. Many VAZ 2170 Priora owners sooner or later face the problem of failure of standard power windows. There are two common reasons:
- Broken cable.
- Electric drive failure.
The work of standard window closers also causes criticism, due to which the car is often left wide open. They also resort to replacing them quite often.
Procedure when the window regulator does not work
The design of the Priora's window regulators differs from the usual ones, which use a relay and a window regulator fuse. AVTOVAZ made the glass control using an electrical package control controller (TSBKE), which is located near the ECU.
1. Check the TsBKE fuse in the mounting block (F31, 30A).
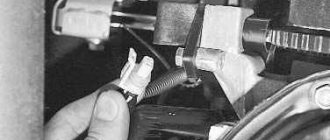
2. Remove the door trim and check the voltage at the power window motor terminals using a multimeter or a 12V test lamp.
If there is no voltage, then check the serviceability:
- window control unit (buttons in doors)
- wiring (connector connection)
- electrical package control unit, which is located above the ECU unit (more on this below)
If current flows to the electric motor, but the glass does not move, then we check:
- malfunction of the window lift motor (for example, the drive motor brushes are stuck/sticking, the plastic gear in the gearbox is worn out)
- The window lift cable is frayed
- glass is jammed (distorted)
The most common problems with power windows are:
- Faulty double-glazed window control unit (GCU)
- Window lift motor malfunction
- Skewed, broken power window cable
- Poor contact
Types of compatible window regulators
One of the most common models on the aftermarket is the window regulator for the Priora Forward. This model of electric lift is made in a combined arrangement of the drive and the actual rack-and-pinion lifting mechanism, compactly combined with the glass guide. Lifts of this model are characterized by increased reliability and ease of installation on Priora.
Garnet is the second most popular system. Under this name there is not even a single model, but a whole family, each modification of which is intended for a specific car. The mechanism is also rack and pinion type and has earned many good reviews from car enthusiasts. This type of lifts is characterized by uninterrupted operation, fast speed of raising/lowering the glass, and low noise.
It has already been said above about glass closers. In the luxury package they are available on all doors, but their performance leaves much to be desired. It is necessary to resort to replacement with other similar devices. One of the available alternatives is the Master system. It allows you to automatically raise the windows when the anti-theft system is turned on, and even control them within half an hour from the moment the ignition is turned off. The device itself looks like an electronic board with connectors connected to the standard Priora wiring.
The master is not very expensive (from 700 rubles), and its installation does not affect the door trim in any way. The whole procedure consists of removing the rear door sill trims, bending the sound insulation and connecting the door closer to the connector.
For the front doors, the Master will by default raise and lower the windows without ignition, and for the rear doors you need to install a slightly different version, called Master Plus. There are no differences in installation, the main thing is not to forget to disconnect the negative battery before starting work. The wizard has many other useful functions, for example, it automatically turns off the radio when the car is armed.
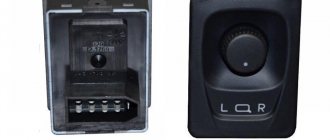
Where is the Priora comfort block located?
To gain access to the product, you will need to unscrew the protective plastic walls of the car's center console. They are located on the left side of the front passenger seat and on the right of the gas pedal, on the driver's side. The device itself is located above the control unit. In order to remove the device you will need a 10 mm wrench and a Phillips screwdriver.
Pinout of the Priora comfort block
The main, important elements of the device are:
- The so-called control drivers. Each driver is responsible for a set of specific functions.
- Transponder receiver.
- Relay control.
- Transceiver. Communicates with the module installed in the door.
- 2 connectors. The first is responsible for supplying power, the second for transmitting the necessary technical information.
Click to enlarge To ensure proper operation of all elements connected to the comfort unit connectors, it is necessary to study the correct pinout (numbered diagram for connecting wires to contacts). The design of the comfort block for the Priora, when studied in detail, is not particularly difficult.
Installing rear door lifts
Electric windows are a necessary element of comfort. But with Priora everything is not so simple. Standard wiring (unless, of course, you have a luxury version) is not enough to install lifts in the rear doors. And the first thing you have to do is stretch the necessary wires from the control unit to the doors. Moreover, this is not the only difficulty. On some versions without rear ESPs, relays for them are installed, and the control unit has only 2 buttons. Thus, in order to install the lifts back, you need to change the control unit to a four-button one.
Door disassembly
If you decide to do everything yourself, then, first of all, you need to remove the Vesta door cards from the rear doors.
To do this, you will need a plastic spatula to remove the panels, but if you don’t have one, a flat-head screwdriver will do, but it is recommended to wrap it with a cloth so as not to scratch the plastic.
First, remove the window handle. To do this, use a spatula to pry up the middle washer and pull the latch, after which the handle will come off easily.
Next, the trim is removed from the door handle, opening access to the bolts that need to be unscrewed.
In the end, all that remains is to unscrew 1 screw from the bottom of the card and snap off the plastic pistons.
The process of removing the rear door window handle of the Lada Vesta is clearly demonstrated in the video
After the doors are disassembled, you need to remove excess dust insulation to gain access to the standard window regulator.
Note! Below are the shipping methods available specifically for this product. Payment options may vary depending on the shipping method. Detailed information can be found on the “Delivery and Payment” page.
Parcel by Russian Post
Available payment methods:
- Cash on delivery (payment upon receipt)
- Using cards Sberbank, VTB, Post Bank, Tinkoff
- Yandex money
- QIWI
- ROBOKASSA
Flashing the immobilizer
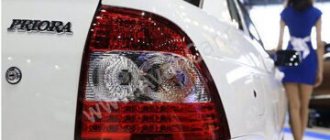
As a rule, Priora is equipped with a standard APS-6 immobilizer. This, as already said, is an optional procedure, but if the budget does not allow you to invest in a security system, you will inevitably have to deal with all this electronic “stuffing”. In addition to the power windows, the immobilizer controls several other systems of the car, even the rear lights. But the main problem is precisely that in the Priora car the immobilizer is structurally combined with the glass unit controller.
Priora lends itself well to tuning. A solution was also found for the immobilizer. During learning, the immobilizer writes its code to a non-volatile area of the ECU memory, which is stored in a disabled state. To disable the immobilizer, you need to clear this memory cell in the ECU.
To do this, you need to disconnect the original wiring connector from the immobilizer. Next, you need to determine the type of ECU. The flashing method will depend on this. If it is a Bosch M1.5.4, you need to open it and install a specially prepared chip with a program for cleaning the ECU EEPROM in place of the standard one and turn on the ignition for a few seconds. For some ECUs, you need to download special programmers from the Internet.
You can order flashing from specialists at reasonable prices. By the way, the Priora immobilizer itself is often prone to malfunctions, and therefore you need to interfere with its operation with extreme caution. On some types of ECUs, it is impossible to do without desoldering the microcircuit and you cannot completely erase the EEPROM. We end here. Good luck!
source
Instead of introducing
Window lifters (or, to use a more familiar word, “window lifters”), as the name suggests, are designed to raise/lower windows.
The option under consideration refers to the electric window lifter
(although in a number of models only mechanical ones are provided for rear windows), i.e. manipulations with the side windows are carried out using electrical energy.
It is convenient and practical, creating additional comfort for the driver and passengers. It is pleasant to note that domestic manufacturers have paid due attention to this indicator.
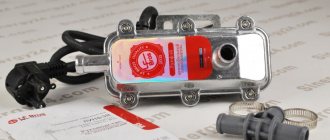
Installation of rear ESP
The need to replace the ESP may arise for a number of reasons. The most common ones are:
- the corresponding fuse has blown;
- poor-quality connection of wires and, as a result, lack of contact;
- failure of the electric motor.
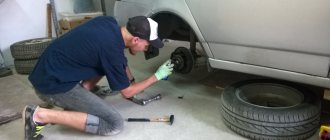
In any of the above cases, replacement (or repair) of the mechanism is necessary. Let’s make a reservation right away - for most amateurs, self-repair is a difficult task, so it will not be considered here. We will simply describe the process of removing the mechanism - accordingly, installation is carried out in the reverse order.
At the first stage
We get access to the ESP. To do this, you need to remove the decorative edge. The process is quite simple and does not require additional description. Let us remind you that the windows must be pre-fixed in the “closed” position.
Next stage:
unscrewing the mounting bolts. We use a 10mm socket. Then we turn out the elements with which the ESP is attached to the door. Here you will have to deal with three bolts (we use an “8” head). Armed again with a “10” socket, we unscrew the nuts securing the ESP guide.
This completes the dismantling. As already mentioned, installation is done in reverse order.
As you can see, installing rear window regulators on a Priora is not difficult: you just need to unscrew the corresponding bolts. Please remember that this process requires care.
, proportionate application of force - to avoid the danger of the heads falling off. As for the unit being replaced, specialists will have to deal with it.
source