Good day. The time has come to install the sub in the car, I read on the Internet how best to do it, the official Lada website tells you how and where to connect everything. I ordered a mini ISO cable from aliexpress, here is the link if anyone needs it ru.aliexpress.com/item/Mi...=2114.13010608.0.0.cLHB80, waited for the parcel and started the installation
I started the installation by looking at the engine compartment, it turns out that AvtoVAZ took care of the owners and left free space for connecting the positive wire, it was very nice)
To post a reply you must log in or register.
Messages 4
1 Topic from SinySenya 2014-09-24 14:43:25 (2014-09-24 14:47:24 edited by SinySenya)
- BlueSenya
- New member
- Inactive
- Messages: 6
- Thank you: 0
Topic: Installing a subwoofer or what kind of bass do we do in Vesta?
Hello guys, the car hasn't come out yet, but I'm already thinking about installing a subwoofer in the trunk of the Lada Vesta. Maybe someone has already installed high-quality bass in the basins? I'm looking at them, can anyone give me some advice?
I want it to swing normally
2 Reply from Axel 2016-02-20 16:38:25 (2016-02-20 16:42:35 edited by Axel)
- Axel
- Participant
- Inactive
- Messages: 973
- Thank you: 139
Re: Installing a subwoofer or what kind of bass do we do in Vesta?
Connecting an amplifier and subwoofer to the standard radio
AvtoVAZ equips modern Lada cars (Granta, Kalina, Priora and Vesta) with standard push-button radios, and in the top version (Luxury trim levels) with more modern multimedia systems (MMS) with a touch screen. In this article we will tell you how to connect an amplifier and subwoofer to the standard radio and MMC of Lada cars.
Connection diagram for an external amplifier in a car
Stretch a separate +12 V (red thick wire) from the battery to the amplifier, installing a fuse next to the battery. Route the ground (black wire) from the body to the amplifier. Connect the amplifier to the subwoofer and speakers. Stretch the speaker wires from the amplifier to the radio, laying them separately from the standard car wiring.
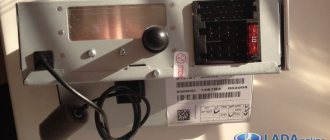
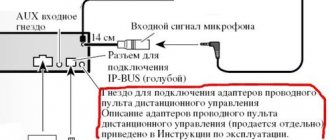
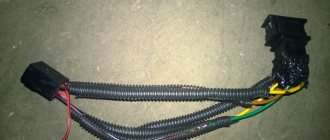
About the connectors of the standard MMC Grants/Kalina 2
The back of the radio is as follows:
You can immediately notice the familiar ISO connector (brown and gray pads in the photo):
As well as the top row of mini connectors (blue, green and empty slot). This connector is called mini-ISO and has the following circuit:
Now about the amplifiers. Typically, an amplifier has two groups of inputs: linear and high-level input. You can use any of them, and here are the features of connecting the amplifier to the standard Granta/Kalina 2 radio:
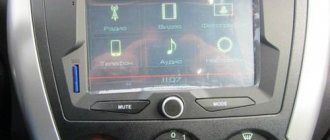
Touch panel of the Vesta multimedia system
This technology combines many options and has an mms screen of almost 18 cm diagonally. Matches with vehicle panel. Multimedia in Lada Vesta includes all the parameters of standard equipment. Such panels are used in foreign cars and VAZ models. The display is designed on a resistive basis. The mms screen does not pay attention to changes in temperature in the cabin. Switching options in mms, updating and controlling is carried out even in severe frost without removing gloves.
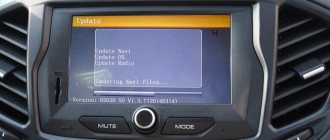
How to install an application on MMS
Procedure:
- Copy the installation file (with the extension cab) to the SD card.
- Insert the SD card into the MMC.
- Exit to desktop.
- Go to “My Computer” -{amp}gt; SD card.
- Start installing the application by double clicking on the cab file.
It is more convenient to install and launch applications through AppLauncher:
- Launch Total Commander
- Open the SD card and start installing the application by double clicking on the cab file.
What useful and interesting applications for the standard Lada Vesta MMC can you recommend? By the way, here is the directory of programs for WinCE.
Let us remind you that we previously talked about other applications that expand the functionality of Vesta’s multimedia system:
- AppLauncher – allows you to launch applications without going to the desktop.
- A patch that allows you to watch videos while driving.
- Altmenu – allows you to comfortably use several navigation programs at once.
- The improved CityGuide will make the program interface more convenient and will add data about cameras, ambushes, etc. to the maps.
- Navitel
- Yandex maps
Key words: cassette player Lada Vesta
Found an error? Select it and press Ctrl Enter..
- New option Lada Vesta Luxe: leather and Alcantara seats
- Installation of trunk linings (on the bumper and threshold) Lada XRAY
- Review from the owner of a Lada Granta with a mileage of almost 1 million km.
- Replacing and checking the oxygen concentration sensor on LADA
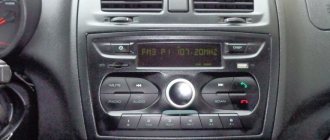
Lada Vesta radio
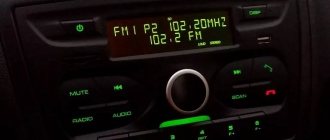
The standard radio for the Lada Vesta is a Russian development and includes a telephone. On its panel there are call and reset keys. There were incidents in the operation of the device due to the input of many options. The equipment was overloaded.
To correct malfunctions, you need to press the “RESET” toggle switch using a sharp object and hold it for 10 seconds.
Radio menu
You can control the equipment parameters from two display pages, the first one contains:
- radio control key;
- audio transition key;
- connecting a telephone;
- area navigation map.
On the second:
- Photo mode - you can view photos;
- Play video from another media via the AUX connector.
There is a USB connector under the glove compartment and near the cigarette lighter. The USB unit memory is 1024 MB. Through the USB socket you can charge your mobile device; the current it produces is 1.5A.
Connecting a Grant subwoofer
The amplifier can be connected to the standard Grant Lux radio via a mini-ISO connector. This connector, located on the rear panel of the radio, carries four sound signals from the linear outputs of the built-in unit. An adapter with connected “Tulip” type connectors is inserted into it. The Grant MMC subwoofer (multimedia system) is connected through the linear inputs of the external low-frequency unit. When connecting a low-frequency speaker, difficulties may arise with the configuration of the entire sound system. You can leave the standard car speakers, which will work through the ISO connector. Linear outputs from the mini-ISO connector must be combined through an adder and a signal sent to the input of a single-channel block. It will only work on the bass speaker. In the adder, you can combine only the outputs to the front speakers, leaving the two rear channels free. You can use two rear channels for the low-frequency system, and feed two front channels to a separate low-frequency unit, which is loaded onto powerful broadband speakers.
Source
Setting up the Lada Vesta radio
First you need to apply power by pressing the device's power key or encoder knob. Switching off is carried out automatically after turning off the ignition.
There is a battery in the panel to save radio stations when the battery is low for ten days.
The band is supported by FM/AM. Frequencies are selected in two ways: automatically and by selecting the encoder knob, RDS AF, RDS PTY, RDS REG keys. There is a noise reduction function.
Audio adjustment is carried out in the following order: equalizer, bass tone, treble tone, balance, front/rear balance, loudness, output.
The equalizer adjustment on the video is as follows: EQ JAZZ, EQ POP, EQ CLASSIC, EQ VOCAL, EQ USER. In the time section, the hours/seconds of the required time zone are set.
The hands free function allows you to connect your phone via Bluetooth. The connection is established in the setup menu on the touch panel.
How to connect a subwoofer
A subwoofer is a sound reproduction device designed for low-frequency sound. In other words, it produces bass that enhances the rhythm of the music being played.
As a rule, it is not included in the speaker system; it must be connected additionally. And this is often associated with large labor costs if you do it yourself, or additional financial investments in your iron horse if you contact a car service.
Therefore, connecting it is purely voluntary and is determined only by the love of loud music.
To the standard radio
To connect a subwoofer to a standard radio, you first need to check whether there are connectors for the corresponding wires on its rear panel. Usually these are the well-known “tulips” of red, yellow and white colors. If you have them, the process becomes much simpler. In addition, active and passive subwoofer options should be distinguished. The first has little effect, but the second gives an excellent result: when listening to music through it, special emphasis is placed on the bass and rhythm.
Additional wires required to connect the standard radio to the subwoofer can be purchased at any auto store. To make the design look neat, the wires are hidden under the car's trim. In fact, it turns out that they are stretched across the entire cabin right under the hood, and their chaotic arrangement throughout the interior of the car, and not only will it not add aesthetics, it will also disturb passengers, especially when entering or exiting the car.
To a foreign radio
To connect a subwoofer to a non-factory radio you will need:
- amplifier;
- wiring for power connection;
- connections between the radio itself;
- amplifier and speakers themselves.
We recommend:
Rear view cameras for cars: review of the best cameras and their features
In this case, the wires will have to be purchased additionally, and it will be necessary to take into account not only the brand of the radio, but also the car, including the year of its manufacture.
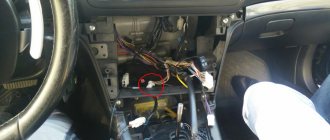
First you will need to remove the radio from the socket. Try not to pick at it with screwdrivers to do this, but if there are no other ways, this one will do. Look at what inputs are on the back panel. Modern radios all have connectors for connecting a subwoofer. Most likely it will be tulips.
Connect the wires to them according to the colors. They will have to connect the radio and amplifier. Then the wires coming from the speakers themselves in accordance with the positive and negative terminals. And don’t forget about connecting the amplifier to the battery.
If you want a subwoofer
When connecting acoustics, it is better to look at the connection diagram provided by the manufacturer. They stretch the wire from the battery to the amplifier; the connection is made through the fuse. The cord is also pulled, connecting the mass of the receiver and the body. Acoustic cables are laid separately from the main wiring.
The ISO connector connects the subwoofer of the standard Lada Vesta radio. It connects to the high level input of the radio and goes to the speakers installed in the car. Simple installation is available for the average driver.
For those who perceive sounds sensitively, if you are not comfortable with a lot of wiring, connect an mmc audio amplifier using a mini iso plug. Such connection must be made with shielded wires. This circuit will provide clear sound inside the car.
Currently, we are developing a model in which the sound will be heard when the sensor goes out.
Connecting a subwoofer in Lada Vesta
Connecting the subwoofer to the standard Lada Vesta radio is carried out as follows. On the rear wall of the case there are ISO and mini ISO connectors for connecting speaker systems, line output jacks, remote control and power. All connections are made through connectors “B” and “C” - yellow. The contact markings are given in the table. Connecting speakers in section “B”:
- 1 – rear right +
- 2 – rear right –
- 3 – front right +
- 4 – front right –
- 5 – front left +
- 6 – front left –
- 7 – rear left +
- 8 – rear left –
These pins can be used to connect a passive speaker system or the high-level inputs of a low-frequency amplifier. The yellow section “C” contains the linear outputs of the radio. The contacts are marked as follows:
- 1 – rear left
- 2 – rear right
- 3 – GND (ground) linear outputs
- 4 – front left
- 5 – front right
- 6 – remote power-on of the amplifier (REM)
By applying a low-frequency signal from these terminals to the ULF input, maximum quality of bass reproduction is achieved. It is recommended to connect the subwoofer to the Lada Vesta radio in this way.
Simultaneous activation of the radio and amplifier
Most amplifiers have protection against transient processes; when turned on, there is a delay; perhaps many have noticed that the amplifier turns on a little later than the radio. So we need to check this algorithm. To do this, disconnect the control wire (remote) from the amplifier without disconnecting the signal wires, then turn on the radio, and after a while (5-10 seconds) connect the control wire manually. If there is no pop, then perhaps the capacitor that determines the delay time for turning on the amplifier has partially lost its capacity. This is an amplifier repair, but a fairly simple one.
If the amplifier does not have such an algorithm, you can install a button on the remote and turn on the system yourself if you want to listen to music. You can also use a delay relay, but the button is cheap and brutal.