Why the light in the cabin does not light (main reasons)
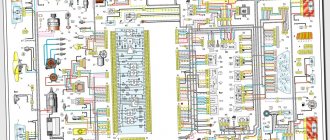
Car electrical circuit diagram, which must be studied before starting work
Car interior lighting is part of the electrical system , and therefore, in any case, it is worth looking for the problem in this part of the car. Of course, it is recommended to study, at least superficially, technical electrical diagrams in order to be at least a little up to date .
So, what do you need? A detailed diagram of the car's electrical components, a little ingenuity and a minimal set of tools. Let's look at places where the problem may be hiding:
We fix the lights and get acquainted with electrics
Since the main fault locations have been identified, you can safely move directly to methods for solving the problem. It is worth noting that with automotive electrics, not everything is so simple, but since this is a VAZ-2114, everything can be said very clearly here. Let's move on to methods for solving the problem.
Bulb
The first thing that needs to be checked is the lighting lamp, since its burnout can cause the light to go out in the car interior.
In order to get it out you will have to remove the lamp cover. After this, you need to check whether there is a filament, and insert the lamp into the control device or simply connect it to the battery. If the lamp lights up, then it is not the cause of the malfunction.
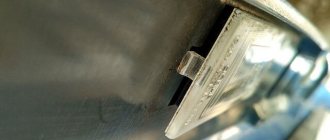
Ceiling lamp
The problem may be hidden in the ceiling lamp
More than once, the cause of the malfunction was the lamp itself, where the contact group simply melted and closed, which caused a burnout or a blown fuse.
To diagnose it, you will need to remove it from the car and visually inspect it. It is also recommended to ring the contacts going from the lamp to the wiring.
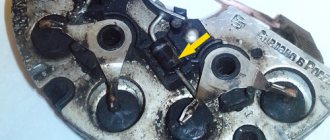
Fuse and relay for VAZ-2114
Replacing the fuse may solve the problem
The next reason is a blown interior lighting fuse . This part can burn out due to a short circuit, which for various reasons occurs in the on-board circuit. Often the short circuit is caused by a malfunction of the lampshade.
The interior lighting relay is marked with an arrow. Often the contacts burn out and prevent the light from turning on.
Wiring
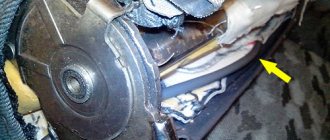
Broken wiring may cause a malfunction
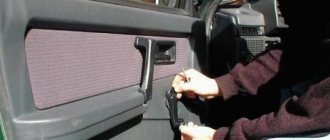
Electrical wiring is every car enthusiast's nightmare. For some, everything is clear, but for others, it’s a “dark forest.” So, during diagnostic operations, it is necessary to ring the wires going from the lampshade to the power supply or button.
Replacing the VAZ 2114 fuse
Often, car electrical breakdowns are caused by a blown fuse. Before checking components, contacts, and wiring for damage, the fuses are always checked first. If the integrity of the element is compromised, it simply needs to be replaced.
First, we determine which device is faulty and where its fuse is located. When further troubleshooting, you must disconnect the “—” terminal of the battery. Open the hood, remove the cover of the VAZ 2114 mounting block, take tweezers and pull out the fuse that is supposedly blown. Do not use a metal screwdriver or other tools to work on fuses.
There are external signs by which you can visually determine whether it has burned out or not. But the most reliable check is with the help of a tester. We set the multimeter to the continuity mode and apply the probes to the contacts of the electrical circuit. If the product is working properly, the tester will show a resistance of 0 and emit a sound signal.
If the fuse element is destroyed, the fuse must be replaced. The cost of the product varies between 150–350 rubles, depending on the type.
- Electrical equipment
- Engine
- Brake system
- Other
- Steering
- Transmission
- Suspension
- Tuning
- VAZ 2110 Other
- Engine
- Steering
- Electrical equipment
- Transmission
- Brake system
- Suspension
- Tuning
- VAZ 2114
- Engine
- Brake system
- Other
- Steering
- Transmission
- Suspension
- Tuning
- Lada Priora
- Engine
- Suspension
- Electrical equipment
- Tuning
- Brake system
- Transmission
- Video publications
- VAZ tuning photo stream
- Operation and repair manuals
Replacing fuses is easy:
- The hood opens;
- The power supply cover is removed;
- Use your hands or tweezers to pull out the old fuse;
- A new insert is installed, the block is closed with a lid.
When changing the insert, you should find the reason for its burnout, because it usually doesn’t burn out just like that. If there is a short circuit in the electrical circuit, there is a high probability that the fuse links will burn out.
Checking the functionality of the fuse is very simple. You can check the insertion like this:
- Carefully unclip the power supply cover, pull out the fuse and inspect it in the light. If the wire has a break, it means the fuse has blown,
- If the gap is not noticeable, you need to measure the resistance of the insert between the contacts; here you need an ohmmeter or multimeter. The absence of resistance indicates its serviceability;
- You can also measure the voltage on both contacts of the fuse when it is inserted into the power supply. If voltage comes to the input, but disappears at the output, it means the insert has burned out.
Removing the fuse box on a VAZ 2114 is also easy. To do this, you only need a key for 10 and your hands:
- Remove the power supply cover, this will make it easier to get to the fastening nuts;
We press on the clamps and remove the cover of the VAZ 2114 mounting block. Unscrew the two nuts with a wrench;
Unscrew the nuts
No problem removing the block
We install the new mounting block in the reverse order. The only difficulty is that the connection wires are relatively short, and inserting the plugs into place is not very convenient. But with some skill everything should work out.
Basic lighting
In a standard way, on the base model the issue of interior lighting on this car is resolved quite simply:
- interior lamp of VAZ 2114;
- individual interior lighting lamp;
- dashboard lighting.
There is also lighting for the glove box and interior lighting of the VAZ 2114, which includes illumination lamps for the front ashtray, heater switches and levers, and the hydraulic corrector scale for the front lamps.
The interior lighting is a simple electrical device. Built into the upholstery in the middle, upper part of the body, above the heads of the driver and passengers. It should light up when the doors are opened and go out when they are closed, a simple electrical signal is supplied from limit switches installed on the door pillars. The interior has switches on the front and rear side pillars on each side for manually turning on the dome light.
VAZ 2114 interior lamp
There are times when the light in the interior of a VAZ 2114 does not work. Such issues are often discussed on the forums of fans of this car. In fact, there should not be any special problems in fixing such a problem. There is a proven action plan in such cases.
- Check the functionality of the lamp. If it does not light up, the fuse is faulty and should be replaced. If the brake light works properly, then the fuse is fine and you need to look further.
- Check the condition of the light bulb, if it is working, then you need to check the contacts and limit switches on the door pillars. If an LED lamp was installed, then change the polarity; there could be a mix-up during installation.
- It is necessary to measure the current at the contacts, whether it flows or not. If there is no current, then you need to ring the entire circuit; a breakdown in the wiring is possible.
- The limit switches on the door pillars should be checked very carefully; experts and many of those who communicate on the forums say that this is where problems often occur. There may simply be a bad contact that needs to be adjusted.
Tuning the ceiling
Such a pleasant and exciting thing for a car enthusiast as do-it-yourself tuning is also possible with a courtesy lamp. Instead of the usual one, a lampshade with a programmable LED lamp is installed. It has advanced features:
- selection of three brightness modes, this selection is made by switching the switch at intervals of one second, the last switching on is remembered;
- shutdown delay 6-8 seconds with smooth extinguishing of the lamp;
- automatic shutdown when the door is not closed or not tightly closed after 30 minutes.
The price for such a lamp is only about five hundred rubles, so the choice is obvious.
The procedure for installing and connecting a lamp with a programmable LED lamp:
- the plastic diffuser of the standard lamp is removed;
- the wires are disconnected from the contacts of this device;
- the four self-tapping screws holding the light housing on the body ceiling are turned out and the body of the old device is removed;
- the LED illuminator is released from the plastic transparent diffuser cover;
- the electrical wiring is connected to the plugs of the LED illuminator in accordance with the diagram;
- the body of the new lamp is attached to the ceiling of the body in a regular place with self-tapping screws;
- The plastic diffuser is fixed on the body.
It should be noted that such a lighting device produces brighter light, which in the dark is a good help for all people who are in the car.
Sometimes car enthusiasts are faced with such a problem that the interior lighting of the VAZ 2114 stops working properly. Such a nuisance can certainly cause great difficulties when traveling at night, and therefore it should be eliminated as quickly as possible. We'll talk about how to do this in today's article.
SCHEME AND CONSTRUCTION
The cross-section diameter determines at what current strength the jumper will break.
The old-style fuses were oblong, round in shape, the jumper was attached to a ceramic body. Modern fuse links are flat, fork-type, and can have two sizes - standard and reduced. The inserts have different colors depending on the current strength for which they are designed. There is a certain coloring of the jumpers:
- Gray - two amperes (2 A);
- Pink - four amperes (4 A);
- Yellow-orange - five amperes (5 A);
- Red - ten amperes (10 A);
- Blue - fifteen amperes (15 A);
- Yellow - twenty amperes (20 A).
Circuit breakers
More powerful fuses are white (25 A) and light green (or blue) (30 A). You can determine where the fuses are located on a VAZ 2114 by opening the hood of the car. The main fuse block (BP) is installed on the left side member (closer to the driver); it is a plastic rectangular box with a lid, inside of which there are fusible links and relays. Often the power supply unit is also called a mounting block.
Three more inserts are located in the car interior - under the instrument panel on the passenger side. They are located from top to bottom:
- The upper fuse (15A) is responsible for the operation of the fuel pump;
- Medium (7.5 A) – controls the electric radiator fan circuit;
- Lower (7.5 A) – protects the electronic engine control unit from overload. By the way, the ECU itself is located next to the fuse links.
In the immediate vicinity of the ECU, relays are placed in the same order:
- Upper – fuel pump relay;
- Medium – turning on the electric fan;
- The bottom one is the main relay of the electrical circuit.
DESIGN
The main power supply unit located under the hood includes the following parts:
- Plastic body;
- Connection board with connectors and blocks;
- Cover – protects the insides of the unit from dirt and moisture;
- Relay;
- Fuse links.
The plastic cover is very easy to remove - it snaps onto the top of the body. On the sides of the body there are ebbs with holes for attaching the block to the car body (two fastenings in total).
The fuse box diagram for the VAZ 2114 is shown below in the figure for clarity. It clearly shows what rating inserts are installed, which ones are in the relay block, and where all the elements are installed.
Power supply circuit
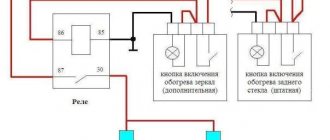
The fuse diagram for the VAZ 2114 is no different from the diagram for the VAZ 2113 and VAZ 2115 models. The power supplies of these brands are completely interchangeable. The following relays are installed on the mounting block:
- K2 – “hazard warning lights” and direction indicator;
- K3 – windshield wipers;
- K4 – to control dimensions and light;
- K5 – electric windows;
- K6 – signal beep;
- K7 – rear window heating threads;
- K8 – switching headlights to high beam;
- K9 – switching headlights to low beam.
Fuse links are numbered from F1 to F20. You can read which insert is responsible for what in the instructions, but on the inside of the block cover there is a pinout for the fuse box. From the drawn diagram icons, even without a description, you can guess the purpose of the insert, or from the icons it is easy to remember what function it performs. For example:
- Opposite F5 there is the number 20 and a horn is drawn - a fuse-link for a sound signal at 20 A. Opposite F7 there is the number 30 and four blades - a fuse for the heating system motor, windshield washer motor (30A);
- Opposite F14 and F15 is the number 7.5 and a headlight icon with long strokes in front - the insert of the high beam of the left and right headlights (7.5A);
- Opposite F16 is the number 15 and arrows in different directions - the fuse for the turn relay.
How interior lighting works
All electric interior lighting can be divided into the following components:
- dashboard lighting (we have already talked about it, as well as its malfunctions, earlier, so today we will not dwell on it in detail);
- main interior lamp of VAZ 2114;
- lamps for individual lighting;
- illumination of glove compartments and cigarette lighter.
The most important and basic light source of all the elements listed above is the VAZ 2114 lamp. It is mounted on the ceiling of the passenger compartment in the front part and is turned on using limit switches located in all doors of the car. When you open even one door, the light instantly lights up, and when all doors are closed, it turns off.
In addition, it is also possible to force the lamp to be turned on/off using special buttons located on the side pillars.
How to get to the right fuse
Almost the entire electrical circuit of the VAZ 2114 is protected by knife-type fusible elements. The most powerful consumers such as headlights, electric fuel pump, etc. are already mounted via a relay. Most fuses can be found in the so-called. fuse box VAZ 2114. However, this diagram has exceptions:
- Next to the battery in the engine compartment there is a fog light relay;
- The fuses for the injection system are mounted under the instrument panel.
No special tools are required to dismantle VAZ 2114 fuses. Therefore, first of all, look at the VAZ 2114 fuse box, which is located under the hood of the car opposite the driver next to the left pillar. In order to open the fuse box, protected by a plastic cover, you need to lightly push a couple of cover latches towards you, lift it and remove it. After this, you will immediately be able to see the modules responsible for the electrical safety of various vehicle systems.
The interior light does not come on - how to find the problem
If you notice that the light in the interior of the VAZ 2114 has stopped turning on, then troubleshooting should start with the fuse. This is very easy to do for the reason that the ceiling fuse located in the common block is also the brake light fuse. If the light in the cabin stops lighting, and the brake light along with it, then the fuse should be replaced. If the brake light works, then the search should continue.
The next thing you should pay attention to is the condition of the incandescent light bulb. To check it, simply remove the cover and check whether the hair has burned out. In case of malfunction, the lamp simply needs to be replaced with a similar one.
Many experienced motorists advise immediately changing the interior lighting from conventional to LED. This will help you forget about the problem of burnt out light bulbs for good.
If, after examining the light bulb, it turns out that its filament is intact (or after replacing the light bulb the light still does not light up), then you should carefully inspect its socket and, if necessary, clean all its contacts with fine sandpaper.
If, even after removing the oxides, the light in the interior of the VAZ 2114 does not light, then you should check the presence of voltage at the contacts of the lamp using a voltmeter (or tester). If there is no current, then you will have to ring the entire circuit one by one and, if a break is detected, replace the wiring. This operation is not difficult, but can take a fair amount of time.
It is for this reason that the continuity test of the chain can begin not from the lampshade, but from checking the limit switches. As many 2114 owners report, very often the problem lies with them. If the limit switches turn out to be faulty, they will have to be replaced, since this part is practically beyond repair.
Before throwing away the old limit switch, you can try to adjust it. Very often, the cause of the malfunction may be insufficient pressing force or poor contact, as a result of which the switch simply does not operate.
The purpose of each of the fuses on the car
If you turn over the removed cover, then on its inside you will see a diagram of the location of the relays and fuses in the mounting block (fuse block). On it, all these elements are numbered and designated from F1 to F20. Naturally, everyone is responsible for the performance of various consumers in the vehicle’s electrical network:
- F1 – rear fog light and indicator lamp for turning on the latter (10 A);
- F2 – turn signal breaker relay, VAZ 2114 emergency alarm, turn signals (10 A);
- F3 – front and central interior lighting, trunk, trip computer and brake light bulbs (7.5 A);
- F4 – heated rear window (20 A);
- F5 – sound signal, cooling system fan (20 A);
- F6 – power windows (30 A);
- F7 – electric motor for heater, front window, washer, glove compartment lamp, cigarette lighter (30 A);
- F8, F9 – fog lights, right and left, respectively (7.5 A);
- F10, F11 – left clearance, as well as right, indicator for turning on dimensions, license plate lighting, as well as instrument lighting lamp, ashtrays (7.5 A);
- F12, F13 – right and left low beam, respectively (7.5 A);
- F14, F15 – high beam left and right, respectively (7.5 A);
- F16 – turn signals, dashboard indicators – parking brake, low battery, etc., as well as a trip computer (15 A);
- F17-20 – reserve respectively for 7.5, 10, 30 and 20 A.
The VAZ 2114 fuse diagram also contains backup fuses for 7.5, 10, 20, and 30 A, located in the lower part of the VAZ 2114 fuse block. Having pulled out the supposedly blown one, you should inspect it visually. If it is clear that the integrity of the thread is broken, then it can be unequivocally stated that the reason for the inoperability of the vehicle equipment lies precisely in the malfunction of the fuses.
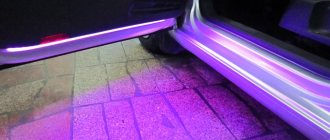
Lighting tuning
In order to save yourself from a lot of problems with lighting, you can install a VAZ 2114 interior lamp with customizable LED backlighting instead of a standard lampshade. Such tuning is within the capabilities of almost every motorist - it does not require either complex tools or extensive knowledge in the field of auto electrics. The most important thing you will need is to purchase a ready-made lampshade at a car dealership (it usually costs around 500 rubles).
For this money you will buy not just a new light source, but also such advantages as:
- efficiency;
- the presence of three customizable lighting modes with a memory function;
- delay before turning off (7 seconds) followed by smooth turning off of the backlight;
- function of automatically turning off the lighting when the door is not closed or not tightly closed after half an hour from the moment it was turned on (which is very convenient if you left the door open and did not turn off the lighting).
Installation of the LED lamp is carried out in the following order:
- Remove the plastic diffuser cap of the standard lamp (it is secured with latches).
- Disconnect the wires from the lamp contacts.
- Unscrew the screws (4 pieces) holding the lamp housing to the interior ceiling, and then remove the housing.
- Remove the diffuser cap from the new lampshade.
- Secure the housing of the new lampshade to the ceiling using self-tapping screws.
- Connect the wires to the contacts of the new lamp (in this case, be sure to take into account the attached diagram with the indicated polarity of the device. It is strictly forbidden to connect an LED lamp without taking into account the polarity).
- Secure the diffuser cover to the body of the new lampshade.
The new interior lighting installed in this way is brighter (at maximum mode) and will make night trips more comfortable for both the driver and his passengers.
Useful video
You can glean additional interesting information from the video below:
The electrical equipment system of the VAZ 2114 car includes a whole range of different lighting devices.
It's good when it's light in the cabin
Conventionally, they can be divided into the following groups:
- Headlight;
- Tail lights;
- Lighting in the cabin.
To make it easier for the driver to navigate the road at night, halogen low and high beam lamps are installed in front of the car in the headlight unit. Turn signal lamps are also installed in one unit with them, so that when repairing the car the entire unit can be removed. At the rear there is one block on each side, which includes brake lights, turn lamps and reverse lamps.
INTERIOR OF THE CAR
The interior lighting is worth a separate discussion. The interior of the VAZ 2114 is illuminated using the following devices:
- Interior lighting;
- Individual light lamps;
- Instrument lighting on the control panel;
- Light in the glove compartment, cigarette lighter and separate bulbs for some buttons and switches.
The general light in the VAZ 2114 is located in the car interior and illuminates it. The engineers decided that it would be optimal to place it above the heads of the driver and front passenger, so it is simply built into the headliner and bolted there. Usually this lamp lights up when one of the doors is open, and goes out when it is closed. This is familiar to us from the classics, where a similar system was organized with light bulbs on the door pillars.
Interior lighting
Here the lamp lights up when the VAZ 2114 door limit switch, which stands on the racks and is pressed by the door itself, is triggered. There are also separate buttons for the passenger and driver to turn on this lamp if desired.
BACKLIGHT DOESN'T WORK
In cases where the light in the interior of a VAZ 2114 does not turn on, drivers who do not understand the electrical equipment of the car and its repair immediately begin to go to the Internet and try to find some advice or a solution to the problem there. But, no matter how strange it may be, you can fix the interior lighting of a VAZ 2114 yourself, you only need a minimum of tools for this and a detailed action plan, which we will analyze today.
INITIAL CHECK
It is better to start repairs by checking the functionality of a specific lamp - perhaps the light bulb has simply burned out and will simply need to be replaced. If the light in the interior of the VAZ 2114 does not go out or, on the contrary, does not turn on when the doors are opened, then you need to check the door switches for functionality, you need to see if the contacts are in order, if they have oxidized, then it is better to clean them and wipe them with alcohol.
There are also certain nuances if there are LEDs. Typically, drivers prefer to replace conventional lamps with LEDs as quickly as possible, this is due to the following factors:
- Cost-effective;
- Longer service life;
- Light brightness is much higher at low cost.
But when operating such lamps, it is necessary that the electrical circuit be fully taken into account, since for LED lamps it is important that the polarity be observed.
So you need to check the plus and minus, and if so, turn the light bulb the other way and see if it lights up after that. In any case, it is better to convert the lampshade of the individual lighting of the VAZ 2114 to LED lamps so that it produces more brightness.
Also, on all light bulbs you need to check the voltage at the contacts and find out whether current is flowing there. If it is not there, then you will have to look for a broken wire somewhere in the wiring. This will require disassembling certain parts of the car, but there is no getting around it - if the interior lighting of the VAZ 2114 no longer works, then it needs to be repaired. The greatest attention still needs to be paid to the limit switches; often the problem with breaking the circuit lies precisely in them; a wire can easily break there, and you won’t even notice it.
Repairing light in VAZ-2115
The first step is to make sure the light bulbs are working. Often the driver goes into the real jungle, looking for a breakdown when it is on the very surface. Using a screwdriver, unscrew the fastening elements of the lamp cover and remove the light bulb. You need to make sure that there is a filament, or simply connect the lighting element to the battery. If the light comes on, you should proceed to the next stage of searching for the problem.
Very often, in cars of the VAZ family there is no light due to a breakdown of the lamp itself. There are often cases when the contacts inside the element melted, resulting in a short circuit. The lampshade can be easily removed using a screwdriver. It is possible to check its functionality by ringing the contacts. It is also recommended to conduct a thorough visual diagnosis, which very often provides answers to all the driver’s questions.
The consequence of a short circuit is the breakdown of the relay or fuse. It is enough to replace failed elements with new ones, after which the light in the VAZ-2115 interior will light up again. Breakdowns that occur in a car's electrical wiring are perhaps the most unpleasant and frightening malfunction for drivers. Not many people have the skill and experience to operate this car system. Therefore, if the reason for the lack of light lies precisely in the wiring, it is best to leave your “iron horse” in the experienced hands of an electrician. The difficulty in handling wiring is due to the fact that diagnostic operations involve ringing the wires from the power supply to the lamp or button.
IMPROVEMENT OF INTERIOR LIGHTS
The interior lighting of the VAZ 2114 can be customized with your own hands to suit your purposes and needs. The most interesting option is considered to be the complete removal of the standard lampshade, and the installation of a programmable analogue along with integrated LEDs instead. It is better to do such an upgrade as soon as it was noticed that the light in the VAZ 2114’s interior does not work - why repair an already broken old lamp if you can replace it with a new and much better one.
In addition, the new lamp will have the following functions that the standard version does not have:
- The ability to select brightness from three possible options, adjusted by pressing a button;
- Automatic shutdown after a certain time if the door is not completely closed or just open. This will prevent the battery from draining overnight;
- Smooth extinguishing of the lamp, switching off occurs within 10 seconds.
The interior lighting does not turn off.
#1 maxks90
- Users
- 205 messages
- City: opposite Butyrka
- Car: VAZ21134
- Top
#2 Sir YareG
thinks he is telling the “Truth”)) Fail
- City: Railway-City
- Interests: Depeche Mode & Cars!
- Auto: Behind The Wheel.
Post edited by Sir YareG: April 11, 2010 - 07:28
- Top
#3 Reizer899
- City: Krasnoyarsk City
- Interests: Auto
- Car: Mercedes G
The light gradually goes out due to the relay, if memory serves, otherwise look at the limit switches, or better yet, immediately change them to new ones.
- Top
#4 maxks90
- City: opposite Butyrka
- Car: VAZ21134
- Top
#5 Vint
I know what I'm saying
- City: Kursk
- Auto: 2112 T
Changes memory. Smooth dimming of the light is ensured by the immobilizer. APS-4 in this case.
- Top
#6 Fuser
- City: Moscow, Southern Administrative District
- Auto: 2115 1.5 16V
- Top
#7 maxks90
- City: opposite Butyrka
- Car: VAZ21134
- Top
#8 alpine-2
- City: Kazan
- Car: VAZ 21093
- Top
Number of users reading this topic: 0
0 users, 0 guests, 0 hidden users
INSTALLATION OF NEW EQUIPMENT
Now let’s figure out how to install an LED lamp on a car; for this we will definitely need a VAZ 2114 interior lighting circuit. This is done in the following sequence:
- Remove the lampshade;
- Unscrew the base of the case;
- We connect the new lampshade;
- Screw the LED lamp into place.
First we need to remove the original lampshade and disconnect the wires from it, all the contacts, we also need to remove the diffuser. The housing is screwed to the roof sheathing with four self-tapping screws; they are simply unscrewed and the housing is removed. Next, you need to take a new case and connect all the plugs in accordance with the diagram to the contacts that go to the battery. The new housing is screwed in exactly the same way onto the same four self-tapping screws, and the lens is snapped into place.
In this simple way you can update your car interior and make the interior lighting of the VAZ 2114 more comfortable and convenient.
Write below in the comments how useful this material is.