The principle of operation of the ignition coil
As mentioned above, the ignition coil is a step-up voltage transformer that converts the resulting 12 V voltage into a voltage of several kilovolts. Structurally, the coil consists of two windings - primary and secondary (low and high voltage, respectively). However, depending on the type of coil, the windings and their arrangement differ.
Let's start the description with the simplest common coil . Here there are 100...150 turns on the primary winding. The winding is wound with insulated copper wire. Its ends are brought out onto the coil body. The number of turns of the high voltage winding is 30...50 thousand (depending on the model). Naturally, the wire used here is of a much smaller diameter. The “minus” of the secondary winding is connected to the “minus” of the primary. And the “plus” is connected to the terminal on the cover. This ensures that the resulting high voltage is removed.
To increase the magnetic field, the windings are wound around a metal core. In some cases, to avoid overheating, the windings and core are filled with transformer oil (it not only cools the system, but also acts as an insulator).
Now let's move on to considering the individual ignition coil . There are also two windings here, but the difference is in their location. In particular, they are wound in reverse order. The primary winding has an internal type core, and the secondary winding has an external type.
Individual ignition coils are installed in systems with electronic ignition. Therefore, their design is complicated. So, to cut off significant current, a diode is provided in the secondary winding. Another feature of the individual coil is the fact that the resulting high voltage does not go to the distributor (as in classical systems), but directly to the spark plugs. This was made possible by a design that included an insulated body, rod and spring.
Another type of coil is two-terminal . It supplies voltage to two cylinders at once. There are several varieties of them. As a rule, such coils are combined into one common unit, which is essentially a four-terminal ignition coil.
Regardless of the type of ignition coil, its main technical parameter that you should focus on when diagnosing is the resistance of the windings. In particular, the resistance of the primary winding is usually in the range of 0.5...3.5 Ohms, and the secondary - 6...15 kOhms (these values may differ for different coils, so it is better to find reference information specifically for the model that is used in your car ). Measurements are made using traditional instruments - multimeters or ohmmeters. If the obtained value differs greatly from the specified value, then there is a high probability that the coil has failed.
You also need to be aware that each coil has different indicators:
- winding resistance;
- spark duration;
- spark energy;
- spark current;
- inductance of the primary winding.
Therefore, in order to understand how well the coil readings correspond to the norm, it is necessary to clarify the technical characteristics of your individual coil. This will be especially useful if the spark is lost, since the ignition coil is one of the first elements of the system to be checked.
CHANGING THE IGNITION SYSTEM MODULE
When repairing the ignition module does not produce positive results, all that remains is to look for and install a new device. Most mechanics recommend choosing a “GM” device as a very reliable product. Its cost varies in different regions, but is close to 2000 rubles.
Replacing the ignition module can be done independently, there are no special features, and no special devices are needed. For work, prepare:
- Ignition unit for replacement;
- Key to "13";
- Rags.
The work can easily be done in a garage or on level ground. Work order:
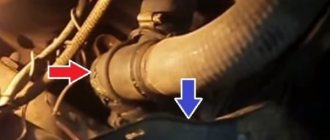
- Open the engine compartment hood and disconnect the battery terminals. It is quite enough to remove the terminal only from the negative side.
- After this, we remove the high-voltage wires from their installation locations. You need to remember where which wire was located. If you doubt your abilities, then make marks. Wires cannot be swapped. A new spare part can be damaged.
- At the next stage, carefully disconnect the connector with wires from the module. Use the key set to “13”, which unscrews the three nuts securing the device to the motor.
- When the nuts are removed, the device is removed from the engine.
Now they use rags to wipe the installation area and around it. Carefully inspect the new device and begin installing it. It is carried out in the reverse order to removal.
Once again I would like to remind you of the importance of installing high-voltage wires in their places. If difficulties still arise, then take another look at the block
It shows the numbers of high-voltage wires.
Numbers – the order of arrangement of explosive wires in the module.
- Release the lock and disconnect the wires from the ignition coil terminals.
- Turn on the ignition and use a voltmeter to measure the voltage between terminal 15 and ground in the case of an ignition coil or between terminals C and D in the case of an ignition module on the wiring harness block. The voltage must be at least 12 volts. If there is no voltage or it is less than needed, then you need to check the charge of the battery, computer or power circuit. To check the ignition coil, you can replace it with a known good one.
- After taking measurements, turn off the ignition.
- Disconnect the high-voltage wires from the spark plugs.
- Using a 13mm wrench, unscrew the 2 bolts of the upper mounting of the coil bracket.
- Using a 17mm wrench, loosen the lower mounting bolt of the bracket and remove it together with the coil.
- Disconnect the high-voltage wires from the ignition coil
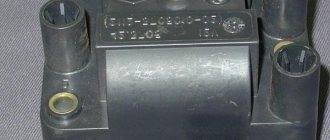
- Using a multimeter in ohmmeter mode, we measure the resistance between the central terminal 15 and the housing. The multimeter should show that there is no short circuit of the primary winding of the coil to ground. We sequentially measure the electrical resistance between the central terminal 15 and the outer terminals - 1a and 1b. The resistance of each of the primary windings of the coil should be about 0.5 ohms. When taking measurements, you need to take into account the device's own resistance.
- Using an ohmmeter, we measure the resistance between the high-voltage terminals of the coil 1 and 4, and then 2 and 3. The resistance of the windings should be about 5.4 kOhm.
- Using a 5mm hex wrench, unscrew the 4 screws securing the coil to the bracket and remove the coil.
- We install the new ignition coil in place in the reverse order.
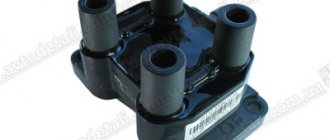
The VAZ 2114 ignition module is the heart of the engine system as a whole, the cycles of which allow the spark plug to produce a spark and start the fourteenth. The device is needed for the process of generating high voltage current transmitted to the spark plugs through high-voltage wires (4 wires coming from the module). In common parlance, this app. The part is also called the ignition system coil (named after the fundamental two parts of the device itself).
Ignition coil VAZ 2114.
Module replacement
Replacement is a fairly common solution to the problem of a faulty ignition module. The procedure is performed as follows:
- Locate the ignition module. If anything, high voltage wires go from the spark plugs to it. You can't go wrong;
- Remove the negative terminal from the battery;
- Disconnect the wiring block from the ignition module;
- Turn off the high voltage;
- Dismantle the module and remove it;
- Place a new coil, or rather a module, in place of the old device, and reassemble in the reverse order;
- Please do not confuse the location of the high voltage wires on the module, otherwise you will have to buy a new component;
- For preventive purposes, it would not be a bad idea to replace the old wires. Especially if there are yellow stripes on the tips of the spark plugs and on the wiring themselves. This is clear evidence that the elements must be replaced.
Article on the topic: Chip tuning VAZ 2114, 2113, 2115: is it better to do it yourself or have it done at a service center?
Demonstration of replacement using the example of a VAZ 2112
Malfunctions of the VAZ 2114 ignition module
Determining that a module has malfunctions is not so difficult. One of the signs is a decrease in engine power of the VAZ 2114 or acceleration in jerks. If the unit malfunctions, the engine begins to operate intermittently when idling. If such “symptoms” are present, then it is necessary to check the serviceability of the spark plugs and the fastening of high-voltage wires, as malfunctions may appear due to these elements.
Checking the VAZ 2114 for malfunctions must be carried out in compliance with safety precautions: hands must be wearing rubber gloves, and tools must be isolated. If the spark plugs and wires are in perfect order, the module needs to be replaced. You can find it under the hood; the device will reveal itself as large high-voltage circuits, from which replacement begins.
The module is quite easy to get, as there are minimal fastenings on it
In order not to make a mistake with connecting the wires when replacing, it is advisable to plug the high-voltage wires into their sockets and then label each of them. Then the new ignition coil can be connected, following the wires from the old one. Modern units have numbering that will help you figure out the connection. Marking will be useful if you buy an old-style module without numbering on the outputs.
Symptoms of a problem
Ignition coil malfunctions can be identified by the following symptoms:
- Unstable engine operation (sometimes at specific speeds).
- Heating the element itself.
- Burning smell coming from the coil.
- Problems starting the engine in rainy weather.
- A drop in power when you press the gas pedal sharply.
- Illuminating the Check Engine light on your car's dashboard.
Malfunctions of this element of the ignition system most often result from overheating. Lack of recommended current or short circuit may cause the coil to burn out.
Malfunctions in the operation of the device can also be caused by breakdowns in the wiring insulation. In this case, regular oil or raindrops getting on the wire can cause problems. To avoid such troubles, it is recommended to apply a special dielectric grease. If you find a gap in the insulation, replace the wire and the problem will be fixed.
Similar symptoms can be caused by a faulty spark plug, so before repairing the coil, check the condition of the spark plugs, at least visually.
Poor quality spare parts can cause malfunctions of this element. To avoid breakdowns for these reasons, buy proven parts, if possible original ones.
The design of the ignition system on the VAZ-2114
Ignition coil
Before proceeding directly to the process of replacing the unit, the motorist needs to know how the system as a whole works. Therefore, let's look at the constituent elements of the ignition system.
Ignition system diagram
Diagram of a non-contact ignition system: 1 – non-contact sensor; 2 – ignition distributor sensor; 3 – spark plugs; 4 – switch; 5 – ignition coil; 6 – mounting block; 7 – ignition relay; 8 – ignition switch
Replacing the ignition coil
Now that the design features of the ignition system are known, you can proceed directly to the process of replacing the bridle. Let's look at the step-by-step instructions:
- We remove the “minus terminal” from the battery.
- Remove the top protective cover of the engine. If the engine volume is 1.5 liters, then this part is missing and this step is skipped.
- We remove the high-voltage wires from the coil.
- Now, using a 13mm wrench, unscrew the two fasteners.
- Using a 17mm wrench, loosen one bolt securing the coil.
- We take out the module.
- Use a hexagon to unscrew the coil from the holder.
- Assembly is carried out in reverse order.
Attention! Particular attention should be paid to the connection, since high-voltage wires must be located in the strict order provided for by the design. If this is not done, the car will stall or the engine may not start at all.
Product selection
Particular attention should be paid to the choice of product, since in the modern automotive spare parts market, low-quality products and fakes are often found. In addition to the original spare part, a number of manufacturers offer analogues that are in no way inferior in quality to the factory part, and in some cases even much better
Let's consider all the options for purchasing an ignition module for a VAZ-2114.
Original
2112-3705010 – original catalog number of the ignition module manufactured by AvtoVAZ. Factory part that is installed on the Lada 2110-2115 family of cars. The cost of a spare part is on average 3,500 rubles.
Possible analogues
Analogue part produced by Fenox
In addition to the original part, on the spare parts market you can find a number of analogues recommended for installation:
- Pekar 2112-3705010 – St. Petersburg plant of spare parts for domestic cars. It occupies a high market share and is famous for its quality. The average cost of a part is 2,500 rubles.
- Fenox IC16009O7 is a Belarusian manufacturer that offers a spare part for 3,500 rubles.
- Startvolt SC 0112 – Another one. The cost of the product is 4000 rubles.
- Fenox IC16009 is another option from the Minsk plant, the cost of which is 4,000 rubles.
Possible repairs
Not in all cases of failure of the ignition module, it requires replacement. As automotive practice shows, some motorists are able to repair this unit on their own. So, using a soldering iron and other radio electronics tools, you can carry out repair work.
Frequent failure of the ignition module on the VAZ-2114 (possible solution)
If the ignition coil often fails (see
“checking the ignition coil”), then you should pay attention to the fact that the plant has chosen a not very good location for it
Moving the ignition coil to a “better” location
A good option would be to move the ignition coil higher.
Spark testing
This method consists of the following steps:
- After turning off the engine and opening the hood, look for the ignition coil. It is usually located near the distributor or starter.
- The high-voltage cable is disconnected from any spark plug.
- Using a special wrench, the spark plug is unscrewed.
- The cable is put back on the spark plug.
- Next, you need to seek help from a partner who will need to get behind the wheel.
- The spark plug with the attached cable is taken with pliers and leaned against the clean metal with an L-shaped tendril.
- The partner starts the engine.
- If a blue spark appears, then the coil is working. Orange color means outages. The absence of a spark makes it clear that the device requires replacement.
Examination
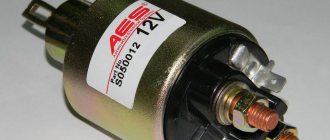
The easiest way to test a switch is to try replacing it with a known good one. But this can only be done if a working switch is at hand. It is not advisable to buy a new unit just to test the operation of the old one. There is a cheaper and not particularly complicated way. To test the switch, you only need a standard set of keys and a test lamp. This is enough to verify the presence or absence of pulses supplied to the ignition coil. Before checking the switch, make sure that “plus” is supplied to it and the ignition coil. Also check the connection contacts of the Hall sensor and the functionality of the sensor itself. Checking the VAZ 2107 ignition switch is performed as follows:
- turn off the ignition;
- unscrew the nut on the ignition coil and disconnect the brown wire marked “K” (the wire goes to connector “1” on the switch);
- connect a test lamp to the gap between the wire terminal and the coil terminal;
- turn on the ignition;
- turn the key and start the starter.
A flashing light indicates a working switch. If the lamp does not light, the switch needs to be replaced.
THE MOST KNOWN PROBLEMS WITH IGNITION COIL BREAKAGE:
- Winding damage. This factor leads to breakdown of the insulating layer, resulting in a short circuit.
- Open circuits and overload. The reason is a malfunction of the spark plugs or due to defects in high-voltage wires.
In general, ignition coils fail quite rarely, but sometimes such troubles do happen. Typically, the insulating layer of the coil can be damaged as a result of an instantaneous voltage increase of up to 35,000 V. As a result, the secondary voltage drops and misfires occur under load. As a result, the coil cannot produce the voltage needed to start the engine running.
Reasons for failure of ignition coils:
— Spark plugs are of low quality. Always monitor the quality of the spark plugs installed on your car and do not install cheap fakes - if you skimp on this, you can end up getting stuck for a much tidy sum. The reason is reverse gases and insulator breakdown, which adversely affect the condition of the rubber tip of the ignition coil.
— Overheating of the ignition coils. Structurally, the coils are designed to work at any temperature conditions of the engine, but as practice has shown, if your engine is hotter than it should be (lean mixture, faulty cooling system), the coils “die” more actively. We do not want to say that any heating is fraught with danger to the coil, but there is a certain resource for heating-cooling cycles. This also affects the rubber tip and the electronics of the reel.
What are the risks of driving with a non-working coil:
— Melting of the catalytic converter in the exhaust system.
— If you drive with a faulty coil, the engine mounts may wear out over time due to excessive vibrations.
— High fuel consumption associated with a drop in engine power and efficiency.
How to check a non-working coil yourself:
— The easiest way is to alternately disconnect the connectors (chips) from each coil in turn during “triplication”, so when you disconnect a chip from a working coil, you will hear a dip in revolutions and unstable operation on the remaining cylinders, and when disconnected from a non-working coil, the engine will run Will not change. It is this coil that needs to be changed.
— If it is possible to remove the coils, then a good way to determine this is to measure the resistance of the primary and secondary windings (between the contacts, between the contacts and the output to the spark plug), record and compare the readings on all coils, usually the resistance of faulty coils is strikingly different. In addition, pay attention to the condition of the spark plug electrodes; spark plugs on a faulty coil are usually wet and with black soot.
- In some cases, the car’s self-diagnosis can “tell” which cylinder is not igniting (only if the check engine light is on). Look for trouble codes for your car.
How professionals determine a faulty ignition coil:
There are motor testers (scanners) that allow you to analyze the operation of electronic components of cars, including coils. The author of the article came across three different methods for professionally identifying a faulty coil: alternately turning off the cylinders (turning off the injectors), alternately turning off the control voltage, and analyzing the curves of an oscilloscope connected to the coils.
Professional diagnosticians NEVER DISCONNECT THE COILS MANUALLY, as this can lead to failure of the engine ECU.
What to do with a non-working coil???
The most reasonable way is to replace it, all imported ignition coils are non-separable and filled with polymer to prevent moisture from entering, even if you can replace/repair microelectronic parts, it is no longer possible to assemble the coil without oxygen getting inside. Replacing the ignition coil - only in this case can you ensure long-term operation of your car!
If the manufacturer of your car has provided for the supply of a separate rubber tip from the ignition coil, you can order and replace the old tip with a new one, but this will not guarantee you that the electronic part that worked under increased load has survived in the old coil.
How to replace the ignition module on a VAZ 2113-VAZ 2115?
Removal: 1) First disconnect the “-” terminal from the battery, thereby de-energizing it. (How to remove the minus terminal in order to de-energize the battery, see the article: “Replacing the battery”).
2) Then find the location of the ignition module in the engine, and after finding it, disconnect the four high-voltage wires that are connected to it.
3) Next, disconnect the wire block by squeezing the retaining clip that secures it to the module.
4) Next, remove the three nuts that secure this module to the bracket.
Note! To make it easier for you to visually determine, look at the photo below, which shows the places where three nuts secure the module to the bracket!
5) Then remove the module from the three long pins that are present on the bracket.
Installation: The ignition module is installed in the reverse order of removal, but when installing it back, you must know two things:
1. After the ignition module is installed, look at its surface, you see the numbers shown there: 1, 2, 3, 4. So, these numbers indicate the numbers of the corresponding cylinders.
2. Have you noticed that the same numbers are present at the tips of the high-voltage wires: 1, 2, 3, 4. All this was done to make it easier for you to determine which of the high-voltage wires should be connected to the module where.
Note! When reinstalling the module, connect all high-voltage wires strictly by numbers, for example: “the first wire - to the first terminal”, “the second wire - to the second terminal”, etc.
Checking the ignition module for functionality:
To check the module, you will need a “high voltage spark gap”, which can be purchased at a car store for a price in the region of 900-1500 rubles. Using this spark gap, you can check for serviceability: the ignition module, the ignition coil, and the high-voltage wires themselves for the presence of sparking.
Note! The video clearly shows that the ignition module is working properly, because when all the wires are connected to it one by one, a spark constantly appears on the spark gap, but the last check shows that the spark breaks off a little, but still the module performs well and does not need to be replaced !
Important! When working with the ignition module, be careful, and under no circumstances carry out any actions with it without de-energizing the battery!
Hello Timur! As I understand it, you have through cracks on the ignition module itself, since you wrote that sparks come from the cover itself when the engine is running? Or did you mean that the terminals of the ignition module spark? Well, anyway, in both the first and second cases, you need to replace the ignition module with a new one, because if a small amount of flammable liquid, for example gasoline, gets on it, a fire can occur! In the second case, the high-voltage wires themselves may also be to blame; in this case, try replacing the wires with new ones, or simply remove them from some other machine and see what happens!
Note! Ignition module terminals - This is where the high-voltage wires are connected!
Could the car not start because of the module?
Hello Roman! Certainly!
Could it be because of the module that it works smoothly, then it starts to misfire, turn it off and start it again, it works normally, then it runs at idle and starts to misfire again?
Hello, Alexey! Troubleshooting after prolonged idling can occur for two reasons: a rich mixture at idle (perhaps the air filter is clogged or the mass air flow sensor is faulty) or old spark plugs (or simply inappropriate in terms of heat rating). I would start by replacing the spark plugs with suitable ones.
Good afternoon To cold through
20 sec. After starting, it starts to shake a lot and at the same time the check light blinks, the BC issues a misfire. I don’t want to overpay the service station for diagnostics, reassure me that this is the module!). And yet, when restarting, the engine runs smoothly. The spark plugs are new, the wires were also recently changed (pierced)
Hello, Ivan! A module usually either works or it doesn't. Well, in wet weather it can be glitchy. In your case, it looks more like there is no correction of mixture enrichment as the engine warms up. Try 10 seconds after starting to remove the chip from the temperature sensor (which has two wires), the radiator fan should work and the speed should decrease. If there is no tripping, it means that the sensor is to blame or there is not enough antifreeze (and it does not reach the sensor). Well, or the spark plugs are defective...
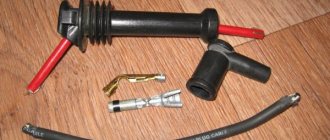
Cleaning
After washing the engine, driving in heavy rain, after winter parking, ignition breakdowns appear and the engine tunes up. Motorists have to carry out preventive cleaning of the ignition coil, tip, and conductive cables with their own hands.
- You need to stock up on alcohol, a small file, and cotton swabs.
- The rubber insulator boot is carefully bent off the tip of the ignition coil.
- The springs and radio interference suppression resistor are removed.
- Springs and resistor tips must be aligned with the crimping force. If this is not the case, they bend slightly.
- Everything is cleaned of dust, dirt, oil, rust, and wiped with alcohol.
- The tip springs need to be slightly stretched.
Resistance measurement
The method is as follows:
- The ignition coil is removed from the car. To do this, all wires are disconnected from it and the mounting bolts are unscrewed.
- An ohmmeter is used. On the side of the coil, look for 2 contacts to which the measuring device is connected. The data obtained will show the resistance value on the primary winding.
- Next, the ohmmeter is connected to one of the side contacts and the central one, from which a wire extends to the ignition distributor. The readings obtained will provide information about the resistance of the secondary winding.
After measurements are taken, the recorded results are compared with the data printed directly on the coil. If they are not there, then the information is looked for in the technical passport.
When the indicators differ from the norm, the coil requires replacement.
Connection diagram
Mechanism connection diagram
You can find the module itself using high-voltage cables - from the spark plugs they go straight to it. The diagram given in this article will allow you to easily replace the mechanism. The device connection procedure can be carried out using one of two methods. When the short circuit is dismantled and when it is located at the installation site in the engine compartment of the vehicle.
If the module is in front of you:
- Contacts numbered 1 and 4 go to one winding, as for contacts 2 and 3 - they are connected to another winding.
- After this, the leftmost high-voltage cable is connected to cylinder 1 (the bottom one in the diagram).
- Another high-voltage wire is connected to the second cylinder, only this time it’s the top one.
- The right high-voltage wire (top) goes to cylinder 3.
- Accordingly, the lower high-voltage cable must be connected to the last, fourth cylinder.
If the assembly is connected to a motor, then the pinout of high-voltage cables will be more complicated, since the mechanism itself is installed at an angle:
- The central lower wire is connected to the first cylinder.
- To the second - left.
- The third contact is connected to the top contact.
- And to the last, fourth cylinder - the right one.
Of course, the first installation method will be simpler, especially if you consider that high-voltage cables must be connected very carefully and carefully. If you accidentally confuse it, this may lead to the inability to start the power unit, which is worse - to the occurrence of malfunctions. As for the actual acquisition of a new short circuit, this pleasure in general is not cheap. Today, the cost of a node varies from 700 to 1000 or more rubles, much depends on the region of residence. So before changing the node, you can try to restore its functionality (the author of the video is Alexey Romanov).
Instructions for replacing the coil
The procedure for replacing the coil is as follows:
- The battery is disconnected.
- The old coil is dismantled. To do this, disconnect all contacts and the central wire leading to the distributor. The location of the wires is first recorded.
- The nuts securing the housing are unscrewed. You can simply loosen them, then the device can be easily removed.
- A new coil is installed in this place, the nuts are tightened and all the wires are connected back.
The new coil is installed, you can connect the battery and start the engine.
Features of the contactless ignition system
In the automotive industry, in addition to the contact ignition system, there is also a contactless option. The essence of this method is to generate a current by rotating a magnet winding.
As a rule, BZS has a longer service life and efficiency. It is able to withstand temperatures ranging from -40°C to +80°C. It itself is located under the hood, and the coil and sensor are located in place of the standard ignition system.
In order to determine whether it is necessary to change the ignition coil or not, in this case it is enough to test the wires connecting the sensor to the switch. However, sometimes there is a possibility of a tear in the wire between the commutator and the coil.
Finally, I would like to highlight the main points of the article:
- Eliminate the option of checking the functionality of the ignition coil by detecting a spark between the spark plug and the car body!
- Check the operation of the coil only with an electrical measuring device!
- The smell of a burnt winding will speak for itself - the coil cannot be saved.
How to remove the ignition coil using the example of a VAZ 21114:
How to remove the ignition coil using the example of a Peugeot 306:
How to check the ignition coil directly on a car:
How to change the ignition coil:
Ignition module repair
If the ignition module does not work, you can try to rehabilitate it:
- Take 10, 13 and 17 end keys, a 5 hex key, a regular screwdriver, a soldering iron, aluminum flux, nail polish, and stranded wires.
- Most often, the connection in the ignition system deteriorates - those same contacts.
- We turn the key in the ignition, start it, move the contacts, and get a comprehensive answer in the absence of their quality connection.
- Now we turn off the engine and remove the ignition module out.
- You need to open it, pry up its body with a screwdriver.
- Inside the board is covered with silicone film - remove it.
- We remove all aluminum from the explosive contacts.
- Now comes the hard part: we need to solder new wires to the plan from where we just removed the old ones.
- First, you need to clean the surface of the collector from plaque, then put the board on the stove and heat it to 200 degrees (approximately by eye, of course), it will start to smell a little when it reaches the desired temperature and soldering on it will become much easier.
- Now, actually, we solder: we connect the ends of the wires to the module.
- We cover all the contacts of the wires with the module and the board with nail polish.
- Now you need to put everything back together, put the ignition device in place and start the engine. Only after this, when you are convinced that everything is working properly, can you take the sealant and seal it tightly.
- Individual elements that have failed. They cannot be repaired, they are only for replacement. Fortunately, the price for them is adequate: a switch is within 200 rubles, a transistor is from 200 to 300 rubles.
A very important point: in common parlance, as here, the ignition coil and the ignition module are synonyms. But in terms of technical design, no. For fourteenths with different engine sizes, different spare parts are installed: for 1.5-liter Samaras of the old generation, it is the ignition module, and for 1.5 and 1.6 liters of the new generation Samaras, it is the ignition coil. The switch of the new type of machines is hidden in the electronic control unit, it turns out that the module was broken, and they began to call it by the name of its main part - the coil. Be careful when choosing a spare. parts from disassembly: do not confuse them, given this fact.
If we talk about service, the price is not worth the cost. It’s easier to figure everything out yourself, even more so. That there are a lot of resources where they can give you advice and help. The main thing is to remember the layout of the high-voltage wires and their good contact. It happens that incorrectly connected wires contribute to improper combustion, a spark hits the relay. And the ignition module completely burns out.
In fact, the ignition coil on the 8-valve VAZ 2114 is not quite the correct name. The fact is that the coil is installed on carburetor cars, and on the “fourteenth” it is the module that is used. Regardless of what you call this element, it refers to the same unit. And it periodically fails, which entails the need for repairs.
- Functions and tasks
- Signs of breakdown
- Error codes
- Module replacement
- Repair
Ignition bobbin or coil
The reason for the problems of the reel is the regular use of the part and heavy loads affecting this mechanism of the car. Of course, this increases the likelihood of failure.
Symptoms of a broken bobbin
A clear symptom of a broken bobbin is lag in movement. This is especially clearly felt when accelerating or maneuvering the car.
Many motorists, having discovered such signs on their car, begin to look for reasons in the circuit. After replacing a couple of questionable wires, the failures occur again.
Broken ignition module
Also alarming in this case is the black exhaust that appears “cold” when starting the engine. This is exactly how a diesel engine works when it breaks down. Wild rattling and loss of speed, which is aggravated by errors in the on-board computer.
A broken bobbin is always a crack through which a spark breaks. It breaks through to the screen (the steel shell of modern coils), which, in turn, hits the block.
Modern rubber bobbin insulators. This is certainly good, because such material is not affected by electricity. However, over time, the rubber “gets tired”—in other words, it crumbles.
The reasons that lead to problems with reels can also be called power problems. For example, the voltage level should not be less than 11.5 volts. This can happen if the car battery is used for a long time. In this case, the battery performance decreases, which reduces the voltage level.
Old style ignition coil
Faulty wiring is also the cause of bobbin failure. The coils get very hot due to this. To solve this problem, just replace the wiring with a new one.
It is noteworthy that if the temperature of the reel during its operation is less than 150 degrees, repair is still possible. However, exceeding this temperature leads to complete combustion of the reel.
Region30 › Blog › Replacing the ignition module 2114
30 years I drive a Lada 2114 Astrakhan, Russia
It all started 2-3 months ago. I went on some errands, started it, warmed it up, sat down and drove off. I drive about 300 meters and the check light flashes... the engine seems to be running on 3 cylinders... basically I stopped and turned it off (what the hell did I say to myself)... With the emergency lights I barely made it home, parked the car and went to the store. I bought new NGK spark plugs and BB wires, installed them and started them, but it was like the car was spinning. Okay, I went for diagnostics while I was driving, the check went out and everything was fine. I did the diagnostics - they said there were no problems... Hmmm... Okay, I drive for another week... I went to a car service center (Near the house)... I arrived and I say such things... I measured the compression, in all the pots 12. I measured the pressure in the fuel rail - everything was fine, I adjusted the valves at the same time... I started the car, still the car was shaking... I went home upset (
I gave up on the car - it drives and drives, let it drive, “I said to myself,” and drove for another week... On the weekend, having collected my thoughts and spirit, I decided to go to the service center again. This time they cleaned the throttle, injectors, replaced the IAC sensor, and What do you think? What do you call sausage...
Sitting at work, I thought maybe it was connected to the ignition module... and it started dripping in different directions... I came across an article where they check the ignition module using a multimeter. I read in the article that the resistance between contacts 1 and 4, 2 and 3 should not exceed 5.8 kOhm
. Finding a multimeter at home
I went to the car, removed the ignition module by unscrewing 3 bolts and began to measure the resistance... and then it turned out that the module was long overdue for replacement...
Resistance between 1 and 4
Resistance between 2 and 3
Horrified, having installed the module, the store went back. Upon arrival at the store, they offered a choice of 2 reels, one of them was made in Russia and the other was made by Bosch Germany, the difference in price was a little more than 1000 rubles... At that time there were problems with finances, so I had to buy something cheaper
Having put the new module in place, the car simply whispered (I made 3 laps around the area with pleasure)
Issue price: 780 rubles
3 years Tags: ignition module, 2114, ignition coil, multimeter
Like 24 Subscribe
Category: BMW
BMW cars are a lot of fun to drive in many ways - including behind the wheel. And the fact that BMW engineers are able to create efficient units is not known today. We advise which ones are worth considering. Anyone who has ever had the pleasure of driving a BMW (especially one with a powerful engine) rarely chooses a car from another brand later. These cars seduce in different ways: comfortable and good […]
Read more
This engine is known for its appetite for motor oil, but when it exceeds reasonable limits, you must intervene. One liter per 1000 km is too much! There can be several reasons, from valve seals to worn oil rings. Repairs are usually quite expensive compared to the value of the car. Mrs. Rosalia wrote us a rather dramatic letter: About a year ago I bought a […]
Read more
The expansion of the BMW X7 range is part of the current product offensive in the luxury segment. This is an important element of the BMW Group NUMBER ONE> NEXT strategy. The new BMW X7 will be produced at the BMW plant in Spartanburg, USA. The market will appear in March 2021. Length 5151 mm, width 2000 mm, height 1805 mm and wheelbase 3105 mm give harmonious proportions and clearly position the car at the top of the […]
Read more
BMW continues to develop models in the luxury segment and introduces an open sports car that meets the highest demands in terms of driving dynamics, excitement and exclusivity. The new BMW 8 Series Cabrio captivates both when driving quietly along city boulevards and on winding country roads and at the racetrack. When they hit the market in March 2019, they will be available […]
Read more
The BMW Z8 has a roadster body style. The model was produced from 2000 to 2003. At this time, the 1st generation of this model appeared. The BMW Z8 is a class of luxury passenger car. The maximum power is 294 kW, and counting mechanical horsepower. With. The BMW Z8 model has a speed of 400 km, which makes its top speed 250 km/h, and acceleration to 100 km/h takes 4.7 seconds. The BMW Z8 engine is […]
Read more
The BMW Z4 has coupe and roadster body styles. The model was produced from 2002 to 2021. During this period, 5 generations of this model were created. BMW Z4 is a class of above average passenger cars. The maximum power ranges from 110 to 252 kW, and counting mechanical horsepower. With. The BMW Z4 model ranges from 150 to 343 KM, making its top speed between 220 […]
Read more
The BMW X4 has a station wagon body. The model has been produced since 2014 until today. At this time, 2 generations of this model appeared. The BMW X4 is a class of above average passenger cars. The maximum power ranges from 135 to 265 kW, and counting mechanical horsepower. With. The BMW X4 model ranges from 184 to 360 HP, which makes its top speed range from 212 to […]
Read more
The BMW X2 has a station wagon body. The model has been produced since 2017 until today. At this time, the 1st generation of this model appeared. BMW X2 is a class of above average passenger cars. The maximum power ranges from 103 to 170 kW, and counting mechanical horsepower. With. BMW X2 model ranges from 140 to 231 KM. The BMW X2 engine is in-line, having from 3 to 4 cylinders of […]
Read more
The BMW X1 has a station wagon body. The model has been produced since 2009 until today. At this time, 3 generations of this model were created. BMW X1 is a class of above average passenger cars. The maximum power ranges from 85 to 190 kW, and counting mechanical horsepower. With. The BMW X1 model ranges from 116 to 258 HP, which makes its top speed range from 190 to […]
Read more
The BMW 6 Series is available in coupe, hatchback, convertible and sedan body styles. The model has been produced since 1979 until today. At this time, the 12th generation of this model was created. The BMW 6 Series is a class of luxury passenger cars. The maximum power ranges from 135 to 412 kW, and counting mechanical horsepower. With. BMW 6 Series model ranges from 183 to 560 KM, which makes it […]
Read more
site1.ru
( 2 ratings, average 4 out of 5 )